RoadTest: Raspberry Pi 3 Model A+
Author: florinescu
Creation date:
Evaluation Type: Development Boards & Tools
Did you receive all parts the manufacturer stated would be included in the package?: True
What other parts do you consider comparable to this product?: Raspberry Pi 3 B+, Pi 4, Pi Zero W, Arduino Yun
What were the biggest problems encountered?: needing to buy additional parts (getting slightly expensive) to fully support the board's capabilities, weak documentation
Detailed Review:
Hello! My name is Florin, I am a major in Systems Engineering currently working in an automotive company and here is my review of the Raspberry Pi 3 A+ Development Board.
With this review I attempt to analyse the board and its capabilities, to try to answer the questions "How can it help me develop an IoT solution? What differentiates it from other products?". I have two small demo projects to demonstrate what I can obtain from the board. I will not go in-depth on synthetic benchmarks because the internet is already full of these, and instead talk about my experience with the board and what I "feel" regarding its usability.
The board is first and foremost marketed as a learning device. It provides some embedded development experience, but not quite on the same level as, say, an Arduino. It doesn't have that many low level peripherals and you don't have to delve that deep into configuring registers to get things working. The documentation for the microcontroller is very hard to find and what the manufacturer's website provides is lackluster, so not very good for learning once you want to get deeper into how the peripherals work.
It provides however an entry point into embedded development for people used to Linux, or into Linux for people used to handling registers directly in C or assembly (this is where I would fit). Its strength lies in the addition of the ability to write code in higher level languages such as Java or Python, or using old-school, well documented linux programs instead of writing everything by yourself. Also, stitching together Linux services, C, Python libraries, bash scripts to reach your goal. All this brings new possibilities into IoT like:
Oh, and there's a version of Windows 10 IoT core available for people unfamiliar with Linux. More on this near the end of the review.
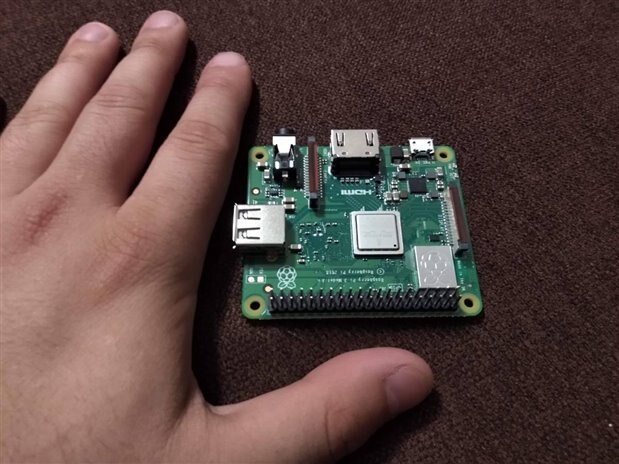
I received a small box containing just the board. First of all it's surprising just how tiny the board is for how powerful it is. It's pretty close to the size of an Arduino. Here it is next to my hand:
It is very much pointed out on their website that in addition to the board, you NEED a micro usb cable+power supply, an HDMI cable AND a micro SD card to get started. On the one hand it's nice to have everything modular so that you don't need to pay for all components since you will most likely have an HDMI or Micro USB cable lying around. On the other hand, it is a big shame that the original package doesn't provide you with the bare minimum required setup and that you need to do some research in order to buy everything necessary. There is only one "official" supplier for Raspberry for my country, and looking at its page we get the following:
So I need to resort to some external suppliers to get what I want and shell out extra cash to fully exploit the board's capabilities.
There are some quirks regarding the additional components that you need to learn about before purchasing:
My setup eventually consisted of the following:
First few weeks of the review period (without the case and camera):
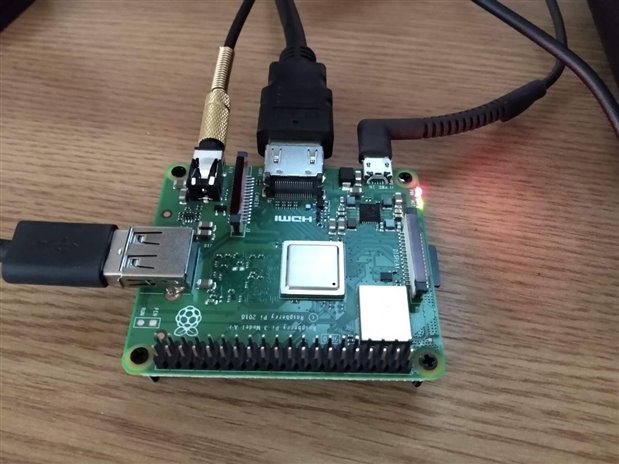
Rest of the review, where I got the case and the camera:


As I touched on this before, the Raspberry website provides extensive explanations in regards to the additional components you need for the board and installation procedure. They provide mechanical drawings and electronic schematics which are detailed enough.
My biggest disappointment is that the information provided by the Raspberry Foundation regarding in-depth CPU details is very lackluster and they reference A LOT of 3rd parties or enthusiast sites on their site for more detailed information. The information is not gathered in one place (the producer's website or a PDF) and this greatly complicates development. There is also in my opinion limited responsibility assumed by the Raspberry Foundation since most documentation is not provided by them directly, merely linked to. For instance, all of there are the only way to get relevant info about something, linked from the official website:
There is no correct datasheet version available for the 3 A+'s CPU. Official information is only available for peripherals of CPUs of older generations of Pis (the BCM 2835). The official statement from Raspberry's site is something along the lines of "CPU x is similar to y, but the ARM core is different. CPU y is similar to CPU z, but the ARM core was replaced with another ARM core". So not that exact and detailed. There are some datasheet variants on the web put out by some universities for the 3 A+ CPU (the BCM 2837B0), such as this one. But they are not without their drawbacks, and to quote the guy who created the BCM2837 document:
I created that document. It is indeed simply a modified version of the original BCM2835 document with the intention of preventing confusion and bugs as students work through assignments. As explained on the course website:
If you open the manual we’ve linked you to, you’ll see references to the BCM2835 chip everywhere. This is because we’ve simply taken the documentation for the BCM2835 chip, fixed relevant errata [and addresses], and [changed] the title to say BCM2837.
Even if it may be correct, for me this is not so trustworthy as it is not an official source. And considering that peripheral addresses changed for different Pi boards (more on this in the peripherals chapter), to me it becomes even more doubtful that the old datasheet applies to the 3 A+'s CPU.
This was just the document describing the peripherals. Typically this would be all you need, but in case you need information about the ARM core (address spaces, arithmetic unit etc.), you need to also look at the ARM documentation for the Cortex-A53 core, which is available on ARM's website. The Raspberry website does provide links to the ARM core documentation for older Pi CPUs, but not for the one in 3 A+.
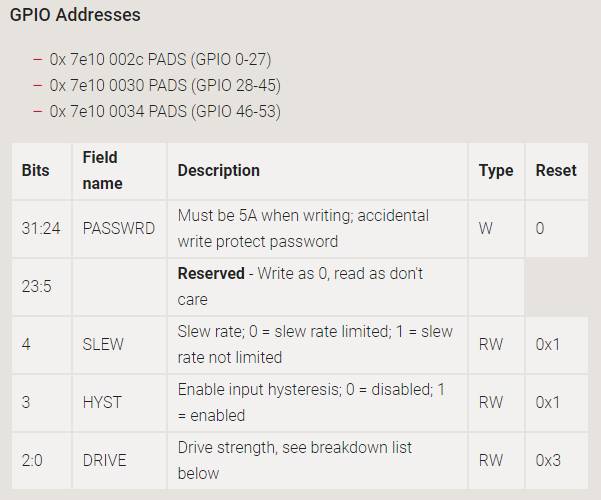
Next I tried to go into detail to find as much as possible about GPIO functionality. I found this page where it explains configuring GPIO drive strength. It only specifies that it applies to "all models up to and including the 3B+ model". Are all CPU variants since Pi 1 all the way to the 3 A+ and B+ 100% identical in this regard? What about the Pi 4? There are register addresses and descriptions available, but only the drive strength configuration bits are explained here. It doesn't even touch on what do limited slew rate or input hysteresis mean.
Going back to the drive strength setting, it states that "Even if you set the drive strength to 2mA and then load it so 16mA comes out, this will not damage the device". How is the drive strength configuration then relevant? Why should I configure it? No clear answer...
On the official website they also provide a link to an external user's guide of the board's pinout, which provides more in-depth information. It goes into pretty decent detail, such as: "Pin x which can be configured as I2C SDA, includes a fixed, 1.8 kohms pull-up to 3.3v, which means this pin is not suitable for use as a GPIO where no pullup resistor is desired". This however is the kind of information that can make a big difference when designing for my board, so it is disappointing that it is not clearly stated on the producer's website and is only available from 3rd party sources (even though they are referenced by the producer). I cannot give this kind of documentation to an "old-school" HW engineer and expect him to understand what to connect to which pin for an application.
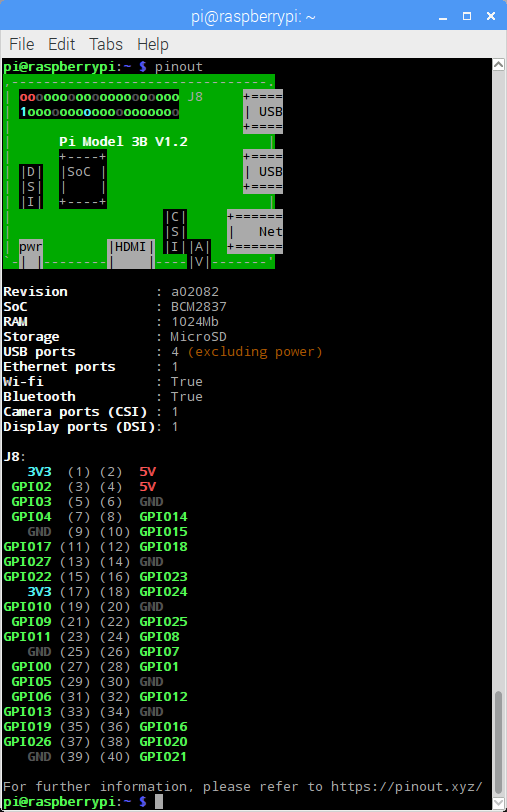
There still are some useful things they did, like the pinout command. You type it in the terminal and it tells you the board pinout so you don't need to print out a pinout sheet to permanently have on your desk.
Overall, it feels like the Raspberry follows the "maker" way of doing things, where everything is not 100% clearly documented. You just try and fail or browse stackoverflow for hours, hoping not to damage the board while trying to understand what goes where. You rely heavily on forums and amateur opinions which we all know how well they work. An official, well structured, complete documentation is lacking for everything Raspberry and pushes away a more "professional" approach.
Then again, it is meant as a teaching device, so maybe it doesn't necessarily need to provide that kind of detail.
Out of the box, the Pi doesn't have an OS and you need a separate PC to download Raspbian, a modified Debian (Linux) distro for the Pi. The Raspberry Foundation provide detailed setup instructions on the Pi's setup guide. The way it works is you put a tool for this called NOOBS on the SD card from a separate PC, plug it in the Pi and the OS installation will start at first boot, downloading the OS from the cloud.
During installation you get a list of available OSes and you can tick several to install them, so I thought I would attempt a dual boot setup with Windows and Raspbian. Raspbian installed successfully, however for Windows I got an error saying that NOOBS cannot actually install Windows. Why have it as an option then?
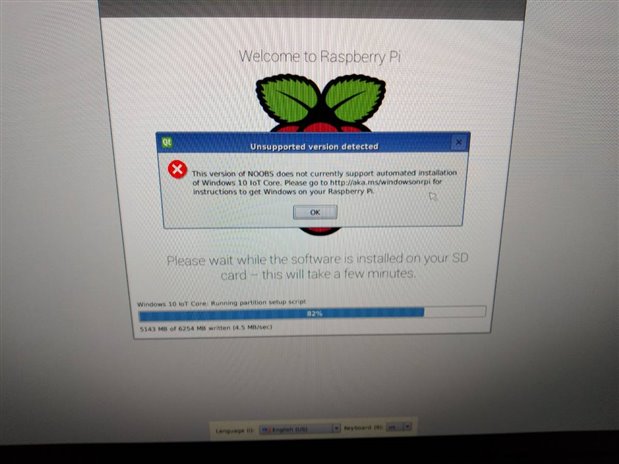
Anyways, I would focus on other parts of my review and later come back to Windows. As it turned out, the installer did in fact create some NTFS partitions for windows, and all Raspbian partitions were in total around 28GB. I left it at that and tried at a later point to reinstall Raspbian to get the entire SD card available.
Another thing to note is that Bluetooth devices obviously will not work during the installation so you need a USB mouse and keyboard. Also a USB hub if they both are wired or use separate dongles.
As with any Linux system, going through the OS menus, starting and closing apps feels much smoother than Windows on a more powerful PC.
This is the first time I am using a Raspberry. So the first thing I wanted to try was to watch a youtube video in 1080p  , since it would theoretically support this. Chromium comes preinstalled so I was glad to be in a familiar environment. I ran into a video codec issue and all videos looked really funky. Through a quick google search I found the package I need to install and the video looked better afterwards, although at an unwatchable FPS. This is how all videos looked without the codec:
Chromium is as much a memory hog as its sibling Chrome and this is where the smaller RAM of 512MB is becoming and impediment. Browsing the web from the Pi to look for code examples while also having a development environment open proved nearly impossible as it would take up almost the entire RAM and be really sluggish for a few minutes, before finally giving up and closing itself. You can tweak the amount of RAM shared with the GPU but it doesn't really help much.
I later found out that the unusability of Chrome was because I logged into my user account, and it automatically downloaded adblock, which was eating up 50-100 MB of RAM. Removing it improved the browsing experience to something almost usable. Viewing video on YouTube was still nearly impossible. After reinstalling to the new Raspbian 10, things improved slightly and I was able to do some google research while tinkering with code without a problem.
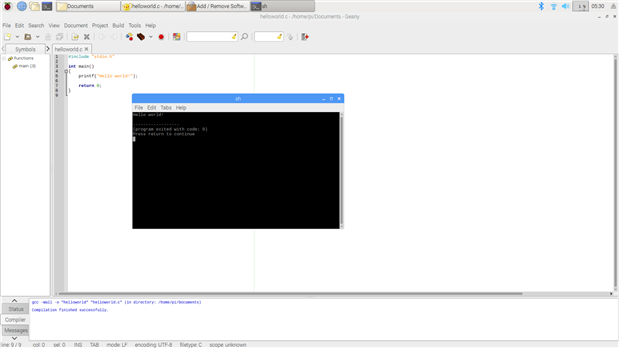
Otherwise, the OS comes with a bunch of IDEs preinstalled so you can jump right away into writing code for most common languages. Here is the default IDE for C/C++, Geany, running a Hello World example:
Installing or updating new programs is possible via the classic apt-get command, but there is also a basic GUI which can do this in a more user-friendly way. I wanted to install eclipse since it is easily extendable and can handle a lot of programming languages:

With eclipse it is possible to have one IDE for C, C++, Python and Java. This is great for helping people learn how to accomplish the same thing in different languages. I cannot stress enough how the Pi's biggest strength is the fact that you are not bound to a single language as with most IoT solutions. It's very easy to even mix multiple programs written in different languages to accomplish a task. For instance, here are some really short Hello World snips for these 4 programming languages:


After getting familiar with the board I wanted to tinker around a bit and see what is possible from the Pi's peripherals. Sadly there is no analog input, so you need an external ADC chip for that, but otherwise most peripherals you would expect from an embedded controller are there.
From the Pi website you get a link to a library on how to work with the GPIO/peripherals in Python, and how to access registers in C. The easiest way would probably be to work in Python, where this is how to blink an LED for once a second:
from gpiozero import LED
from time import sleep

led = LED(21)

while True:
 led.on()
 sleep(1)
 led.off()
 sleep(1)
They also provide possibilities for PWM-ing an LED, very straightforward:
from gpiozero import PWMLED
from time import sleep
import RPi.GPIO

led = PWMLED(21)

while True:
 led.value = 0.20
 sleep(1)
 led.value = 0.80
 sleep(1)
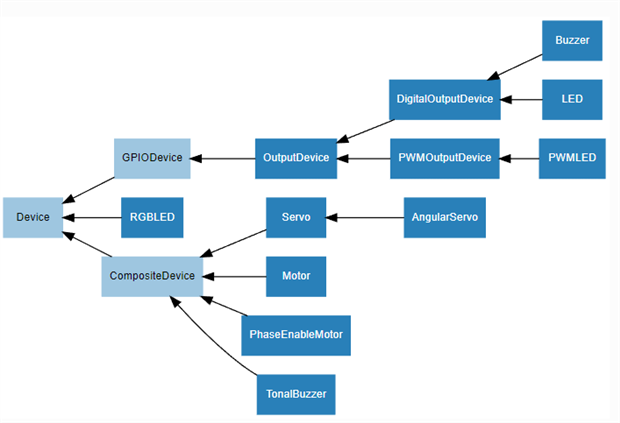
The python library for working with GPIOs, GPIO Zero, along with basic tutorials can be found here. What I really like about it is that in addition to providing basic input/output functionality, it also provides a lot of helper classes in an OOP fashion with added functionality. Which is what most of us would anyways write when starting with a new microcontroller. For instance:
Here is a picture of the class hierarchy for output devices:
Otherwise to write the code in C, while I am sure there are libraries out there, the "embedded" way would be to access the registers directly. The official website links to yet another website describing how to do this, found here. There are no headers defining registers and mapping them to their correct addresses as would be expected of an embedded development environment. You have to do this yourself using macros for the "base peripheral address" and offsets according to the peripherals datasheet mentioned previously. Since there have been changes over time for the Raspberry CPUs, the base peripheral register address changed and the Raspberry Foundation are kind enough to provide a library with some helper functions which will work on all Pi boards and should be future-proof. Neat!
Going further, I tried to get UART communication running. First, I connected the UART pins of the Pi through a MAX3232 UART to RS-232 converter, to my PC's serial port. The Raspberry Foundation this time suggested a different library called WiringPi-Python. A bit annoying how you need to bloat your code up with several libraries to achieve basic embedded functionality. Here is a snippet of how to send a message once a second:
import wiringpi
import time

wiringpi.wiringPiSetup()
serial = wiringpi.serialOpen('/dev/ttyS0',9600)
while (True):
 wiringpi.serialPuts(serial,'greetings from the Pi')
 wiringpi.serialPutchar(serial, 0x00);
 time.sleep(1)
This is where I need to highlight some limitations of the Pi, all of them caused by poor documentation, unconventional HW implementation, or the implementation behind "unofficial, officially-supported" libraries:


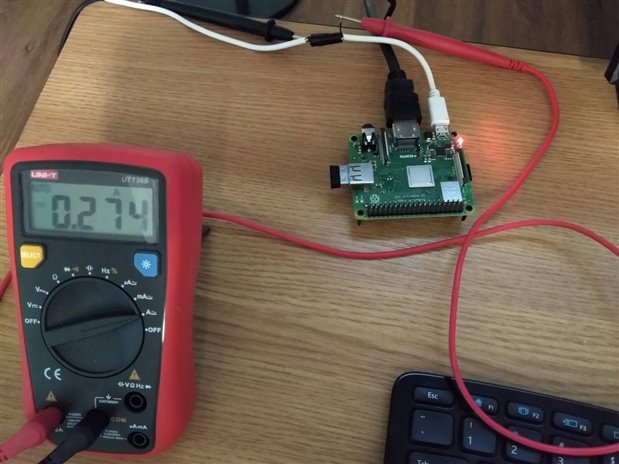
As stated by the official website, the Pi requires a solid 5V supply capable of delivering 2.5A. I used a USB cable that I cut the ground wire from, to connect an Ammeter to measure the current draw. I also sometimes used a Voltmeter to measure the supply voltage on the 5V line.
In idle with a display, my keyboard and mouse connected, the power draw was around 200-300 mA and the supply voltage was holding steady at around 4.9-5 V.
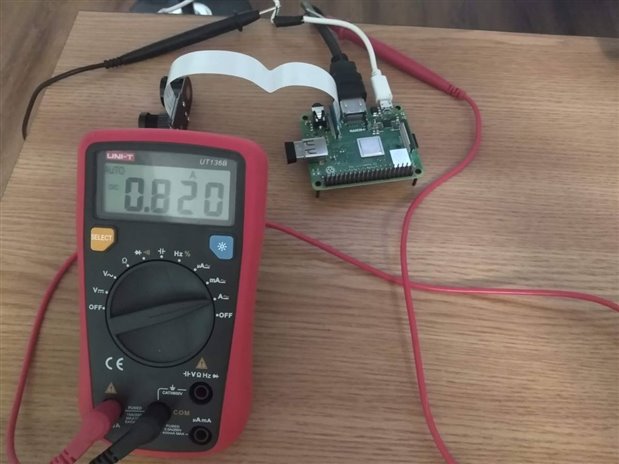
With the Pi Camera connected the power draw was 300-400 mA higher, due to the fact that my camera has infrared LEDs and they are almost always on due to the bad lighting in the room. The camera module by itself eats about 100-150 mA while not running. Running the camera, the power draw is about 800 mA:
And the power draw grows to almost 1 A while running the image detection project. The supply voltage also dips to ~4.5 - 4.8 V momentarily during heavy tasks so I should probably find a better power supply.
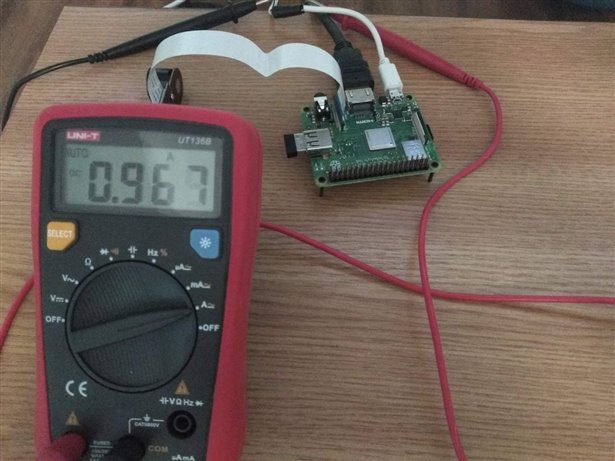
Still, for me getting a 5 W power draw for a security camera that cost ~60 euros sound pretty good.
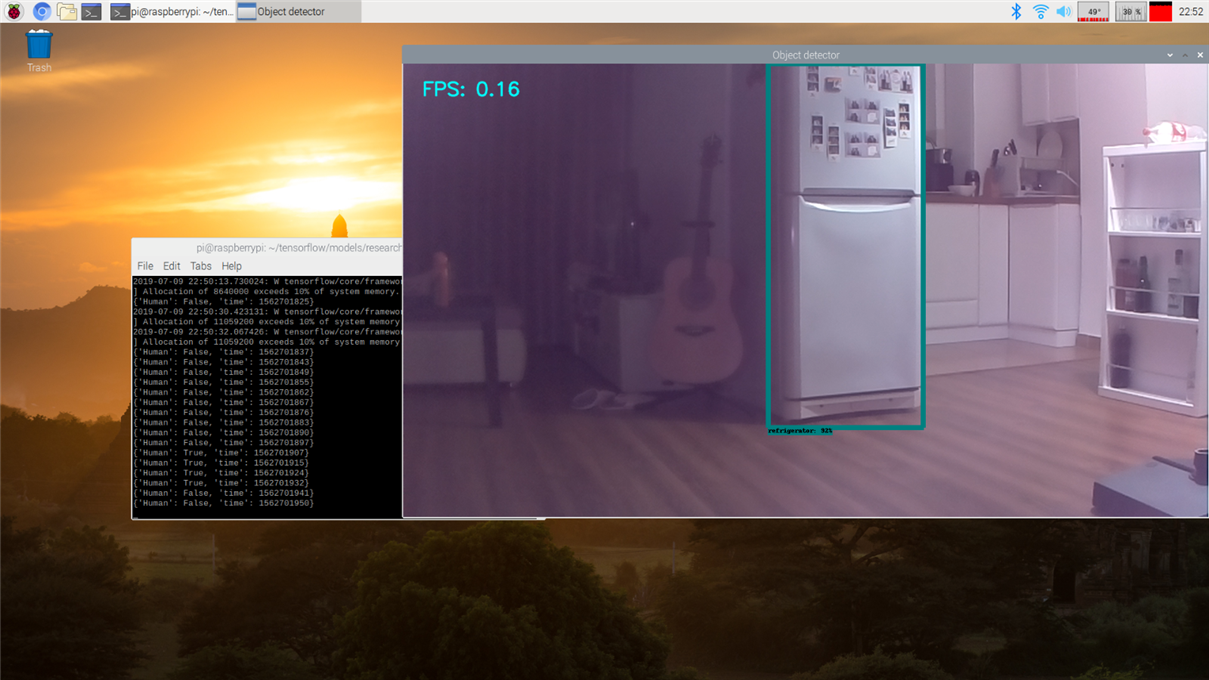
You can see in various screenshots that I have in this review that in the corner I have configured it to show CPU temperature, CPU usage % and RAM usage %, in this order from left to right. The CPU was running at 45-50 degrees C when idle, with RAM usage at 20-30%. When browsing the web in Chrome or doing more intensive tasks the RAM was usually the bottleneck, getting almost full very easily, sometimes to a point where the Pi was completely unresponsive. The CPU would also get hot to 50-60 degrees, at which point it would start to throttle (the temperature chart in the corner turns red when the frequency was throttled due to heating AFAIK). This is a screenshot from my Object detector example:
The case helped a lot with thermals and is very sturdy (dropped it once or twice without a problem to the Pi). The entire case acts as a heatsink and connects to the CPU and RAM chips with thermal tape. Two letdowns regarding the case:
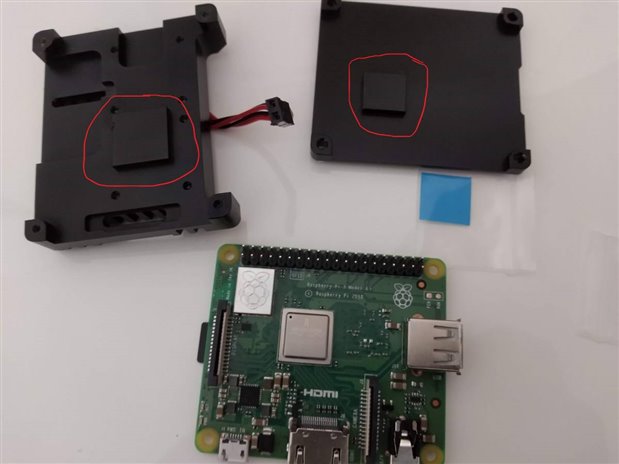
Anyways, the CPU temperature was kept at a constant 35 degrees by the case and barely exceeded 40 degrees on the same example program as before.
Regarding memory usage, there is not much you can do and you simply have to live with this limitation. Building programs from source as is common for Linux is nearly impossible as you run out of RAM easily. Browsing the web is not very smooth. Pages take a while to load and memory fills up very quickly with 2-3 tabs open in Chrome.
Due to Linux, the Pi uses a swap partition for when RAM gets really low, but since the swap stuff is written to the SD card (much slower than RAM), the system becomes unusable once swap is used. I used the commands described by this guy here to disable the swap mechanism. This way, when a process uses too much RAM, the system kills it instead of getting frozen.
The audio output was very low compared to my PC but of decent quality. I couldn't initially connect my Bluetooth LE mouse (and I expect the speaker to be the same) due to some Raspbian mumbo-jumbo. I found some help on their forums here, after which my mouse connected without a problem automatically at every boot-up.
I was unsure in the beginning where the board would fit in an IoT context. Since the board is incomparably more power hungry than other boards it cannot be battery-powered. The peripherals are fairly hard to set up. And obviously it would make a lot of sense to take advantage of its processing power. Therefore the best choices would be either image processing applications or as a concentrator/data processor in a network of IoT devices.
The first use case I conceived for the board is that of a concentrator, where it gathers data from several devices, processes it and outputs results or sends commands to devices in the network. For this I have an existing Google Cloud project from my previous roadtest. I also use a board from Microchip from the same roadtest, which reads its temperature and brightness sensors and outputs them to Firebase (a Google cloud hosted database) via a WiFi connection. Receiving that data on the Pi would be a pretty good demonstration of the concentrator functionality.
To connect to Firebase I used the REST API available for it, basically sending HTTP requests to exchange data with the database. This is the Firebase guide to how the HTTP links would need to look like and what REST commands can be used to send/receive data. This is a really nice website describing how to call REST APIs in Python. Following is my Python code that resulted. It's not the best implementation possible, but everything is fairly obvious and it gets the job done. Also, I removed the path to my Firebase project and to my board UID from the code snip just to be safe.
import requests
import cv2
import time
import json
import matplotlib.pyplot
import numpy
from datetime import datetime
from matplotlib import pyplot

avrDevice = #UID of my device
firebaseDbPath = #link to Firebase database, something like 'https://project-name.firebaseio.com'
avrLastUpdatedPath = firebaseDbPath + '/avr-iot/lastUpdated'
avrDataPath = firebaseDbPath + '/avr-iot/data/' + avrDevice

latestTimestamp = 0
xs = []
ysLight = []
ysTemp = []
fig, axs = pyplot.subplots(1,2)
pyplot.ion()
pyplot.show()

while True:

    resp = requests.get(avrLastUpdatedPath + '.json')
    if resp.status_code != 200:
        print('Error while getting avr last timestamp: ' + str(resp.status_code))
    else:
        if (latestTimestamp != resp.json()[avrDevice]):
            latestTimestamp = resp.json()[avrDevice]

            print('New data at ' + str(latestTimestamp))

            resp = requests.get(avrDataPath + '.json?orderBy="time"&limitToLast=1')
            if resp.status_code != 200:
                print('Error while getting avr data: ' + str(resp.status_code))

            data = next(iter(resp.json().values()))
            light = int(data['Light'])
            temperature = float(data['Temp'])
            timestamp = datetime.fromtimestamp(int(data['time']/1000))

            print(light)
            print(temperature)
            xs.append(timestamp)
            ysLight.append(light)
            ysTemp.append(temperature)

            if (len(xs) == 31):
                xs.pop(0)
                ysLight.pop(0)
                ysTemp.pop(0)

            axs[0].clear()
            axs[1].clear()
            axs[0].set_title('Light')
            axs[0].set_xlabel('Time')
            axs[0].set_ylabel('Light (lux)')
            axs[1].set_title('Temperature')
            axs[1].set_xlabel('Time')
            axs[1].set_ylabel('Temperature (°C)')
            axs[0].plot(xs, ysLight)
            axs[1].plot(xs, ysTemp)
            fig.autofmt_xdate()
            pyplot.pause(0.1)
Here's how the charts look. At first I had the other board next to an open window, so it was pretty bright and slightly colder. As I took the board inside at ~19:54:13, it was much darker and starting to get warm.
On an unrelated note, the board was actually measuring the board temp, not the ambient one, since the sensor is a very small SMD chip. It wasn't that hot inside!
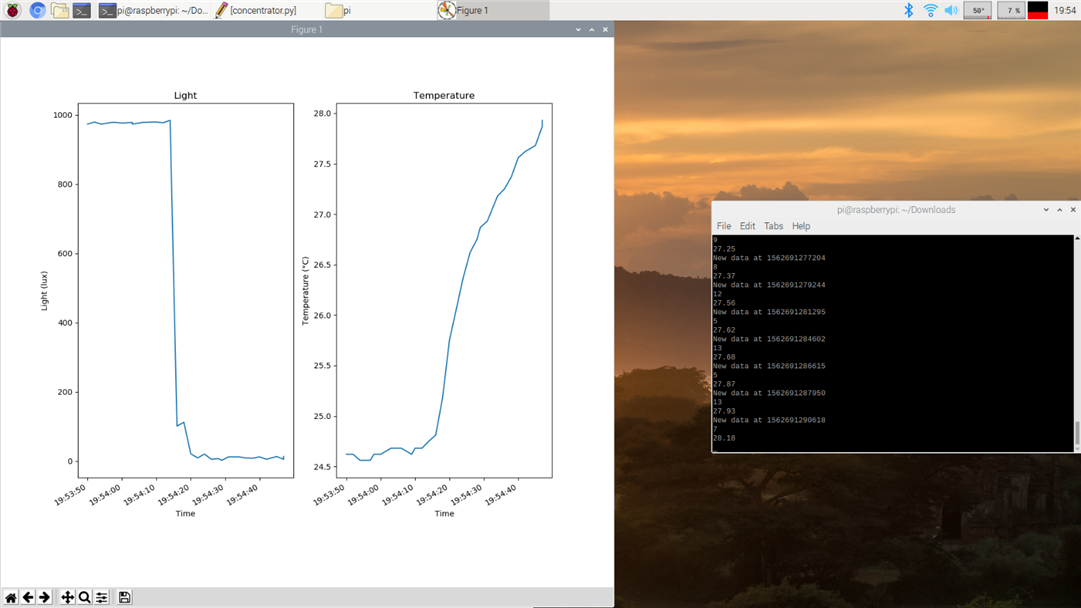
The data loaded consistently, the charts updated in real time, and the CPU and memory weren't that stressed. Great success!
Another thing I wanted to try was an image recognition software. I would like to integrate this within my existing IoT home 'network', by using the same Firebase database. The Raspberry would analyse data from the camera and this data could trigger actions on another device like keeping a light on if it detects a human in the room.
I want to use a camera for this application for these 2 reasons:
For the image recognition, I found this project on GitHub by user EdjeElectronics. It is a python script based on the TensorFlow machine learning library from Google and provides a detailed tutorial for the installation process and source code for connecting everything together. It also uses an already existing model for the object detection, meaning what a person or several items (clock, refrigerator etc.) "look" like. You don't have to train the model from scratch so the algorithm would "know" what a human looks like.
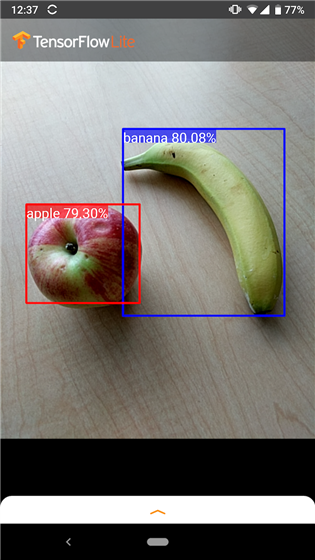
The way this program works is it takes a live feed from the Pi Camera and runs the inference model on individual frames from the camera. This inference reports an array of objects it has detected, the certainty with which it "assumes" that what it detected is that certain object, and coordinates of where in the picture the objects were detected. Then the program draws nice boxes around the objects detected using OpenCV. There is also an FPS display in the corner. It will detect multiple objects, as can be seen here (test image from the TensorFlow website):
Installing everything went ok on my first attempt, keeping in mind that TensorFlow 1.13 is available pre-built to install for the Pi, while the latest version is 1.14 and 2.0 is in the beta. The 1.13 version worked ok but I had problems when I decided to reinstall the OS to get the full SD card available. Due to the Raspbian update from the beginning of July (with the launch of Pi 4), OpenCV failed to install and I also had to try several times to install TensorFlow. Finally after getting everything running, this is how it looks on my setup:

I'm 87% a person, yay! Excuse the coloring, this is due to the camera running on infrared because of the low ambient light in the evening. Also to note, the 1 meter camera cable didn't affect video quality at all.
Straight away we can notice the very low FPS below one per second. By default the python script runs the camera at 720p continuously capturing JPEG images. Lowering the resolution gradually, down to even 240p, does provide slightly higher framerates but just up to 0.8 FPS. Also increasing the resolution to 1080p lowers the FPS to around 0.5. I decided to leave it at 720p.
Now to add the data to Firebase is very easy. I just add the connection to my database, and for every image captured I send new data to the database indicating if a human is detected or not. I used code taken from the concentrator project (REST API) and this got me to a result of around 0.18-0.2 FPS (one every 5-6 seconds). Terrible performance which would clearly benefit from running things asynchronously, but anyway, here's a sample:

Worth noting that it doesn't need to see an entire human body or whatever object it's detecting to identify it. This means you get to be a little more flexible with the camera placement.
Also you can see that the RAM usage (red chart in the taskbar next to the clock) is almost at full. While the CPU could probably handle more, clearly the RAM is the bottleneck in this case. Also you can see in the temperature chart that when it goes red, CPU is throttling. Not sure why it throttles at 50 degrees though, as I would expect it to happen at 80.
Anyways, same script no longer detecting me and reporting state via Firebase. See, it picked up my fridge

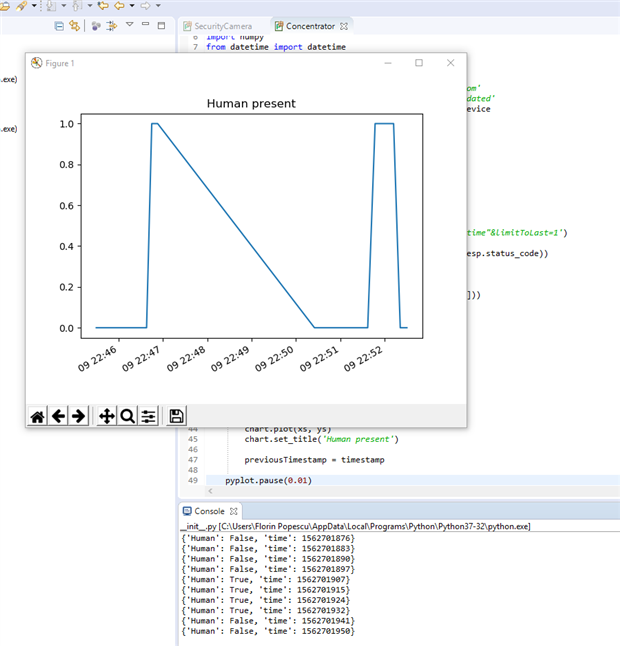
And here is the concentrator script, altered from my earlier example to pull the new data from Firebase. I ran this on a separate PC since the raspberry obviously wouldn't handle both tasks at the same time. You can see where it first detected me at 22:46 (the timestamps display the day of month and not the seconds for some reason). Followed by a few minutes of silence since the script on the Pi was killed (low memory I assume), and then at 22:50 I restarted the script and you can see me getting in front of the camera again.
It is also worth mentioning at this point that I installed a version of TensorFlow intended for CPU processing. There is another version which does processing on the GPU but it is sadly not available for the Raspberry. There is a third version, TensorFlow Lite, which works in a different way and is tailored towards mobile devices and IoT. I figured I'd give this one a shot too and see if it brings any performance optimizations. Benchmarks on the net for the Pi promise 2-3x better performance compared to the regular library!
TensorFlow Lite for Python is bundled with the regular TensorFlow Python package, but it is disappointingly broken for the Pi. It crashes as it expects some NEON support function, but apparently the library for that wasn't linked when building the official TensorFlow package for the Pi. NEON is related the vector arithmetic core in the ARM CPU, so pretty mandatory for speeding up advanced math calculations. Awkward moment!
I tried to build TensorFlow Lite on the Pi but to no success due to RAM limits. I tried to build it on a separate PC running Ubuntu for literally >2 weeks but failed miserably. Things that went wrong:
The build process is very long and tedious, not that well documented, and I have encountered several bugs while building of which most or all were tracked on Google's GitHub, but some without official fixes.
This goes to show how complicated things are in the Linux world. "Open source, download sources and see for yourself that we don't do shit, build for yourself and run" doesn't really work in the real world, where people aren't really deep into what they're doing. Eventually I gave up due to time constraints for this review, but I may try it again at some point in the future.
Directions for improving this project:
So far it seems to me that this is a very stripped down version of Windows, which allows you to run Windows apps (basically write them in C#, take advantage of .Net, Azure Technologies etc.). But they need to be build for ARM and therefore regular apps meant for x86 will not work here.
Seems there is no switching around windows and launching apps, so development will not be done directly on the Pi. Rather, you use your regular PC to develop an app, push the app to the Pi and then the Pi displays only that app. My feeling is that Windows would be much more limited than Linux on the Pi. Dual boot seems to not provide any benefit at this point.
So far I have failed to get to boot Windows 10 IoT Core several times. Installation requires you to download an application on your PC and use it to write the SD card. Done. However whenever I put the card into the Pi, it just wouldn't boot and remain stuck at the "rainbow" screen. I am not sure how Windows works and would like to see someone using it, but for me it has been too much time wasted on installing (clicking next, next, next) just to not have it work in the end without an error I can google. This is anyways none of Raspberry Foundation's fault and going back to my previous statement, Linux is much better supported for the Pi so I will stick to that.
Out of the entire roster of Raspberry Pi boards, I find the Pi 3 A+ to be the choice for me due to it being a good compromise device between performance, size and cost. All other devices perform better in some of these 3 points, but are lackluster in the others. The A+ is a "Jack of all trades, master of none", if you will. Following, a more detailed comparison:
The A+ and the B+ have pretty much the same hardware. This is a choice between size/cost vs performance:
There is not much to compare. The Pi 3 A+ is almost in every regard better than any previous generation
Going back to the A+ vs B+ argument, the Zero W takes the A+ and goes way further by reducing size and cost.
While writing this review the Raspberry Pi 4 got released and I got a bit jealous of its incredible performance. It is going more in the direction of a low power computer than an embedded device. So for IoT, I feel like there are limited use cases which can benefit more from the Pi 4. Further comparison points between the Pi 4 and the Pi 3 A+:

Official documentation and supporting documents are a major letdown for this board and improving this doesn't seem to be on the radar for the Raspberry foundation. With this in mind, it is hard to develop anything too serious using this board, and most people anyways use it as a "learn to write python stuff on it, make a demo project, but then leave it in a drawer forever".
With that being said, it is still a very capable board exceptionally cheaply priced. I am happy to report that I have found a proper spot for the Pi 3 A+ in an IoT context. These are what I believe are major use cases and where it would make sense to consider this Pi board:
I hope that people reading this review will find it useful in deciding if this board makes sense for them.
I would like to thank element14 for this learning opportunity and for giving me a chance to provide something back to the community. I also get to keep a cool device after all this!


