


Table of Contents
Introduction
Ever wanted to control or configure or monitor hardware using a mobile phone, using (say) USB or Bluetooth? I have, and usually I code it in JavaScript, so that the software can run from any platform with a web browser. Recently I decided to try something called Flutter, which is a set of tools for creating applications that can then be compiled for a target platform. The programming language that is used with Flutter is called Dart; it looks a bit like Python, or any typical programming language. I'm a beginner at it, and this blog post documents my progress in case anyone wants to try to give it a shot too.
With Flutter, if you want to create an app, the procedure is to write code in Dart, including fancy widgets and libraries provided with Flutter, process your code using the Flutter tools from the command line, which will compile using the normal target build tools. In the case of Android phones for instance, you could use Android Studio for the final compilation.
This blog post discusses how I installed Flutter, and built a default demo app (the demo doesn't do much, it displays a single button and text that updates when the button is clicked).
For this blog post, I used Android, but one could make apps to run on iPhones, and also desktop apps too.
If interested, there is a follow-up blog here: (+) Creating a Mobile App with Flutter: Interfacing Microcontrollers with AnyOperate! - element14 Community
Software Installation
Create a folder for Android development. I created a folder called:
C:\DEV\vhd_mounts\android
Android Studio and Flutter Setup
I won’t be using Android Studio as a code editor, but nevertheless it is easier if it is installed for access to the tools and software development kit (SDK). I Installed Android Studio from the Android developer website,
In my case, the Android Studio path was:
C:\DEV\vhd_mounts\android\Android Studio
Start Android Studio, and install the Android SDK as prompted. Install it to somewhere like:
C:\DEV\vhd_mounts\android\Sdk
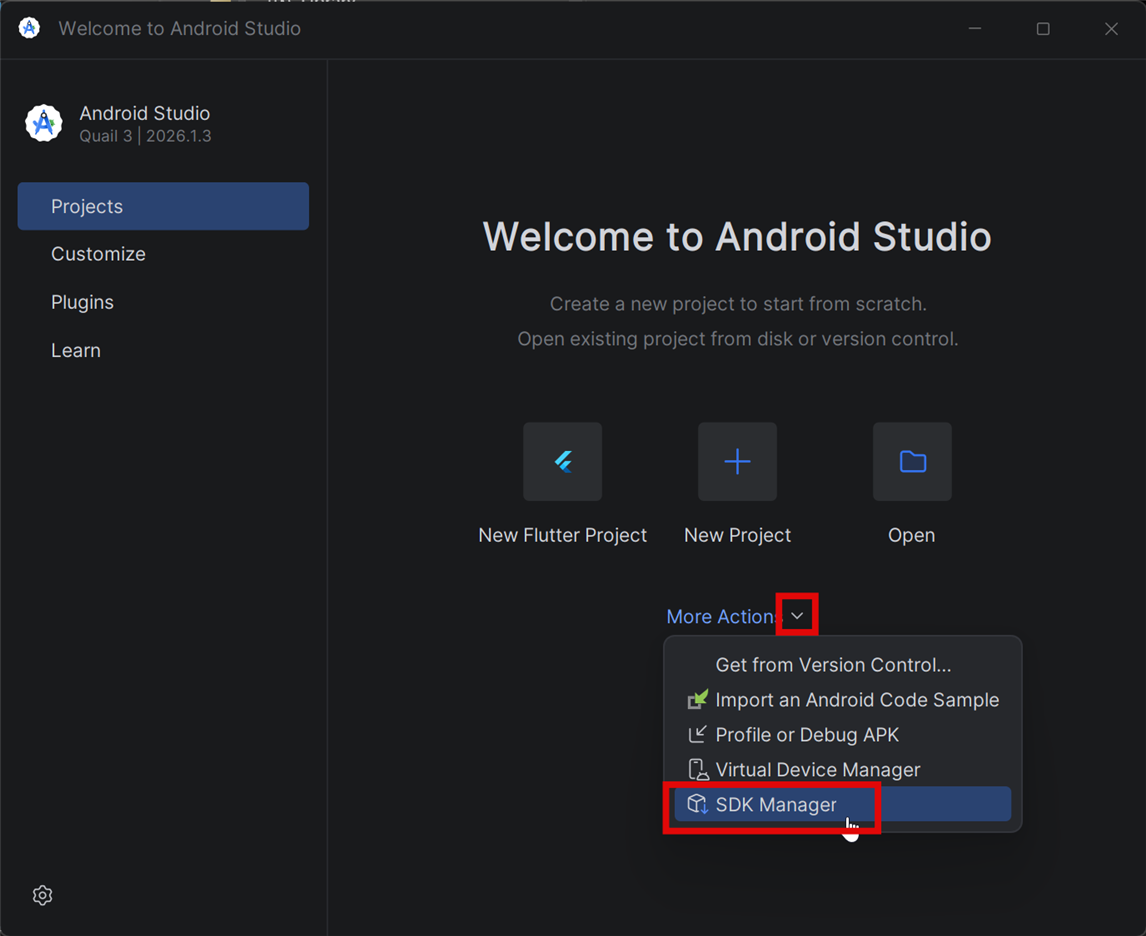
Run Android Studio, and from More Actions, select SDK Manager.
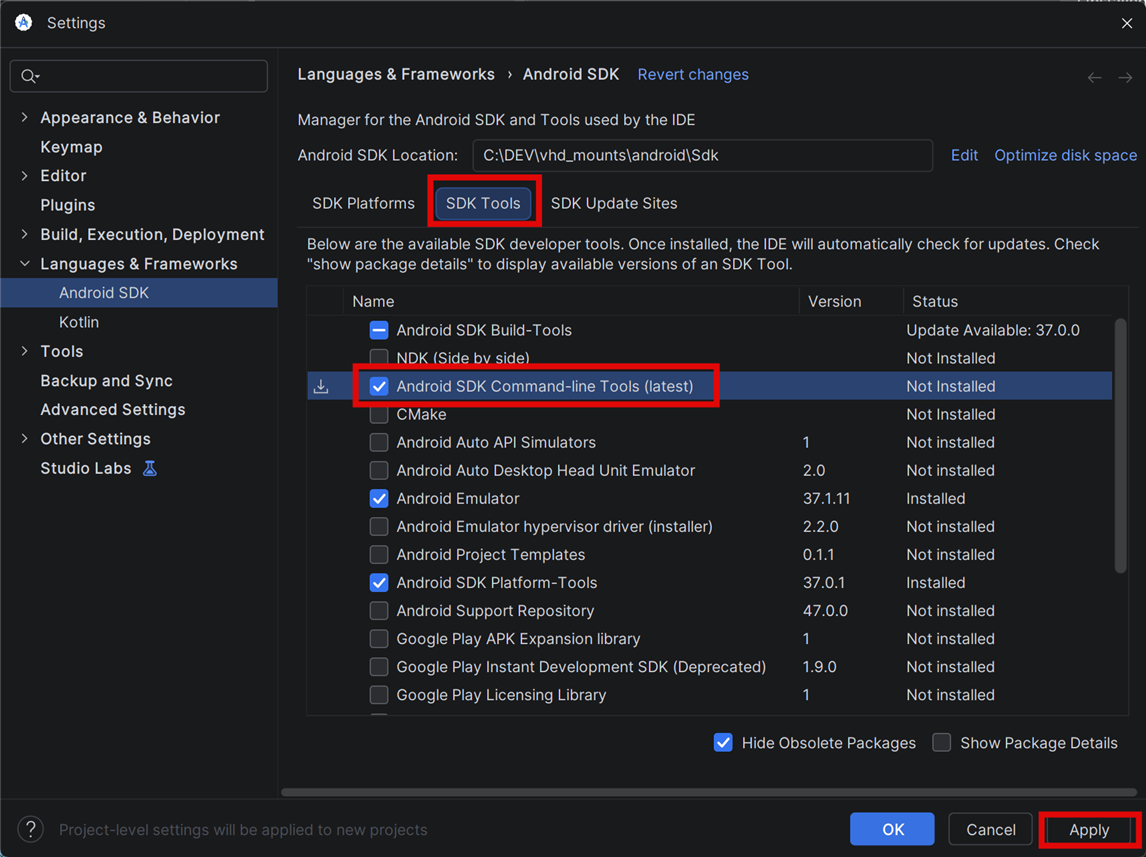
Go to SDK Tools, and enable command line tools as shown below. Click Apply, and wait a short while for it to install.
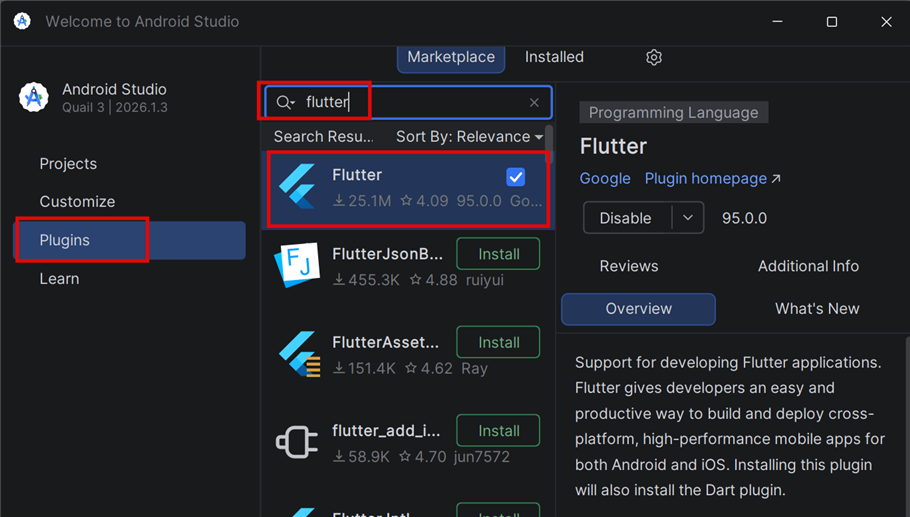
Next, go to Plugins, and install the Flutter plugin. Note that you still need to install Flutter itself; that will come next.
Close Android Studio, and then download Flutter. It’s a zip file, extract it somewhere (I extracted to my android folder I created earlier), and then append the bin folder path to your PATH environment variable; I added it to the user variable. In my case, the path was:
C:\DEV\vhd_mounts\android\flutter\bin
Also, while you’re at it, add the Android Studio SDK platform-tools folder to the PATH as well; in my case:
C:\DEV\vhd_mounts\android\Sdk\platform-tools
Phone Setup
Your mobile phone needs to be in a USB Developer mode (it is also possible to use WiFi, but for now I’ll only cover USB).
The precise process is manufacturer dependent, and in the case of Samsung, there are quite a few steps. I had to seek out Developer Options, turn that on, then scroll down to the Debugging section there and turn on USB Debugging. Then, I had to locate the Auto Blocker configuration in the phone, and disable that. When the phone is eventually connected to the PC (don’t do that yet if possible), then you’ll have to look for a notification which indicates that USB is “Connected for charging only”, tap on that, and change that to “Use USB for Transferring files / Android Auto”.
To make matters more complicated, the standard Microsoft driver (called MTP) cannot be used with Samsung phones, so one has to download and install a driver from the Samsung website before connecting the phone.
If you have previously already plugged the phone into the PC, then the old driver needs deleting (unplug the phone, then in Device Manager, select View->Show Hidden Devices and then locate the phone in the list, and delete it, and then definitely reboot the PC, otherwise the Microsoft driver gets reinstalled.
For Samsung phone users, you need to get the view in Windows Device Manager to the state as shown in the screenshot below. As Windows and Android evolves, the information above may not precisely match what needs to be done in future.

Once you see the above, as another sanity check, you could go to Powershell and type the following, and see if your phone gets listed as a recognized Android device:
adb.exe devices
Creating a Project
Create a folder for android project. My path was:
C:\DEV\projects\android_studio_projects
Open up a PowerShell, go to that folder, and type (all lower-case!):
flutter create <your_project_name>
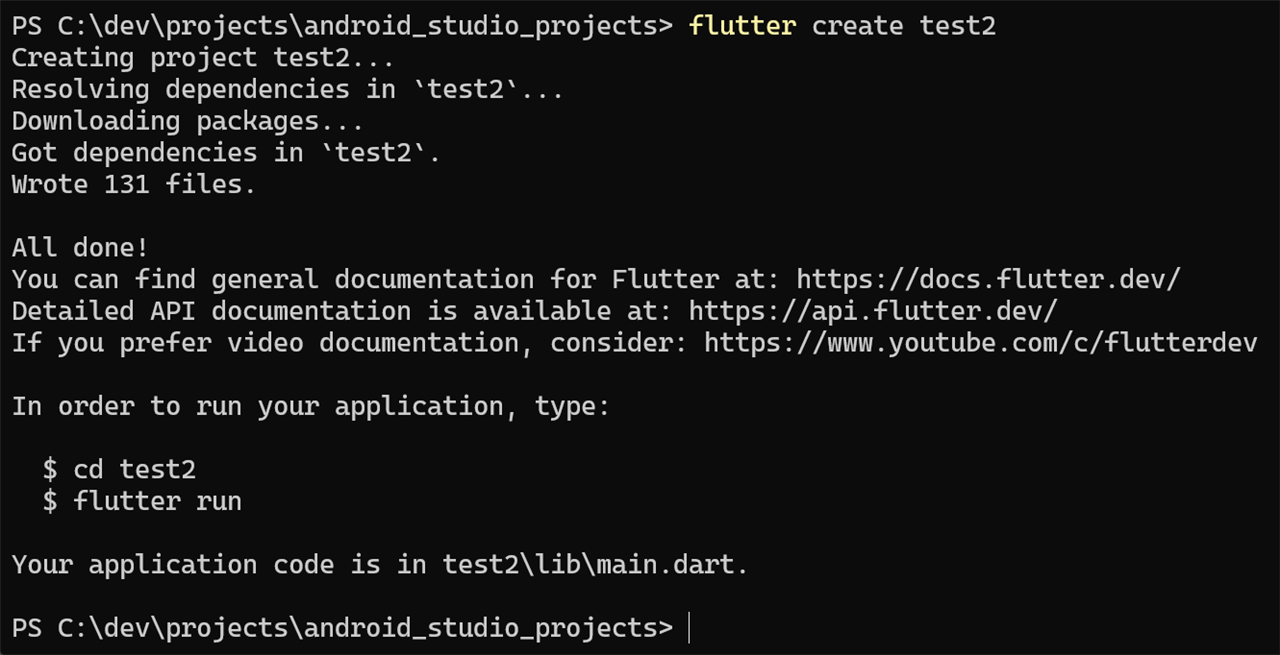
You’ll see that a load of files got created:

Using PowerShell, go into the project folder (test2 in my example), and then type the following to run some sanity checks:
flutter doctor

In my case, you can see there are some warnings and errors. The Chrome and Visual Studio errors are not relevant for mobile development, but you may wish to correct them to experiment with desktop Flutter apps.
I followed the warning text, and ran:
flutter doctor --android-licenses
Running the App
You can type the following in a PowerShell window, in your project folder:
flutter run
Note that it will take some time to execute the first time! Long enough to make tea/coffee.
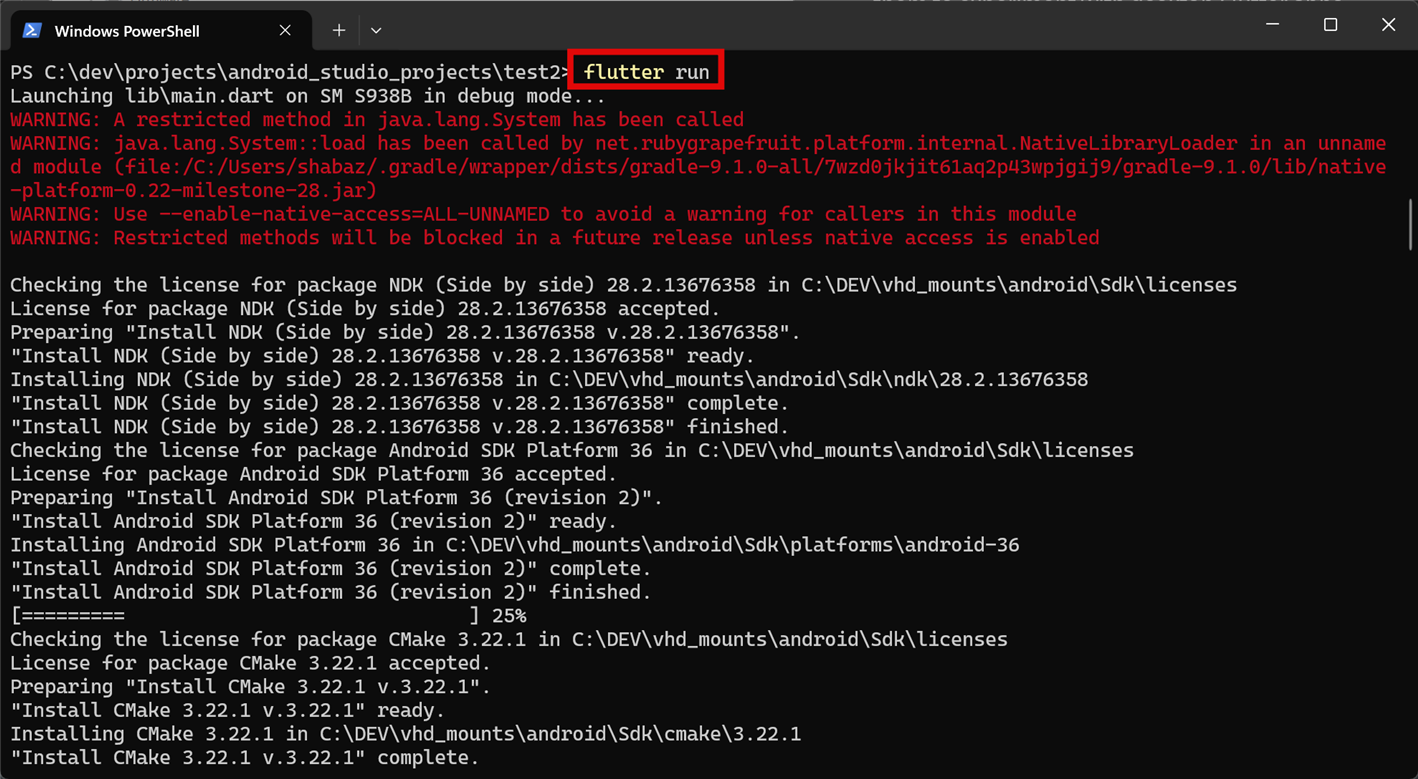
There’ll be a ton of scrolling text, but eventually, on the mobile phone, an example flutter app appears!
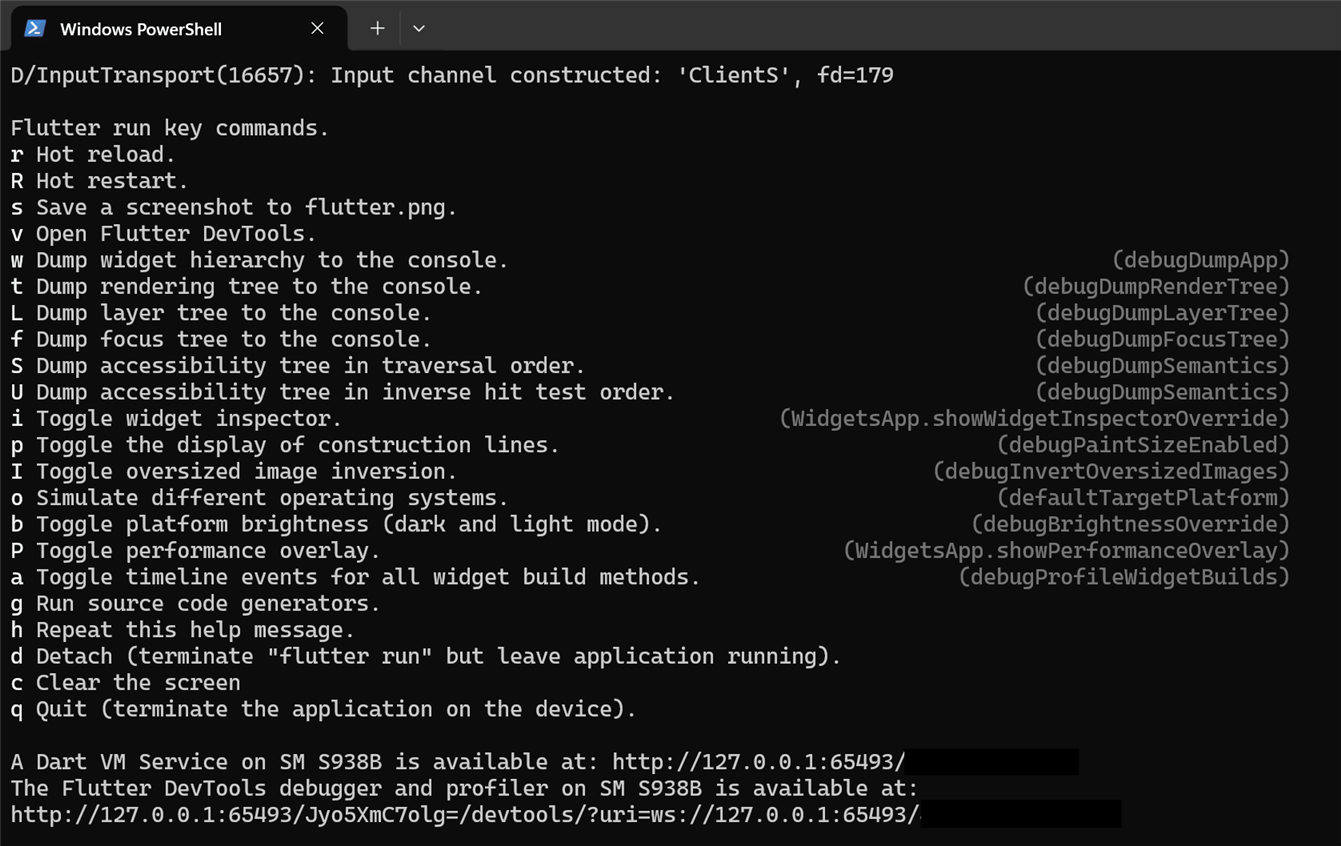
In PowerShell, press ‘h’ to see a list of commands:
Project Folder Explained
The project folder contains quite a lot, but in practise, the most important things to know are that the project source is in the lib folder, and then there are a load of platform-specific folders (such as android, ios, linux, macos and so on) that may occasionally need to be touched (to edit the project name, permissions, and so on).
The pubspec.yaml file is important, this is where any packages are entered as dependencies (such as code libraries) that the project may require.
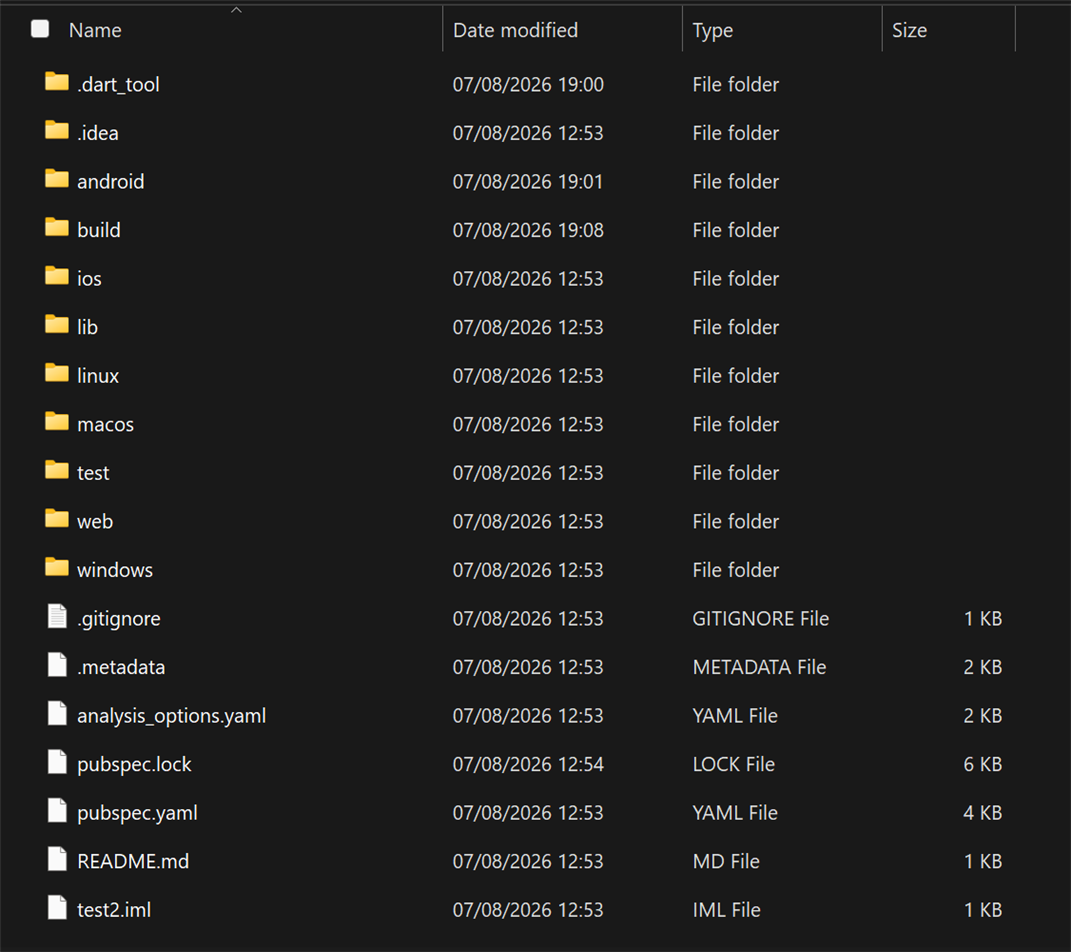
Note that if you add dependencies in pubspec.yaml, then you’ll need to type the following to install them:
flutter pub get
Demo Code Explained
Right-click and open the demo code in a separate window if that helps to follow it.
import 'package:flutter/material.dart';

void main() {
  runApp(const MyApp());
}

class MyApp extends StatelessWidget {
  const MyApp({super.key});

  // This widget is the root of your application.
  @override
  Widget build(BuildContext context) {
    return MaterialApp(
      title: 'Flutter Demo',
      theme: ThemeData(
        // This is the theme of your application.
        //
        // TRY THIS: Try running your application with "flutter run". You'll see
        // the application has a purple toolbar. Then, without quitting the app,
        // try changing the seedColor in the colorScheme below to Colors.green
        // and then invoke "hot reload" (save your changes or press the "hot
        // reload" button in a Flutter-supported IDE, or press "r" if you used
        // the command line to start the app).
        //
        // Notice that the counter didn't reset back to zero; the application
        // state is not lost during the reload. To reset the state, use hot
        // restart instead.
        //
        // This works for code too, not just values: Most code changes can be
        // tested with just a hot reload.
        colorScheme: .fromSeed(seedColor: Colors.deepPurple),
      ),
      home: const MyHomePage(title: 'Flutter Demo Home Page'),
    );
  }
}

class MyHomePage extends StatefulWidget {
  const MyHomePage({super.key, required this.title});

  // This widget is the home page of your application. It is stateful, meaning
  // that it has a State object (defined below) that contains fields that affect
  // how it looks.

  // This class is the configuration for the state. It holds the values (in this
  // case the title) provided by the parent (in this case the App widget) and
  // used by the build method of the State. Fields in a Widget subclass are
  // always marked "final".

  final String title;

  @override
  State<MyHomePage> createState() => _MyHomePageState();
}

class _MyHomePageState extends State<MyHomePage> {
  int _counter = 0;

  void _incrementCounter() {
    setState(() {
      // This call to setState tells the Flutter framework that something has
      // changed in this State, which causes it to rerun the build method below
      // so that the display can reflect the updated values. If we changed
      // _counter without calling setState(), then the build method would not be
      // called again, and so nothing would appear to happen.
      _counter++;
    });
  }

  @override
  Widget build(BuildContext context) {
    // This method is rerun every time setState is called, for instance as done
    // by the _incrementCounter method above.
    //
    // The Flutter framework has been optimized to make rerunning build methods
    // fast, so that you can just rebuild anything that needs updating rather
    // than having to individually change instances of widgets.
    return Scaffold(
      appBar: AppBar(
        // TRY THIS: Try changing the color here to a specific color (to
        // Colors.amber, perhaps?) and trigger a hot reload to see the AppBar
        // change color while the other colors stay the same.
        backgroundColor: Theme.of(context).colorScheme.inversePrimary,
        // Here we take the value from the MyHomePage object that was created by
        // the App.build method, and use it to set our appbar title.
        title: Text(widget.title),
      ),
      body: Center(
        // Center is a layout widget. It takes a single child and positions it
        // in the middle of the parent.
        child: Column(
          // Column is also a layout widget. It takes a list of children and
          // arranges them vertically. By default, it sizes itself to fit its
          // children horizontally, and tries to be as tall as its parent.
          //
          // Column has various properties to control how it sizes itself and
          // how it positions its children. Here we use mainAxisAlignment to
          // center the children vertically; the main axis here is the vertical
          // axis because Columns are vertical (the cross axis would be
          // horizontal).
          //
          // TRY THIS: Invoke "debug painting" (choose the "Toggle Debug Paint"
          // action in the IDE, or press "p" in the console), to see the
          // wireframe for each widget.
          mainAxisAlignment: .center,
          children: [
            const Text('You have pushed the button this many times:'),
            Text(
              '$_counter',
              style: Theme.of(context).textTheme.headlineMedium,
            ),
          ],
        ),
      ),
      floatingActionButton: FloatingActionButton(
        onPressed: _incrementCounter,
        tooltip: 'Increment',
        child: const Icon(Icons.add),
      ),
    );
  }
}


// Copyright 2014 The Chromium Authors. All rights reserved.
//
// Redistribution and use in source and binary forms, with or without
// modification, are permitted provided that the following conditions are
// met:
//
//    * Redistributions of source code must retain the above copyright
// notice, this list of conditions and the following disclaimer.
//    * Redistributions in binary form must reproduce the above
// copyright notice, this list of conditions and the following disclaimer
// in the documentation and/or other materials provided with the
// distribution.
//    * Neither the name of Google Inc. nor the names of its
// contributors may be used to endorse or promote products derived from
// this software without specific prior written permission.
//
// THIS SOFTWARE IS PROVIDED BY THE COPYRIGHT HOLDERS AND CONTRIBUTORS
// "AS IS" AND ANY EXPRESS OR IMPLIED WARRANTIES, INCLUDING, BUT NOT
// LIMITED TO, THE IMPLIED WARRANTIES OF MERCHANTABILITY AND FITNESS FOR
// A PARTICULAR PURPOSE ARE DISCLAIMED. IN NO EVENT SHALL THE COPYRIGHT
// OWNER OR CONTRIBUTORS BE LIABLE FOR ANY DIRECT, INDIRECT, INCIDENTAL,
// SPECIAL, EXEMPLARY, OR CONSEQUENTIAL DAMAGES (INCLUDING, BUT NOT
// LIMITED TO, PROCUREMENT OF SUBSTITUTE GOODS OR SERVICES; LOSS OF USE,
// DATA, OR PROFITS; OR BUSINESS INTERRUPTION) HOWEVER CAUSED AND ON ANY
// THEORY OF LIABILITY, WHETHER IN CONTRACT, STRICT LIABILITY, OR TORT
// (INCLUDING NEGLIGENCE OR OTHERWISE) ARISING IN ANY WAY OUT OF THE USE
// OF THIS SOFTWARE, EVEN IF ADVISED OF THE POSSIBILITY OF SUCH DAMAGE.

--------------------------------------------------------------------------------
Copyright (c) 2014, Vaibhav Singh (design) and Rosetta Type Foundry s.r.o. (post-production).

This Font Software is licensed under the SIL Open Font License, Version 1.1.
This license is copied below, and is also available with a FAQ at:
http://scripts.sil.org/OFL


-----------------------------------------------------------
SIL OPEN FONT LICENSE Version 1.1 - 26 February 2007
-----------------------------------------------------------

PREAMBLE
The goals of the Open Font License (OFL) are to stimulate worldwide
development of collaborative font projects, to support the font creation
efforts of academic and linguistic communities, and to provide a free and
open framework in which fonts may be shared and improved in partnership
with others.

The OFL allows the licensed fonts to be used, studied, modified and
redistributed freely as long as they are not sold by themselves. The
fonts, including any derivative works, can be bundled, embedded,
redistributed and/or sold with any software provided that any reserved
names are not used by derivative works. The fonts and derivatives,
however, cannot be released under any other type of license. The
requirement for fonts to remain under this license does not apply
to any document created using the fonts or their derivatives.

DEFINITIONS
"Font Software" refers to the set of files released by the Copyright
Holder(s) under this license and clearly marked as such. This may
include source files, build scripts and documentation.

"Reserved Font Name" refers to any names specified as such after the
copyright statement(s).

"Original Version" refers to the collection of Font Software components as
distributed by the Copyright Holder(s).

"Modified Version" refers to any derivative made by adding to, deleting,
or substituting -- in part or in whole -- any of the components of the
Original Version, by changing formats or by porting the Font Software to a
new environment.

"Author" refers to any designer, engineer, programmer, technical
writer or other person who contributed to the Font Software.

PERMISSION & CONDITIONS
Permission is hereby granted, free of charge, to any person obtaining
a copy of the Font Software, to use, study, copy, merge, embed, modify,
redistribute, and sell modified and unmodified copies of the Font
Software, subject to the following conditions:

1) Neither the Font Software nor any of its individual components,
in Original or Modified Versions, may be sold by itself.

2) Original or Modified Versions of the Font Software may be bundled,
redistributed and/or sold with any software, provided that each copy
contains the above copyright notice and this license. These can be
included either as stand-alone text files, human-readable headers or
in the appropriate machine-readable metadata fields within text or
binary files as long as those fields can be easily viewed by the user.

3) No Modified Version of the Font Software may use the Reserved Font
Name(s) unless explicit written permission is granted by the corresponding
Copyright Holder. This restriction only applies to the primary font name as
presented to the users.

4) The name(s) of the Copyright Holder(s) or the Author(s) of the Font
Software shall not be used to promote, endorse or advertise any
Modified Version, except to acknowledge the contribution(s) of the
Copyright Holder(s) and the Author(s) or with their explicit written
permission.

5) The Font Software, modified or unmodified, in part or in whole,
must be distributed entirely under this license, and must not be
distributed under any other license. The requirement for fonts to
remain under this license does not apply to any document created
using the Font Software.

TERMINATION
This license becomes null and void if any of the above conditions are
not met.

DISCLAIMER
THE FONT SOFTWARE IS PROVIDED "AS IS", WITHOUT WARRANTY OF ANY KIND,
EXPRESS OR IMPLIED, INCLUDING BUT NOT LIMITED TO ANY WARRANTIES OF
MERCHANTABILITY, FITNESS FOR A PARTICULAR PURPOSE AND NONINFRINGEMENT
OF COPYRIGHT, PATENT, TRADEMARK, OR OTHER RIGHT. IN NO EVENT SHALL THE
COPYRIGHT HOLDER BE LIABLE FOR ANY CLAIM, DAMAGES OR OTHER LIABILITY,
INCLUDING ANY GENERAL, SPECIAL, INDIRECT, INCIDENTAL, OR CONSEQUENTIAL
DAMAGES, WHETHER IN AN ACTION OF CONTRACT, TORT OR OTHERWISE, ARISING
FROM, OUT OF THE USE OR INABILITY TO USE THE FONT SOFTWARE OR FROM
OTHER DEALINGS IN THE FONT SOFTWARE.

--------------------------------------------------------------------------------

                                 Apache License
                           Version 2.0, January 2004
                        http://www.apache.org/licenses/

   TERMS AND CONDITIONS FOR USE, REPRODUCTION, AND DISTRIBUTION

   1. Definitions.

      "License" shall mean the terms and conditions for use, reproduction,
      and distribution as defined by Sections 1 through 9 of this document.

      "Licensor" shall mean the copyright owner or entity authorized by
      the copyright owner that is granting the License.

      "Legal Entity" shall mean the union of the acting entity and all
      other entities that control, are controlled by, or are under common
      control with that entity. For the purposes of this definition,
      "control" means (i) the power, direct or indirect, to cause the
      direction or management of such entity, whether by contract or
      otherwise, or (ii) ownership of fifty percent (50%) or more of the
      outstanding shares, or (iii) beneficial ownership of such entity.

      "You" (or "Your") shall mean an individual or Legal Entity
      exercising permissions granted by this License.

      "Source" form shall mean the preferred form for making modifications,
      including but not limited to software source code, documentation
      source, and configuration files.

      "Object" form shall mean any form resulting from mechanical
      transformation or translation of a Source form, including but
      not limited to compiled object code, generated documentation,
      and conversions to other media types.

      "Work" shall mean the work of authorship, whether in Source or
      Object form, made available under the License, as indicated by a
      copyright notice that is included in or attached to the work
      (an example is provided in the Appendix below).

      "Derivative Works" shall mean any work, whether in Source or Object
      form, that is based on (or derived from) the Work and for which the
      editorial revisions, annotations, elaborations, or other modifications
      represent, as a whole, an original work of authorship. For the purposes
      of this License, Derivative Works shall not include works that remain
      separable from, or merely link (or bind by name) to the interfaces of,
      the Work and Derivative Works thereof.

      "Contribution" shall mean any work of authorship, including
      the original version of the Work and any modifications or additions
      to that Work or Derivative Works thereof, that is intentionally
      submitted to Licensor for inclusion in the Work by the copyright owner
      or by an individual or Legal Entity authorized to submit on behalf of
      the copyright owner. For the purposes of this definition, "submitted"
      means any form of electronic, verbal, or written communication sent
      to the Licensor or its representatives, including but not limited to
      communication on electronic mailing lists, source code control systems,
      and issue tracking systems that are managed by, or on behalf of, the
      Licensor for the purpose of discussing and improving the Work, but
      excluding communication that is conspicuously marked or otherwise
      designated in writing by the copyright owner as "Not a Contribution."

      "Contributor" shall mean Licensor and any individual or Legal Entity
      on behalf of whom a Contribution has been received by Licensor and
      subsequently incorporated within the Work.

   2. Grant of Copyright License. Subject to the terms and conditions of
      this License, each Contributor hereby grants to You a perpetual,
      worldwide, non-exclusive, no-charge, royalty-free, irrevocable
      copyright license to reproduce, prepare Derivative Works of,
      publicly display, publicly perform, sublicense, and distribute the
      Work and such Derivative Works in Source or Object form.

   3. Grant of Patent License. Subject to the terms and conditions of
      this License, each Contributor hereby grants to You a perpetual,
      worldwide, non-exclusive, no-charge, royalty-free, irrevocable
      (except as stated in this section) patent license to make, have made,
      use, offer to sell, sell, import, and otherwise transfer the Work,
      where such license applies only to those patent claims licensable
      by such Contributor that are necessarily infringed by their
      Contribution(s) alone or by combination of their Contribution(s)
      with the Work to which such Contribution(s) was submitted. If You
      institute patent litigation against any entity (including a
      cross-claim or counterclaim in a lawsuit) alleging that the Work
      or a Contribution incorporated within the Work constitutes direct
      or contributory patent infringement, then any patent licenses
      granted to You under this License for that Work shall terminate
      as of the date such litigation is filed.

   4. Redistribution. You may reproduce and distribute copies of the
      Work or Derivative Works thereof in any medium, with or without
      modifications, and in Source or Object form, provided that You
      meet the following conditions:

      (a) You must give any other recipients of the Work or
          Derivative Works a copy of this License; and

      (b) You must cause any modified files to carry prominent notices
          stating that You changed the files; and

      (c) You must retain, in the Source form of any Derivative Works
          that You distribute, all copyright, patent, trademark, and
          attribution notices from the Source form of the Work,
          excluding those notices that do not pertain to any part of
          the Derivative Works; and

      (d) If the Work includes a "NOTICE" text file as part of its
          distribution, then any Derivative Works that You distribute must
          include a readable copy of the attribution notices contained
          within such NOTICE file, excluding those notices that do not
          pertain to any part of the Derivative Works, in at least one
          of the following places: within a NOTICE text file distributed
          as part of the Derivative Works; within the Source form or
          documentation, if provided along with the Derivative Works; or,
          within a display generated by the Derivative Works, if and
          wherever such third-party notices normally appear. The contents
          of the NOTICE file are for informational purposes only and
          do not modify the License. You may add Your own attribution
          notices within Derivative Works that You distribute, alongside
          or as an addendum to the NOTICE text from the Work, provided
          that such additional attribution notices cannot be construed
          as modifying the License.

      You may add Your own copyright statement to Your modifications and
      may provide additional or different license terms and conditions
      for use, reproduction, or distribution of Your modifications, or
      for any such Derivative Works as a whole, provided Your use,
      reproduction, and distribution of the Work otherwise complies with
      the conditions stated in this License.

   5. Submission of Contributions. Unless You explicitly state otherwise,
      any Contribution intentionally submitted for inclusion in the Work
      by You to the Licensor shall be under the terms and conditions of
      this License, without any additional terms or conditions.
      Notwithstanding the above, nothing herein shall supersede or modify
      the terms of any separate license agreement you may have executed
      with Licensor regarding such Contributions.

   6. Trademarks. This License does not grant permission to use the trade
      names, trademarks, service marks, or product names of the Licensor,
      except as required for reasonable and customary use in describing the
      origin of the Work and reproducing the content of the NOTICE file.

   7. Disclaimer of Warranty. Unless required by applicable law or
      agreed to in writing, Licensor provides the Work (and each
      Contributor provides its Contributions) on an "AS IS" BASIS,
      WITHOUT WARRANTIES OR CONDITIONS OF ANY KIND, either express or
      implied, including, without limitation, any warranties or conditions
      of TITLE, NON-INFRINGEMENT, MERCHANTABILITY, or FITNESS FOR A
      PARTICULAR PURPOSE. You are solely responsible for determining the
      appropriateness of using or redistributing the Work and assume any
      risks associated with Your exercise of permissions under this License.

   8. Limitation of Liability. In no event and under no legal theory,
      whether in tort (including negligence), contract, or otherwise,
      unless required by applicable law (such as deliberate and grossly
      negligent acts) or agreed to in writing, shall any Contributor be
      liable to You for damages, including any direct, indirect, special,
      incidental, or consequential damages of any character arising as a
      result of this License or out of the use or inability to use the
      Work (including but not limited to damages for loss of goodwill,
      work stoppage, computer failure or malfunction, or any and all
      other commercial damages or losses), even if such Contributor
      has been advised of the possibility of such damages.

   9. Accepting Warranty or Additional Liability. While redistributing
      the Work or Derivative Works thereof, You may choose to offer,
      and charge a fee for, acceptance of support, warranty, indemnity,
      or other liability obligations and/or rights consistent with this
      License. However, in accepting such obligations, You may act only
      on Your own behalf and on Your sole responsibility, not on behalf
      of any other Contributor, and only if You agree to indemnify,
      defend, and hold each Contributor harmless for any liability
      incurred by, or claims asserted against, such Contributor by reason
      of your accepting any such warranty or additional liability.

   END OF TERMS AND CONDITIONS

   APPENDIX: How to apply the Apache License to your work.

      To apply the Apache License to your work, attach the following
      boilerplate notice, with the fields enclosed by brackets "[]"
      replaced with your own identifying information. (Don't include
      the brackets!)  The text should be enclosed in the appropriate
      comment syntax for the file format. We also recommend that a
      file or class name and description of purpose be included on the
      same "printed page" as the copyright notice for easier
      identification within third-party archives.
   Copyright [yyyy] [name of copyright owner]
   Licensed under the Apache License, Version 2.0 (the "License");
   you may not use this file except in compliance with the License.
   You may obtain a copy of the License at
       http://www.apache.org/licenses/LICENSE-2.0
   Unless required by applicable law or agreed to in writing, software
   distributed under the License is distributed on an "AS IS" BASIS,
   WITHOUT WARRANTIES OR CONDITIONS OF ANY KIND, either express or implied.
   See the License for the specific language governing permissions and
   limitations under the License.
I'm just a beginner so I don't want to try to explain this code in detail because I will probably make mistakes! But here are some basics I've learned so far.
(1) Like C++ (and other programming languages) classes and objects are present.
(2) Base classes are indicated using the extends keyword
(3) @override is used to indicate that a function overrides from the base class
(4) @override followed by Widget build(BuildContext context) means a method/function called build that returns an object of type Widget (or a subclass, i.e. a class that inherits [extends] the Widget class functionality)
(5) Widget objects are used a lot, they are core to Flutter. Flutter creates a tree model of widgets while the app is running (think of it like an upside-down tree, approximately near the top of the tree could be a Scaffold widget, then further below could be an AppBar widget and a Column widget, and then the ColumnWidget might contain a Text widget, and so on).
(6) The build function literally describes the things to be displayed (that are used by Flutter to actually do it), therefore, it returns a Widget or Widget-inheriting object
(7) In a Flutter app an ordering or hierarchy of build functions can execute, all contributing to some part of the process to build up the entire screen display, because each build function will describe some chunk of the tree of Widgets.
(8) In the example code, you can see that the first build function returned an object of class MaterialApp (which inherits from Widget), and as part of that object creation, an object of class MyHomePage was created.
(9) There are StatefulWidget and StatelessWidget base classes, if you use the StatefulWidget class to create an object, then you also need to have a class extending the base class of State too, and you need to override the createState function, so that Flutter can create an object of that class. Notice that State-inheriting class can contain functions to set variables, call functions etc as part of the state action, but also implements a build function that likely contains widgets that can register callbacks to execute when user interaction events occur
(10) An underscore prefix indicates a private entity, often (not always; this is a first-level approximation) this is private to the file and not used by other code files.
(11) There is a _MyHomePageState class that also has a build function, so that too is responsible for some part of the screen creation process; you can see it returns a Widget object of class Scaffold, containing more widgets.
(12) Each build function contains a BuildContext object as a parameter. That's so the code in the build function can get access to things found higher-up in the Widget tree (as an example, you may want to know the top-level color used for the background; Theme.of in the demo code looks for the first suitable Theme object it finds dynamically in the tree from the location determined by the BuildContext).
(13) You can see that some widgets, such as FloatingActionButton used in that demo code, have an onPressed event that will call a function
(14) Unlike some app frameworks where you need to manually call a function to make an update to the display, Flutter instead relies on the build functions, they auto-run based on what widget needs the build function re-running, and that is determined by which setState function got executed. That's why, for the demo code, because a display update was desired when a variable incremented, when the setState function was called by a user event on a button, Flutter knew that the setState function was a member function of the _MyHomePageState object, and therefore it auto-ran the build function in that class.
Creating an App Icon
Create an assets folder in the project folder.
In pubspec.yaml, under dev_dependencies, add this entry:
flutter_launcher_icons: ^0.14.4
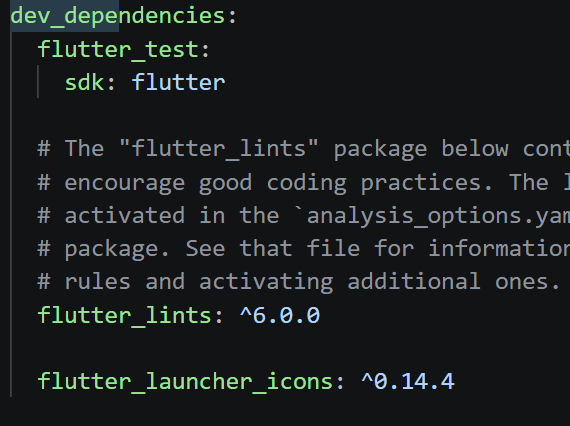
At the end of the pubspec.yaml file, place the following:
flutter_launcher_icons: android: "ic_launcher" ios: true image_path: "assets/app_icon.png"
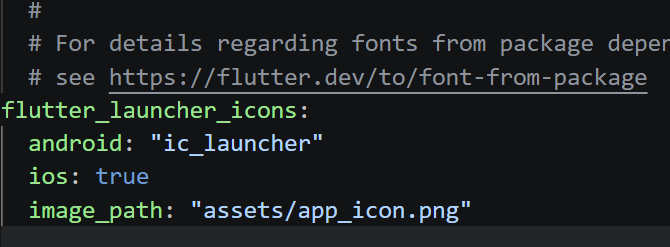
Place a 1024x1024 PNG file in the assets folder, then in PowerShell, type:
flutter pub getdart run flutter_launcher_icons
Now when you run the app (in the same way as mentioned in Running the App, i.e. by typing flutter run) you'll see the icon has changed.
Summary
The Flutter toolkit allows one to create apps that can potentially be compiled and built to run on many different platforms, including mobile devices. In this blog post, the steps to install Flutter were discussed, and the mobile phone was configured for uploading apps via USB, and a demo app was run. Next steps could be to examine the example project source code in the lib folder, and to perhaps try modifying it.
Eventually, I'd like to be able to control my microcontroller projects using mobile apps developed with Flutter (currently I do it with HTML/JavaScript); that will be the subject for another blog.
If you've ever used Flutter/Dart, or are planning to, it would be great to hear about how it went for you, and any tips or reading suggestions would be gratefully received.
Thanks for reading this blog!


