


Table of Contents
Introduction
In an earlier article, I briefly discussed the topic of Creating a Mobile App with Flutter. This second more comprehensive blog follows on from that.
If you followed the first blog, you’ll be aware what Flutter is, how to install it, and how to run a default demo app, and roughly be aware how the demo code works.
This second blog post should leave you feeling fairly confident at looking through an entire realistic Flutter app, and understand what’s going on. Lots of useful Flutter/Dart concepts will be explored by seeing how they are used in the real app.
Recap
A few Flutter concepts were discussed in the first blog, namely that Flutter uses a programming language called Dart, and that classes and objects are used much like as with any other programming language. The upside-down tree of Widgets was discussed, StatefulWidget and StatelessWidget were touched upon, and the fact that unlike some other app frameworks, Flutter doesn’t rely on calling functions to update displayed content on the screen, and instead, whenever your code (say, from a callback) results in a call to setState(), an associated build function will auto-run, each build function containing some portion of Widgets from the tree.
New App: Introducing AnyOperate!
This second blog walks through the architecture and code for a practical app, called AnyOperate. It can be used to connect to microcontrollers, to configure parameters or view results or status. I used AI to develop parts of the app, but large chunks of the documentation are my own work; I wanted to spend some time on those things, so that the project can be studied, to actually learn a bit about Flutter and Dart, rather than rely wholly on AI. Note: this blog was not AI generated! All errors are my own, it is fully original content.
Note # 2: If you’re not interested in how the app works and just wish to use it, you could skip most of this blog post and just download a pre-built .apk file for Android devices, from the GitHub releases page.
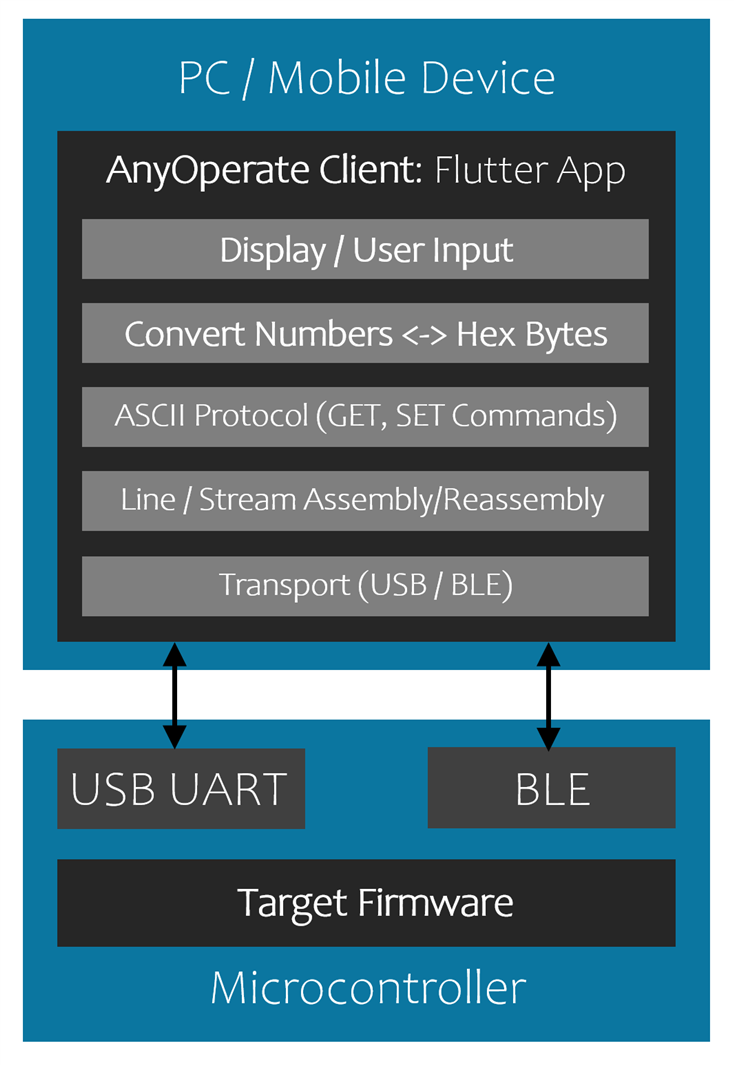
The diagram here shows what the app does internally. The app presents the user with a display of parameters and the user can edit them. Numbers are internally converted from user-friendly decimal values to more microcontroller-friendly hex bytes. Commands are created, such as GET temperature or SET relay1=ON and then are streamed over USB Serial or Bluetooth LE to the target microcontroller device.
The microcontroller firmware (not discussed in any detail here) would need to be developed to accept and respond to GET and SET commands, but also to respond to LIST commands with the list of supported parameters that the microcontroller firmware is willing to allow the AnyOperate app to view or modify. For instance, the microcontroller might respond with temperature|Temperature (deg C)|float and relay1|Main Relay|string.
Screens and their Classes
The AnyOperate app has five displayed screens. When launched, the user gets to choose whether they wish to use USB or Bluetooth (BLE) to connect to the microcontroller. Any found devices are displayed in a list. Next, the user can choose to view the microcontroller status, or make parameter (configuration) changes.
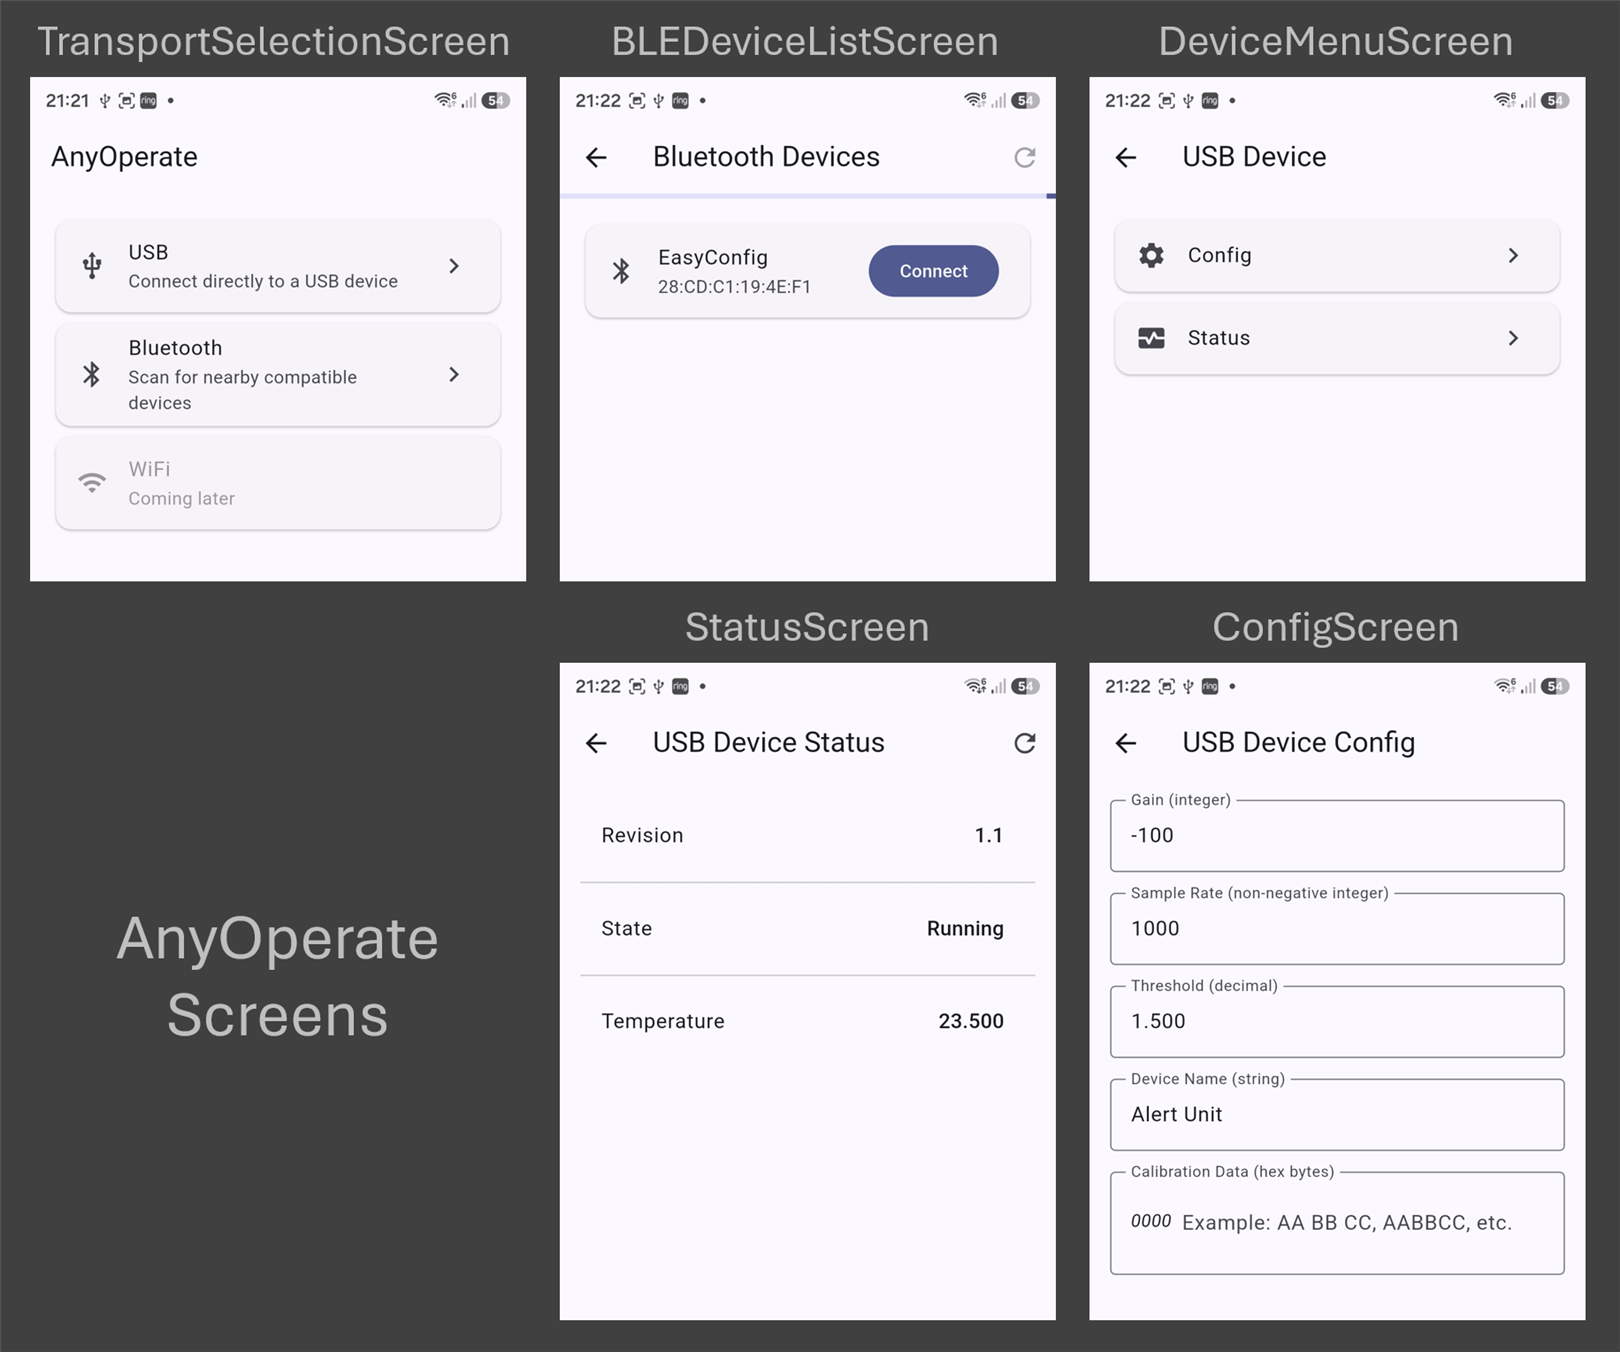
In the code, each screen resides in a separate .dart file, they are in the lib/screens folder. The class name for each screen is listed in the image above.
Each screen class inherits either StatefulWidget or StatelessWidget (most of them inherit StatefulWidget).
Protocol Overview
The protocol between AnyOperate and the microcontroller is text based. AnyOperate as a client initiates requests, and the microcontroller responds.
Here are some example commands, where, say, a microcontroller is being used to adjust the gain of an amplifier:
| Example | Command (Request) |
| Setting a gain value to -100 | $SET gain=0xFF9C\n |
| Retrieving the gain value | $GET gain\n |
The AnyOperate app queries all possible parameters by issuing $LIST CONFIG\n and $LIST STATUS\n requests, and the microcontroller needs to respond with three fields per perameter, for example:
gain|Gain|int16\n
The microcontroller also needs to respond to requests beginning with $CONNECT, with an OK\n response (this is for future use, where say a microcontroller may act as a interface to many other devices).
Note: This isn't a particularly brilliant protocol and may even fail spectacularly. It is fine for non-critical purposes, and easy to implement at the microcontroller end.
Block Diagram
The diagram here shows from the bottom-up, how the app functions. At the bottom, the serial data stream is of the format described above, in the Protocol Overview, but, since the actual transport method (e.g. BLE) might not support large volumes of content in one go, the protocol content is broken up into smaller fragments where needed. This is one reason why commands are sent with a special character such as $ at the beginning, and \n at the end.
The protocol transfers integers and floating point numbers as hexadecimal bytes (Big-endian order), which is ugly to use for an end user, hence a conversion is done between those bytes and a friendly decimal version, so that parameters can be nicely displayed and edited.

Main Function
The screenshot here shows the entire main.dart file contents (in lib/main.dart; recall from the earlier blog post, that most of the source code will be in the lib folder).
When the app is run, a ControlApp object is created, and passed to runApp. That tells Flutter to put ControlApp at the root of the tree.
ControlApp inherits (extends) StatelessWidget, and it contains a build function, which Flutter can call automatically as required, and that returns an object called MaterialApp, which then becomes the next node in the tree. The MaterialApp constructor accepts a home parameter, which happens to be an instance of a StatefulWidget inheriting class called TransportSelectionScreen, which also gets added to the tree. That’s it, the main function does nothing else.

We can now look to the transportSelectionScreen class, and, as is suspected, if it does indeed inherit StatefulWidget, then we expect to see a function called createState that Flutter will run when required, and that function will instantiate a State-inheriting class, and we can see what that State-inheriting class’ build function will add to the Widget tree.
Let’s Study a Screen
There are five screens in the current application; the first one is explained in a bit of detail here, and the remainder screens should become straightforward to follow.
As we expected, the TransportSelectionScreen class source overrides createState, which is responsible for creating an instance of _TransportSelectionScreenState which inherits State.
We can skip to the build function, and see that it will result in Widgets that visually look like tiles to be added to the Widget Tree.

When the USB tile is pressed, if the variable _connectingUsb is null then the function _useUsb() will execute, and when the BLE tile is pressed (not shown in the screenshot above but it is in the code), the function _useBluetooth() will execute.
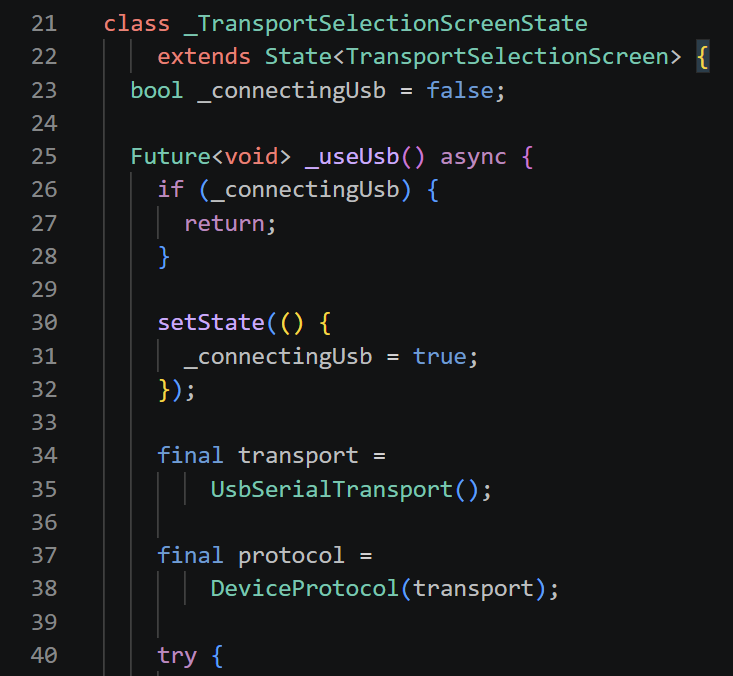
Focusing just on USB for now, we can now look through the rest of the class and see that _useUsb function begins with:
Future<void> _useUsb() async {
Future<> Objects and Asynchronous Functions
The Future<> class, and async functions, are concepts that many programming languages offer these days. What that means is that you’re declaring the function (or things that function calls) may contain bits of functionality that may take a long time to complete, so the system will suspend for that, and continue to run the rest of the app, with the understanding that the function will eventually return in the future (with a Future<void> object, i.e. no actual result value in this case).
Whenever the code might need to suspend, the await keyword is used, and it’s also used to pull out the returned value from the Future<> object. For instance, if there was a function defined as Future<int>fetchCount() then you could use the following code: int countResult = await fetchCount().
Exception Handling: Try..Catch..Finally Statements
Another concept worth being aware of is try..catch..finally. At a high level, as the code in the try block of code runs, if any part of that results in an error (known as throwing an exception, since code can literally include things like: throw Exception(‘no response!’)) then the remainder of the code in the try block is aborted, and the code in the catch block runs instead. The code in the finally block runs regardless of if an exception occurred or not.
The code screenshot below shows part of a try..catch..finally sequence in the _useUsb function. The open and connectDevice functions will execute in sequence, but if they internally suspend for a length of time, then the remainder of the application will continue to run even though the async function is paused.
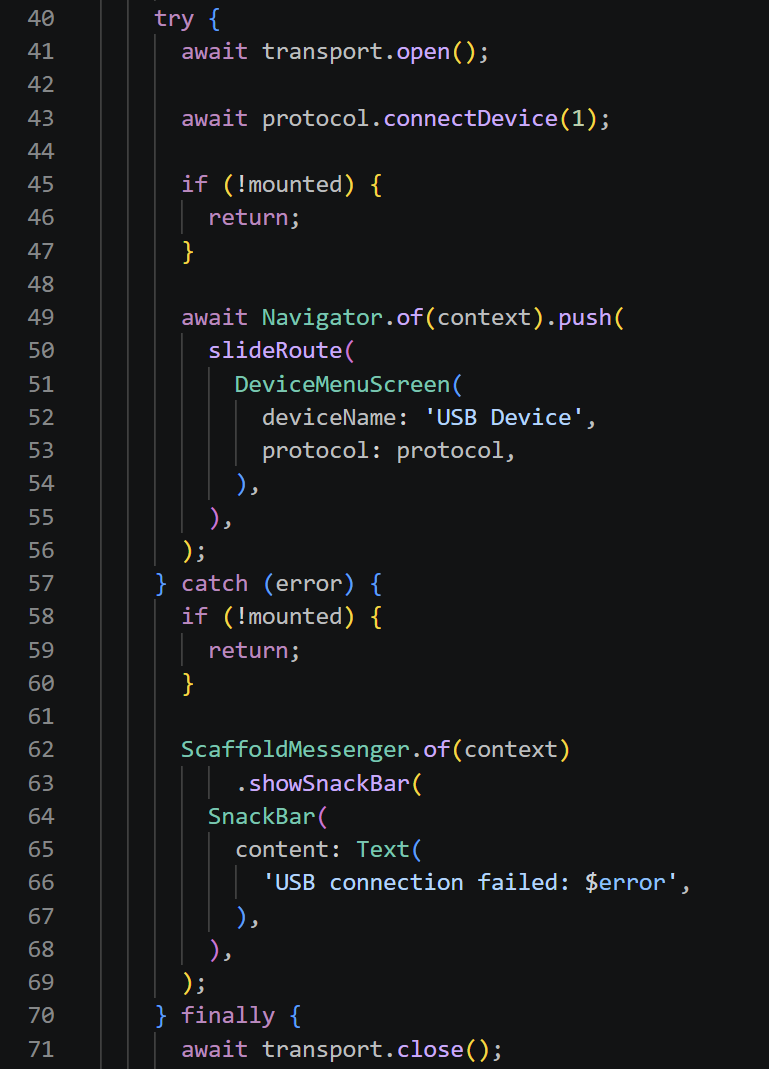
The if (!mounted) part of code is used a lot after await statements; while the function was suspended waiting for the Future, the screen's State might have been removed from the widget tree (say if the user navigated away while a device was still connecting) and then it could be necessary to abort running the remainder of the function, instead of trying to interact with a screen that no longer exists.
Navigator Stack
The bit of code starting with await Navigator.of(context).push is used to insert a route into the stack of screens (see the earlier blog for an explanation of this). In this code, slideRoute happens to be a template that adds a sliding animation to the transition, that part is not essential.
Widget Tree and Updates
Going back to the build function, there are some interesting things.
The ListTile widget can display several things from left to right, using leading, title/subtitle and trailing parameters. For the trailing portion, the code tests to see if _connectingUsb is true, and if it is, then a progress indicator is shown, otherwise, a right-arrow icon is displayed. This change will happen whenever the build function is executed by Flutter.

Flutter is aware of when the build function needs to execute, because the code calls the setState function whenever a variable that requires a display update is changed. You can put all those variable updates in a function passed as a parameter to setState, as shown in the screenshot below. Technically speaking, as far as I understand, you could just call setState and pass an empty function instead of one that modifies parameters, but placing all parameters there at least makes it clear that modifications to those parameters result in the build function executing.
An End-to-End User Interaction
The developer documentation contains some AI-generated mermaid sequence diagrams, which show in some detail how the app works.
For this blog post, I’ll explore how the USB connection gets selected and used. The rest of the app can be followed in a similar manner.

The sequence diagram above shows that when the user taps the USB tile that was in the TransportSelectionScreen set of widgets (actually in the _TransportSelectionScreenState class build function, since we’re inheriting from StatefulWidget), then the app needs to seek permission from the Android SDK to use the USB transport. In the code, that was achieved as part of await transport.open(). That open function is in the UsbSerialTransport class which can be found in a file in the lib/services folder. Notice that an exception can be ‘thrown’ (this was mentioned earlier too).

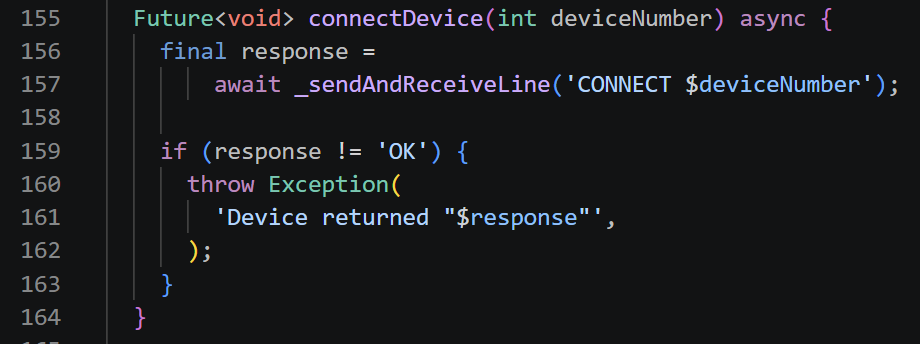
Skipping to the sixth arrow in the sequence diagram, we already saw in the code earlier that the code issues await protocol.connectDevice(1) and since this is protocol related, the class will most likely be in the lib/services folder. The relevant function in the DeviceProtocol class is shown below.
The protocol can be recognised from the string on line 157; the text “CONNECT 1” will ultimately be sent to the microcontroller, wrapped with $ and \n.
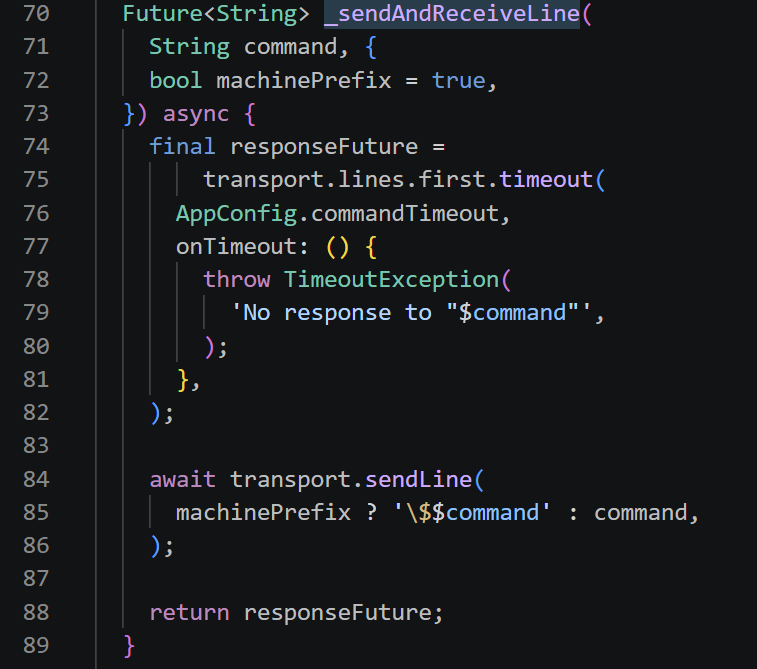
The next function that executes, _sendAndReceiveLine, has an unusual line transport.lines.first.timeout, and if you explore the code, you’ll see that transport references an object of type UsbSerialTransport.
Getters and Setters
The UsbSerialTransport class contains this interesting line of code:

This is a Dart way of specifying how a function can be used to retrieve or update (get or set!) a local variable. The code line can be interpreted as follows: Create a getter called lines, whose sole purpose is to return the local variable (an object in this case) _lineController.stream, and that will be an object of type Stream<string>.
So, whenever you wanted to obtain that object, you’d type something like:
Stream<String> responseStream = transport.lines;
Setters are a similar thing used to assign values/objects to variables belonging to some class.
Streams
A Stream<String> is like a pipe that passes multiple strings over time! One way to create that and feed strings into the pipe is by creating a StreamController object in the code, and then using its add function. On the receiving end of the pipe, you can pick off individual strings using Future<String> objects.
If you look at the _sendAndReceiveLine function in the screenshot further above, the transport.lines.first.timeout() function call now makes more sense. The return value is a Future<String> object, and first is a core function of Stream, that provides the object at the head of the pipe. A timeout is used so that an exception can be thrown if nothing arrives for ages (currently configured to be 1 sec; the microcontroller must respond in that time).
The code continues running (with just the promise that a Future<String> will eventually become available) and then the await transport.sendLine is used to send the text over the USB Serial connection (and suspend here and let other parts of the app continue running).
Next, the code suspends and waits at return responseFuture, until the promise is fulfilled and the head of the pipe provides the content for the Future<String> object to be returned. That, of course, occurs after the microcontroller gets around to building up a response to the “$CONNECT 1\n” request that was sent, and sends it over USB serial.
Serial Port Library: flserial
The application pubspec.yaml file (see pubspec documentation) was modified to specify a dependency:
flserial: ^0.7.3
The flserial library allows a developer to register callbacks that run whenever serial events occur. The flserial library happens to implement a Stream internally too. Instead of using first to pick off just the first item from the head of the serial data/events from that internal pipe, you can make an indefinite connection or subscription (to continuously receive serial events/data) by using the FlSerial object’s events.listen() function and register callbacks that will repeatedly get called as the pipe sees content arrive.
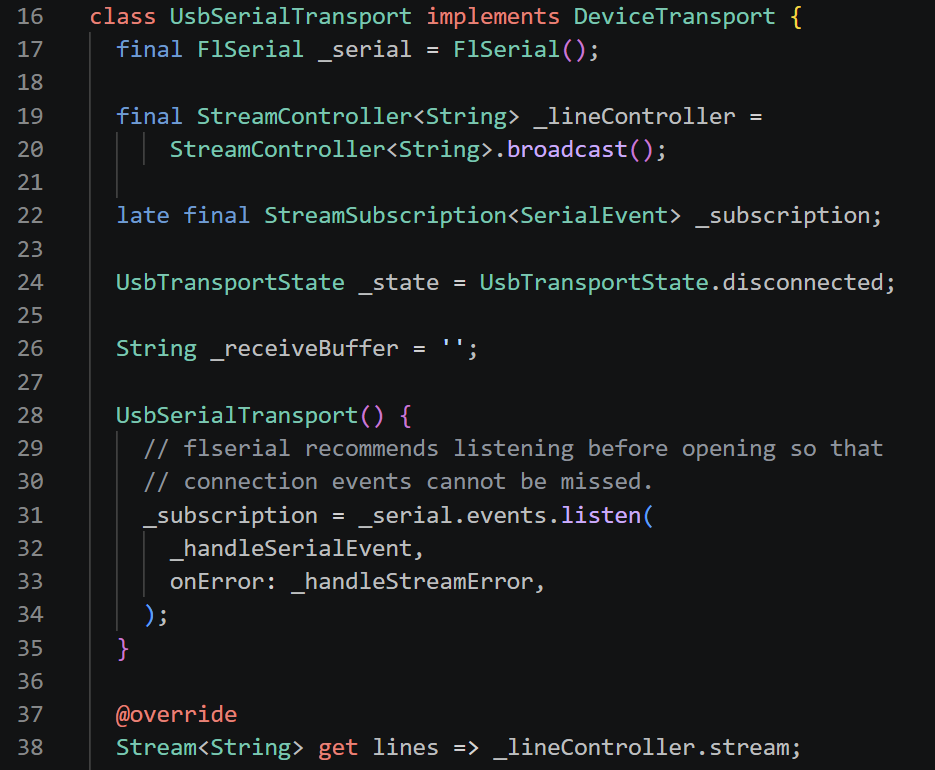
Incidentally, sending data via USB serial is easy; a write() function is available with the FlSerial object.
Line Reassembly and Feeding the Stream
If you look further at the source code file, you’ll see that the receiving data callback eventually executes _handleIncomingBytes, which appends whatever arrives to _receiveBuffer, until a \n character is observed. The text up to that is placed into a line variable, and then the add function mentioned previously, is used to feed the completed response text into the stream that was using the stream controller that we saw earlier, _lineController, which was a member field of UsbSerialTransport.

That’s it! That is hopefully a fairly complete understanding of how USB is used end-to-end, from button-tap to protocol request and response, within the app software.
See the AnyOperate Developer Documentation for fuller sequence diagrams, and an overview of the project and files structure, and what all the main classes and functions in the app do.
Building and Running the App
Assuming the PC is set up as discussed in the first blog post, and you have your mobile phone attached and set up in Developer mode, then from PowerShell, type the following flutter commands:
git clone https://github.com/shabaz123/AnyOperate.git
cd AnyOperate
flutter clean
flutter pub get
flutter run
Note: you may get errors depending on the setup; you may need to use Google or AI to resolve those. That’s the nature of the beast; the libraries, SDKs and developer build tools setup are all complex enough that there is bound to be the occasional unexpected issue to resolve. You may need to look at the error output text, possibly Google it, and see how to fix it. I’m still a beginner, so please let me know if you spot any significant issues and how they were resolved.
Ready-Built App
If you just wish to run a pre-built app, then download the .apk file onto your phone, and then select it using a file browser app and it should install (you may receive warnings about the app being a risk and you may need to temporarily disable some level of security (you can re-enable afterwards), I don’t know how to solve that yet! No one is forcing anyone to install the app of course, it’s down to your own level of comfort or discomfort.
Using the App
You’ll need to attach the phone to a microcontroller running firmware that can respond to commands. A very basic Pi Pico demo app is available: The Pi Pico code simply offers one variable, called duty. By changing the value (0-100), the Pi Pico LED will blink at that duty cycle.
Install the .uf2 firmware on a Pi Pico (this is a drag-and-drop operation with the Pi Pico), and the LED should start blinking.
Connect the Pi Pico via USB cable to the mobile phone, and run the AnyOperate software. Tap on USB, then tap Config, and a Duty Cycle configuration box should appear.
Summary
By the end of this long blog! you should be fairly confident looking through Flutter applications and broadly understand what they may be doing, and be able to modify or extend them.
An entire app was explored, by seeing how screens are created and added to the stack of them, and how events from the widget tree can cause callback functions to execute, and how screen-related classes that inherit from State and StatefulWidget construct parts of the widget tree, and update it by calling setState.
The Future<> object was covered, and asynchronous functions that can suspend execution while allowing the rest of the app to continue running.
Try..catch..finally and throw statements were introduced.
Information-passing was explored using streams. An entire message transaction was made possible by creating a promise of a result at the head of a stream, then meanwhile sending (writing) a request to the microcontroller via USB (using the flserial library) and suspending (for a specified timeout duration) until that return response from the microcontroller arrived.
The developer documentation indicates the protocol format and the BLE characteristic settings (if your microcontroller supports BLE).
The AnyOperate app can be easily tried out if you have an Android device that you are willing to temporarily relax install permissions on (I’m not encouraging or forcing anyone!) and if you have a Pi Pico board to run a demo app, that will allow the control of the duty cycle of a flashing LED. Pre-built app and firmware is available.
Next Steps
If you have tried Flutter/Dart or are hoping to (for any app, AnyOperate or otherwise), I’d be interested to hear what you think of it.
Flutter tips/tricks would be gratefully appreciated.
If you make improvements to AnyOperate, please share them!
Apologies if there are mistakes in this blog post; I used quite relaxed language in places and things might not be strictly accurate, or mistakes or misunderstandings might be made. Please let me know if you see anything non-trivial that needs changing.
Thanks for reading!

