


In this post, I write a C++ driver class for the Allegro A4988 stepper motor driver IC. I designed it originally for the Raspberry Pico. Later ported it to TI's MSPM0. This time, adapted for NXP's SDK.
I'm testing it with an NXP MCXN236 microcontroller, on shabaz' EZ-MCXN dev board.
This can be helpful to work with the stepper(s) of the Rise Of The Robots - Robotics Design Challenge.
This little library has two duties:
- control the enable and microstep settings of the A4988
- provide an object that makes enabling the driver easy and safe*.
* the pattern I used is Resource Acquisition is Initialization (RAII). You enable the driver by declaring an object. Once the object is out of scope, the driver disables itself.
This is useful for stepper motor designs. Leaving a driver enabled when the motor is not running can cause high currents, hot driver ICs and cooked motor coils.
Configuration
In this minimal configuration, the ~EN pin is used, and 3 MSx pins to configure microsteps. You 'll need 4 GPIO output pins. The driver code expects that all 4 are on the same GPIO port.

Set the initial state of N_ENABLE to 1. It's active low, and this takes care that the driver is disabled right at the initialisation part of your program.
Main code
This is the same program used in post EZ-MCXN: NXP MCXN326 C++ simple stepper motor controller , but now with support for the A4988 driver IC.
// physical stepper IC driver
import stepper_driver;          // wakeup class
import a4988_mcx;               // hw driver class
// mcxn pwm timer driver
import mcx_pwm_stepper_driver;

const uint32_t microstep_x = 1;

// object to manage the a4988 IC used for motor1
using driver_t = a4988_mcx::a4988_mcx;
driver_t driver1(BOARD_INITPINS_DRIVER_N_EN_PIN_PIN,
    BOARD_INITPINS_DRIVER_MS1_PIN_PIN, BOARD_INITPINS_DRIVER_MS2_PIN_PIN, BOARD_INITPINS_DRIVER_MS3_PIN_PIN,
    BOARD_INITPINS_DRIVER_N_EN_PIN_GPIO);

// ...

int main(void) {
    // ...

    // physical stepper IC driver
    driver1.init();
    driver1.microsteps(microstep_x);

    // ...


    while (1) {
        stepper_driver::wakeup w(driver1); // A4988 is enabled as long as the while loop runs
        // ... step
    }
}
A4988 driver class
Very similar to the Pico and MSPM0 version. Because this class only uses GPIO, I only need to change the GPIO SDK / API calls and datatypes.
Also similar to the other 2: the class is derived from an abstract stepper_driver class I wrote earlier. It provides the basics for enabling and microstepping.
class a4988_mcx: public stepper_driver::stepper_driver {
public:
    a4988_mcx( uint32_t n_enable, uint32_t ms1, uint32_t ms2,  uint32_t ms3, GPIO_Type *gpio) :
        n_enable_(n_enable), ms1_(ms1), ms2_(ms2), ms3_(ms3), gpio_(gpio) {}
    virtual inline  bool init() override {
        return true;
    }
    virtual bool microsteps(unsigned int microsteps) override {
        unsigned int mode = true;
        switch (microsteps) {
        case 1:
            mode = 0x0000;
            break;
        case 2:
            mode = 0x0001;
            break;
        case 4:
            mode = 0x0002;
            break;
        case 8:
            mode = 0x0003;
            break;
        case 16:
            mode = 0x0007;
            break;
        default:
            // TODO check: assert(false); // develop check unsupported microstep
            mode = 0x0000;
        }
        put(ms1_, mode & 0b001);
        put(ms2_, mode & 0b010);
        put(ms3_, mode & 0b100);
        return true;
    }
    virtual void enable(bool enable) override {
        put(n_enable_, enable? false : true);
    }

private:
    uint32_t n_enable_;
    uint32_t ms1_;
    uint32_t ms2_;
    uint32_t ms3_;
    GPIO_Type *gpio_;

    virtual void init_gpio() {
        // done by sysconfif
    }
    void put(uint32_t pin, bool set) {
        GPIO_PinWrite(gpio_, pin, set ? pin : 0U);
    }
}; // class a4988_mcx
Using the A4988 driver in your project
The code is hosted on GitHub. You can add it to your CMake project by adding these snippets:
set(CMAKE_CXX_FLAGS "${CMAKE_CXX_FLAGS} -fmodules-ts")

# ...

include(FetchContent)

FetchContent_Declare(stepper_driver
  GIT_REPOSITORY "https://github.com/jancumps/stepper_driver_lib.git"
  GIT_TAG "origin/main"
)
FetchContent_MakeAvailable(stepper_driver)

FetchContent_Declare(mcx_a4988
  GIT_REPOSITORY "https://github.com/jancumps/mcx_a4988_lib.git"
  GIT_TAG "origin/main"
  # prevent makefile execution (if any)
  SOURCE_SUBDIR =
)
FetchContent_MakeAvailable(mcx_a4988)

# ....

target_sources(${CMAKE_PROJECT_NAME}  # cpp modules
  PRIVATE
  FILE_SET cxx_modules TYPE CXX_MODULES FILES
  ${stepper_driver_SOURCE_DIR}/source/stepper_driver.cpp
  ${mcx_a4988_SOURCE_DIR}/source/a4988_mcx.cpp
)
CMake will resolve everything. No need to copy sources manually.
Connections
Most A4988 kits have digital pins on one side, power and motor connections on the other.
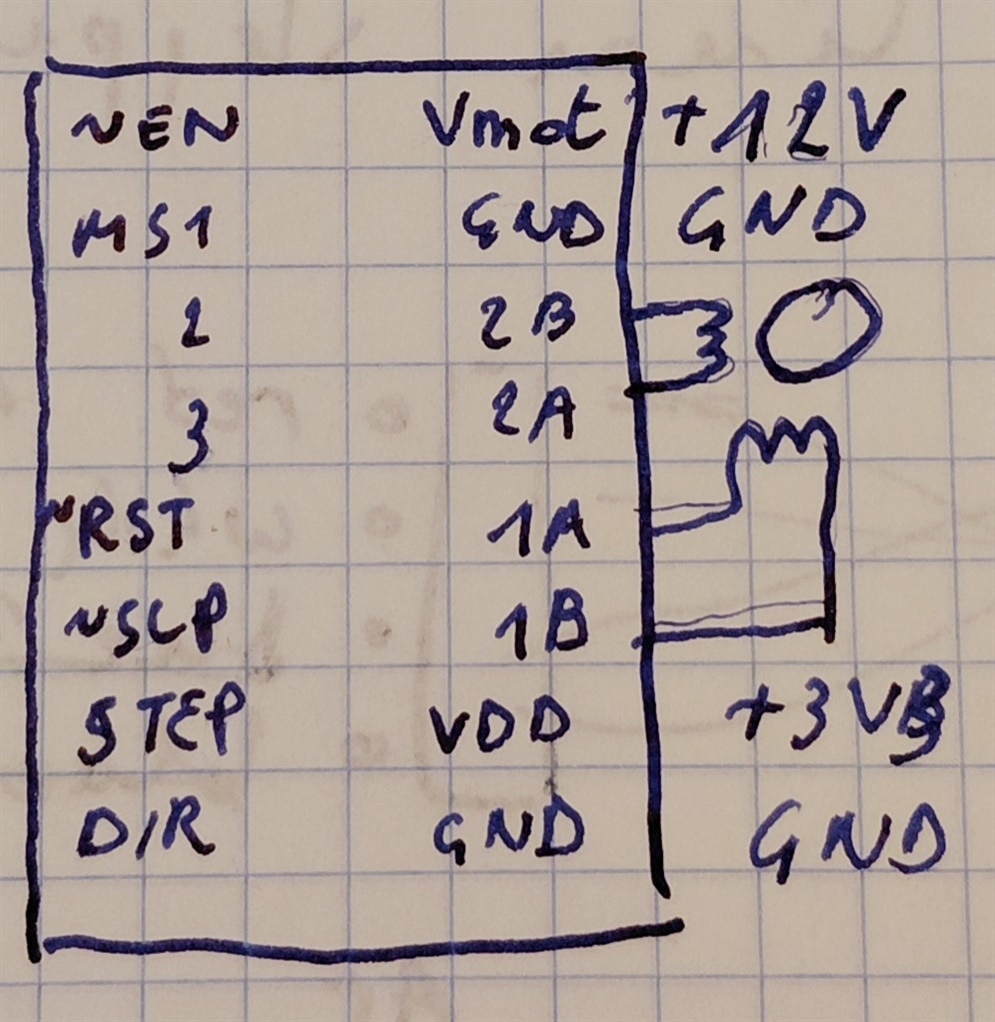
Connect ~EN and MS1.. 3 to the GPIO pins configured in the first section of this post. STEP and DIR to your step control pins (see EZ-MCXN: NXP MCXN326 C++ simple stepper motor controller )
VDD and GND have to go to your microcontroller board. Vmot and its ground are the motor power, and should come from a capable power supply.
I tied ~RST or ~SLP to VDD. Check the datasheet (A4988 ) if you have questions about the function of those pins.
VS Code project, including the C++ PWM driver from previous post: ez_mcxn_stepper_fixedspeed_20261120.zip
Thank you for reading
-

shabaz
-
Cancel
-
Vote Up
0
Vote Down
-
-
Sign in to reply
-
More
-
Cancel
Comment-

shabaz
-
Cancel
-
Vote Up
0
Vote Down
-
-
Sign in to reply
-
More
-
Cancel
Children