


In this blog series, I build a Texas Instruments MSPM0 example with VS Code as IDE, and CMake as build infrastructure.
In the previous posts, I created an end to end flow, from install over build to debug, tested on LaunchPad and EasyL1105 kit.
In post 6, I try to make an easy start point. An empty project, and the steps to adapt it for your project.
The previous posts tackled a few aspects at a time. And following them from start to end gives you a working project. This one is single shot: minimal steps, starting from a preconfigured template project.
This blog assumes that you have (see previous posts for detailed instructions):
- GCC cross compiler for arm (arm-none-eabi), V14.2 or higher.
- CMake 3.29 or higher
- Ninja v1.13.1 or higher.
- TI SysConfig
- mspm0 SDK 2.11 or higher
- Microsoft CMake Tookit for VS Code extension
- TI Embedded Development For VS Code
- TI Cortex-Debug: Device Support Pack - Texas Instruments MSPM0 (can be installed form TI Embedded Development)
- TI Embedded Debug for VS Code (can be installed form TI Embedded Development)
If you have a lower version of some components, you can try if it works. You may have to make some changes in that case.
It also assumes that you have these entries in your workspace settings (see previous posts for detailed instructions):
,
	"settings": {
		"cmake.cmakePath": "C:/Users/jancu/.pico-sdk/cmake/v4.2.1/bin/cmake.exe",
		"cmake.generator": "Ninja",
		"cmake.environment": {
			"CMAKE_PROGRAM_PATH": "C:/Users/jancu/.pico-sdk/ninja/v1.13.2/ninja.exe",
			"SYSCONFIG_CLI": "C:/ti/sysconfig_1.28.1/sysconfig_cli.bat",
			"SDK_ROOT": "C:/ti/mspm0_sdk_2_11_00_07"
		},
		"cmake.enableTraceLogging": false,
		"cmake.loggingLevel": "info",
		"ti-embedded-debug.armToolchainPath": "c:/Users/jancu/Documents/toolchains/arm-gnu-toolchain-15.2.rel1-mingw-w64-i686-arm-none-eabi/bin",
		"cortex-debug.armToolchainPath": "c:/Users/jancu/Documents/toolchains/arm-gnu-toolchain-15.2.rel1-mingw-w64-i686-arm-none-eabi/bin"
	}
|
If you happen to use the Raspberry Pico VS Code extension, you will already have GCC, CMake and Ninja. They are all installed by that extension. SysConfig can be downloaded from TI. You install the VS Code extensions in the IDE, like any other extension. |
You will have to adapt to your installation(s).
To get at the JSON file, select Settings -> Workspace -> Open Settings (JSON)
Those are the prereqs. Now we're ready for action. Let's call our project mspm0_e14.
1: download project and add it to your workspace
A zipped VS Code project is attached at the end of this post. Download and unzip it to a place of your choice.
- Rename the resulting folder to your project name: mspm0_e14.
- rename mspm0_empty.cpp to mspm0_e14.cpp
- rename mspm0_empty.syscfg to mspm0_e14.syscfg
- adapt .vscode/settings.json to your installation
- the SysConfig file is configured for a MSPM0L1306 Launchpad. Change that to your device via the SysConfig GUI.
In VS Code, select File -> Add Folder to Workspace, and select the mspm0_e14
If VS Code asks for the toolchain, select your cross compiler. If you don't do it now, you still have a chance to select (and change) in the next step.
2: Open the project in CMake Toolkit, configure, build
Select the CMake Toolkit, and select the folder you just added to the workspace.
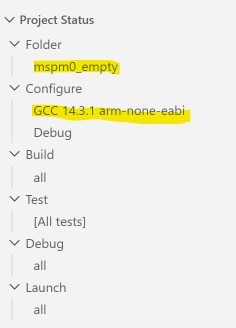
You can also change the toolchain if needed.
- Configure the project, by clicking on the button that appears when you hover over Configure.
- Then build, by clicking on the button that appears when you hover over Build.
The project will generate 2 firmware binaries. One for loading by a debugger, the other a .hex for shabaz' bootloader.
3: Debug
This step requires that you have a debugger, either on your LaunchPad, or a standalone XSD110
Select the VS Code Run and Debug button. There will be an entry for TI Embedded Debug.
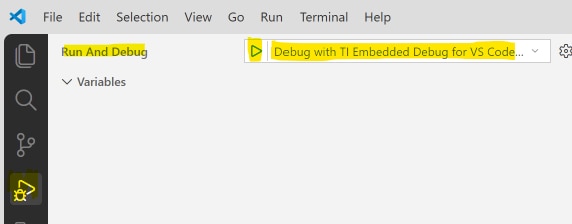
The debugger will stop at the first executable line of code in main()
4: make your own design
When step 1 - 3 work, you have a good baseline to start building your own design.
Use SysConfig to select and configure your peripherals (GPIO, I2C, UART, ...).
If you add files to your project, take care to add them to the CMakeLists.txt. Typically in this section:
If you add libraries via the SysConfig GUI, the CMake script will find them. If you want to add other libraries, adapt these two sections:
If you want a C main file, rename the .cpp file to .c, and change this entry in the CMake script:
Good luck!
attachment: the VS Code project mspm0_empty_20260912_01.zip
post 5: MSPM0 project with VS Code, CMake and GCC - part 5: Open .syscfg file in SysConfig GUI
example that uses the template: MSPM0 interrupt messaging system
part of the EasyL1105 series. all posts
Top Comments