element14 Community
element14 Community
    Register Log In
  • Site
  • Search
  • Log In Register
  • About Us
  • Community Hub
    Community Hub
    • What's New on element14
    • Feedback and Support
    • Benefits of Membership
    • Personal Blogs
    • Members Area
    • Achievement Levels
  • Learn
    Learn
    • Ask an Expert
    • eBooks
    • element14 presents
    • Learning Center
    • Tech Spotlight
    • STEM Academy
    • Webinars, Training and Events
    • Learning Groups
  • Technologies
    Technologies
    • 3D Printing
    • FPGA
    • Industrial Automation
    • Internet of Things
    • Power & Energy
    • Sensors
    • Technology Groups
  • Challenges & Projects
    Challenges & Projects
    • Design Challenges
    • element14 presents Projects
    • Project14
    • Arduino Projects
    • Raspberry Pi Projects
    • Project Groups
  • Products
    Products
    • Arduino
    • Avnet Boards Community
    • Dev Tools
    • Manufacturers
    • Multicomp Pro
    • Product Groups
    • Raspberry Pi
    • RoadTests & Reviews
  • Store
    Store
    • Visit Your Store
    • Choose another store...
      • Europe
      •  Austria (German)
      •  Belgium (Dutch, French)
      •  Bulgaria (Bulgarian)
      •  Czech Republic (Czech)
      •  Denmark (Danish)
      •  Estonia (Estonian)
      •  Finland (Finnish)
      •  France (French)
      •  Germany (German)
      •  Hungary (Hungarian)
      •  Ireland
      •  Israel
      •  Italy (Italian)
      •  Latvia (Latvian)
      •  
      •  Lithuania (Lithuanian)
      •  Netherlands (Dutch)
      •  Norway (Norwegian)
      •  Poland (Polish)
      •  Portugal (Portuguese)
      •  Romania (Romanian)
      •  Russia (Russian)
      •  Slovakia (Slovak)
      •  Slovenia (Slovenian)
      •  Spain (Spanish)
      •  Sweden (Swedish)
      •  Switzerland(German, French)
      •  Turkey (Turkish)
      •  United Kingdom
      • Asia Pacific
      •  Australia
      •  China
      •  Hong Kong
      •  India
      •  Korea (Korean)
      •  Malaysia
      •  New Zealand
      •  Philippines
      •  Singapore
      •  Taiwan
      •  Thailand (Thai)
      • Americas
      •  Brazil (Portuguese)
      •  Canada
      •  Mexico (Spanish)
      •  United States
      Can't find the country/region you're looking for? Visit our export site or find a local distributor.
  • Translate
  • Profile
  • Settings
Experts, Learning and Guidance
  • Technologies
  • More
Experts, Learning and Guidance
Ask an Expert Forum My pin crimping tips -- what are yours?
  • Blog
  • Forum
  • Documents
  • Leaderboard
  • Files
  • Members
  • Mentions
  • Sub-Groups
  • Tags
  • More
  • Cancel
  • New
Join Experts, Learning and Guidance to participate - click to join for free!
Actions
  • Share
  • More
  • Cancel
Forum Thread Details
  • State Verified Answer
  • Replies 26 replies
  • Answers 14 answers
  • Subscribers 292 subscribers
  • Views 10973 views
  • Users 0 members are here
  • pins
  • crimping
  • crimper
Related
See a helpful answer?

Be sure to click 'more' and select 'suggest as answer'!

If you're the thread creator, be sure to click 'more' then 'Verify as Answer'!

My pin crimping tips -- what are yours?

Sean_Miller
Sean_Miller over 5 years ago

I am a self taught pin crimper.  Sounds like a personal problem, I know.


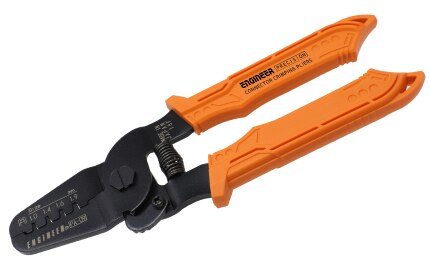
I have a crimper tool that looks like this:

imageimage

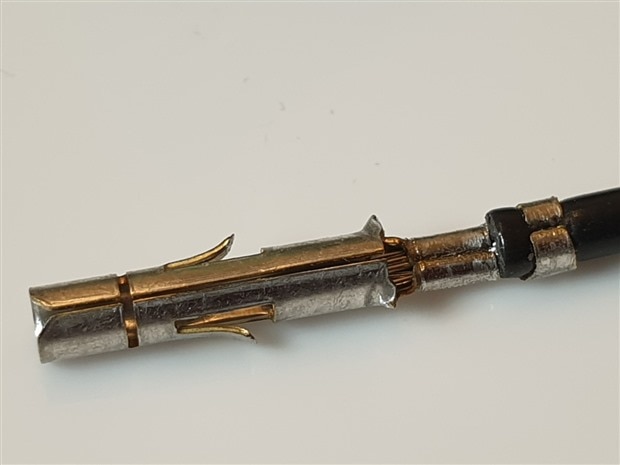
I use it to crimp pins for proto board soldered wire-to-board connectors that look like this:


image


At first, I was unhappy with the results due to the following results:

  • The wires would stab through the hole blocking the male end
  • I’d lose the pin from it falling off the cable before I could crimp it
  • the pins are hard to seat into the connector
  • the pins back out of the connector when connected to the male end
  • the wire breaks off at the base of the pin
  • the male pins would not want to stab into the female after everything was crimped and ready


<EDIT:  See this post below for the crowd improved troubleshooting guide:  https://www.element14.com/community/message/284233/l/re-my-pin-crimping-tips-what-are-yours#284233 >

Here's how I adjusted my approach:

IssueSolution
Wires stabbing through the holeI bend the wires back over the insulation
Dropping the pinI’d pre crimp the bottom with just my fingers to hold it in place.
Hard to seatAfter crimping the bottom of the crimp pin to the cable sheathing, I take a small plier to shape the female tip to remove any parts sticking out impeding entry into the plastic connector housing.
pins back outAfter adjusting the pin shape in the previous step, I pull up the tab that will catch inside the connector to prevent it from backing out.
the wire breaks offI stopped using jumper cables as the donor wire.  Instead, I use ribbon cable.
Male pins not fittingI use a single jumper male pin to pre stab in the female pins I just inserted into the connector to open it back up.


I now get reasonable results, but what bothers me is that I have to do all this.  I would think I could just crimp and insert and be done.


So, my question is, what are the community members experiences, steps, and tricks for using crimp pins?


Thanks,

Sean

  • Sign in to reply
  • Cancel

Top Replies

  • michaelkellett
    michaelkellett over 5 years ago in reply to fmilburn +6 suggested
    That's a good link , Frank. @Sean As you'll see from Frank's link, bending the inner back over the insulation is wrong. It sounds to me as if you are using the wrong tool for the crimp, and stripping off…
  • Sean_Miller
    Sean_Miller over 5 years ago in reply to fmilburn +6 suggested
    Thanks for linking that thread, Frank. All that shop talk was happening on my birthday. Funny thing was, I was probably trying to crimp pins and missed it. Looks like the one twist I had from Shabaz's…
  • fmilburn
    fmilburn over 5 years ago +5 suggested
    Hi Sean, My experience is similar to yours. There is a good discussion here: https://www.element14.com/community/message/276825/l/re-creating-dupont-equivalent-crimp-terminal#276825. Several people give…
  • jw0752
    0 jw0752 over 5 years ago

    Hi Sean,


    Thanks for posting your experience with these connectors. I have almost no experience with them so I can't be of any help but I am interested in learning so I have replied so I can follow any responses from our more experienced brothers.


    John

    • Cancel
    • Vote Up +3 Vote Down
    • Sign in to reply
    • Verify Answer
    • Cancel
  • fmilburn
    0 fmilburn over 5 years ago

    Hi Sean,


    My experience is similar to yours.  There is a good discussion here:  https://www.element14.com/community/message/276825/l/re-creating-dupont-equivalent-crimp-terminal#276825.  Several people give their experience including me.  Andreas Spiess has a youtube channel and has quite a bit on them as well.

    • Cancel
    • Vote Up +5 Vote Down
    • Sign in to reply
    • Verify Answer
    • Reject Answer
    • Cancel
  • michaelkellett
    0 michaelkellett over 5 years ago in reply to fmilburn

    That's a good link , Frank.


    @Sean As you'll see from Frank's link, bending the inner back over the insulation is wrong. It sounds to me as if you are using the wrong tool for the crimp, and stripping off too much insulation.


    The long stripped section is why you are poking the wire in too far.

    I suspect that backing out is caused by deforming the whole crimp, usually due to using the wrong tool.


    Having said all that, some crimps are just plain difficult, and unless you can afford a real tool (typically over £200 for once from the connector manufacturer) best left alone.


    I've had reasonable results with Molex KK types and Amp using cheapo tools.


    08-50-0032 -

    Contact, KKRegistered 254, KK 254 4809 Series, Socket, Crimp, 22 AWG, Tin Plated Contacts 


      image 


        Add to compare 


    Image is for illustrative purposes only. Please refer to product description.

    MOLEX


    Manufacturer:
    MOLEX 


    Manufacturer Part No:
    08-50-003


    TE Connectivity AMPMODU MOD II Female Crimp Terminal Contact 22AWG 181270-2181270-2

    • RS Stock No. 233-0038
    • Mfr. Part No. 181270-2181270-2 
    • Brand  TE Connectivity


    MK

    • Cancel
    • Vote Up +6 Vote Down
    • Sign in to reply
    • Verify Answer
    • Reject Answer
    • Cancel
  • Sean_Miller
    0 Sean_Miller over 5 years ago in reply to fmilburn

    Thanks for linking that thread, Frank.  All that shop talk was happening on my birthday.  Funny thing was, I was probably trying to crimp pins and missed it.


    Looks like the one twist I had from Shabaz's guide is how to use the second crimp zone.  I had evolved to bend the bare wire back on the insulation and use both crimp zones to grab the insulation to prevent the wire from breaking and to get more copper surface area contacted.  To see how they are mass produced, I just destroyed a store bought cable and did indeed find that the second crimp zone should be nothing but raw copper wire.  So, I updated my troubleshooting chart below.  Note, its not just for DuPont pins in mind, but variations.


    Pin Crimping Troubleshooting Guide

    Issue

    Solution

    Wires stabbing through the holeCut off enough insulation such that the cable insulation will sit at the base (outer) crimp zone and raw copper will be crimped in the next zone. If you have excess, "Double up" the excess to the raw copper zone or trim it to fit.  See next issue to prevent it from slipping forward prior to crimping.
    Dropping the pinPaying close attention to orientation of the pin in the jaws (it's designed to fit only one way), squeeze the pin by itself until one ratchet click.  Then, insert the wire.  Make sure the copper isn't too long, then squeeze all the way.
    Hard to seat in the housing

    The standard crimping tool is designed to go one way.  It has a recess on one so that the lower section of the pin crimps with a bigger diameter to accomodate for the insulation.  The upper section of the crimper jaw has a smaller diameter to grab the bare wire.  So, its imperative that you place the pin in the crimper such that each section is aligned with the tool correctly and no pin section overlap occurs in the center.  If not, you'll deform the pin such that it will give unpredictable results when trying to slide in the housing.


    If the pin is so small that it fits inside the width of the crimper, then you need to switch to a different style crimper such as the PA-09.  That style crimper doesn't have the offset and is designed to first squeeze the base of the pin at the insulation and then squeeze again at the next crimp section that is at the bare wire.


    After crimping, gently push the pin into its housing observing where any clearance issues may be.  If needed, take a small plier to shape any parts sticking out impeding entry.  This may be the case for the smaller pins or if your tool is slightly oversized than the pin your crimping.

    pins back out when making final connectionDepending on the pin, there may or may not be a tab that will click into an opening visible of its connector housing.  That needs pulled out a little if you did not get a confirmational click.  Other problems could be you simply have not inserted it all the way in so that the catch mechanism has had a chance to click into place.  Use a small flat tipped screwdriver to push the pin at its base into the housing further.  You may need to put the pin under a microscope to fully understand the latching design.  Note, most pins are designed to be oriented one way in the housing.  Getting this backwards will definitely cause it to push back out.
    the wire breaks off

    Some cables are designed to be very flexible, but require pins that provide substantial crimp contact area as well as a connector housing that provides stress relief (example, DuPont pins on jumper cable).  Such cables do poorly for pins that have tiny crimp contact area and no stress relief.  For these, try ribbon cable instead or provide stress relief using heat shrink over the crimp zone of each pin and outward at least 1/2".

    In general, don't over squeeze or squeeze too quickly as it can snap the insulation section.

    Male pins not fittingFor connectors used on 0.1" pitch headers, such as the Raspberry Pi, you may use a single jumper male pin to pre stab in the female pins prior to final assembly of the connector.  This will correct any distortions that may have occurred in the crimping process.  For other connectors, try a single male header pin to work each female pin individually.
    All otherPractice, Practice, Practice!


    After reading the other thread, coupled to my own experiences, I now feel confident I'm on the right track.  I had a good project yesterday that gave me plenty of practice on an assortment of the cheap chinese pins.  The results were custom sized, strong wire-to-board connectors that cleaned up the inside of the enclosure and are ready for the field.  The project will measure vessel growth due to thermal expansion over a 30 hour operational cycle.  This will allow me to locate vessel attachments without concern of clearance issues with its surroundings.


    Thanks!

    Sean

    • Cancel
    • Vote Up +6 Vote Down
    • Sign in to reply
    • Verify Answer
    • Reject Answer
    • Cancel
  • neilk
    0 neilk over 5 years ago

    My experience also similar to yours, as are the steps I take to try and get a good result!


    Sadly, I don't do enough to become slick at it, so each time I need to do it, I usually end up wasting 2 or 3 before I get a good result!


    Neil

    • Cancel
    • Vote Up +4 Vote Down
    • Sign in to reply
    • Verify Answer
    • Cancel
  • shabaz
    0 shabaz over 5 years ago

    Hi Sean,


    I've not found a universal tool, but I've got about three different ones, and between them I've so far got repeatable results for a good range of crimps. I'm sure there's other low-cost tools that are just as good or better, these are merely the ones I'm using:

    For the 0.1" pitch header pin sockets or pins, I'm at 100% repeatable results (unless I'm extremely careless) with the HT-225DHT-225D tool (some photos of how to use the tool, and the results on 0.1" crimps are in that other thread that Frank mentioned).

    It's also fine for other similarly-sized, and larger pins or sockets - it gives superb results with MATE'N'LOK crimps too (again 100% repeatable, with what looks to me like a great crimp and grip on the insulation; see photo below), which are intended for up to 19A.

    image


    For smaller than 0.1" pitch, e.g. JST ZH (as used on the BeagleBone-AI serial connector) then I had to resort to a PA-09 tool. That's a fairly low-cost tool, which is useful for the extremely small crimps (like 2mm pitch). It can do 0.1" pitch too, but HT-225DHT-225D is better for those since that has a proper ratchet action and simultaneously does the insulation as well as the conductor. With the PA-09, they have to be done separately.


    Finally from Fry's I've got this crimp tool: https://www.frys.com/product/1922790 which is sometimes handy if there's some unusual connector. It is intended for D-sub connectors but works with other stuff. I prefer the HT-225DHT-225D overall though.


    Here's how I try to resolve the issues you mention:

    1. Better accuracy with wire strip length, so that the wire doesn't go into the wrong area. Something like the Stripmaster LiteStripmaster Lite is great for thinner wires, or the Knipex tool here: Knipex Precision Wire Insulation Strippers Review - Model 12 12 06  because they strip the insulation fairly square, and repeatably. The Knipex tool has a depth stop, and I think the Stripmaster Lite may have that as an optional extra (otherwise it should be easy to 3D-print an attachment for it). The photo above shows a wire that was stripped with the Knipex tool, and the insulation is cut very square. I didn't set the depth stop correctly since the wire is protruding by about 1mm into the space where it shouldn't, but I don't think that has an impact for this particular connector. If the wire is extremely thin, then I may fold back and double the wire, but not over the insulation.

    2. I have no real solution to this, except either crimping the ratchet by one or two clicks so that the crimp is held in place and then I only need one hand on the tool and one hand guiding in the wire, or putting light pressure on the tool so that the crimp is held in place. In other words, the crimp is solely held by the tool, and that leaves me with one hand free to then insert the wire. With the HT-225DHT-225D, I can tell when the wire is inserted in to the correct depth, because I hold the tool at an angle and guide in the wire until I see a glint of the wire from the other side. Somehow that's quite repeatable, although it sounds like it shouldn't be : )

    3. I use your solution. It does sometimes happen, if the wire insulation is thicker than will easily fit into the plastic housing.

    4. This doesn't happen much, but your solution seems good (or push the latching plastic on the shell in slightly, if the shell has that feature.

    5. So far I don't see this issue too often, but for single jumper wires I like using heatshrink.

    6. So far I've not encountered this much (usually the crimp tool won't affect the working end of the crimp) but the solutions you mention seem good.

    • Cancel
    • Vote Up +4 Vote Down
    • Sign in to reply
    • Verify Answer
    • Reject Answer
    • Cancel
  • Andrew J
    0 Andrew J over 5 years ago

    I use both the crimp pins Shabaz mentions in the other thread as well as he Molex KK pins mentioned above and get good results with both.  The Molex pins requires specific KK series headers of course, which aren’t as cheap as the generic pin ones but shopping around helps.  I’ve also found them just as easy to insert/extract as the generic pins.


    The tool I use for both is one also recommended by Shabaz on a different thread which I will try and dig out and post a link to (EDIT: don’t need to, I see Shabaz has already linked it!)


    My recommendation from discussions on this community is to:

    • buy and use quality crimps - I.e. not cheap junk from eBay or Amazon, but name branded from somewhere like Farnell.
    • Also, a decent tool, again not an el-cheapo ‘kit’ tool from eBay or Amazon.  It doesn’t need to be a £250 manufacturer specific tool, just good quality with the right crimping die(s).
    • I struggled at first with correct insertion depth and wiring falling out but it’s important to follow manufacturer recommendations from their datasheet - the Amphenol and Molex ones all stated the amount of wire to strip.
    • To prevent falling-out, insert the crimp into the tool to the right depth then close one-click to grab it.  You then have a hand to operate the tool and a hand to insert the wire.  Observing from the other side of the tool to where you are inserting the wire you should be able to see the wire reach the right point and you can then ratchet it shut.
    • I had to practice a few times to get this right and because I don’t do it every day and won’t build up muscle memory, will expect to get it wrong once or twice when I next get around to it.
    • Cancel
    • Vote Up +4 Vote Down
    • Sign in to reply
    • Verify Answer
    • Reject Answer
    • Cancel
  • Sean_Miller
    0 Sean_Miller over 5 years ago in reply to Andrew J

    This is all great stuff.  At some point in the future, I'll turn this to a guide/blog and put it under Connectors with proper acknowledgements.


    I'm eager to try the one handed, single click trick.  Oddly, there's a satisfaction that comes with a well crafted, short board-to-board connector.  Same feeling as tying flies for fishing.


    See ya',

    Sean

    • Cancel
    • Vote Up +3 Vote Down
    • Sign in to reply
    • Verify Answer
    • Reject Answer
    • Cancel
  • koudelad
    0 koudelad over 5 years ago

    I personally tried about 3 types of crimp tools (mentioned above and in the linked discussion) in addition to just small pliers. However, I don't always have original DuPont connectors and even small differences mean crimping might go wrong. Or the crimp looks OK, but the connector can't be inserted to the housing.


    I haven't seen anyone recommending Engineer's crimp tools: ENGINEER INC. - PRECISION CONNECTOR CRIMPING PLIERS FOR NARROW-PITCH AND UNIVERSAL CRIMPING

    It is a universal tool, have a look at the application guide: ENGINEER INC. - PRECISION CONNECTOR CRIMPING PLIERS FOR NARROW-PITCH AND UNIVERSAL CRIMPING


    image


    It costs about €60. I use it for 2.54 mm connectors, but also made great crimps of JST 1.5 mm, 2.0 mm, 2.5 mm connectors. Specialized crimp tools for just one or two types were offered to us at work for about € 300.

    The downside is, you need to crimp every connector twice, the inner conductor first, the insulated part second.


    David

    • Cancel
    • Vote Up +2 Vote Down
    • Sign in to reply
    • Verify Answer
    • Reject Answer
    • Cancel
  • Sean_Miller
    0 Sean_Miller over 5 years ago in reply to koudelad

    The smallest pair of these are going on my Christmas list.  Thanks for sharing!  For me, the small pair of these along side the one I already have similar to the Shabaz link is all I will need for the hobby.


    I can see a plus side to crimping twice.  It might help prevent a problem I was having with the smaller pins - not aligning the pin perfectly in the die and crossing the offset - or, worse, complacently placing it in the crimper backwards altogether.  This results in smashed metal that held wire, but with a lot of distortion.


    See ya',

    -Sean

    • Cancel
    • Vote Up +3 Vote Down
    • Sign in to reply
    • Verify Answer
    • Cancel
>
element14 Community

element14 is the first online community specifically for engineers. Connect with your peers and get expert answers to your questions.

  • Members
  • Learn
  • Technologies
  • Challenges & Projects
  • Products
  • Store
  • About Us
  • Feedback & Support
  • FAQs
  • Terms of Use
  • Privacy Policy
  • Legal and Copyright Notices
  • Sitemap
  • Cookies

An Avnet Company © 2025 Premier Farnell Limited. All Rights Reserved.

Premier Farnell Ltd, registered in England and Wales (no 00876412), registered office: Farnell House, Forge Lane, Leeds LS12 2NE.

ICP 备案号 10220084.

Follow element14

  • X
  • Facebook
  • linkedin
  • YouTube