element14 Community
element14 Community
    Register Log In
  • Site
  • Search
  • Log In Register
  • About Us
  • Community Hub
    Community Hub
    • What's New on element14
    • Feedback and Support
    • Benefits of Membership
    • Personal Blogs
    • Members Area
    • Achievement Levels
  • Learn
    Learn
    • Ask an Expert
    • eBooks
    • element14 presents
    • Learning Center
    • Tech Spotlight
    • STEM Academy
    • Webinars, Training and Events
    • Learning Groups
  • Technologies
    Technologies
    • 3D Printing
    • FPGA
    • Industrial Automation
    • Internet of Things
    • Power & Energy
    • Sensors
    • Technology Groups
  • Challenges & Projects
    Challenges & Projects
    • Design Challenges
    • element14 presents Projects
    • Project14
    • Arduino Projects
    • Raspberry Pi Projects
    • Project Groups
  • Products
    Products
    • Arduino
    • Avnet Boards Community
    • Dev Tools
    • Manufacturers
    • Multicomp Pro
    • Product Groups
    • Raspberry Pi
    • RoadTests & Reviews
  • Store
    Store
    • Visit Your Store
    • Choose another store...
      • Europe
      •  Austria (German)
      •  Belgium (Dutch, French)
      •  Bulgaria (Bulgarian)
      •  Czech Republic (Czech)
      •  Denmark (Danish)
      •  Estonia (Estonian)
      •  Finland (Finnish)
      •  France (French)
      •  Germany (German)
      •  Hungary (Hungarian)
      •  Ireland
      •  Israel
      •  Italy (Italian)
      •  Latvia (Latvian)
      •  
      •  Lithuania (Lithuanian)
      •  Netherlands (Dutch)
      •  Norway (Norwegian)
      •  Poland (Polish)
      •  Portugal (Portuguese)
      •  Romania (Romanian)
      •  Russia (Russian)
      •  Slovakia (Slovak)
      •  Slovenia (Slovenian)
      •  Spain (Spanish)
      •  Sweden (Swedish)
      •  Switzerland(German, French)
      •  Turkey (Turkish)
      •  United Kingdom
      • Asia Pacific
      •  Australia
      •  China
      •  Hong Kong
      •  India
      •  Korea (Korean)
      •  Malaysia
      •  New Zealand
      •  Philippines
      •  Singapore
      •  Taiwan
      •  Thailand (Thai)
      • Americas
      •  Brazil (Portuguese)
      •  Canada
      •  Mexico (Spanish)
      •  United States
      Can't find the country/region you're looking for? Visit our export site or find a local distributor.
  • Translate
  • Profile
  • Settings
Experts, Learning and Guidance
  • Technologies
  • More
Experts, Learning and Guidance
Ask an Expert Forum How do you start up an untested circuit board?
  • Blog
  • Forum
  • Documents
  • Leaderboard
  • Files
  • Members
  • Mentions
  • Sub-Groups
  • Tags
  • More
  • Cancel
  • New
Join Experts, Learning and Guidance to participate - click to join for free!
Actions
  • Share
  • More
  • Cancel
Forum Thread Details
  • Replies 38 replies
  • Subscribers 287 subscribers
  • Views 7292 views
  • Users 0 members are here
  • testing
  • start-up
  • circuit board
Related
See a helpful answer?

Be sure to click 'more' and select 'suggest as answer'!

If you're the thread creator, be sure to click 'more' then 'Verify as Answer'!

How do you start up an untested circuit board?

fmilburn
fmilburn over 3 years ago

I've been known to throw a circuit together, apply power to it, and fry something.  Or the circuit just doesn't work and the problem could be anywhere in that mess of wiring.  But I used to work on complex and potentially hazardous projects where we couldn't afford those types of mistakes. There were mechanical, electrical, civil, chemical processing, and instrumentation disciplines, and towards the middle of the design specialists in commissioning and start-up were brought in.

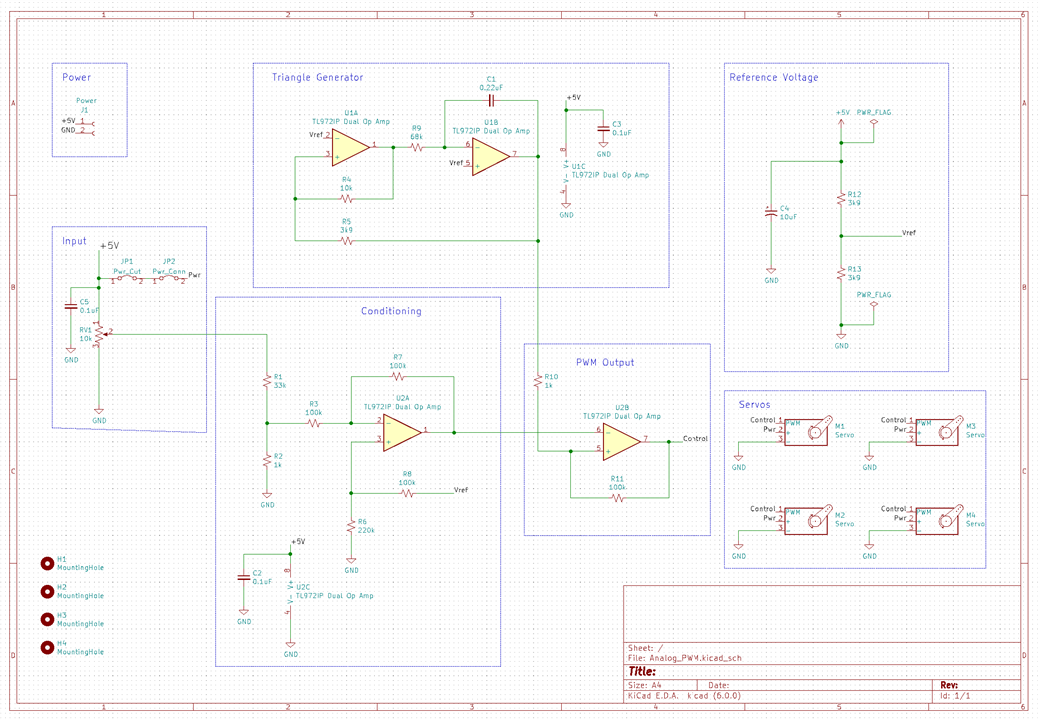
I recently sent out a PCB design for manufacture without prototyping it first.  The schematic is shown below but it is just an example.  My question is more general to starting up any untested circuits.

Schematic

Time for me to get my act together.  I put together a plan with the following approach:

  • Break the circuit into logical sections that can be tested sequentially
  • Describe the test plan for each section with the expected outcome
  • Solder it up a section at a time and test the section before moving on

The actual plan used is shown below.

Commissioning and Startup Plan

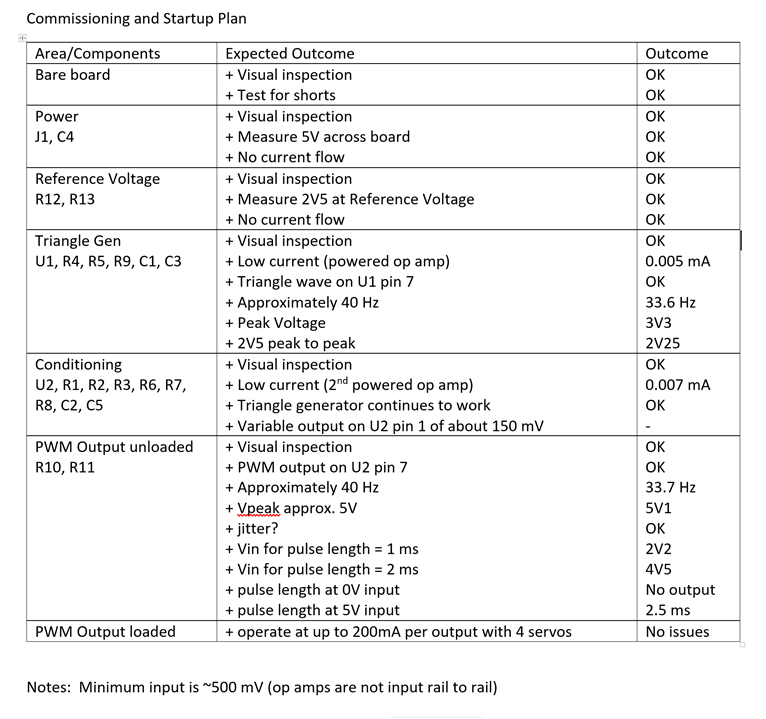
One lesson from this was that the test plan should have been made before the PCB was sent out which would have allowed for dedicated test points.  Not shown in the plan (but they should have been) are the bench power over-voltage and over-current settings.

Fortunately, this board went together and started up without a problem but it got me thinking.  What did I leave out?  What tips do you have for planning and starting up an untested circuit?  Do you know of any good resources on the web?

  • Sign in to reply
  • Cancel

Top Replies

  • michaelkellett
    michaelkellett over 3 years ago +5
    For production designs of products which will be small and use 0402 parts I often start with a development or prototype board based on 0603 minimum sizes. I use lots of test points for power and key…
  • wolfgangfriedrich
    wolfgangfriedrich over 3 years ago +4
    With the small footprints on ICs, one can often measure correct solder joints on digital IOs or generally all pins that have protection diodes built in. With the DMM set to diode forward voltage mode,…
  • fmilburn
    fmilburn over 3 years ago in reply to BigG +3
    I had the same questions on test points, although it isn't clearly stated. How many, where to put them, and what to measure is the main reason I developed the test plan. I did some internet searching before…
Parents
  • shabaz
    shabaz over 3 years ago

    Hi Frank,

    Interesting topic : ) A proper test plan for bring-up is an excellent idea, and the table looks very good. It is sometimes very easy to design oneself into a hole, with a board that is not easily testable : ) so thinking it through like this makes a lot of sense.

    Prior to PCB testing, I try (although admittedly not always) to test all the bits I'm unsure of (either real or use a dev-board, or simulate), before creating the PCB, i.e. I end up with a lot of scraps of stripboard/perfboard etc. But I also scavenge the parts off them once the PCBs arrive.
    Sometimes I can't do this, especially recently, where I'm waiting a month or longer for parts to arrive from China, and I sonetimes have to just take the leap, sometimes even just going by measurements of pixels from photos of the parts, to get the dimensioning approximately right. This is only for hobby stuff of course.
    For the PCB, in terms of test points, zero-ohm resistors can also be handy for isolating circuits on a board (in third place to 100k and 10k resistors, they are the next most-used resistor for me. I try not to connect inputs/outputs from subsystems on a circuit board together without a resistor in-between, for allowing the isolation, unless I'm certain the circuit portion will work. For digital circuits, I might use a resistor instead of tying pins high or low, in case something else needs to be patched. I don't always do that, but sometimes it's handy. Also I'll sometimes add a resistor in-line, it is usually benign (might help with matching impedances a bit occasionally) but saves too much damage if things get shorted, or if two outputs are accidentally connected together, e.g. RX/TX lines, since sometimes it's easy to get that wrong in a design. Ferrite bead chips are also handy for isolating power to portions of circuitry on a board too, i.e. there's usually no harm to add that in on supply lines to chips. That way, even if a lot of the board is assembled, it is still possible to power off portions for testing (provided inputs/outputs do not cause an issue), or to current-limit using a resistor.
    It is also good to stick a polyfuse on each board, especially if it's expensive, I don't do that much on cheap hobby projects, but for the small cost it's worth it for a bit more peace of mind on more expensive boards. With test wires or metal chassis everywhere, it's too easy to accidentally short things, so that bit of extra protection from the polyfuse could help.

    EDIT: Also test code helps : ) It is handy to have debug code, extra print statements with a debug flag, to troubleshoot the code and hardware.

    • Cancel
    • Vote Up +2 Vote Down
    • Sign in to reply
    • Cancel
Reply
  • shabaz
    shabaz over 3 years ago

    Hi Frank,

    Interesting topic : ) A proper test plan for bring-up is an excellent idea, and the table looks very good. It is sometimes very easy to design oneself into a hole, with a board that is not easily testable : ) so thinking it through like this makes a lot of sense.

    Prior to PCB testing, I try (although admittedly not always) to test all the bits I'm unsure of (either real or use a dev-board, or simulate), before creating the PCB, i.e. I end up with a lot of scraps of stripboard/perfboard etc. But I also scavenge the parts off them once the PCBs arrive.
    Sometimes I can't do this, especially recently, where I'm waiting a month or longer for parts to arrive from China, and I sonetimes have to just take the leap, sometimes even just going by measurements of pixels from photos of the parts, to get the dimensioning approximately right. This is only for hobby stuff of course.
    For the PCB, in terms of test points, zero-ohm resistors can also be handy for isolating circuits on a board (in third place to 100k and 10k resistors, they are the next most-used resistor for me. I try not to connect inputs/outputs from subsystems on a circuit board together without a resistor in-between, for allowing the isolation, unless I'm certain the circuit portion will work. For digital circuits, I might use a resistor instead of tying pins high or low, in case something else needs to be patched. I don't always do that, but sometimes it's handy. Also I'll sometimes add a resistor in-line, it is usually benign (might help with matching impedances a bit occasionally) but saves too much damage if things get shorted, or if two outputs are accidentally connected together, e.g. RX/TX lines, since sometimes it's easy to get that wrong in a design. Ferrite bead chips are also handy for isolating power to portions of circuitry on a board too, i.e. there's usually no harm to add that in on supply lines to chips. That way, even if a lot of the board is assembled, it is still possible to power off portions for testing (provided inputs/outputs do not cause an issue), or to current-limit using a resistor.
    It is also good to stick a polyfuse on each board, especially if it's expensive, I don't do that much on cheap hobby projects, but for the small cost it's worth it for a bit more peace of mind on more expensive boards. With test wires or metal chassis everywhere, it's too easy to accidentally short things, so that bit of extra protection from the polyfuse could help.

    EDIT: Also test code helps : ) It is handy to have debug code, extra print statements with a debug flag, to troubleshoot the code and hardware.

    • Cancel
    • Vote Up +2 Vote Down
    • Sign in to reply
    • Cancel
Children
  • fmilburn
    fmilburn over 3 years ago in reply to shabaz

    Hi Shabaz,

    Those are all great suggestions.  I especially like the concept of modeling/testing things beforehand and isolating circuits with zero-ohm resistors.  Can you give an example of a case where you would consider adding a resistor in-line and how you would size it?  I've thought about adding a polyfuse but haven't done that to date.  Ferrite beads are another thing I haven't tried.

    • Cancel
    • Vote Up +2 Vote Down
    • Sign in to reply
    • Cancel
  • shabaz
    shabaz over 3 years ago in reply to fmilburn

    Hi Frank, 

    For digital logic 33 ohm is often typical (at the output end of the wire), apparently that's good to prevent reflections bouncing.. often I won't over-think it and will just put in a 100 ohm resistor, and see what happens. It will limit current to 33 mA max with 3.3V logic, so it's unlikely to damage chips if an output is accidentally shorted or two outputs are mistakenly connected together, but will hardly slow things down either.

    For surface mount, 1206 size is pretty good to select for polyfuses, there's a nice selection then at current ratings which are typical for semiconductor circuits. For ferrite beads, there are curves to indicate the expected impedance at different frequencies, but some datasheets only specify one frequency, in either case I just go for one with high impedance at that frequency... 0805 size is handy, and 600 ohm @ 100 MHz is a typical value feasible for them.. they may have 10 ohm or so at 10 MHz from memory. I used this one: HZ0805E601R-10 but I was running low on them and they are out of stock, so this time ordered PE-0805FB601ST which is similar. They can be treated like a zero-ohm resistor on power lines, but act as a higher value resistor for all the noise on the power line, so they are nicer than a real zero-ohm resistor for power lines, and the same/similar price.

    • Cancel
    • Vote Up +1 Vote Down
    • Sign in to reply
    • Cancel
  • fmilburn
    fmilburn over 3 years ago in reply to shabaz

    Thanks Shabaz,

    Got it and thanks for the clear explanations. I suppose I have been getting away without some of these things as my circuits are not critical and are low speed. But then again I have a box of things I never made work as well. 

    • Cancel
    • Vote Up 0 Vote Down
    • Sign in to reply
    • Cancel
element14 Community

element14 is the first online community specifically for engineers. Connect with your peers and get expert answers to your questions.

  • Members
  • Learn
  • Technologies
  • Challenges & Projects
  • Products
  • Store
  • About Us
  • Feedback & Support
  • FAQs
  • Terms of Use
  • Privacy Policy
  • Legal and Copyright Notices
  • Sitemap
  • Cookies

An Avnet Company © 2025 Premier Farnell Limited. All Rights Reserved.

Premier Farnell Ltd, registered in England and Wales (no 00876412), registered office: Farnell House, Forge Lane, Leeds LS12 2NE.

ICP 备案号 10220084.

Follow element14

  • X
  • Facebook
  • linkedin
  • YouTube