element14 Community
element14 Community
    Register Log In
  • Site
  • Search
  • Log In Register
  • Community Hub
    Community Hub
    • What's New on element14
    • Feedback and Support
    • Benefits of Membership
    • Personal Blogs
    • Members Area
    • Achievement Levels
  • Learn
    Learn
    • Ask an Expert
    • eBooks
    • element14 presents
    • Learning Center
    • Tech Spotlight
    • STEM Academy
    • Webinars, Training and Events
    • Learning Groups
  • Technologies
    Technologies
    • 3D Printing
    • FPGA
    • Industrial Automation
    • Internet of Things
    • Power & Energy
    • Sensors
    • Technology Groups
  • Challenges & Projects
    Challenges & Projects
    • Design Challenges
    • element14 presents Projects
    • Project14
    • Arduino Projects
    • Raspberry Pi Projects
    • Project Groups
  • Products
    Products
    • Arduino
    • Avnet & Tria Boards Community
    • Dev Tools
    • Manufacturers
    • Multicomp Pro
    • Product Groups
    • Raspberry Pi
    • RoadTests & Reviews
  • About Us
    About the element14 Community
  • Store
    Store
    • Visit Your Store
    • Choose another store...
      • Europe
      •  Austria (German)
      •  Belgium (Dutch, French)
      •  Bulgaria (Bulgarian)
      •  Czech Republic (Czech)
      •  Denmark (Danish)
      •  Estonia (Estonian)
      •  Finland (Finnish)
      •  France (French)
      •  Germany (German)
      •  Hungary (Hungarian)
      •  Ireland
      •  Israel
      •  Italy (Italian)
      •  Latvia (Latvian)
      •  
      •  Lithuania (Lithuanian)
      •  Netherlands (Dutch)
      •  Norway (Norwegian)
      •  Poland (Polish)
      •  Portugal (Portuguese)
      •  Romania (Romanian)
      •  Russia (Russian)
      •  Slovakia (Slovak)
      •  Slovenia (Slovenian)
      •  Spain (Spanish)
      •  Sweden (Swedish)
      •  Switzerland(German, French)
      •  Turkey (Turkish)
      •  United Kingdom
      • Asia Pacific
      •  Australia
      •  China
      •  Hong Kong
      •  India
      •  Japan
      •  Korea (Korean)
      •  Malaysia
      •  New Zealand
      •  Philippines
      •  Singapore
      •  Taiwan
      •  Thailand (Thai)
      •  Vietnam
      • Americas
      •  Brazil (Portuguese)
      •  Canada
      •  Mexico (Spanish)
      •  United States
      Can't find the country/region you're looking for? Visit our export site or find a local distributor.
  • Translate
  • Profile
  • Settings
Internet of Things
  • Technologies
  • More
Internet of Things
Blog ESP8266 developing using an Arduino
  • Blog
  • Forum
  • Documents
  • Quiz
  • Events
  • Polls
  • Members
  • Mentions
  • Sub-Groups
  • Tags
  • More
  • Cancel
  • New
Join Internet of Things to participate - click to join for free!
  • Share
  • More
  • Cancel
Group Actions
  • Group RSS
  • More
  • Cancel
Engagement
  • Author Author: camuyano
  • Date Created: 4 Nov 2014 10:00 PM Date Created
  • Views 4995 views
  • Likes 2 likes
  • Comments 23 comments
  • wifi
  • internet_of_things
  • esp8266
  • iot
  • arduino
Related
Recommended

ESP8266 developing using an Arduino

camuyano
camuyano
4 Nov 2014

Currently I am playing with the ESP8266 WIFI module as many others are. Since I want to create some Arduino libraries for it, I am in the need to do some debugging. The Arduino only has one hardware UART. And if you wire anything to the atmega UART port you may run into problems when downloading new code to the Arduino. The Arduino programs the atmega via the hardware UART port and if something is connected it may cause trouble. For downloading you end up disconnecting and reconnecting the ESP module without mentioned that you loose the ability to use the Serial Console for debugging.


To solve this situation I now am using the SoftwareSerial library. Before all this I updated the ESP8266 firmware and the default baud rate is 9600 which is fine for the SoftwareSerial library.

My current setup is:

1. ESP8266 (ESP02) connected to a level shifter (to make 3.3V talks to the Arduino 5V). The level shifter I am using is a 74HC4050N hex non inverting buffer.

2. Wire pin 10, 11 via the level shifter to the ESP8266

3. Load a modified SoftwareSerial echo example to allow me to send serial commands from the Serial Monitor window to the ESP8266 via the arduino. Here is the link to the Arduino code for software echo.

I had it all wired without a level shifter but the SoftwareSerial library responded always like there were data available to receive when there were none. By using the level shifter all that "noise" went away and now I have a clean communication.image
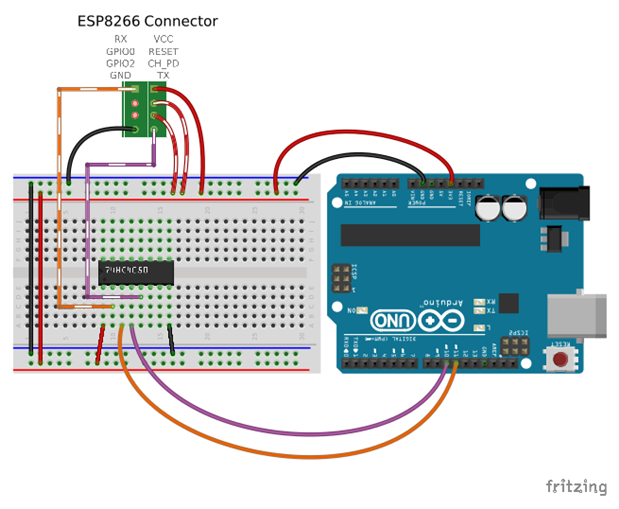
 

What the code do is just wait for anything from the UART serial port and sends it via the SoftwareSerial port (pins 10,11) and back. This way I can upload new code to the Arduino, talk to the ESP8266 and get debug messages via the Serial console without having to rewire things.

I am just starting to use this module, but it looks very interesting. Just wanted to share my current setup in case anyone wants to code for the Arduino and ran into the same problem I did.


Sorry that my diagram do not have a pretty ESP8266 module drawing but you get the idea. Use the legend above the green connector to match your module.


Update:

With this same thinking I decided to try a more "permanent solution". So I am in the process of building an interface prototype board for this module. I decided to build a dedicated interface circuit board (no breadboard prototype, straight to production). I blogged about it here if you care.


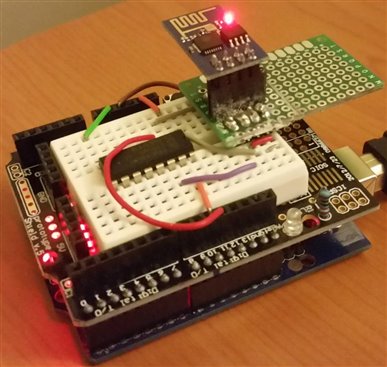
This is how this setup looks in real life:
image


Note:

Verify your Arduino version maximun 3.3V supply current. The official Arduino Uno R3 can supply something like 150mA tops and that is not enough to make the ESP8266 work always. It may power up but not much more. Arduino compatible boards or clones may have different hardware with more power ratings. If not available then my recommendation is to get an external power source or to reduce the 5V power to 3.3V.

  • Sign in to reply

Top Comments

  • e14 Contributor
    e14 Contributor over 11 years ago +1
    Thanks, it is a good starting point for beginners with ESP8266
  • mcb1
    mcb1 over 11 years ago in reply to scargill +1
    Peter Mohan has provided the datasheet link. https://anibit.com/sites/default/files/product_files/ESP8266_Specifications_English.pdf Unless an IC is specifically designed, it's never a good idea to apply…
  • e14 Contributor
    e14 Contributor over 11 years ago in reply to camuyano

    I've tried with my mini pro 3v3 clone. Still no luck in talking with the ESP. I can send commands to the module, I can see the blue led light up when transmitting data, but the response I get to AT+RST command is always (int value) 255 255 255 255. RESET and CH_PD pin are connected to the VCC pin

    On other commands I get more or less same meaningless data.

    Maybe an upgrade of the firmware can solve the issue?

    • Cancel
    • Vote Up 0 Vote Down
    • Sign in to reply
    • More
    • Cancel
  • camuyano
    camuyano over 11 years ago in reply to e14 Contributor

    As Peter said, you only need level shifting when interfacing with 5v device. A level shifting circuit can be achieve by a lot of methods, from two simple resistors or zenner diodes, no inventing level shifter IC, some transistor, etc. Search for level shifting and choose the one you can make with the hardware you have.

    The official Arduino may not be capable to provice enough 3.3v to power the module but some of the Arduino clones can. Also there are Arduino compatible boards that runs on 3.3V and you will no need to do any kind of shifting.

    • Cancel
    • Vote Up 0 Vote Down
    • Sign in to reply
    • More
    • Cancel
  • Problemchild
    Problemchild over 11 years ago in reply to scargill

    I was up the Wrekin  reading this post this morning it was still -2 ish so was thinking of the balmy 0 degree weather you are having image

    • Cancel
    • Vote Up 0 Vote Down
    • Sign in to reply
    • More
    • Cancel
  • scargill
    scargill over 11 years ago in reply to Problemchild

    Not an accident John but a lot simpler than it looks. Last time I was in Spain (we have a house out in the wilds) I took the photo.. and it is the screen backdrop on my high-res PC screen. I stuck my hand in front of the screen with LED lighting lighting up my hand.. and took the photo :-)


    I agree it would have been more dynamic to actually be standing out in the country but this way was easier - and given that it's zero centigrade (freezing) in the UK right now, a lot more practical :-)

    • Cancel
    • Vote Up 0 Vote Down
    • Sign in to reply
    • More
    • Cancel
  • Problemchild
    Problemchild over 11 years ago in reply to scargill

    What are you doing with that module there Peter it looks like you put it at the focal point of a dish point out across the bay or was that just an accidental photo ?

    • Cancel
    • Vote Up 0 Vote Down
    • Sign in to reply
    • More
    • Cancel
<>
element14 Community

element14 is the first online community specifically for engineers. Connect with your peers and get expert answers to your questions.

  • Members
  • Learn
  • Technologies
  • Challenges & Projects
  • Products
  • Store
  • About Us
  • Feedback & Support
  • FAQs
  • Terms of Use
  • Privacy Policy
  • Legal and Copyright Notices
  • Sitemap
  • Cookies

An Avnet Company © 2026 Premier Farnell Limited. All Rights Reserved.

Premier Farnell Ltd, registered in England and Wales (no 00876412), registered office: Farnell House, Forge Lane, Leeds LS12 2NE.

Follow element14

  • X
  • Facebook
  • linkedin
  • YouTube