element14 Community
element14 Community
    Register Log In
  • Site
  • Search
  • Log In Register
  • Community Hub
    Community Hub
    • What's New on element14
    • Feedback and Support
    • Benefits of Membership
    • Personal Blogs
    • Members Area
    • Achievement Levels
  • Learn
    Learn
    • Ask an Expert
    • eBooks
    • element14 presents
    • Learning Center
    • Tech Spotlight
    • STEM Academy
    • Webinars, Training and Events
    • Learning Groups
  • Technologies
    Technologies
    • 3D Printing
    • FPGA
    • Industrial Automation
    • Internet of Things
    • Power & Energy
    • Sensors
    • Technology Groups
  • Challenges & Projects
    Challenges & Projects
    • Design Challenges
    • element14 presents Projects
    • Project14
    • Arduino Projects
    • Raspberry Pi Projects
    • Project Groups
  • Products
    Products
    • Arduino
    • Avnet Boards Community
    • Dev Tools
    • Manufacturers
    • Multicomp Pro
    • Product Groups
    • Raspberry Pi
    • RoadTests & Reviews
  • Store
    Store
    • Visit Your Store
    • Choose another store...
      • Europe
      •  Austria (German)
      •  Belgium (Dutch, French)
      •  Bulgaria (Bulgarian)
      •  Czech Republic (Czech)
      •  Denmark (Danish)
      •  Estonia (Estonian)
      •  Finland (Finnish)
      •  France (French)
      •  Germany (German)
      •  Hungary (Hungarian)
      •  Ireland
      •  Israel
      •  Italy (Italian)
      •  Latvia (Latvian)
      •  
      •  Lithuania (Lithuanian)
      •  Netherlands (Dutch)
      •  Norway (Norwegian)
      •  Poland (Polish)
      •  Portugal (Portuguese)
      •  Romania (Romanian)
      •  Russia (Russian)
      •  Slovakia (Slovak)
      •  Slovenia (Slovenian)
      •  Spain (Spanish)
      •  Sweden (Swedish)
      •  Switzerland(German, French)
      •  Turkey (Turkish)
      •  United Kingdom
      • Asia Pacific
      •  Australia
      •  China
      •  Hong Kong
      •  India
      •  Korea (Korean)
      •  Malaysia
      •  New Zealand
      •  Philippines
      •  Singapore
      •  Taiwan
      •  Thailand (Thai)
      • Americas
      •  Brazil (Portuguese)
      •  Canada
      •  Mexico (Spanish)
      •  United States
      Can't find the country/region you're looking for? Visit our export site or find a local distributor.
  • Translate
  • Profile
  • Settings
Internet of Things
  • Technologies
  • More
Internet of Things
Blog How to setup a home automation server with EnOcean Pi
  • Blog
  • Forum
  • Documents
  • Quiz
  • Events
  • Polls
  • Members
  • Mentions
  • Sub-Groups
  • Tags
  • More
  • Cancel
  • New
Join Internet of Things to participate - click to join for free!
  • Share
  • More
  • Cancel
Group Actions
  • Group RSS
  • More
  • Cancel
Engagement
  • Author Author: malakai
  • Date Created: 2 Jun 2014 6:31 AM Date Created
  • Views 2008 views
  • Likes 1 like
  • Comments 4 comments
  • home-energy_control
  • raspberry-pi
  • enocean_pi
Related
Recommended

How to setup a home automation server with EnOcean Pi

malakai
malakai
2 Jun 2014

A complete walk through can be found in my Road Test Review on setting up the EnOcean Pi and Sensors:


http://www.element14.com/community/roadTestReviews/1795


With my recent arrival of the EnOcean Pi Road Test Kit I thought a tutorial on setting up the Gateway would be a great article to start with. The Sensor Kit is on backorder so I will fill my time working with just the EnOcean Pi Gateway for now.


This entire process is outlined within the White Paper :


Raspberry Pi talks EnOcean - How to setup a home automation server with EnOcean Pi or USB 300


Source: http://www.enocean.com/fileadmin/redaktion/pdf/white_paper/wp_Raspberry_talks_EnOcean.pdf


Steps to setup the EnOcean Pi


1. Connect the EnOcean Pi board to the Raspberry Pi


image


Disable Serial Console

sudo nano /boot/cmdline.txt


The file should look like this:


dwc_otg.lpm_enable=0 console=ttyAMA0,115200 kgdboc=ttyAMA0,115200 console=tty1 root=/dev/mmcblk0p2 rootfstype=ext4 elevator=deadline rootwait


Remove all references to ttyAMA0 so the contents are:


dwc_otg.lpm_enable=0 console=tty1 root=/dev/mmcblk0p2 rootfstype=ext4 elevator=deadline rootwait


Exit and Save the File. CTRL+X


Update Raspbian


sudo apt-get update && sudo apt-get upgrade


Install the required Perl packages:


sudo apt-get install perl libdevice-serialport-perl libio-socket-ssl-perl libwww-perl


Install FHEM (Check to make sure you are getting the latest FHEM Version Home of FHEM.)


wget http://fhem.de/fhem-5.5.deb

sudo dpkg –i fhem-5.5.deb


2. Display FHEM Web Interface


Start your browser and type following to the link field:


http://<Raspberry_Pi_IP>:8083/fhem


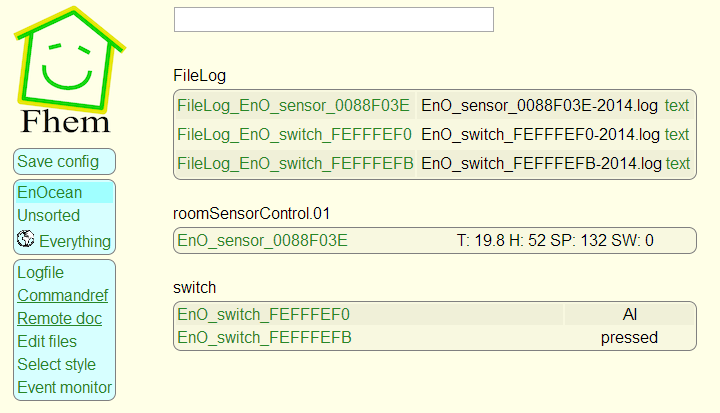
You will get the following user interface on the screen:


imageimage


FHEM recognizes and configures the EnOcean PI. It receives radio telegrams from all EnOcean devices within the neighborhood (10-30m within buildings). Device entities will be created automatically for each new received EnOcean device (every EnOcean radio module or device has a unique manufacturer ID). Switches are by recognized by their specific RPS telegram, sensor types are recognized via learn button with 1BS or 4BS telegram. By default devices with EnOcean radio protocol will be to room EnOcean.


3. FHEM auto configurations


FHEM server is configured via the configuration file fhem.cfg.

Start the configuration file editor via the FHEM menu item “Edit files”.


image


Gateway:


If USB 300 is plugged and configured to the Rapsberry Pi correctly following code will be generated automatically by the FHEM autocreate function:


image


define TCM310_0 TCM 310 /dev/ttyUSB0@57600


If EnOcean Pi is plugged and configured to the Rapsberry Pi correctly following code will be generat-ed automatically by the FHEM autocreate function:


image


define TCM310_0 TCM 310 /dev/ttyAMA0@57600


At this point in the log file it returned the following:


2013.02.01 07:43:29 3: Can't open /dev/ttyAMA0: Permission denied

To remedy this add the users pi and fhem into the tty groups:


sudo usermod -a -G tty pi

sudo usermod -a -G tty fhem

Switch:


imageimage


After you press the rocker the first time a new device entry is generated:


define EnO_switch_FEFFFEFB EnOcean FEFFFEFB

attr EnO_switch_FEFFFEFB room EnOcean

attr EnO_switch_FEFFFEFB subType switch

define FileLog_EnO_switch_FEFFFEFB FileLog .../log/EnO_switch_FEFFFEFB-%Y.log EnO_switch_FEFFFEFB

attr FileLog_EnO_switch_FEFFFEFB logtype text

attr FileLog_EnO_switch_FEFFFEFB room EnOcean


Manufacturer ID is 0xFEFFFEFB, telegram data will be logged automatically.


Sensor:


imageimageimage


This is an example of an temperature (room controller) sensor. After you press the learn button the time a new device entry is generated:


define EnO_sensor_0088F03E EnOcean 0088F03E attr EnO_sensor_0088F03E manufID 00B

attr EnO_sensor_0088F03E room EnOcean

attr EnO_sensor_0088F03E subType roomSensorControl.01

define FileLog_EnO_sensor_0088F03E FileLog ./log/EnO_sensor_0088F03E-%Y.log EnO_sensor_0088F03E

attr FileLog_EnO_sensor_0088F03E logtype text

attr FileLog_EnO_sensor_0088F03E room EnOcean


Manufacturer ID is 0x0088F03E, telegram data will be logged automatically and can be displayed within a diagram.


Interface:


With the user interface you can visualize and configure graphical user elements to visualize events and send control telegrams to actuators.


A reference of FHEM commands for EnOcean can be found at:


http://fhem.de/commandref.html#EnOcean


A small guide “how to” can be found at: http://fhem.de/HOWTO.html


For German users there is an additional forum available: http://forum.fhem.de/


Example of visualization:


Following visualization example has been generated by STM 330 (temperature sensor) with HSM 100 (humidity sensor plugged):


#ID:0088F03E STM_330 temperatur & humidty sensor

define Sensor_0088F03E EnOcean 0088F03E

attr Sensor_0088F03E manufID 00B

attr Sensor_0088F03E room EnOcean

attr Sensor_0088F03E subType roomSensorControl.01

define FileLog_EnO_sensor_0088F03E FileLog ./log/EnO_sensor_0088F03E-%Y.log Sensor_0088F03E

attr FileLog_Sensor_0088F03E logtype text

attr FileLog_Sensor_0088F03E room EnOcean


image


More Resources:


EnOcean Link Trial Software is also available follow this article

element14: How to use EnOcean Pi with Raspberry Pi


For an overview see the article

EnOcean Pi: Transforms Raspberry Pi into a Wireless Gateway


Also See:

Greg Fenton's Article EnOcean Sensor Kit (ongoing) with 3D Printed housing for the Temperature Module.


For more details on setting up the EnOcean Pi and Sensors see my review


http://www.element14.com/community/roadTestReviews/1795

.

Attachments:
imagewp_Raspberry_talks_EnOcean.pdf
  • Sign in to reply

Top Comments

  • Former Member
    Former Member over 11 years ago +1
    Hi Todd, Good overview here. I wanted to point out that the unique 32 it EnOcean IDs are known as chip IDs and are similar to MAC addresses in functionality. The manufacturer ID is something a little bit…
  • Former Member
    Former Member over 8 years ago

    Hi,

    I have the EnOcean sensorkit and a raspberry pi 2 B, I followed each point of this tutorial and tried many other (one of them was the "Raspberry talks enocean" for example). But in each case I always have the same problem : the "EnOcean" button doesn't appear on the side in fhem and I can't continue the configuration.


    Does anyone had this problem ? Any help would be welcome image

    • Cancel
    • Vote Up 0 Vote Down
    • Sign in to reply
    • More
    • Cancel
  • Former Member
    Former Member over 9 years ago in reply to Former Member

    Try to find the "TCM_ESP3_0" in Room "Everything". Then click on this name and set the Dropdown value (which is preset to "room" when you load the page for the TCM_ESP3_0) to "learningMode always" and push this attribute with the button "attr". Now you can use your Switch or click the learning button of your different controllers/sensors. This worked for me. The EnOcean room was created automatically with the different devices.

    • Cancel
    • Vote Up 0 Vote Down
    • Sign in to reply
    • More
    • Cancel
  • Former Member
    Former Member over 9 years ago

    I have the EnOcean Sensor Kit ( using EnOcean Pi ) that came with the Raspberry Pi 2 B model, and I've installed everything (FHEM + dependancies), updated my Pi, disabled my serial console, but what ever I do I cannot seem to get my EnOcean Pi sensor to recognize the sensor data, going to "Events Monitor" and trying to click the rocker switch, numerous guides have told me this should be seen via the browser and an individual log file, and it does not seem to be working .(Rebooted numerous times as well)


    The only difference I can see from my setup to what is documented here is that , I am using the newest package for FHEM, 5.6, the web interface is pretty much the same, but slightly different

    (On the second menu on the left down, instead of having "EnOcean, Unsorted, Everything" my FHEM 5.6 interface has only "Unsorted, Everything" .


    My /opt/fhem/log/fhem*.log file seems file, but the last line in the log file states that "En0cean Cryptographic functions are not available"


    I am 99% certain that my En0cean Pi is seated corrected onto my Raspberry Pi, and the antenna wire is sticking up as shown in the diagram.


    Need some help, please assist if possible ...

    • Cancel
    • Vote Up 0 Vote Down
    • Sign in to reply
    • More
    • Cancel
  • Former Member
    Former Member over 11 years ago

    Hi Todd,


    Good overview here. I wanted to point out that the unique 32 it EnOcean IDs are known as chip IDs and are similar to MAC addresses in functionality. The manufacturer ID is something a little bit different and can be used to establish who created the device in your hand. The EnOcean Alliance is in charge of handling Manufacturer IDs.


    In the line, "define EnO_sensor_0088F03E EnOcean 0088F03E attr EnO_sensor_0088F03E manufID 00B" You can see the manufID is 0x00B which happens to be EnOcean's manufacturer ID.

    • Cancel
    • Vote Up +1 Vote Down
    • Sign in to reply
    • More
    • Cancel
element14 Community

element14 is the first online community specifically for engineers. Connect with your peers and get expert answers to your questions.

  • Members
  • Learn
  • Technologies
  • Challenges & Projects
  • Products
  • Store
  • About Us
  • Feedback & Support
  • FAQs
  • Terms of Use
  • Privacy Policy
  • Legal and Copyright Notices
  • Sitemap
  • Cookies

An Avnet Company © 2025 Premier Farnell Limited. All Rights Reserved.

Premier Farnell Ltd, registered in England and Wales (no 00876412), registered office: Farnell House, Forge Lane, Leeds LS12 2NE.

ICP 备案号 10220084.

Follow element14

  • X
  • Facebook
  • linkedin
  • YouTube