element14 Community
element14 Community
    Register Log In
  • Site
  • Search
  • Log In Register
  • Community Hub
    Community Hub
    • What's New on element14
    • Feedback and Support
    • Benefits of Membership
    • Personal Blogs
    • Members Area
    • Achievement Levels
  • Learn
    Learn
    • Ask an Expert
    • eBooks
    • element14 presents
    • Learning Center
    • Tech Spotlight
    • STEM Academy
    • Webinars, Training and Events
    • Learning Groups
  • Technologies
    Technologies
    • 3D Printing
    • FPGA
    • Industrial Automation
    • Internet of Things
    • Power & Energy
    • Sensors
    • Technology Groups
  • Challenges & Projects
    Challenges & Projects
    • Design Challenges
    • element14 presents Projects
    • Project14
    • Arduino Projects
    • Raspberry Pi Projects
    • Project Groups
  • Products
    Products
    • Arduino
    • Avnet Boards Community
    • Dev Tools
    • Manufacturers
    • Multicomp Pro
    • Product Groups
    • Raspberry Pi
    • RoadTests & Reviews
  • Store
    Store
    • Visit Your Store
    • Choose another store...
      • Europe
      •  Austria (German)
      •  Belgium (Dutch, French)
      •  Bulgaria (Bulgarian)
      •  Czech Republic (Czech)
      •  Denmark (Danish)
      •  Estonia (Estonian)
      •  Finland (Finnish)
      •  France (French)
      •  Germany (German)
      •  Hungary (Hungarian)
      •  Ireland
      •  Israel
      •  Italy (Italian)
      •  Latvia (Latvian)
      •  
      •  Lithuania (Lithuanian)
      •  Netherlands (Dutch)
      •  Norway (Norwegian)
      •  Poland (Polish)
      •  Portugal (Portuguese)
      •  Romania (Romanian)
      •  Russia (Russian)
      •  Slovakia (Slovak)
      •  Slovenia (Slovenian)
      •  Spain (Spanish)
      •  Sweden (Swedish)
      •  Switzerland(German, French)
      •  Turkey (Turkish)
      •  United Kingdom
      • Asia Pacific
      •  Australia
      •  China
      •  Hong Kong
      •  India
      •  Korea (Korean)
      •  Malaysia
      •  New Zealand
      •  Philippines
      •  Singapore
      •  Taiwan
      •  Thailand (Thai)
      • Americas
      •  Brazil (Portuguese)
      •  Canada
      •  Mexico (Spanish)
      •  United States
      Can't find the country/region you're looking for? Visit our export site or find a local distributor.
  • Translate
  • Profile
  • Settings
Internet of Things
  • Technologies
  • More
Internet of Things
Blog Tiva LaunchPad: Building an Event/Data Logger - Part 2 – Real Time Clock capability
  • Blog
  • Forum
  • Documents
  • Quiz
  • Events
  • Polls
  • Members
  • Mentions
  • Sub-Groups
  • Tags
  • More
  • Cancel
  • New
Join Internet of Things to participate - click to join for free!
  • Share
  • More
  • Cancel
Group Actions
  • Group RSS
  • More
  • Cancel
Engagement
  • Author Author: shabaz
  • Date Created: 26 Jul 2014 10:55 PM Date Created
  • Views 1474 views
  • Likes 0 likes
  • Comments 2 comments
  • tiva
  • logger
  • ioe
  • internet_of_everything
  • sensors
  • internet_of_things
  • energia
  • texas_instruments
  • iot
  • test_and_measurement
  • launchpad
  • ti
Related
Recommended

Tiva LaunchPad: Building an Event/Data Logger - Part 2 – Real Time Clock capability

shabaz
shabaz
26 Jul 2014

Introduction

This is the second part in a series of posts on constructing a data logger. The first part provided analog voltage logging capability to SD card. This part 2 now extends the design to include time-stamping capability.


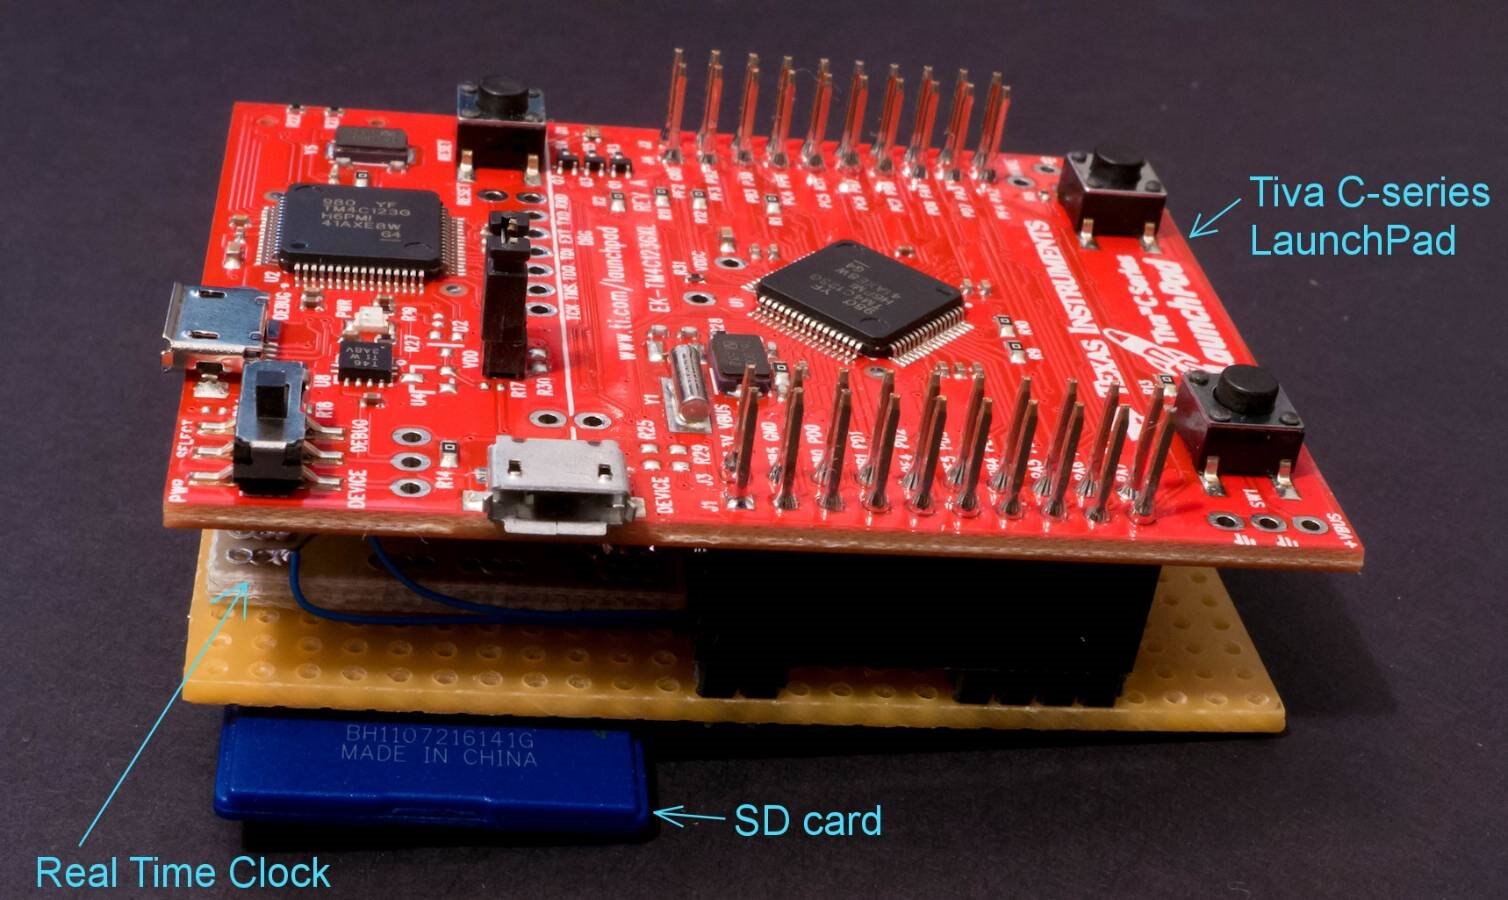
This is what the assembled data logger looks like:

image


As a quick test, here is a video showing a light dependent resistor (LDR) that was connected up to the analog input pin (Launchpad connector J2 pin 2) and data logged. (There is a lamp facing the LDR so the video is flooded with light unfortunately). By plugging into the serial port and running PuTTY or any other terminal software, the user can observe the logged values:

You don't have permission to edit metadata of this video.
Edit media
x
image
Upload Preview
image


Here is what got recorded into a text file onto the SD card. Information is logged every second. Each line contains the time, date and analog value. The first line also contains the temperature (the RTC chip has a built-in temperature sensor, and temperature is logged every minute - the code needs to truncate decimal places of course - I forgot to do this).

01:05:58, WED 23/7/2014, 3428, 29.000000
01:05:59, WED 23/7/2014, 3433
01:06:00, WED 23/7/2014, 3455
01:06:01, WED 23/7/2014, 3462
01:06:02, WED 23/7/2014, 3476
01:06:03, WED 23/7/2014, 3475
01:06:04, WED 23/7/2014, 3482
01:06:05, WED 23/7/2014, 3479
01:06:06, WED 23/7/2014, 3477
01:06:07, WED 23/7/2014, 2423
01:06:08, WED 23/7/2014, 903
01:06:09, WED 23/7/2014, 887
01:06:10, WED 23/7/2014, 877
01:06:11, WED 23/7/2014, 871
01:06:12, WED 23/7/2014, 1691
01:06:13, WED 23/7/2014, 1952
01:06:14, WED 23/7/2014, 1959
01:06:15, WED 23/7/2014, 1807
01:06:16, WED 23/7/2014, 3467
01:06:17, WED 23/7/2014, 3469
01:06:18, WED 23/7/2014, 3463
01:06:19, WED 23/7/2014, 2283
01:06:20, WED 23/7/2014, 839
01:06:21, WED 23/7/2014, 811
01:06:22, WED 23/7/2014, 807
01:06:23, WED 23/7/2014, 3435
01:06:24, WED 23/7/2014, 3437
01:06:25, WED 23/7/2014, 3433
01:06:26, WED 23/7/2014, 3425

The information can be directly imported into Excel or other software.


Hardware Implementation

This project is built around a Tiva LaunchpadTiva Launchpad. In part 1 the SD card functionality was implemented by soldering on a SD card holder to the underside of stripboard. Now for part 2, the photo below shows the real time clock that was added on the other side:

image


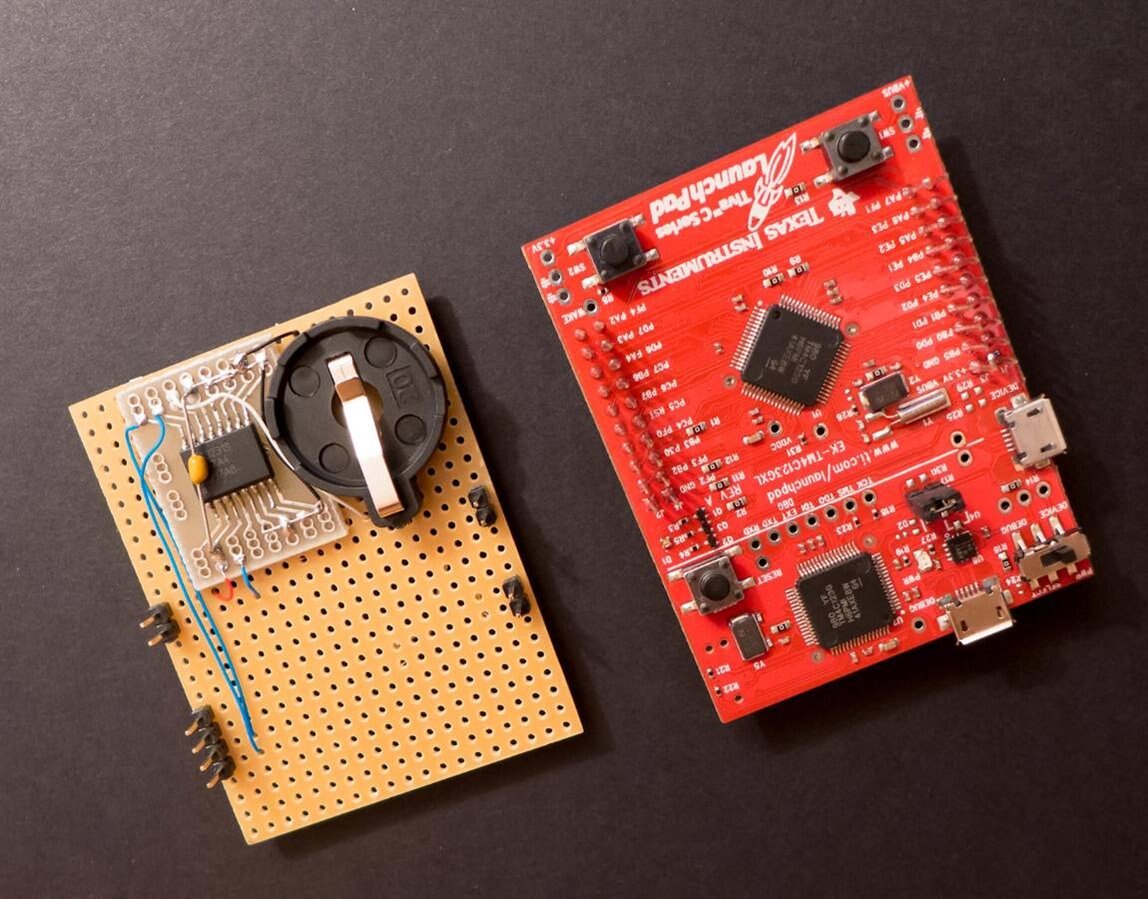
For simplicity the chosen RTC chip  was a DS3231S DS3231S device. It doesn’t need many additional components apart from a few resistors and one capacitor. Although the RTC chip is surface mount, it is a large device and therefore easy to solder with a small tipped soldering iron and a breakout board. The backup cell was a 3V Lithium coin cell (CR2032) in a coin cell holder coin cell holder.


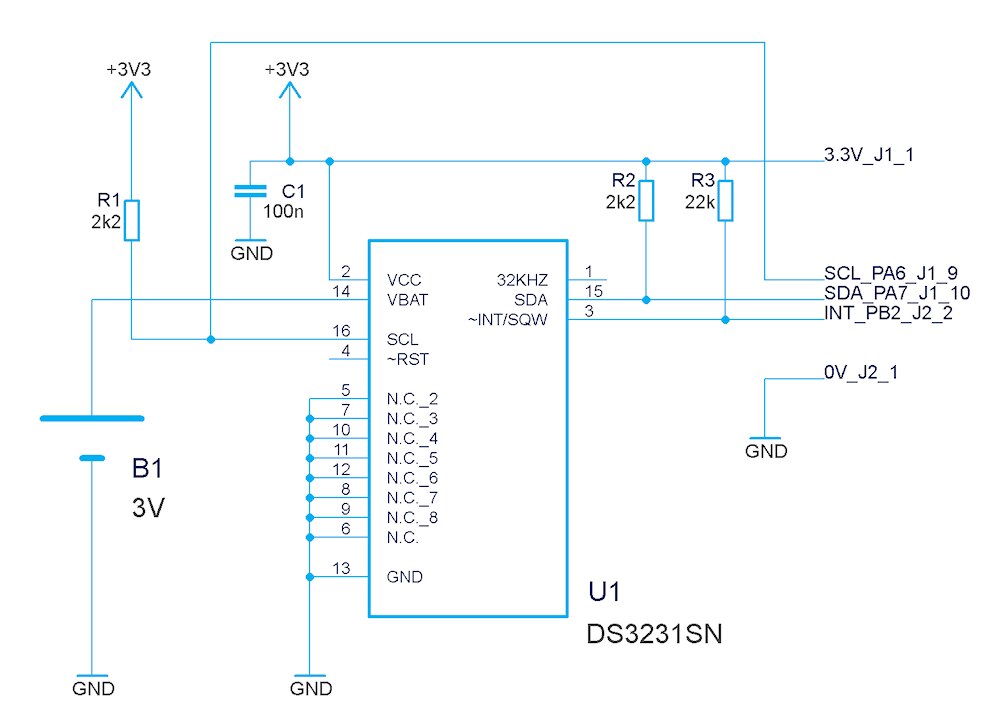
The completed RTC circuit is shown below:

image


Software Implementation

The software reuses the effort from part 1, and adds the capability to be able to set and retrieve time/date information from the real time clock using the I2C bus. The source code is attached below.


The menu implementation is quite simple, it just expects an attribute and a value for most commands.


If the user holds down a button on the LaunchPad while powering up the board, a blue LED will light. Connecting to the USB serial port and hitting enter will then display this menu:

Hello
Commands:
time (displays the current time)
hr xx (00-23)
min xx (00-59)
sec xx (00-59)
day x (1=SUN, 2=MON, 3=TUE, 4=WED, 5=THU, 6=FRI, 7=SAT)
date xx (01-31)
month xx (01-12)
year xxxx (2014-2099)


Once the user has made any configuration changes, the LaunchPad can be power-cycled to exit the menu.


Here is a video of the menu interaction:

You don't have permission to edit metadata of this video.
Edit media
x
image
Upload Preview
image


Summary

By implementing an easy-to-use RTC chip, the functionality of the logger has been greatly improved.  Note that although it currently records just one analog channel, a few code changes would allow additional analog recording channels if desired. I2C sensors could be interfaced too. That’s the subject of a later blog post.


Source Code

A copy of the source code is attached below (see part 1 for details on what to do with the files to run the code), but see github for the version controlled source code for this project.

Attachments:
sd-rtc-logger-source.zip
  • Sign in to reply

Top Comments

  • DAB
    DAB over 10 years ago +1
    Where did you get the break out board for the clock chip? I like the nice simple design. DAB
  • shabaz
    shabaz over 10 years ago in reply to DAB +1
    Hi DAB, I bought some from ebay years ago, and I'm down to my last one I think, so I'll have to start looking for some now too. The size is SO16W for the chip.
  • shabaz
    shabaz over 10 years ago in reply to DAB

    Hi DAB,


    I bought some from ebay years ago, and I'm down to my last one I think, so I'll have to start looking for some now too. The size is SO16W for the chip.

    • Cancel
    • Vote Up +1 Vote Down
    • Sign in to reply
    • More
    • Cancel
  • DAB
    DAB over 10 years ago

    Where did you get the break out board for the clock chip?


    I like the nice simple design.


    DAB

    • Cancel
    • Vote Up +1 Vote Down
    • Sign in to reply
    • More
    • Cancel
element14 Community

element14 is the first online community specifically for engineers. Connect with your peers and get expert answers to your questions.

  • Members
  • Learn
  • Technologies
  • Challenges & Projects
  • Products
  • Store
  • About Us
  • Feedback & Support
  • FAQs
  • Terms of Use
  • Privacy Policy
  • Legal and Copyright Notices
  • Sitemap
  • Cookies

An Avnet Company © 2025 Premier Farnell Limited. All Rights Reserved.

Premier Farnell Ltd, registered in England and Wales (no 00876412), registered office: Farnell House, Forge Lane, Leeds LS12 2NE.

ICP 备案号 10220084.

Follow element14

  • X
  • Facebook
  • linkedin
  • YouTube