element14 Community
element14 Community
    Register Log In
  • Site
  • Search
  • Log In Register
  • Community Hub
    Community Hub
    • What's New on element14
    • Feedback and Support
    • Benefits of Membership
    • Personal Blogs
    • Members Area
    • Achievement Levels
  • Learn
    Learn
    • Ask an Expert
    • eBooks
    • element14 presents
    • Learning Center
    • Tech Spotlight
    • STEM Academy
    • Webinars, Training and Events
    • Learning Groups
  • Technologies
    Technologies
    • 3D Printing
    • FPGA
    • Industrial Automation
    • Internet of Things
    • Power & Energy
    • Sensors
    • Technology Groups
  • Challenges & Projects
    Challenges & Projects
    • Design Challenges
    • element14 presents Projects
    • Project14
    • Arduino Projects
    • Raspberry Pi Projects
    • Project Groups
  • Products
    Products
    • Arduino
    • Avnet Boards Community
    • Dev Tools
    • Manufacturers
    • Multicomp Pro
    • Product Groups
    • Raspberry Pi
    • RoadTests & Reviews
  • About Us
  • Store
    Store
    • Visit Your Store
    • Choose another store...
      • Europe
      •  Austria (German)
      •  Belgium (Dutch, French)
      •  Bulgaria (Bulgarian)
      •  Czech Republic (Czech)
      •  Denmark (Danish)
      •  Estonia (Estonian)
      •  Finland (Finnish)
      •  France (French)
      •  Germany (German)
      •  Hungary (Hungarian)
      •  Ireland
      •  Israel
      •  Italy (Italian)
      •  Latvia (Latvian)
      •  
      •  Lithuania (Lithuanian)
      •  Netherlands (Dutch)
      •  Norway (Norwegian)
      •  Poland (Polish)
      •  Portugal (Portuguese)
      •  Romania (Romanian)
      •  Russia (Russian)
      •  Slovakia (Slovak)
      •  Slovenia (Slovenian)
      •  Spain (Spanish)
      •  Sweden (Swedish)
      •  Switzerland(German, French)
      •  Turkey (Turkish)
      •  United Kingdom
      • Asia Pacific
      •  Australia
      •  China
      •  Hong Kong
      •  India
      •  Korea (Korean)
      •  Malaysia
      •  New Zealand
      •  Philippines
      •  Singapore
      •  Taiwan
      •  Thailand (Thai)
      • Americas
      •  Brazil (Portuguese)
      •  Canada
      •  Mexico (Spanish)
      •  United States
      Can't find the country/region you're looking for? Visit our export site or find a local distributor.
  • Translate
  • Profile
  • Settings
Open Source Hardware
  • Technologies
  • More
Open Source Hardware
Blog Building a Simple Radio - Part 2 - Final Assembly
  • Blog
  • Forum
  • Documents
  • Events
  • Polls
  • Members
  • Mentions
  • Sub-Groups
  • Tags
  • More
  • Cancel
  • New
Join Open Source Hardware to participate - click to join for free!
  • Share
  • More
  • Cancel
Group Actions
  • Group RSS
  • More
  • Cancel
Engagement
  • Author Author: shabaz
  • Date Created: 19 Sep 2021 7:56 PM Date Created
  • Views 3072 views
  • Likes 10 likes
  • Comments 5 comments
  • fm radio
  • silabs
  • silicon labs
  • radio
  • beginners
  • rf
Related
Recommended

Building a Simple Radio - Part 2 - Final Assembly

shabaz
shabaz
19 Sep 2021

Way back in June, I was Building a Simple Radio Receiver that was intended to be solderable by kids, low-cost, and almost guaranteed to work the first time, owing to its simplicity, requiring no adjustments or trimming.

Unfortunately, other work got in the way and I didn't get around to building an enclosure for it until this weekend.


This short blog post covers this final assembly. The 3-minute video here covers it since there's not a lot to this!:


You don't have permission to edit metadata of this video.
Edit media
x
image
Upload Preview
image


I decided to use a metal sweets tin to try to make it look nice (since the radio was intended to be a gift for a child). I originally got this tin box from Bletchley Park gift shop (the actual manufacturer is Tin Treats).

image


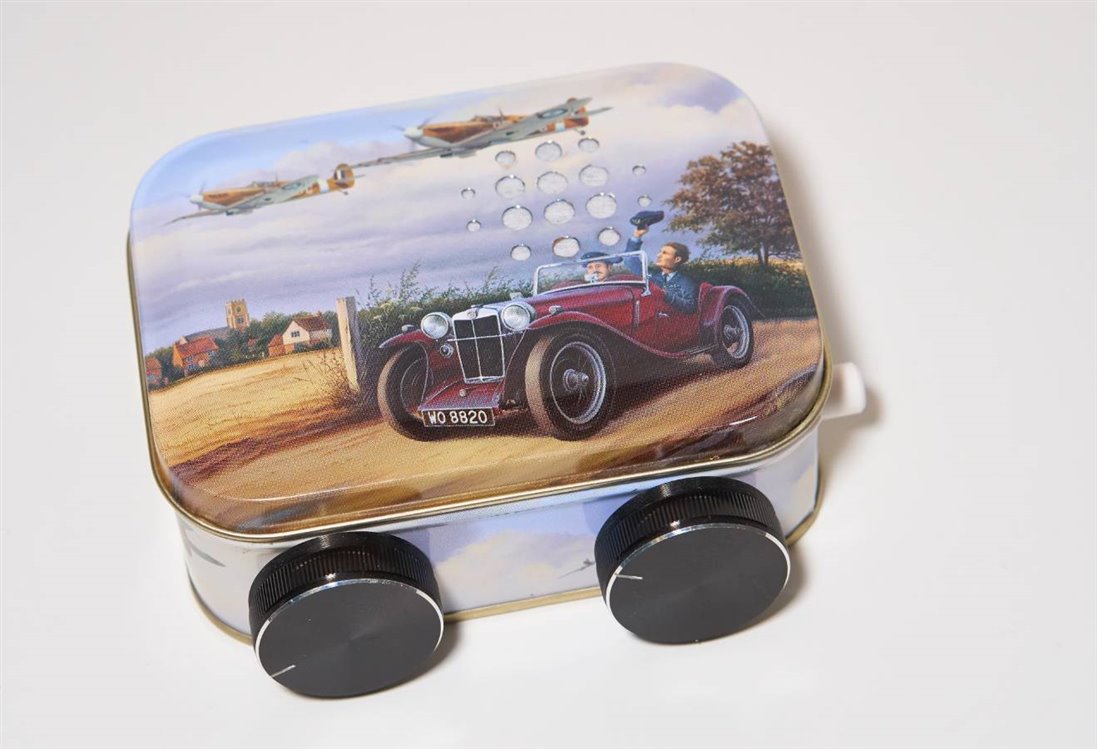
Holes for the volume and tuning knobs and the power button were drilled and then expanded to the correct size using a Q-Max 8-mm hole punch.

image


For the speaker holes, I used Polydoh to pad out the underside of the lid (the inside of the lid needs to be well greased! – I didn't, and had a lot of issues clearing up the consequences of that).

image


Whatever speaker-hole design is desired, can be stuck on and then drilled with ease. Some filing or turning with a countersink bit will still be needed, to clean up any sharp edges.


The metal box had plenty of room, which was great. The on/off button circuit board was held vertically with more Polydoh. A 3D printed bracket could be another option. I color-coded the connectors with permanent markers, so that it can be re-assembled by anyone if the kid ever gets curious and disassembles it.

image


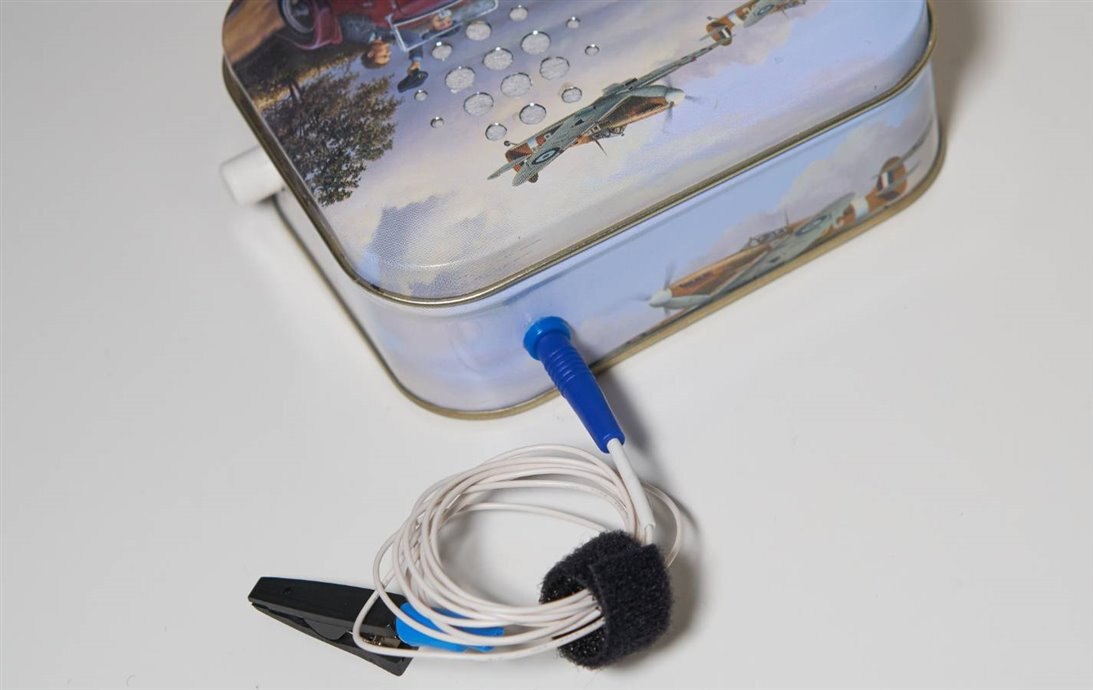
For the antenna, a 2mm banana socket was used. I preferred this to a telescopic antenna, which the recipient (a young kid) may accidentally break. The croc-clip on the end of the antenna wire has no electrical connection. When not in use, the antenna can be disconnected and stowed inside the tin box, since there is enough room for that.

image


I gave the radio today, and the kid seems happy! At least, he danced to some music : )

image

Thanks for reading.

  • Sign in to reply

Top Comments

  • ralphjy
    ralphjy over 4 years ago in reply to shabaz +3
    Reminds me that when I was a teenager I built a slave flash unit for my brother using a Sucrets tin. I think I still have it buried away in storage somewhere. I'll have to look for it when I find the time…
  • genebren
    genebren over 4 years ago +2
    Great construction tips. What a clean job you did putting this all to together.
  • ralphjy
    ralphjy over 4 years ago +2
    Great project!! Looks really sweet .
  • ralphjy
    ralphjy over 4 years ago in reply to shabaz

    Reminds me that when I was a teenager I built a slave flash unit for my brother using a Sucrets tin.  I think I still have it buried away in storage somewhere.  I'll have to look for it when I find the time image.


    Nowadays, I would probably use an Altoids tin although the extra depth of your tin allows for bigger projects.

    • Cancel
    • Vote Up +3 Vote Down
    • Sign in to reply
    • More
    • Cancel
  • shabaz
    shabaz over 4 years ago in reply to genebren

    Hi Gene, Thanks! This was a learning experience for me but now I'd like to try to make a few more things using tin boxes.

    • Cancel
    • Vote Up +1 Vote Down
    • Sign in to reply
    • More
    • Cancel
  • shabaz
    shabaz over 4 years ago in reply to ralphjy

    Hi Ralph,


    Thanks!

    • Cancel
    • Vote Up +1 Vote Down
    • Sign in to reply
    • More
    • Cancel
  • ralphjy
    ralphjy over 4 years ago

    Great project!!  Looks really sweet image.

    • Cancel
    • Vote Up +2 Vote Down
    • Sign in to reply
    • More
    • Cancel
  • genebren
    genebren over 4 years ago

    Great construction tips. What a clean job you did putting this all to together.

    • Cancel
    • Vote Up +2 Vote Down
    • Sign in to reply
    • More
    • Cancel
element14 Community

element14 is the first online community specifically for engineers. Connect with your peers and get expert answers to your questions.

  • Members
  • Learn
  • Technologies
  • Challenges & Projects
  • Products
  • Store
  • About Us
  • Feedback & Support
  • FAQs
  • Terms of Use
  • Privacy Policy
  • Legal and Copyright Notices
  • Sitemap
  • Cookies

An Avnet Company © 2025 Premier Farnell Limited. All Rights Reserved.

Premier Farnell Ltd, registered in England and Wales (no 00876412), registered office: Farnell House, Forge Lane, Leeds LS12 2NE.

ICP 备案号 10220084.

Follow element14

  • X
  • Facebook
  • linkedin
  • YouTube