


Table of Contents
- Introduction
- What is GitHub and Version Control, and Why is it useful?
- What Really Happens
- Installing Software
- Cloning (Checking out) Code
- Creating a Branch and Publishing the Branch
- Editing Code and Committing Code
- Creating a Pull Request
- Merging the Code to the main branch
- Viewing Branches Graphically
- Summary
Introduction
It has become common practice to share code on GitHub; however, GitHub can also be used to aid in feature development. This allows you to publish working code, and then incrementally add new features over time.
This blog post covers just that single scenario, since it may be a common one, and it discusses how to work with GitHub using Visual Code.
No GitHub knowledge is required to understand this blog post, but if you’re completely new to it and wish to use it, you’ll want to spend at least half an hour reading the blog post in detail, setting up a GitHub account, and trying it out for yourself.
Some of the concepts can sound very abstract, and it is not intuitive to a newcomer until you try it for yourself.
There are about nine concepts to familiarise yourself with, but mostly it is a button-clicking exercise. However, you do need to have an idea about what is going on in the background when you click the buttons, and this blog post tries to explain that in a hopefully straightforward way.
What is GitHub and Version Control, and Why is it useful?
GitHub is a cloud-based service, and like all software version control systems, it allows you to organize your code modifications. It reduces errors and promotes collaboration with others. You could share your code on GitHub, and allow others to make code improvements that everyone can benefit from.
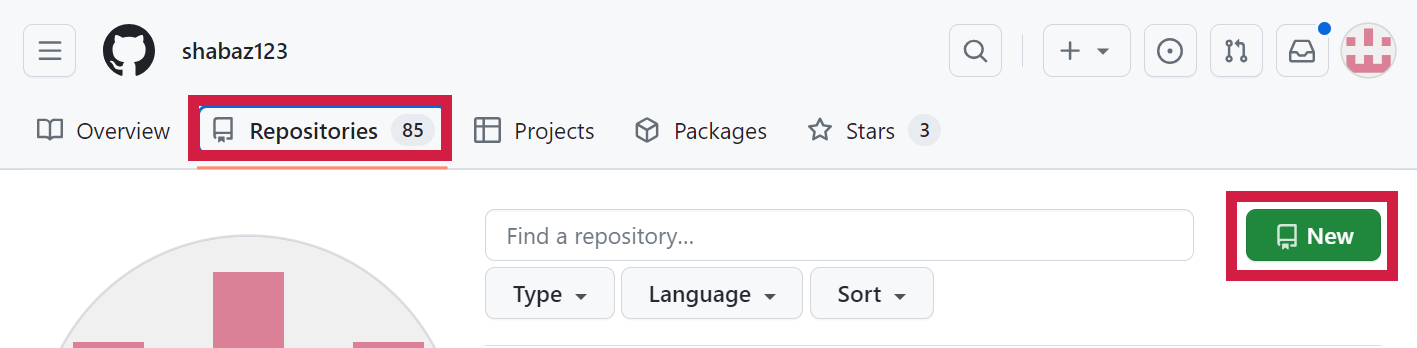
To use GitHub, your code will be placed in an online repository that can be named whatever you like. You will create a new repository per project. Once you have a GitHub account, it is easy to create a new repository by clicking on the Repositories tab, and clicking on New.
Any code for the project will be written as usual on a PC, and it can then be uploaded to the repository. After that, anyone can access the repository, download a copy of the code, and run or edit it.
In GitHub terminology, downloading the latest code is known as a clone operation.
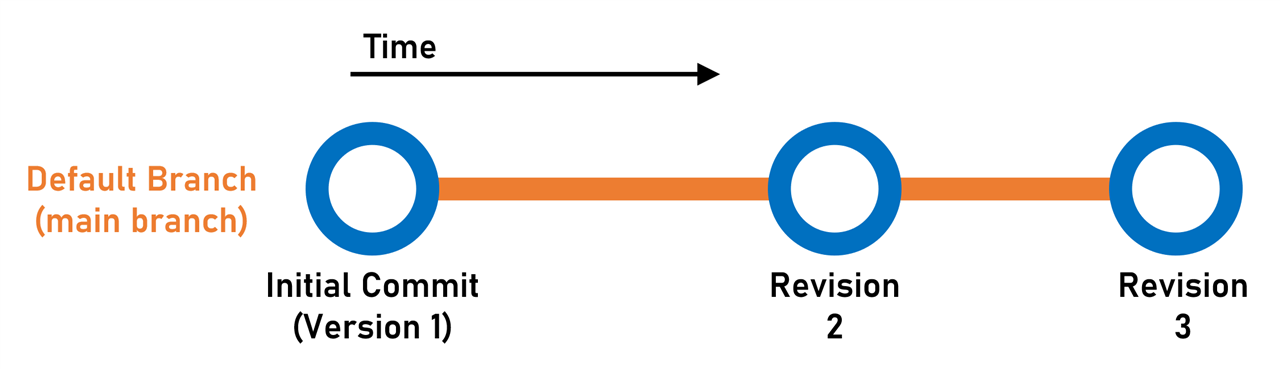
Different code versions are usually indicated graphically on a line, running upward, or perhaps left-to-right.
In the diagram below, a left-to-right layout has been used, and it shows that the latest version of the code is Revision 3, and there were two versions of the code before it.
In a version control system, if a bug were introduced in the latest code, it would be possible to revert to the previously known working code, for instance, the revision 2 code. Furthermore the different revisions of code could be compared, to see what the difference was.
When adding new features, it is good to create a separate branch of code, and work on it independently of the main branch. Once you’re happy, the code can be automatically merged into the main branch. The diagram below shows how this looks like.
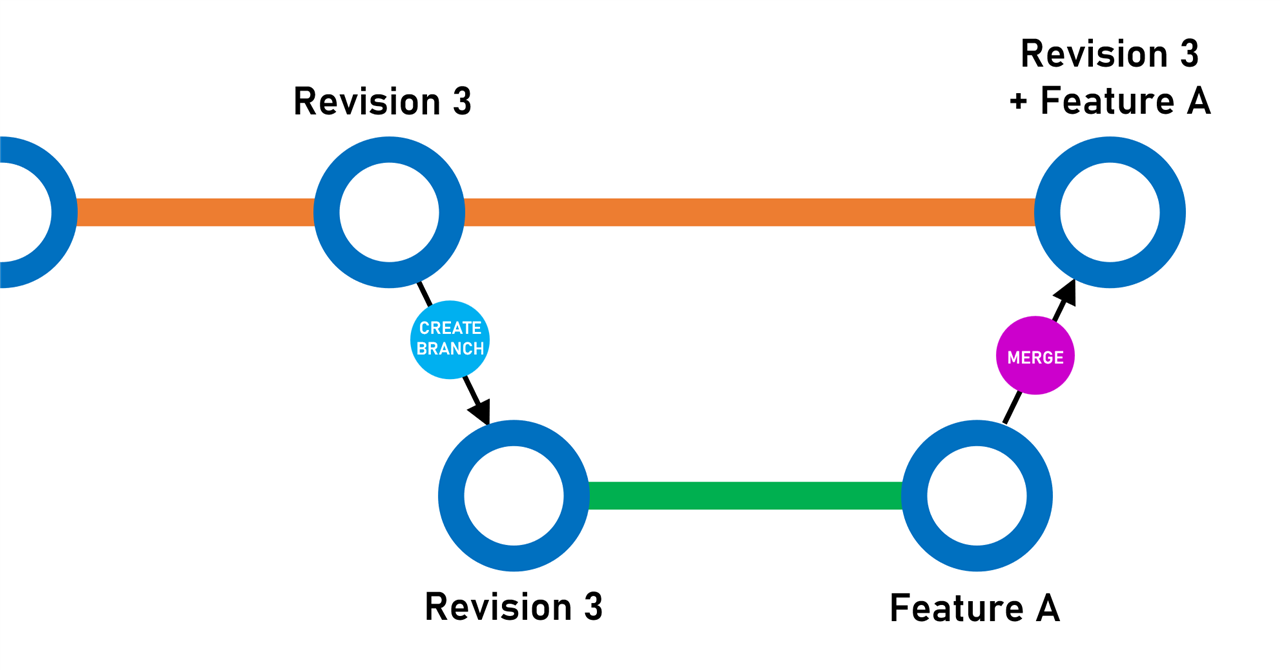
The diagram above shows that a create branch operation will make a copy of code into the new branch, and then you can work on the code, developing the feature. Then finally, a merge operation inserts the feature code into the main branch.
What Really Happens
The diagram below looks a lot more complicated, but the same kind of stuff is occurring as the simpler diagram above, so it’s not too hard to follow. Here is a step-by-step explanation of the diagram.
The way to understand the diagram is to follow it from left to right. The shaded horizontal bars represent code. The top half of the diagram shows code that resides in the cloud, in the GitHub repository, and the bottom half shows code on the local PC.
The diagram starts at the top-left star shape, which shows the assumption that a repository has already been created and that there is an initial version of code there.

A first operation that can be done is to grab a copy of the code onto the local PC; this is done using the Clone operation as mentioned earlier. You can see this is the first black downward arrow at the leftmost side of the diagram. It will dump the code into any folder of your choice. The code is represented by the purple bar. For instance, a clone of a repository called myapp could be done into a folder called C:\my_repositories, and the result would be a folder C:\my_repositories\myapp, containing the code.
Next, a branch of that code could be created on your local PC. That branch is where any code modifications are made. Since others may be interested to see what you’re doing, it is possible to publish the branch to the repository, so the cloud also contains that branch. It gets published under the branch name, and it doesn’t affect any users who may wish to download the known working default (main) branch code.
Note that although a new branch is created, you don’t need to change your local code folder. You will continue to make changes in C:\my_repositories\myapp, and these changes will actually be on that new branch.
As the new feature is developed on that green feature branch in the diagram, the coder can invoke a commit action that acts like a checkpoint. You can do as many commits as you like, and they help document your code since each commit action has a comment to describe what you’ve decided to checkpoint. When desired, the branch in the cloud can be updated, by syncing changes, so that others can peek at your branch code if they are interested.
Another benefit of performing a commit operation is that you can then freely switch to another branch if you’re doing more complex stuff, and then switch back whenever you desire. In other words, if you commit your code, you can switch to the main branch if you like, and the code in C:\my_repositories\myapp will now automatically reflect that branch until you switch back to your feature branch.
Once you’ve tested the new feature and are happy for it to be reviewed and merged into the main branch, two actions are performed; a Pull Request, followed by a Merge operation. The Pull Request advertises your intention to the repository users, and they can view the changes. Anyone with the required permissions can then perform the Merge for you. In the example where it’s your code, then you can do that!
By the end of all that, the main branch will now contain the new feature.
If you subsequently wished to add another feature, you could update your clone of the main branch, by performing Fetch and Sync Changes operation, as shown with the long downward arrow at the center of the diagram above. From then on, you’d simply repeat the items mentioned above.
Read on, to see a real example of all of these steps. But, just to recap, these are the things you’ll want to do:
| Operation | Description |
| Clone | Make a copy of the main branch code from a GitHub repository, into a local folder |
| Create Branch | Define a new branch name, and set the local folder to show that branch |
| Publish Branch (Push) | Publish the new branch information to GitHub, so that others can see the branch. Incidentally, this is known as a Push operation, if you're not using Visual Code. |
| Commit | Create a local checkpoint of your code changes |
| Sync Changes (Push) | After commit(s), this will upload all the checkpoints to the branch in GitHub, so that others can see your code changes in the branch |
| Pull Request | Advertise that you have completed feature code ready to be reviewed and merged |
| Merge | Add the code from the feature branch, into the main branch |
| Fetch | Retrieve information from the GitHub repository in the cloud |
| Sync Changes | After a fetch operation, this will update the local folder code to the latest. Incidentally, this is known as a Merge operation if you're not using Visual Code. |
Installing Software
Once you have installed Visual Code, at the very least, you’ll want to install the GitHub Pull Requests and Issues extension. Optionally (but recommended) install the GitLens extension too.

For the purposes of this blog post, only the following icons in the left sidebar will be used:
![]()
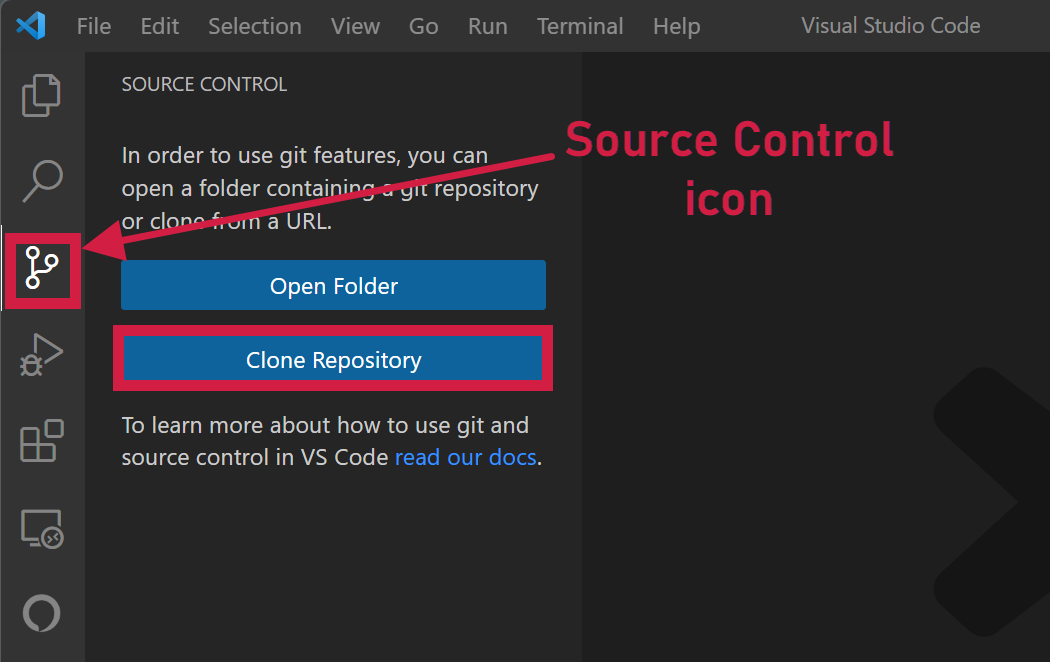
The Explorer icon is used to show a folder view of the files when editing your code. The Source Control icon is used for most of the operations. The GitHub icon will be used for the final steps when completing a feature (creating a Pull Request, and performing a Merge).
Cloning (Checking out) Code
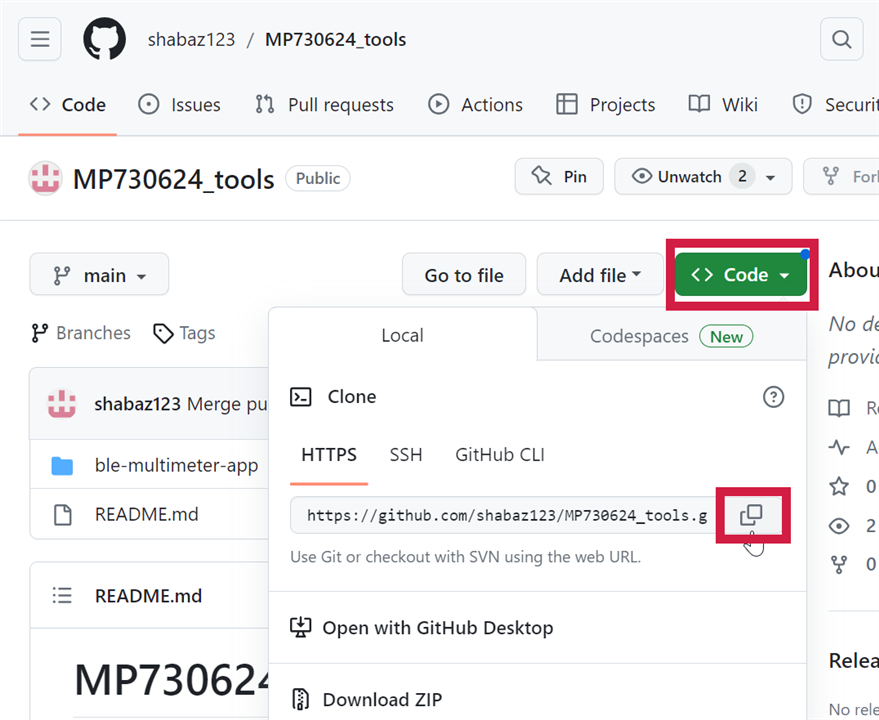
To clone code (this is GitHub speak similar-ish to checking out code; note that I’m being a little vague in my language because some new GitHub users may be familiar with other terminology on other version control systems, and the functionality does not match one-to-one) navigate to github.com to your code location and copy the repository URL as shown below.
Then, in Visual Code, click on the left side icon pane Source Control icon, and then click on Clone Repository:
Paste in the GitHub repository URL at the prompt (as shown in the screenshot below), and press Enter.

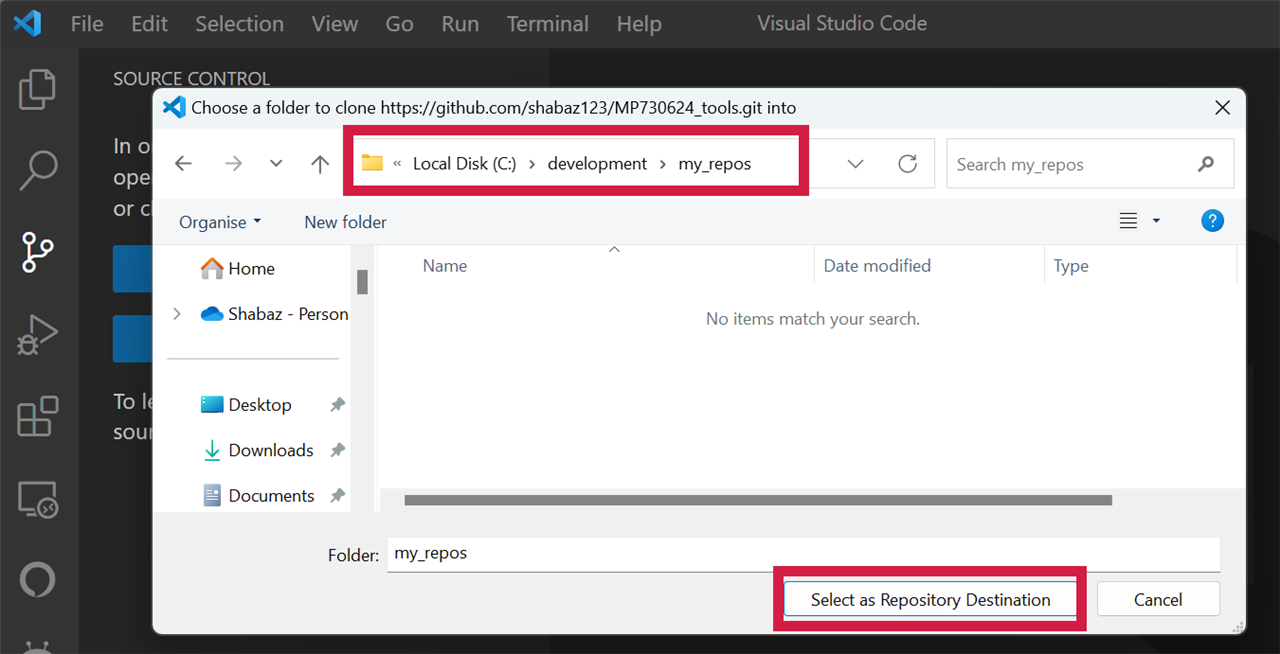
A folder window will pop up, prompting for your local target folder, where you want the code to reside in. I selected a folder called C:\development\my_repos, as can be seen:
Click Open when prompted, and the left side pane will show the opened folder content in the Explorer view. You can now browse the files and run the code if you wish. You won’t want to make any code changes here however, because this code is in your main branch view. You can see that by looking at the bottom blue bar, on the left side, where it will state the branch name. (Note: the bar may be a different color for you. I'll refer to it as a blue bar in this blog post since that's the color of it within these screenshots).
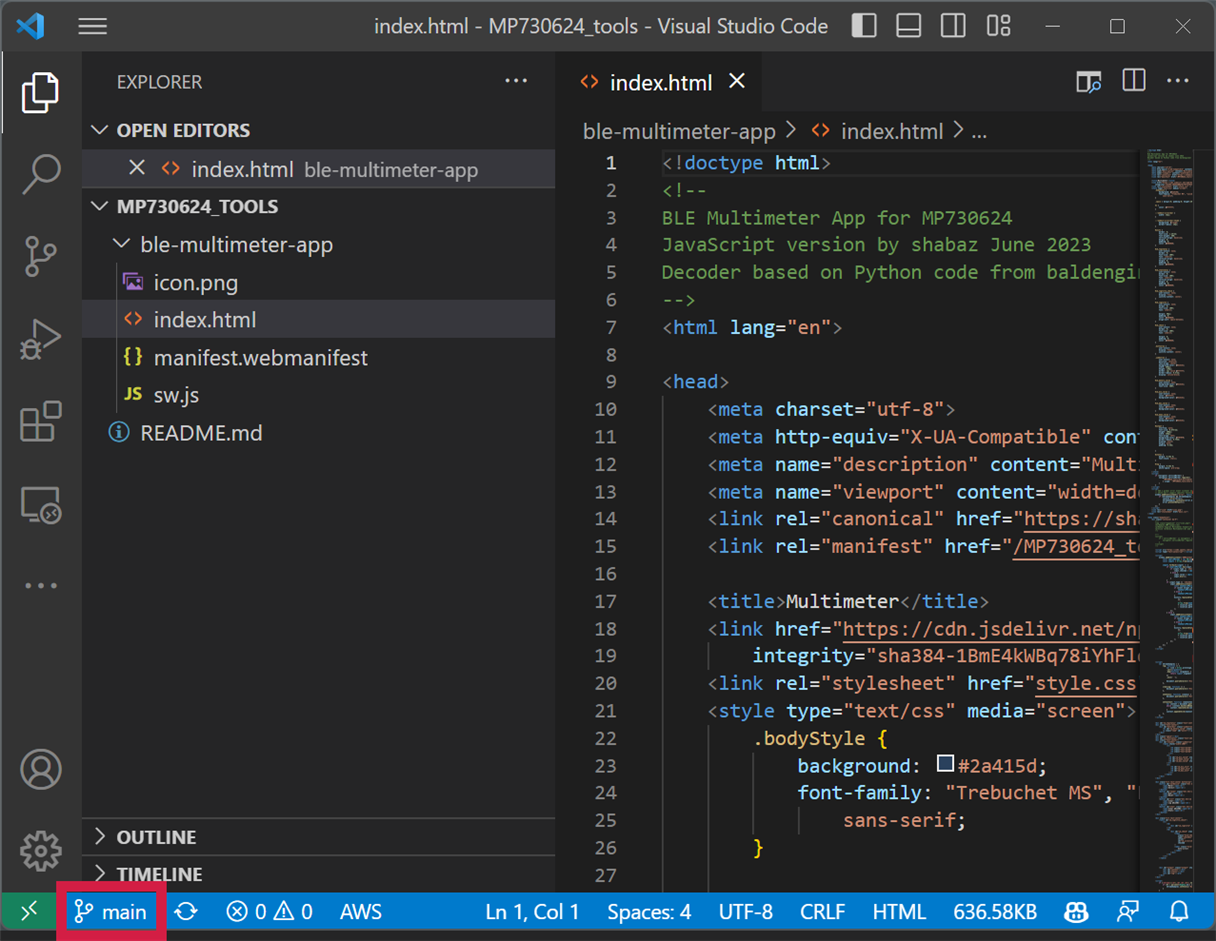
That red highlighted area at the bottom blue bar is very important; clicking on it, it lets you switch to any other branch at any time. More on that below!
Creating a Branch and Publishing the Branch
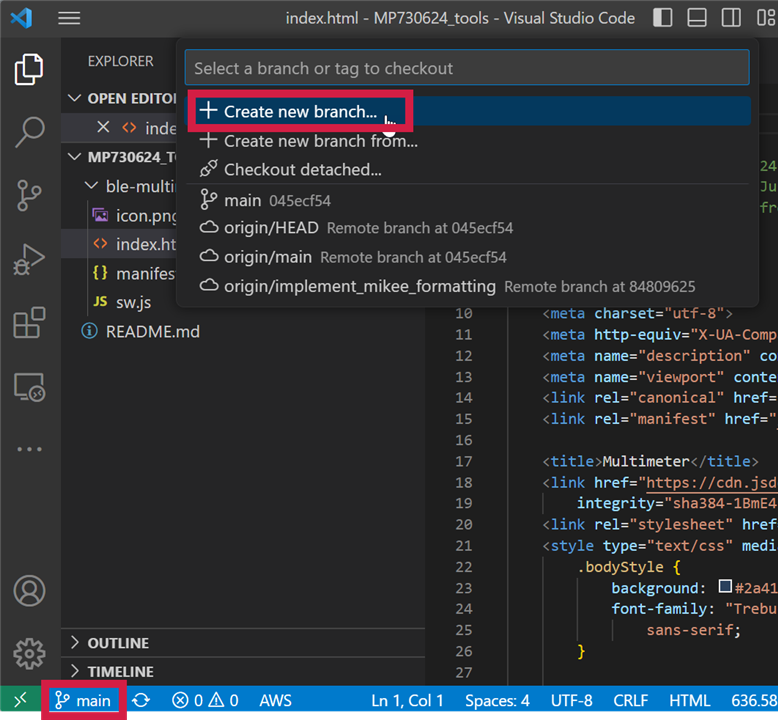
At the bottom-left in Visual Code, in the blue bar, click on the main branch name, and then at the top prompt which will appear, select Create new branch as shown in this screenshot:
Give the new branch a name and press Enter; the example in the screenshot below is called implement_formatting, which could describe the purpose of the branch:

At the bottom-left, it will now show the new branch name. Click the cloud icon next to it, to publish the fact that there is a new branch.
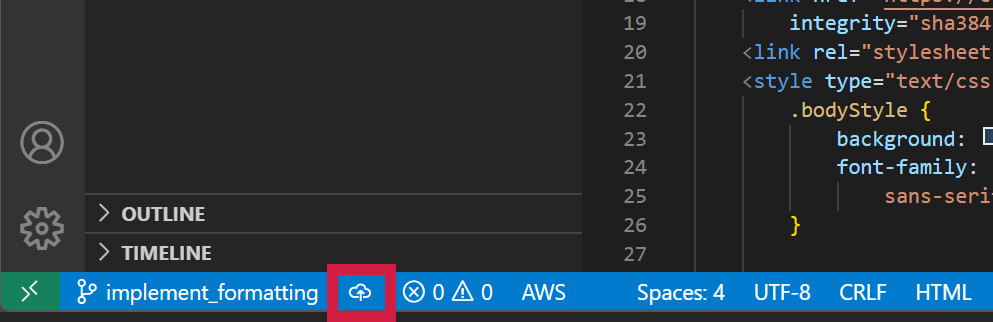
By clicking on the cloud icon it will publish the branch, allowing anyone to be able to see the newly created branch in GitHub:
Note that publishing the branch so early isn’t essential, since you could first make some code changes, but you may as well publish it now if you wish; no point hiding that you’re working on something, and it will let others know to work on something else!
In Visual Code, if you see a prompt asking if you’d like to create a Pull Request as shown in the screenshot below, click the X. The reason is that the Pull Request needs to occur when you have changes to the code ready to be reviewed or merged. Those code changes have not been done yet, and the Pull Request will be done later, therefore, just click on the X for now.

You may get a prompt asking if you’d like VS Code to periodically run “git fetch”. You can click on ‘No’ if you like.
Editing Code and Committing Code
Now the feature code can be written. Visual Code or any other editor can be used. The code to be edited is in the folder that was defined earlier, for instance, C:\my_repositories\myapp
After you’ve made changes, you’ll be able to see the file differences by clicking on the Source Control icon on the left graphic icon pane, and then clicking on the file listed under the label Changes.
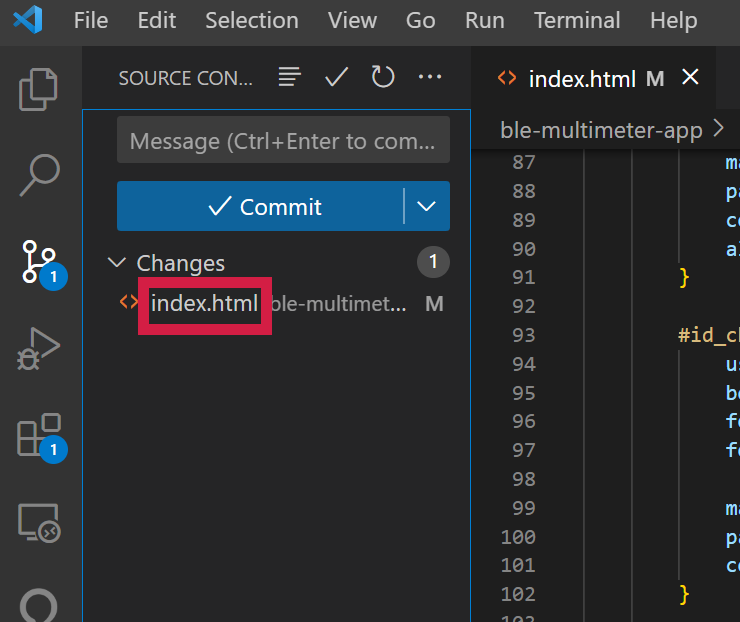
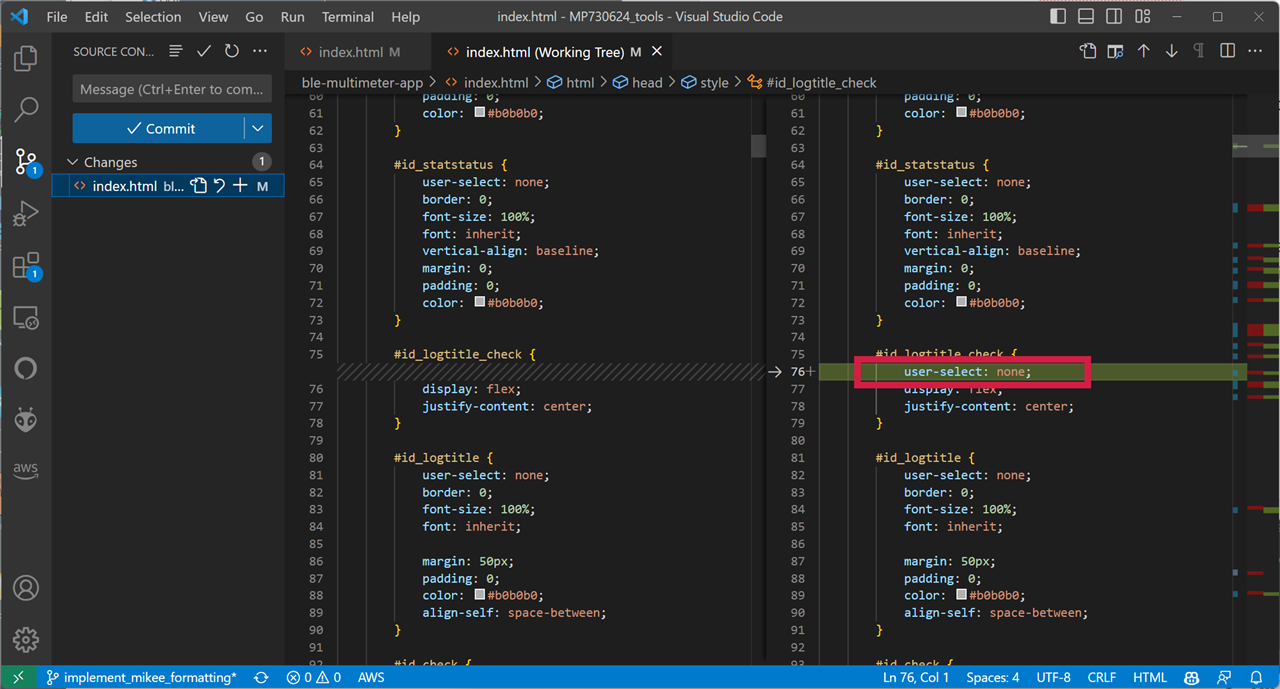
If desired, you can examine the changes. The screenshot below shows in green one change that exists in the new code:
Click the + icon next to the file name in the pane, to stage the file ready for the Commit operation.
![]()
Repeat that for each file in the changes list, until all the modified files are listed under the label Staged Changes. In my case, I only had one modified file.
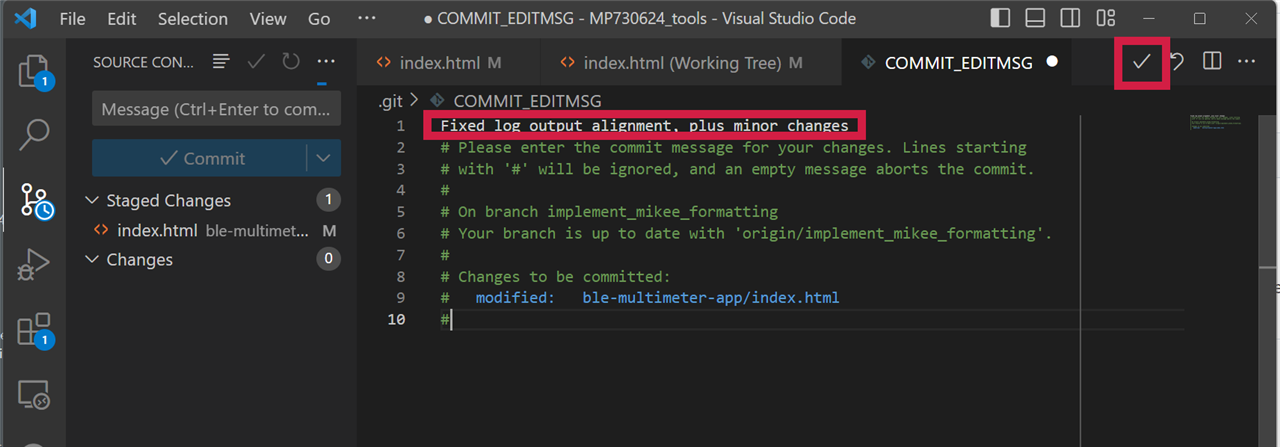
Next, commit by typing a short message and then clicking on the Commit button just below the message at the top of the Source Control pane:

If you omit the message, you will still be prompted, and then click on the check-mark:
If you wish, you can publish the branch changes (i.e., upload the commits into the branch in the cloud) by clicking on the Sync Changes button.
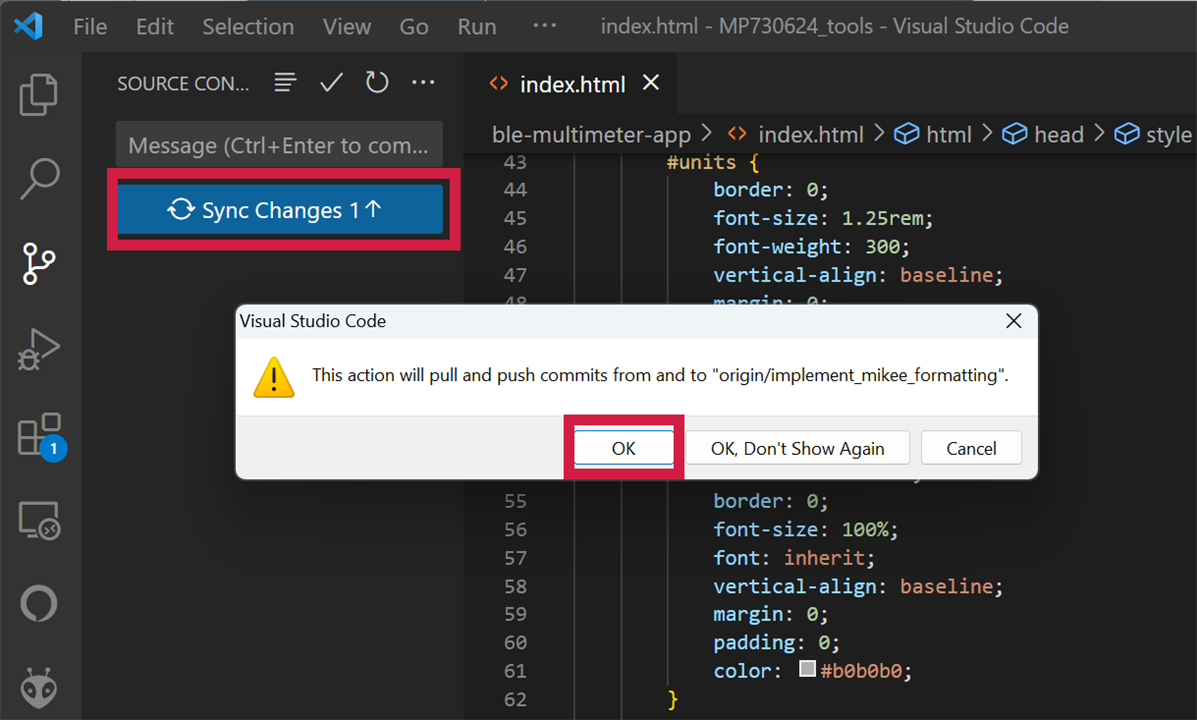
Another way to publish the branch changes, with the branch name visible at the bottom-left, is to click on the circular arrow next to it. Prior to clicking, it will show a 0 with a downward arrow, and 1 with an upward arrow. Click the circular arrow and this will do a sync. The numbers and arrows will disappear. The screenshot below shows at the bottom, in the blue bar, that the branch name is visible, and the circular arrow icon which can be clicked (or just click the larger Sync Changes box that is also highlighted in the screenshot below).
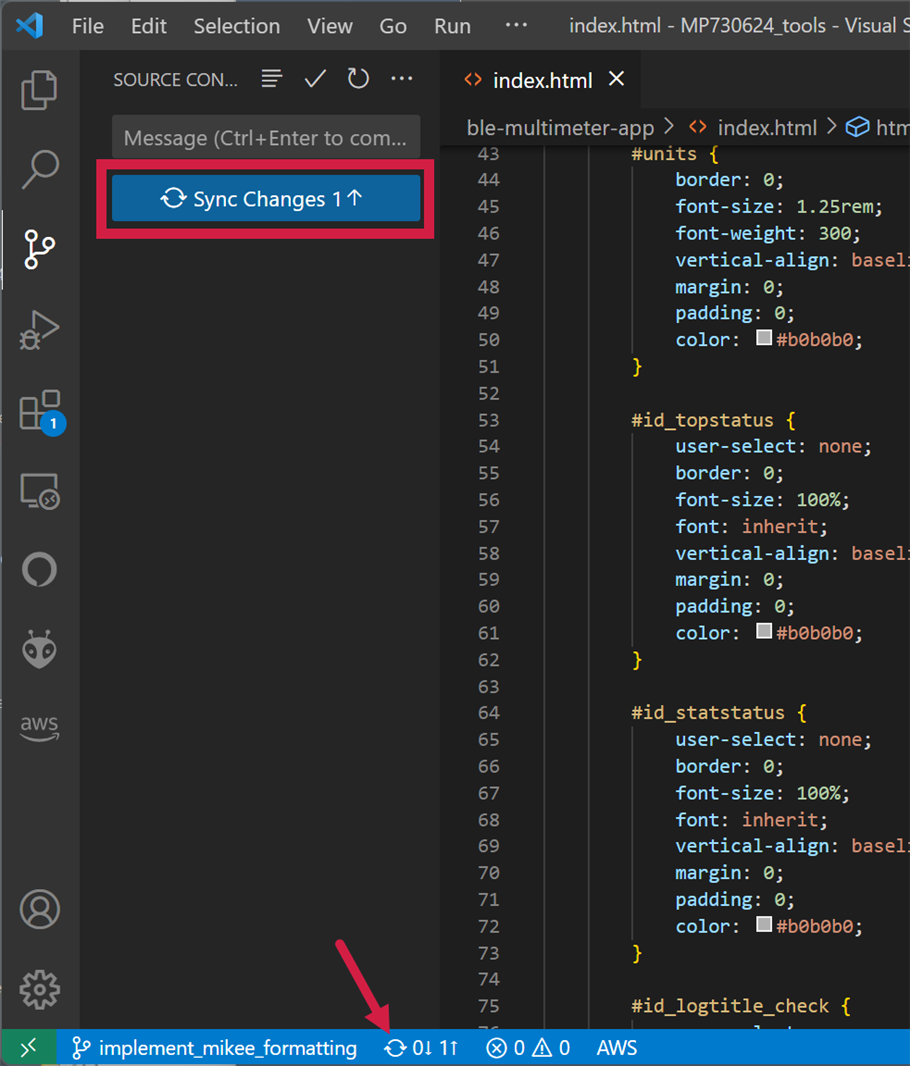
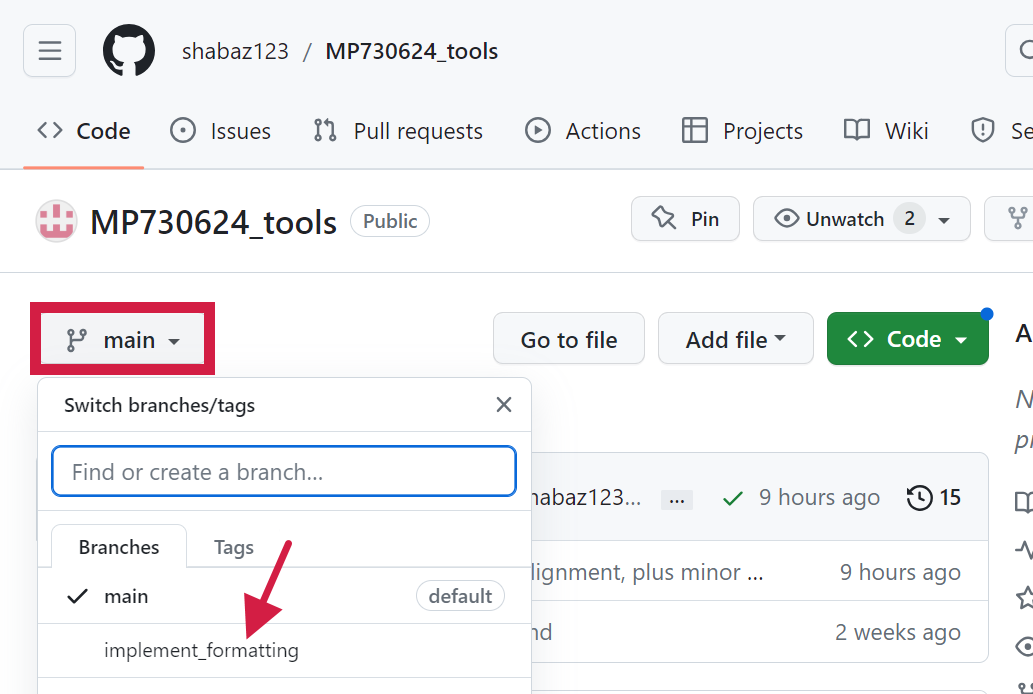
You’ll now be able to see the code change in the github.com browser view if you go to that branch name.
Once you’re happy with your code, you’ve tested it, and performed the commit and Sync Changes operations, you are ready to request the code be merged into the main branch, by creating a Pull Request, as discussed next.
Creating a Pull Request
On the left graphic icon pane, select the GitHub icon (the one that looks like a cat!). At the GITHUB pane at the top, hover over PULL REQUESTS to see a Create Pull Request icon, as shown in the screenshot below. Click on it to create a pull request.
![]()
Ensure the view looks as below; pay attention to the From/Into selections, they should look similar to what is shown below, i.e., the From selection will contain the name of your branch and the Into selection will be set to main.
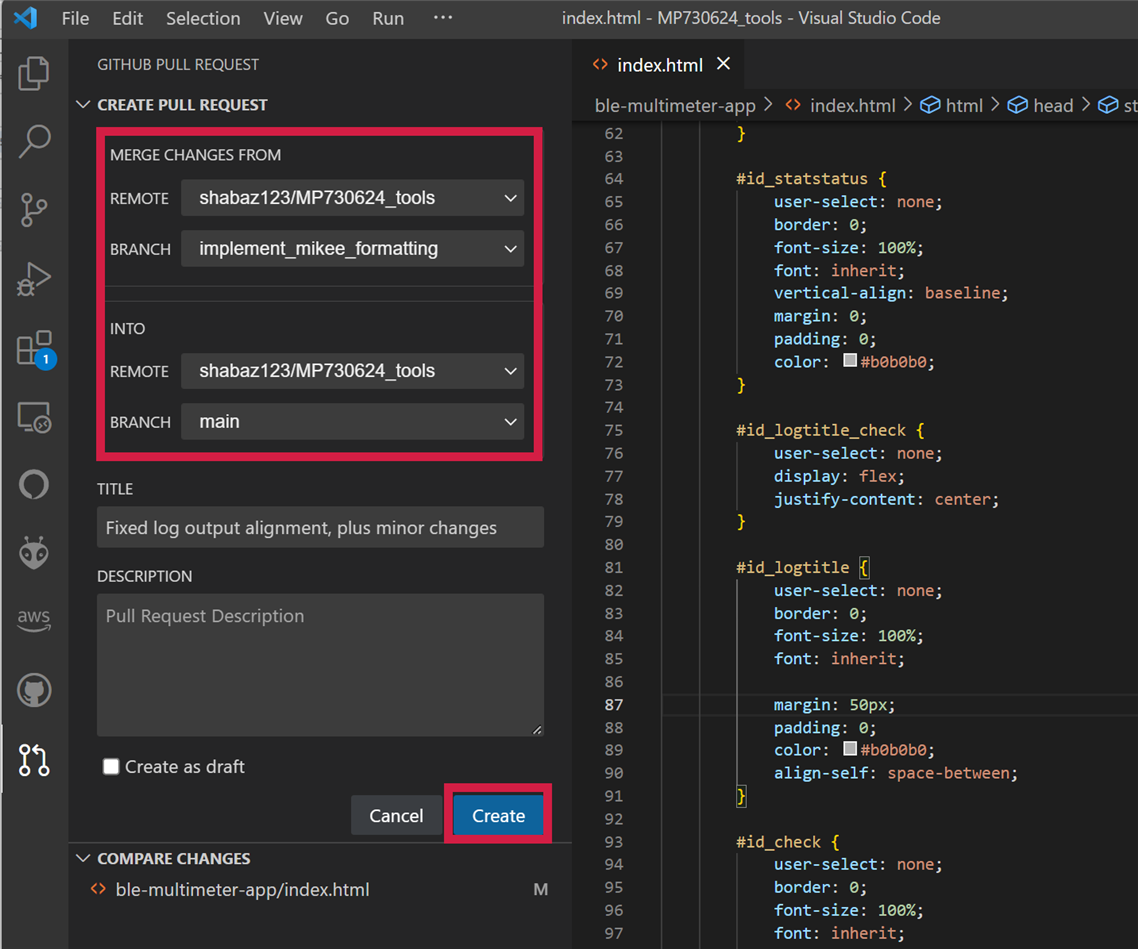
Type in any useful description (because others will read it before merging your code) and click Create.
Now, the owner of the GitHub repository will see a Request appear in the Pull Requests tab in the repository at github.com, and they can examine your proposed code changes, and perform the Merge operation for you, or reject your request if they don’t like it!
Merging the Code to the main branch
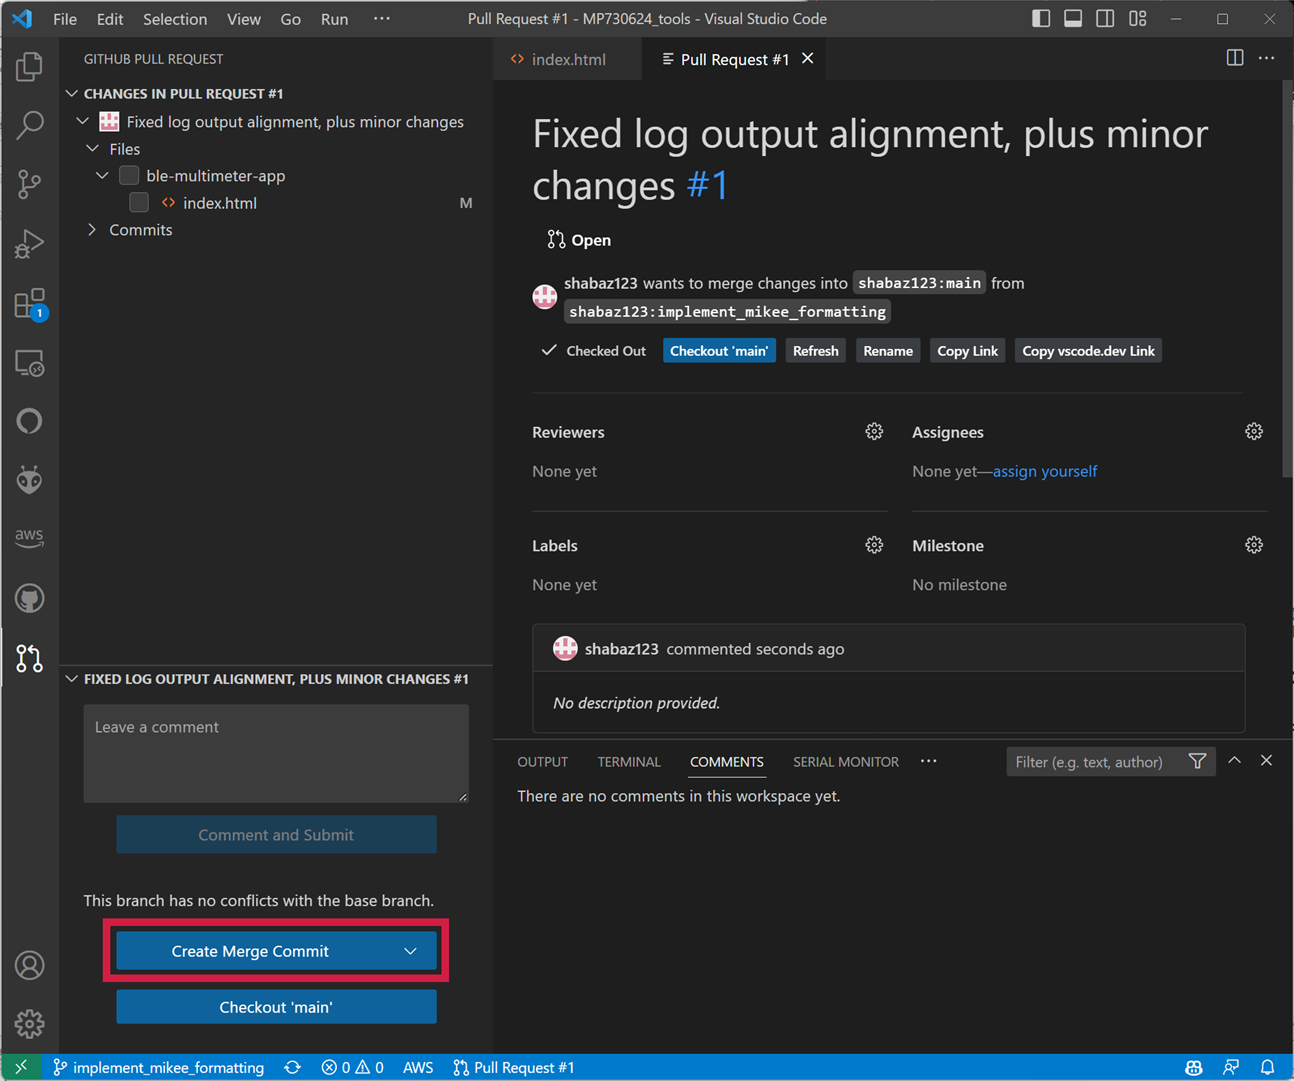
If it is your repository, then you can simply perform the merge yourself, although nothing beats a code review. In Visual Code, after you have created the Pull Request, you’ll see a blue Merge Pull Request blue button has appeared. Click it.
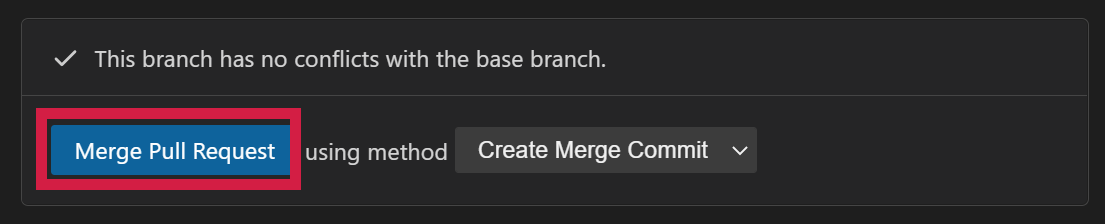
Then click on Create Merge Commit, as shown in the screenshot below.
That’s it! The code change is now merged and is visible in the main view on github.com

One last thing – if you go to the main branch view (click on the branch name at the bottom-left of the bottom blue bar in the Visual Code window), the old main branch code will be visible. So, click on the Sync circle arrow on that blue bar, as mentioned earlier. Now you will have the latest code in your main branch clone.
Viewing Branches Graphically
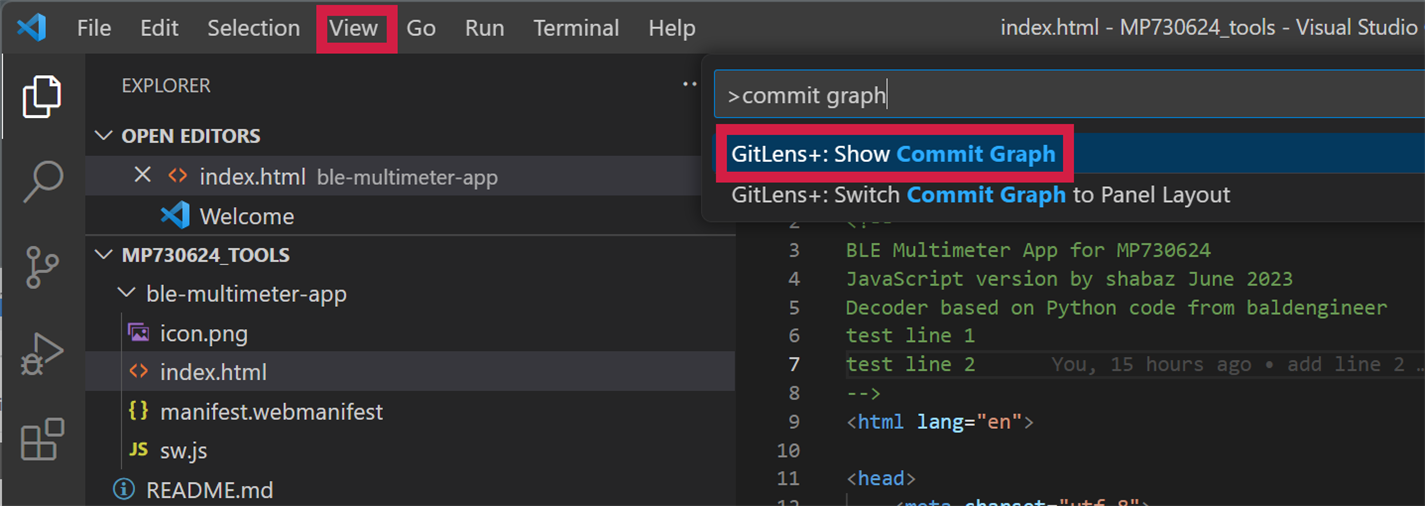
If desired, you can take a look at branches in a graphical manner. Go to View->Command Palette, and in the box that appears, type commit graph and select the following result:
A view will appear showing the branches, in a bottom-to-top format:
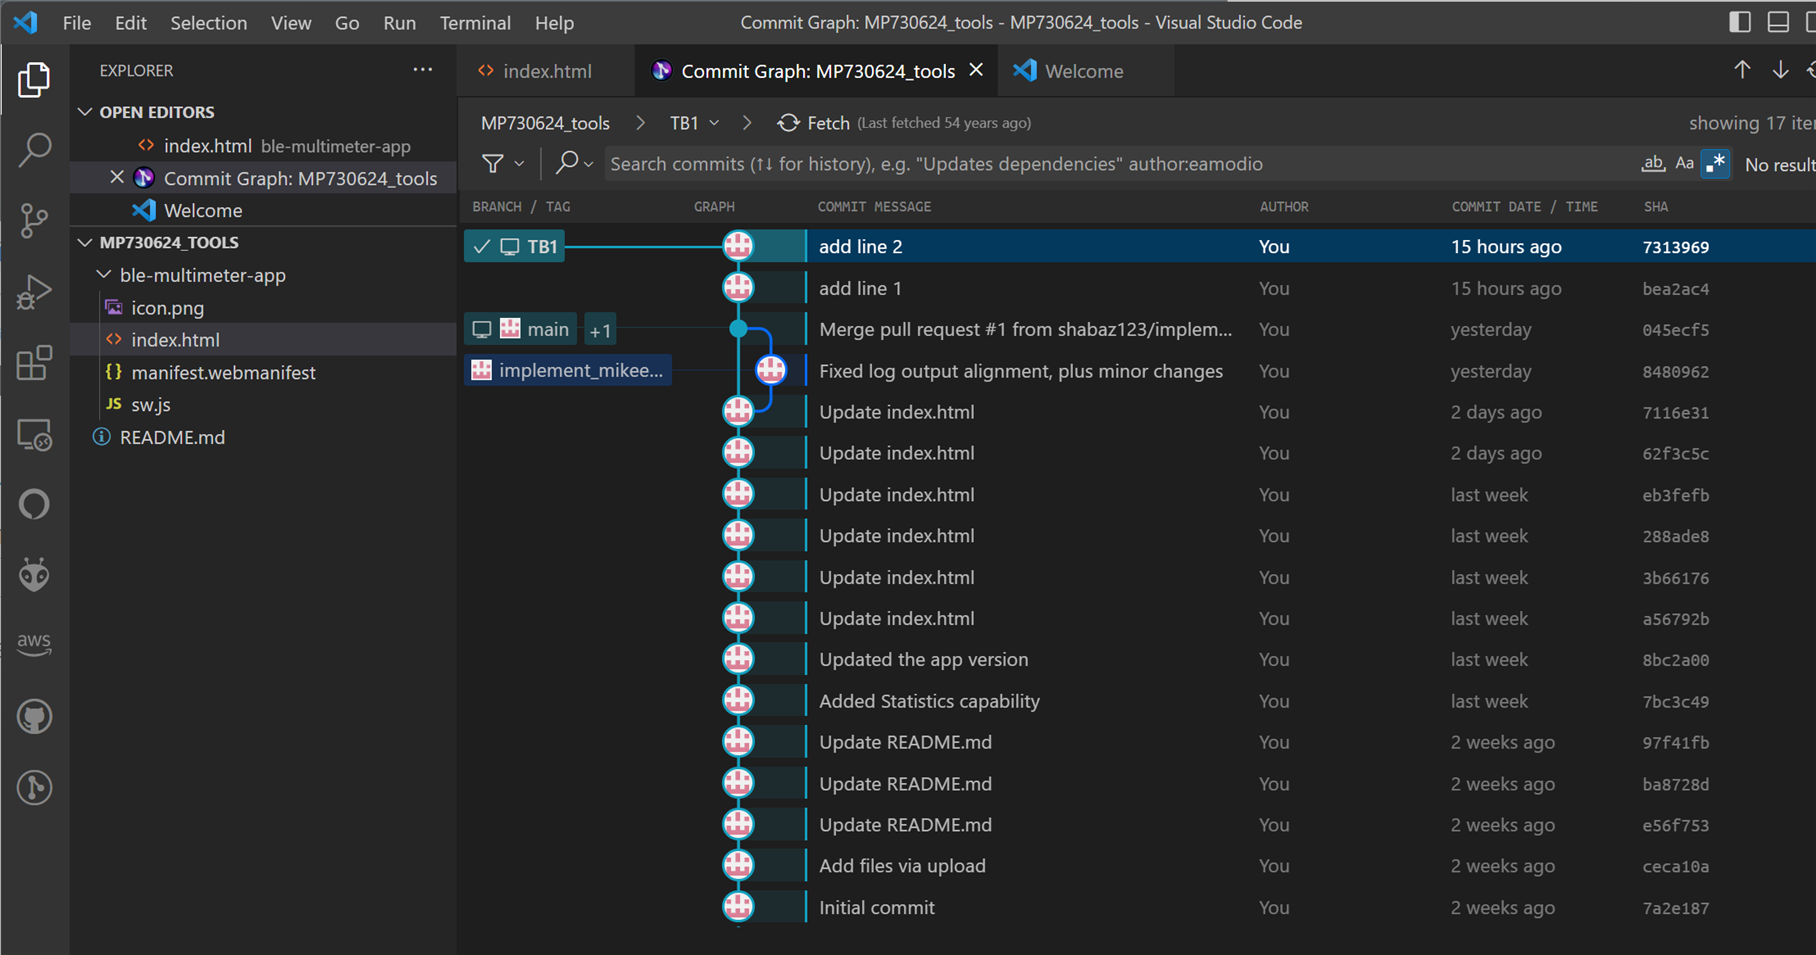
The above screenshot shows the importance of providing good descriptions when committing code. Otherwise, it will be difficult to follow.
Summary
GitHub allows users to easily improve projects incrementally, feature-by-feature, with reduced chance of errors, and the ability to go back in time to see what, where, and when code appeared in branches, and allowing collaboration with other developers.
Visual Code offers an easy graphical user interface (GUI) for performing all the operations to work with GitHub. The operations allow for code from a repository to be cloned or checked-out into any local folder on a PC, and then a new branch can be created, and the code can be edited and tested in the normal manner, using either Visual Code or any other development environment.
Branches can be uploaded to the GitHub repository in the cloud, and code committed and then synced to the branches on GitHub so that others can see what’s being developed.
Finally, when the new feature has been tested, a Pull Request sends a message to the repository owner, so that they can look at your committed code and merge it into the main branch.
Thanks for reading!
-

BigG
-
Cancel
-
Vote Up
0
Vote Down
-
-
Sign in to reply
-
More
-
Cancel
-

shabaz
in reply to BigG
-
Cancel
-
Vote Up
0
Vote Down
-
-
Sign in to reply
-
More
-
Cancel
Comment-

shabaz
in reply to BigG
-
Cancel
-
Vote Up
0
Vote Down
-
-
Sign in to reply
-
More
-
Cancel
Children