element14 Community
element14 Community
    Register Log In
  • Site
  • Search
  • Log In Register
  • Members
    Members
    • Benefits of Membership
    • Achievement Levels
    • Members Area
    • Personal Blogs
    • Feedback and Support
    • What's New on element14
  • Learn
    Learn
    • Learning Center
    • eBooks
    • STEM Academy
    • Webinars, Training and Events
    • More
  • Technologies
    Technologies
    • 3D Printing
    • FPGA
    • Industrial Automation
    • Internet of Things
    • Power & Energy
    • Sensors
    • More
  • Challenges & Projects
    Challenges & Projects
    • Design Challenges
    • element14 presents
    • Project14
    • Arduino Projects
    • Raspberry Pi Projects
    • More
  • Products
    Products
    • Arduino
    • Dev Tools
    • Manufacturers
    • Raspberry Pi
    • RoadTests & Reviews
    • Avnet Boards Community
    • More
  • Store
    Store
    • Visit Your Store
    • Choose Another Store
      • Europe
      •  Austria (German)
      •  Belgium (Dutch, French)
      •  Bulgaria (Bulgarian)
      •  Czech Republic (Czech)
      •  Denmark (Danish)
      •  Estonia (Estonian)
      •  Finland (Finnish)
      •  France (French)
      •  Germany (German)
      •  Hungary (Hungarian)
      •  Ireland
      •  Israel
      •  Italy (Italian)
      •  Latvia (Latvian)
      •  
      •  Lithuania (Lithuanian)
      •  Netherlands (Dutch)
      •  Norway (Norwegian)
      •  Poland (Polish)
      •  Portugal (Portuguese)
      •  Romania (Romanian)
      •  Russia (Russian)
      •  Slovakia (Slovak)
      •  Slovenia (Slovenian)
      •  Spain (Spanish)
      •  Sweden (Swedish)
      •  Switzerland(German, French)
      •  Turkey (Turkish)
      •  United Kingdom
      • Asia Pacific
      •  Australia
      •  China
      •  Hong Kong
      •  India
      •  Korea (Korean)
      •  Malaysia
      •  New Zealand
      •  Philippines
      •  Singapore
      •  Taiwan
      •  Thailand (Thai)
      • Americas
      •  Brazil (Portuguese)
      •  Canada
      •  Mexico (Spanish)
      •  United States
      Can't find the country/region you're looking for? Visit our export site or find a local distributor.
  • Translate
  • Profile
Open Source Hardware
  • Technologies
  • More
Open Source Hardware
Blog Low Battery Warning Indicator
  • Blog
  • Forum
  • Documents
  • Events
  • Members
  • Mentions
  • Sub-Groups
  • Tags
  • More
  • Cancel
  • New
Open Source Hardware requires membership for participation - click to join
Blog Post Actions
  • Subscribe by email
  • More
  • Cancel
  • Share
  • Subscribe by email
  • More
  • Cancel
Group Actions
  • Group RSS
  • More
  • Cancel
Engagement
Author: shabaz
Date Created: 22 Sep 2020 3:10 AM
Views: 2308
Likes: 18
Comments: 15
  • low voltage
  • tl431
  • low voltage alert
  • battery warning
Related
Recommended

Low Battery Warning Indicator

shabaz
shabaz
22 Sep 2020

Introduction

I like building battery-powered circuits, but always in the back of my mind is the thought that I really ought to provide a ‘low-battery’ indication! Since it isn’t usually a core feature of the project, it often gets forgotten. This ultra-short blog post describes my attempt at a generic low-battery indicator that could (hopefully) be reused for many projects.


What does it do?

This circuit alerts the user when the battery needs changing or charging. I have chosen the simplest way of determining that the battery capacity is low, and that’s using the battery terminal voltage.


A couple of circuits are described here. One of them lights up a warning LED whenever the voltage drops below a certain value. The other circuit can be used to replace the typical power-on LED. The behavior, in that case, is to use the LED as a normal power-on indicator, but begin to flash when the battery voltage is low. In other words, the LED should permanently light up when the circuit is powered on and the battery is good. When the battery is bad, the LED should flash.


The design here avoids using a microcontroller, but if a microcontroller exists in the project then using that could be the most economical and effective way, especially if a comparator or other analog input peripheral is built-in to the microcontroller chip. The circuits in this blog post are more useful for a purely analog design, especially low-noise projects.


Basic Circuit

There are many ways to implement a low-battery indicator circuit. This circuit is very low-cost, it uses the TL431 integrated circuit, which costs as little as $0.10 in quantities of a few hundred. The TL431 is a component with dozens of example use-cases, it's extremely versatile, and comes in more than half a dozen different packages, from through-hole varieties to surface-mount SOT-23.

The programmed voltage is achieved using the potential divider circuit created by R1 and R2. The entire circuit is fairly accurate while still being low-cost, based on the premise that modern resistors are low-cost and accurate too, and that combined with the TL431 internal reference voltage (2.5V) should work for providing a low voltage indicator that is ‘good enough’.


The formula for calculating the resistor value is:

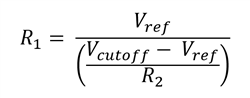
where Vref is 2.5V and Vcutoff is the desired threshold voltage for the alert indication. There is an Excel file attached to this blog post below, which can be used to quickly calculate the right resistance values.


Flashing LED Circuit

The circuit here keeps the low-cost theme going, by using a jellybean op-amp to implement a flashing LED.


Reading from right-to-left, op-amp U2B is unused (you could use a single op-amp chip if desired, but the LM2904 dual op-amp is cheap!). Next, op-amp U2B implements an oscillator circuit and the LED blinking rate can be varied by adjusting C2 or R7. The values in the diagram will implement a slow 1 Hz blink rate.


The circuit on the left is identical to the earlier simpler circuit, except that a PNP transistor is used to gate the oscillator. When the voltage is higher than the programmed threshold, transistor Q1 conducts and the oscillator does not run and the LED stays lit. When the voltage is lower than the threshold, the capacitor C2 can charge/discharge and the LED will blink. I like this circuit because it saves having to drill two holes for a power-on LED and a low-battery LED!


Circuit Adjustments

The circuit can function from 3V up to 26V or even higher (depending on the chosen op-amp). Here’s the detail on the adjustments that should be done to suit any particular needs.


Firstly, size the LED resistor (R5 or R8, depending on if you're using the simple or the flashing LED circuit) appropriately. The value in the diagram (1k) will probably work across the entire 3-26V range, but the LED may be extremely brightly lit at very high voltages, and dimly lit at very low voltages. 1k ohm is a good starting point. High-efficiency red LEDs are a good choice too.


Next, change the value of resistor R1, to suit the desired low-voltage indication threshold, using the formula mentioned earlier. There is a downloadable Excel file attached to this blog post, to make the calculation easier.


To change the blink rate, R7 can be modified. A lower value will result in a faster blink rate. A smaller capacitance value for C2 will also result in a faster blink rate.


Summary

These were a fairly trivial couple of circuits, but it solves what is perhaps a common problem, and it will hopefully enable battery-powered projects to be a bit more complete!

Attachments:
low-volt-tl431-calculator.xlsxlow-volt-tl431-calculator.xlsx
Anonymous

Top Comments

  • shabaz
    shabaz over 1 year ago in reply to genebren +5

    Hi Gene,


    Thanks! I forget to use it often too, but it's a really convenient part when I remember about it!

    This was a ultra-low-cost charger (5mA so not particularly fast, but that was ok for the use…

  • jw0752
    jw0752 over 1 year ago +4

    Hi Shabaz,


    Great spin off of the Amplifier Blog. You are providing lots of building blocks for anyone who likes to imagine and build their own projects.


    John

  • navadeepganeshu
    navadeepganeshu over 1 year ago +4

    Well depicted.

    I always love these kind of basic highly functional op-amp circuit applications and this is well explained. I feel, all challenges can be encountered and exiting applications can be created…

Parents
  • genebren
    genebren over 1 year ago

    Very cool designs!  I have used the TL431 as a reference, but never as a control element.  This was a great opportunity to learn something new and refresh my existing transistor and op-amp knowledge.

    • Cancel
    • Up +3 Down
    • Reply
    • More
    • Cancel
Comment
  • genebren
    genebren over 1 year ago

    Very cool designs!  I have used the TL431 as a reference, but never as a control element.  This was a great opportunity to learn something new and refresh my existing transistor and op-amp knowledge.

    • Cancel
    • Up +3 Down
    • Reply
    • More
    • Cancel
Children
  • shabaz
    shabaz over 1 year ago in reply to genebren

    Hi Gene,


    Thanks! I forget to use it often too, but it's a really convenient part when I remember about it!

    This was a ultra-low-cost charger (5mA so not particularly fast, but that was ok for the use-case) with the TLV431 for a NiMH batteryNiMH battery, that's a nice IC too, identical to the TL431 except the TLV431 has a 1.24V reference (it's often a bit more expensive than TL431).

    • Cancel
    • Up +5 Down
    • Reply
    • More
    • Cancel
Element14

element14 is the first online community specifically for engineers. Connect with your peers and get expert answers to your questions.

  • Members
  • Learn
  • Technologies
  • Challenges & Projects
  • Products
  • Store
  • About Us
  • Feedback & Support
  • FAQs
  • Terms of Use
  • Privacy Policy
  • Legal and Copyright Notices
  • Sitemap
  • Cookies

An Avnet Company © 2022 Premier Farnell Limited. All Rights Reserved.

Premier Farnell Ltd, registered in England and Wales (no 00876412), registered office: Farnell House, Forge Lane, Leeds LS12 2NE.

ICP 备案号 10220084.

Follow element14

  • Facebook
  • Twitter
  • linkedin
  • YouTube