element14 Community
element14 Community
    Register Log In
  • Site
  • Search
  • Log In Register
  • Community Hub
    Community Hub
    • What's New on element14
    • Feedback and Support
    • Benefits of Membership
    • Personal Blogs
    • Members Area
    • Achievement Levels
  • Learn
    Learn
    • Ask an Expert
    • eBooks
    • element14 presents
    • Learning Center
    • Tech Spotlight
    • STEM Academy
    • Webinars, Training and Events
    • Learning Groups
  • Technologies
    Technologies
    • 3D Printing
    • FPGA
    • Industrial Automation
    • Internet of Things
    • Power & Energy
    • Sensors
    • Technology Groups
  • Challenges & Projects
    Challenges & Projects
    • Design Challenges
    • element14 presents Projects
    • Project14
    • Arduino Projects
    • Raspberry Pi Projects
    • Project Groups
  • Products
    Products
    • Arduino
    • Avnet Boards Community
    • Dev Tools
    • Manufacturers
    • Multicomp Pro
    • Product Groups
    • Raspberry Pi
    • RoadTests & Reviews
  • Store
    Store
    • Visit Your Store
    • Choose another store...
      • Europe
      •  Austria (German)
      •  Belgium (Dutch, French)
      •  Bulgaria (Bulgarian)
      •  Czech Republic (Czech)
      •  Denmark (Danish)
      •  Estonia (Estonian)
      •  Finland (Finnish)
      •  France (French)
      •  Germany (German)
      •  Hungary (Hungarian)
      •  Ireland
      •  Israel
      •  Italy (Italian)
      •  Latvia (Latvian)
      •  
      •  Lithuania (Lithuanian)
      •  Netherlands (Dutch)
      •  Norway (Norwegian)
      •  Poland (Polish)
      •  Portugal (Portuguese)
      •  Romania (Romanian)
      •  Russia (Russian)
      •  Slovakia (Slovak)
      •  Slovenia (Slovenian)
      •  Spain (Spanish)
      •  Sweden (Swedish)
      •  Switzerland(German, French)
      •  Turkey (Turkish)
      •  United Kingdom
      • Asia Pacific
      •  Australia
      •  China
      •  Hong Kong
      •  India
      •  Korea (Korean)
      •  Malaysia
      •  New Zealand
      •  Philippines
      •  Singapore
      •  Taiwan
      •  Thailand (Thai)
      • Americas
      •  Brazil (Portuguese)
      •  Canada
      •  Mexico (Spanish)
      •  United States
      Can't find the country/region you're looking for? Visit our export site or find a local distributor.
  • Translate
  • Profile
  • Settings
Sensors
  • Technologies
  • More
Sensors
Blog Connecting 3D gesture sensing to devices using Bluetooth Smart
  • Blog
  • Forum
  • Documents
  • Quiz
  • Events
  • Polls
  • Members
  • Mentions
  • Sub-Groups
  • Tags
  • More
  • Cancel
  • New
Join Sensors to participate - click to join for free!
  • Share
  • More
  • Cancel
Group Actions
  • Group RSS
  • More
  • Cancel
Engagement
  • Author Author: jgmarcelino
  • Date Created: 15 Aug 2014 12:18 PM Date Created
  • Views 1443 views
  • Likes 1 like
  • Comments 9 comments
  • 3d_gesture
Related
Recommended

Connecting 3D gesture sensing to devices using Bluetooth Smart

jgmarcelino
jgmarcelino
15 Aug 2014

One of the most interesting uses for gesture sensing is connecting real world user gestures to "virtual" systems such as apps or games which can receive those gestures and take almost infinite number of actions based on those inputs.This opens up a world of applications from the small, such as smart switches that control your home lights, to museum exhibitions, in-store marketing and even wide scale "Playable Cities" projects (for example under the Future Cities Catapult)  Far too many application to mention in this simple blog post.


The Microchip MGC3130 Gesture IC looked perfect for this, so one of the first things I did when I received the MGC3130 Hillstar development kit for the Element14 roadtest was to try and connect it to "world" independently of the PC.


My technology of choice for connecting devices in the past 2 years has been Bluetooth Smart (I'll refer to it as Bluetooth Low Energy or BLE), an ultra low power, low latency, low cost, longer range version of Bluetooth - recently popularized by "iBeacon" proximity implementations. This lets me not only connect to computers (OSX, Linux and Windows 8)  but also to any of the 4 major mobile operating systems: iOS, Android, WP8.1 and Blackberry. All this with minimal power draw (around 15mA peak in transmit, which is very brief, most of the time it's only a few μA in idle) and great easy integration with apps.


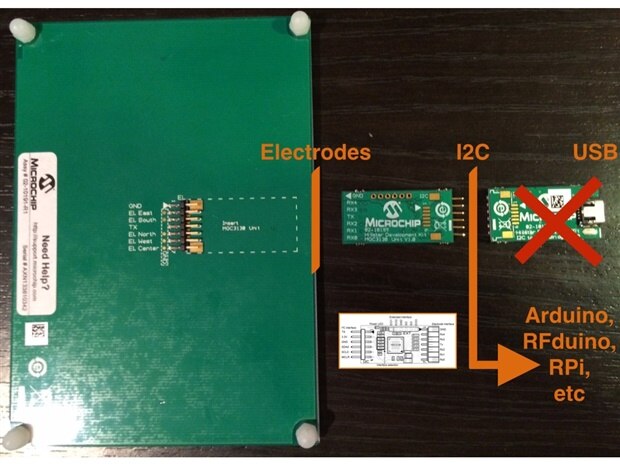
The Hillstar modular approach makes connecting to external controllers very easy. We simply remove the USB-to-I2C module and connect our controller directly to the I2C pins.


image

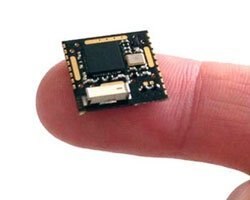
Now for the controller, I could have used an Arduino here (but note the MGC3130 uses 3.3V logic levels!) and a Bluetooth LE shield such as the one from RedBearLabs or Adafruit. However my go-to device for Bluetooth LE prototyping is still without a doubt the RFduino. For those who don't know the RFduino, it's a module that ported the Arduino environment to the ARM Cortex M0 processor that sits inside a Nordic nRF151822 Bluetooth Smart SoC. It works directly with the Arduino IDE (uses the same ARM compiler as the Arduino Due and now the Arduino Zero) and provides an easy to use Bluetooth LE stack on top. It runs on 3.3V (same as the MGC3130). It's also really really small:


image


It's not expensive, around £10 for one module or £15 if you want it mounted on a breadboard friendly PCB . The simplicity comes with limitations of course the biggest being that you can't create your own BLE protocol - or use encryption - so if you plan to get more serious with BLE you should check out something like one of the native Nordic nRF51822 development boards. Microchip themselves have also announced a Bluetooth Smart module, the RN4020, which I'm looking forward to trying when available. Still at the moment, you can't beat the RFduino for quick prototyping and proof of concept.


So here's my setup:


image


  1. Hillstar electrode board
  2. Microchip MGC3130 GestIC board
  3. RFduino DIP module (RFD22102)
  4. RFduino Double AAA battery shield (RFD22126)
  5. 2.54mm to 2mm pitch adapter cable (the MGC3130 is 2mm pitch)


For the Arduino code (that runs on the RFduino) I made some simple modifications to the Hover library since that board also uses the same MGC3130. The only tweaks were to make it work with the RFduino. Once the RFduino was programmed and connected to the Hillstar I ran the Hover example which prints the gesture events:


You don't have permission to edit metadata of this video.
Edit media
x
image
Upload Preview
image


Success!


Inspired by the progress I added Bluetooth code to the Hover example to send the events via Bluetooth LE. This again was very easy, essentially you only need three function calls to have BLE working and sending data with the RFduino. It's that easy.


Once the RFduino was programmed I removed it from the USB and connected to the RFduino battery pack since I also wanted to try the Hillstar in battery powered, portable operation. I also was afraid of issues to do with lack of earth grounding but this wasn't a problem at all. The RFduino battery pack is excellent for this since it provides regulated 3.3V DC out of 2xAAA batteries.


Then I made a little iPhone app to illustrate the operation:


You don't have permission to edit metadata of this video.
Edit media
x
image
Upload Preview
image


Again this worked very well and proved the MGC3130 Hillstar is ready to connect to devices and join the exciting world of apps!


The next step will be to work on power management, right not the circuit consumes around 22mA continuously which isn't ideal for battery runtime. The MGC3130 has a self wake-up mode which can can put itself to sleep and wake up when there's activity nearby, also triggering one of the EIO pins to wake up the host (RFduino). The EIO pins are available on the MGC3130 board but need to be soldered.


Other relatively simple plan in the near future is to connect the Hillstar to another device over the air (or multiple Hillstars) using the mesh-like Nordic GZLL protocol, which is supported in the RFduino concurrently with Bluetooth LE.


Finally I'll follow this up with an MBED library for the MGC3130 which will open up more Bluetooth LE possibilities, for example emulating HID (over GATT) modes.


  • Sign in to reply
  • richardrsalazar
    richardrsalazar over 5 years ago in reply to gpolder

    Hi Gerrit,

    Ok I understand.  thanks very much for replying...:-)


    Best,

    Richard

    • Cancel
    • Vote Up 0 Vote Down
    • Sign in to reply
    • More
    • Cancel
  • gpolder
    gpolder over 5 years ago in reply to richardrsalazar

    Hi Richard,


    for programming the Arduino there are plenty tutorials available, so I would like to advise to search around on the web.

    With respect to the Hillstar, in the link mentioned above is some example code using the Hover library.

    The Sparki is a special type of arduino, so you can take out the Hover code and use it in your Arduino.

    With proper connections to the Hillstar (also mentioned in the link) you can be up and running easily.


    Best,

    Gerrit.

    • Cancel
    • Vote Up 0 Vote Down
    • Sign in to reply
    • More
    • Cancel
  • richardrsalazar
    richardrsalazar over 5 years ago in reply to gpolder

    Hi Gerrit,

    Thanks for the reply.  What I actually wanted to do is to be able to provide haptic feedback to my Hillstar Kit. 

    I have already bought the 3130 Hillstart Kit, as well as the Arduino Uno circuit board and haptic motor from mikroE.

    My problem right now is how to do the embedded software that I need to flash unto the Arduino Uno.  Can you

    help me out with this?  I don't have programming skills, but I can follow instructions pretty well.


    Thanks!

    Richard

    • Cancel
    • Vote Up 0 Vote Down
    • Sign in to reply
    • More
    • Cancel
  • gpolder
    gpolder over 5 years ago in reply to richardrsalazar

    Hi Richard,


    maybe this: Hillstar MGC3130 3D Controlled Sparki Robot (3)  will help.


    Gerrit.

    • Cancel
    • Vote Up 0 Vote Down
    • Sign in to reply
    • More
    • Cancel
  • richardrsalazar
    richardrsalazar over 5 years ago

    Hi Jose,

    I can see that this post was done 5 years ago.  But I have questions here.

    1.  I'm trying to understand how you programmed the RFDuino to accept the Hover data from the Hillstar electrode board.

    2.  Can you give me a copy of the actual program?  And the modifications you made to it?


    Thanks Very Much!  and I really appreciate it if you can help me out.


    • Cancel
    • Vote Up 0 Vote Down
    • Sign in to reply
    • More
    • Cancel
>
element14 Community

element14 is the first online community specifically for engineers. Connect with your peers and get expert answers to your questions.

  • Members
  • Learn
  • Technologies
  • Challenges & Projects
  • Products
  • Store
  • About Us
  • Feedback & Support
  • FAQs
  • Terms of Use
  • Privacy Policy
  • Legal and Copyright Notices
  • Sitemap
  • Cookies

An Avnet Company © 2025 Premier Farnell Limited. All Rights Reserved.

Premier Farnell Ltd, registered in England and Wales (no 00876412), registered office: Farnell House, Forge Lane, Leeds LS12 2NE.

ICP 备案号 10220084.

Follow element14

  • X
  • Facebook
  • linkedin
  • YouTube