element14 Community
element14 Community
    Register Log In
  • Site
  • Search
  • Log In Register
  • About Us
  • Community Hub
    Community Hub
    • What's New on element14
    • Feedback and Support
    • Benefits of Membership
    • Personal Blogs
    • Members Area
    • Achievement Levels
  • Learn
    Learn
    • Ask an Expert
    • eBooks
    • element14 presents
    • Learning Center
    • Tech Spotlight
    • STEM Academy
    • Webinars, Training and Events
    • Learning Groups
  • Technologies
    Technologies
    • 3D Printing
    • FPGA
    • Industrial Automation
    • Internet of Things
    • Power & Energy
    • Sensors
    • Technology Groups
  • Challenges & Projects
    Challenges & Projects
    • Design Challenges
    • element14 presents Projects
    • Project14
    • Arduino Projects
    • Raspberry Pi Projects
    • Project Groups
  • Products
    Products
    • Arduino
    • Avnet Boards Community
    • Dev Tools
    • Manufacturers
    • Multicomp Pro
    • Product Groups
    • Raspberry Pi
    • RoadTests & Reviews
  • Store
    Store
    • Visit Your Store
    • Choose another store...
      • Europe
      •  Austria (German)
      •  Belgium (Dutch, French)
      •  Bulgaria (Bulgarian)
      •  Czech Republic (Czech)
      •  Denmark (Danish)
      •  Estonia (Estonian)
      •  Finland (Finnish)
      •  France (French)
      •  Germany (German)
      •  Hungary (Hungarian)
      •  Ireland
      •  Israel
      •  Italy (Italian)
      •  Latvia (Latvian)
      •  
      •  Lithuania (Lithuanian)
      •  Netherlands (Dutch)
      •  Norway (Norwegian)
      •  Poland (Polish)
      •  Portugal (Portuguese)
      •  Romania (Romanian)
      •  Russia (Russian)
      •  Slovakia (Slovak)
      •  Slovenia (Slovenian)
      •  Spain (Spanish)
      •  Sweden (Swedish)
      •  Switzerland(German, French)
      •  Turkey (Turkish)
      •  United Kingdom
      • Asia Pacific
      •  Australia
      •  China
      •  Hong Kong
      •  India
      •  Korea (Korean)
      •  Malaysia
      •  New Zealand
      •  Philippines
      •  Singapore
      •  Taiwan
      •  Thailand (Thai)
      • Americas
      •  Brazil (Portuguese)
      •  Canada
      •  Mexico (Spanish)
      •  United States
      Can't find the country/region you're looking for? Visit our export site or find a local distributor.
  • Translate
  • Profile
  • Settings
Test & Tools
  • Technologies
  • More
Test & Tools
Blog Example LabVIEW Scenario: test a design with a Rigol PSU and a Keithley DMM
  • Blog
  • Forum
  • Documents
  • Files
  • Members
  • Mentions
  • Sub-Groups
  • Tags
  • More
  • Cancel
  • New
Join Test & Tools to participate - click to join for free!
  • Share
  • More
  • Cancel
Group Actions
  • Group RSS
  • More
  • Cancel
Engagement
  • Author Author: Jan Cumps
  • Date Created: 29 Apr 2020 8:00 PM Date Created
  • Views 4886 views
  • Likes 10 likes
  • Comments 15 comments
  • dp832a
  • dmm6500
  • keithley
  • labview
  • rigol
Related
Recommended

Example LabVIEW Scenario: test a design with a Rigol PSU and a Keithley DMM

Jan Cumps
Jan Cumps
29 Apr 2020

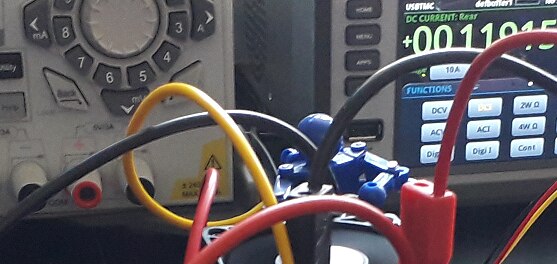
LabVIEW 2020 Community Edition has just been released (yesterday on the day I type this).

I was part of the Beta test team.

To celebrate the release, a flow to characterise a lab instrument: use a power supply and a digital meter to validate a DC load.

image

Instruments used:

  • PSU: Rigol 832A
  • DMM: Keithley DMM6500Keithley DMM6500
  • device under test: our eLoad.

I made this LabVIEW flow because I needed it, not for this blog. But maybe that's an asset. It's a real flow. And it's not hard to adapt this to other lab instruments.


image

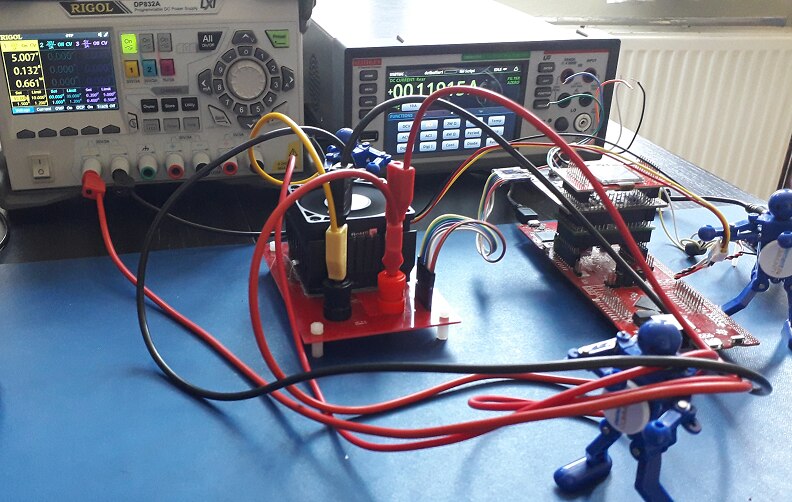
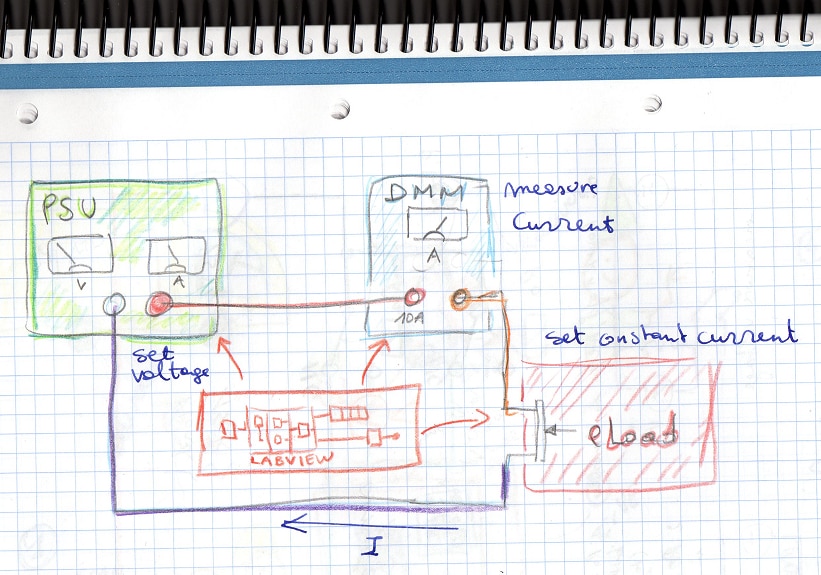
test circuit for this blog. The PSU delivers power, the eLoad draws it. The DMM measures the current. All are controlled by LabVIEW


IVI: Interchangeable Virtual Instrument. What's that?


All three devices in this setup use the LabView virtual instrument interface (IVI).

If you have another PSU or DMM (or even the load!) you can substitute the LabVIEW blocks with those of your instrument.


IVI is an initiative to have a similar driver for similar instruments.  Reusable abstract blocks that represent a DMM, scope, PSU, ...

Whether you have PSU (or other lab instrument) from vendor A or B, the IVI drivers try to help you abstract from that.

It actually works if two instruments have the same functionality. I was able to port a Rigol oscilloscope flow to a Tektronix one with little changes.

When I wrote the IVI drivers for my load, I consulted the ones made by BK and other suppliers, to find common ground.

I've investigated IVI drivers from several suppliers, and they tried to stick to this paradigm for common functionality.


Experienced users will tell that this isn't magic, and that's true.

It works when you're using a DMM, PSU or scope as usual and do your best to abstract from the hardware (like programming portable C image ).

It doesn't when you've built a flow with a specific instrument in mind.


The IVI drivers for the DMM and PSU I use are available from National Instrument's website.

The IVI driver for the eLoad is developed and available on element14.


The LabVIEW Test Panel


You can control the test behaviour from the control panel I built for this flow.


The red square defines what the power supply does.

It will run a number of cycles, stepping from start voltage, increasing the output of the PSU with the voltage increment.

If you select single run, the flow will stop after these steps are taken. Else the process will run until you push the stop button.


The green square groups the settings for the device under test - the DC load.

I'm using the low level API here: talking directly to the DAC that controls the constant current.

Similar to the PSU, it steps through a number of DAC settings, with a start point, a number of steps and an increment.

This is the inner loop. It's running through all the settings for each step the PSU takes.


image


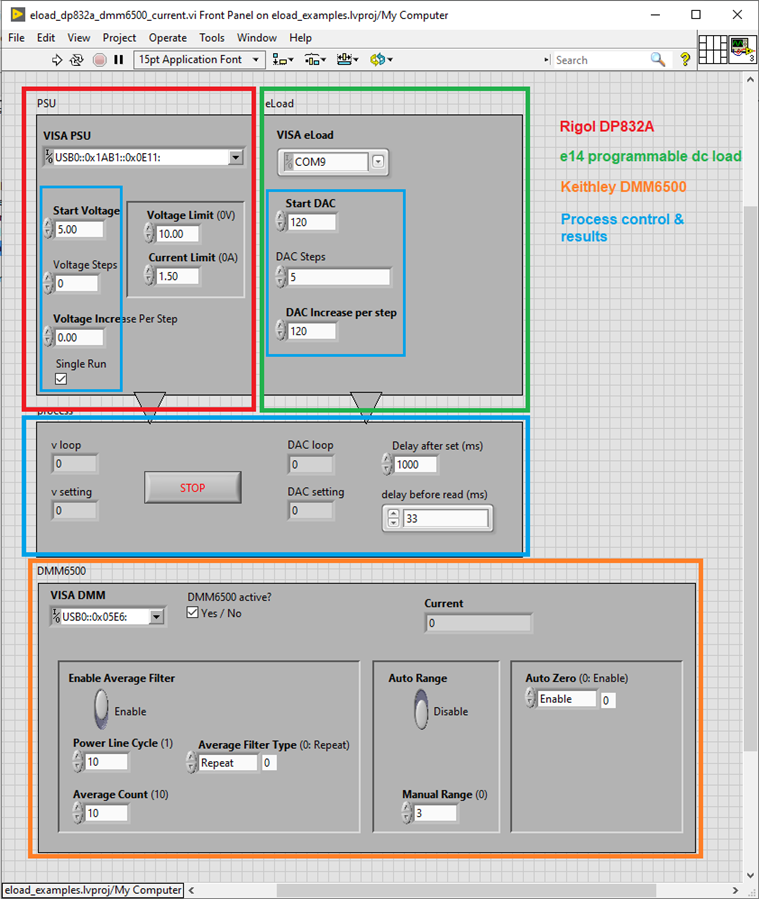
The blue rectangle shows the progress of the test.

You can see how many iterations the outer loop (left) and the inner loop have taken.


The orange part are the DMM settings and results. The meter is set to current mode. Measurements are taken in the inner loop, after the eLoad constant current is set.

All values are written to a spreadsheet.

Additionally, some measurements of the PSU and the ADCs of the load are logged.


image


This allows to see the effective current that the load draws for a given DAC setting.

And how the ADCs measure that current, the temperature and the voltage at the terminals.


We have 3 compare points for the current - that is the same in all three instruments. It's a series circuit.

  • I ask the PSU how much current it delivers (reasonably precise).
  • I ask the DMM what current it measures (very precise).
  • I record the value of the ADC that measures the voltage (I want to make that precise).

Because the data is in a spreadsheet, you can run analysis over the values to find out the behaviour of the load. Both the control part and the measure part of it.


image


The LabVIEW Flow


You'll always find a part of the process that connects to the instruments and initialises them. And a closing block.

These I'm not going to show here. I attach the project so that you can view those yourself.

Let's focus on the outer and inner loop.
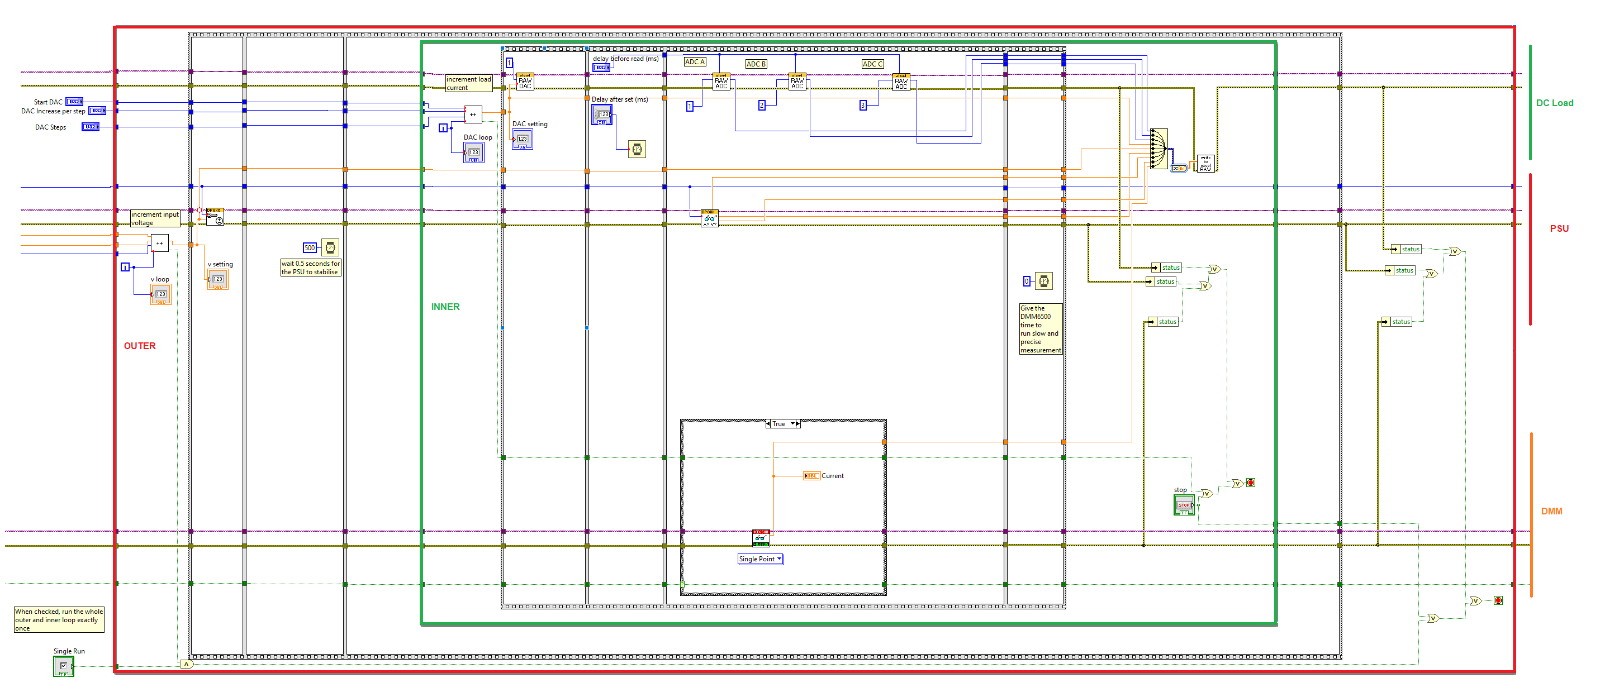
 

image

click to enlarge


You'll see three lanes. The DC Load on top, the PSU in the middle and the DMM at the bottom.

The outer loop is marked red and controls the PSU.

You can see an incrementer block that alters the settings at each iteration.

Each loop, the new value for the PSU voltage is calculated and sent to the instrument.


The green square marks the inner loop - executed several times for each PSU voltage setting.

Again it's controlled by an incrementer block. The desired DAC setting is calculated and sent to the eLoad.

Then - in the middle of the inner loop, after all instruments are set, the flow retrieves data from load, PSU and DMM.

At the end of the inner loop, one row of data is written to a spreadsheet.


At a few places I've placed a wait, to allow things to settle and - in case of the eLoad - wait for the firmware to retrieve the last ADC values.


image


The flow is attached. And a sample spreadsheet.

You can view the full flow with the LabVIEW Community Edition.

Attachments:
eload_dp832a_dmm6500_current_25.xlsxeload_dp832a_dmm6500_current_25.xlsx
eload_examples20200429.zip
imagelabviewreport.pdf
  • Sign in to reply

Top Comments

  • three-phase
    three-phase over 5 years ago +2
    Very nice test project and blog. No doubt it will be a useful concept that gets reused multiple times. Kind regards.
  • memyselfandi
    memyselfandi over 5 years ago +2
    A nice project - thanks for your write-up, Jan! I had used LabView (releases LV8.0, LV 2009 and LV2014) in the past for similar projects. However, I had changed my mind a bit and I am learning some Python…
  • neuromodulator
    neuromodulator over 5 years ago in reply to memyselfandi +2
    You can use the best of both worlds. It is possible to link python to labview!
Parents
  • memyselfandi
    memyselfandi over 5 years ago

    A nice project - thanks for your write-up, Jan!

    I had used LabView (releases LV8.0, LV 2009 and LV2014) in the past for similar projects. However, I had changed my mind a bit and I am learning some Python programming and https://pyvisa.readthedocs.io/ PyVisa now.
    LabView allows one to create very nice GUIs and post-processing, but even with the extensive use of subVIs more complex projects turn into hard-to-comprehend visual coding.

    Really no offense here, as I think this is a great project - but if you were to explain the data flow of your code to another person, this would take you some serious amount of time...

    Cheers,

    M.

    • Cancel
    • Vote Up +2 Vote Down
    • Sign in to reply
    • More
    • Cancel
  • neuromodulator
    neuromodulator over 5 years ago in reply to memyselfandi

    You can use the best of both worlds. It is possible to link python to labview!

    • Cancel
    • Vote Up +2 Vote Down
    • Sign in to reply
    • More
    • Cancel
Comment
  • neuromodulator
    neuromodulator over 5 years ago in reply to memyselfandi

    You can use the best of both worlds. It is possible to link python to labview!

    • Cancel
    • Vote Up +2 Vote Down
    • Sign in to reply
    • More
    • Cancel
Children
No Data
element14 Community

element14 is the first online community specifically for engineers. Connect with your peers and get expert answers to your questions.

  • Members
  • Learn
  • Technologies
  • Challenges & Projects
  • Products
  • Store
  • About Us
  • Feedback & Support
  • FAQs
  • Terms of Use
  • Privacy Policy
  • Legal and Copyright Notices
  • Sitemap
  • Cookies

An Avnet Company © 2025 Premier Farnell Limited. All Rights Reserved.

Premier Farnell Ltd, registered in England and Wales (no 00876412), registered office: Farnell House, Forge Lane, Leeds LS12 2NE.

ICP 备案号 10220084.

Follow element14

  • X
  • Facebook
  • linkedin
  • YouTube