element14 Community
element14 Community
    Register Log In
  • Site
  • Search
  • Log In Register
  • Community Hub
    Community Hub
    • What's New on element14
    • Feedback and Support
    • Benefits of Membership
    • Personal Blogs
    • Members Area
    • Achievement Levels
  • Learn
    Learn
    • Ask an Expert
    • eBooks
    • element14 presents
    • Learning Center
    • Tech Spotlight
    • STEM Academy
    • Webinars, Training and Events
    • Learning Groups
  • Technologies
    Technologies
    • 3D Printing
    • FPGA
    • Industrial Automation
    • Internet of Things
    • Power & Energy
    • Sensors
    • Technology Groups
  • Challenges & Projects
    Challenges & Projects
    • Design Challenges
    • element14 presents Projects
    • Project14
    • Arduino Projects
    • Raspberry Pi Projects
    • Project Groups
  • Products
    Products
    • Arduino
    • Avnet Boards Community
    • Dev Tools
    • Manufacturers
    • Multicomp Pro
    • Product Groups
    • Raspberry Pi
    • RoadTests & Reviews
  • Store
    Store
    • Visit Your Store
    • Choose another store...
      • Europe
      •  Austria (German)
      •  Belgium (Dutch, French)
      •  Bulgaria (Bulgarian)
      •  Czech Republic (Czech)
      •  Denmark (Danish)
      •  Estonia (Estonian)
      •  Finland (Finnish)
      •  France (French)
      •  Germany (German)
      •  Hungary (Hungarian)
      •  Ireland
      •  Israel
      •  Italy (Italian)
      •  Latvia (Latvian)
      •  
      •  Lithuania (Lithuanian)
      •  Netherlands (Dutch)
      •  Norway (Norwegian)
      •  Poland (Polish)
      •  Portugal (Portuguese)
      •  Romania (Romanian)
      •  Russia (Russian)
      •  Slovakia (Slovak)
      •  Slovenia (Slovenian)
      •  Spain (Spanish)
      •  Sweden (Swedish)
      •  Switzerland(German, French)
      •  Turkey (Turkish)
      •  United Kingdom
      • Asia Pacific
      •  Australia
      •  China
      •  Hong Kong
      •  India
      •  Korea (Korean)
      •  Malaysia
      •  New Zealand
      •  Philippines
      •  Singapore
      •  Taiwan
      •  Thailand (Thai)
      • Americas
      •  Brazil (Portuguese)
      •  Canada
      •  Mexico (Spanish)
      •  United States
      Can't find the country/region you're looking for? Visit our export site or find a local distributor.
  • Translate
  • Profile
  • Settings
Test & Tools
  • Technologies
  • More
Test & Tools
Blog i2c Debugging with a RIGOL DS1054Z Oscilloscope: Trigger and Decode
  • Blog
  • Forum
  • Documents
  • Files
  • Members
  • Mentions
  • Sub-Groups
  • Tags
  • More
  • Cancel
  • New
Join Test & Tools to participate - click to join for free!
  • Share
  • More
  • Cancel
Group Actions
  • Group RSS
  • More
  • Cancel
Engagement
  • Author Author: Jan Cumps
  • Date Created: 10 Jul 2020 1:58 PM Date Created
  • Views 13059 views
  • Likes 8 likes
  • Comments 9 comments
  • tutorial
  • i2c
  • trigger
  • oscilloscope
  • protocol
  • decode
  • rigol
Related
Recommended

i2c Debugging with a RIGOL DS1054Z Oscilloscope: Trigger and Decode

Jan Cumps
Jan Cumps
10 Jul 2020

This real world example shows how to trigger a RIGOL DS1054Z oscilloscope at a specific point in an i2c communication, and then check signal + data.

image

The DS1054Z comes with i2c functionality. In the past they were options you bought separately. Since 2019 they are standard.


Test Setup and Hooking up the Oscilloscope


Any i2c setup will do. Just pick whatever design you have that uses the protocol.

I used a very simple design: An Arduino UNO talking to an RGB + ir sensor from RoHM: BH174BH174.

The oscilloscope's channel 1 is connected to the i2c SCI signal. Channel 2 to SDA.


image

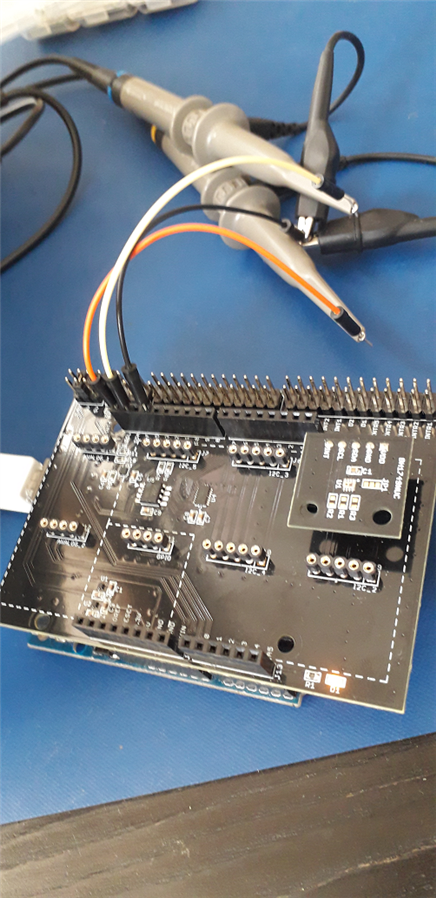
You can follow along just as well if you use a LaunchPad, a Pi or a BB with an i2c design. Or a consumer product that you want to probe.


Scenario: Trigger on a well defined communication spot


I'm assuming here that you want to inspect a particular event in the i2c communication.

In an i2c device, a lot of data can fly around. From and to the controller. Communication with several ICs.

In the example here, I want to check i2c signals specifically when the RoHM sensor in the design is queried for light levels.


image


The code that generates that communication is:


byte BH1749NUC::get_rawval(unsigned char *data)
{
  byte rc;

  rc = read(BH1749NUC_RED_DATA_LSB, data, GET_BYTE_RED_TO_GREEN2);
  if (rc != 0) {
    Serial.println(F("Can't get BH1749NUC RGB, IR and GREEN2 value"));
  }

  return (rc);
}


Our end goal is to trigger exactly when this line of the code is executed to retrieve the data:

  rc = read(BH1749NUC_RED_DATA_LSB, data, GET_BYTE_RED_TO_GREEN2);


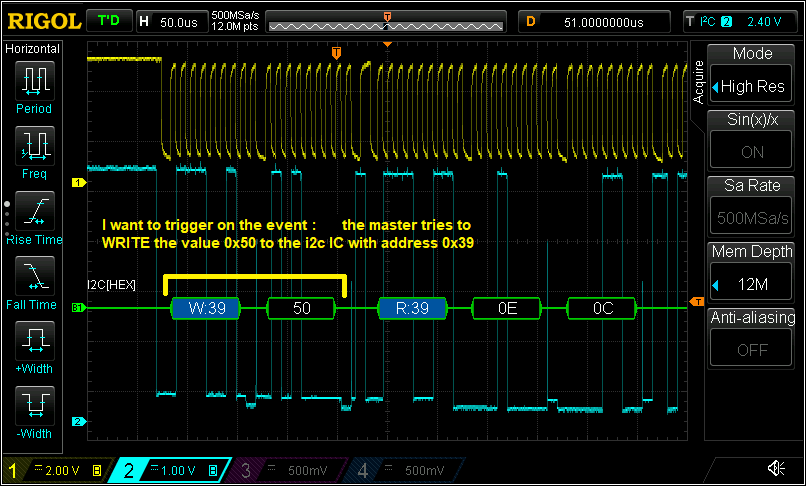
In i2c lingo, this is the sequence we want to trigger on[write to 0x39] [0x50] .


We can use the ICs i2c address to single out the communication with the RoHM IC, and not have any other IC's data captured by accident.

#define BH1749NUC_DEVICE_ADDRESS_39             (0x39)    // 7bit Addrss


That's a good begin, let's set the trigger for that.

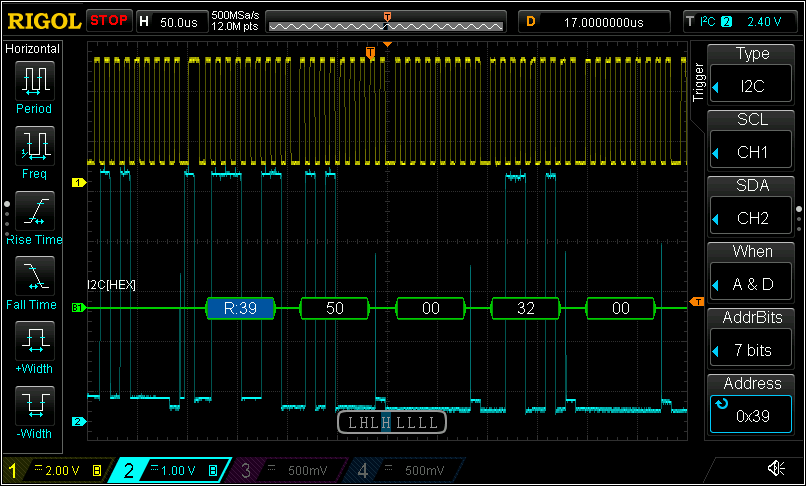
Press the Trigger Menu button, then select Type I2C.


image


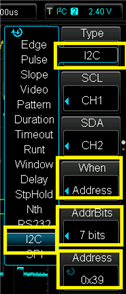
In the When menu, select Address. Set AddrBits to 7  - our RoHM sensor has a 7 bit address.

Then dial the Address to the ICs address, 0x39.


image

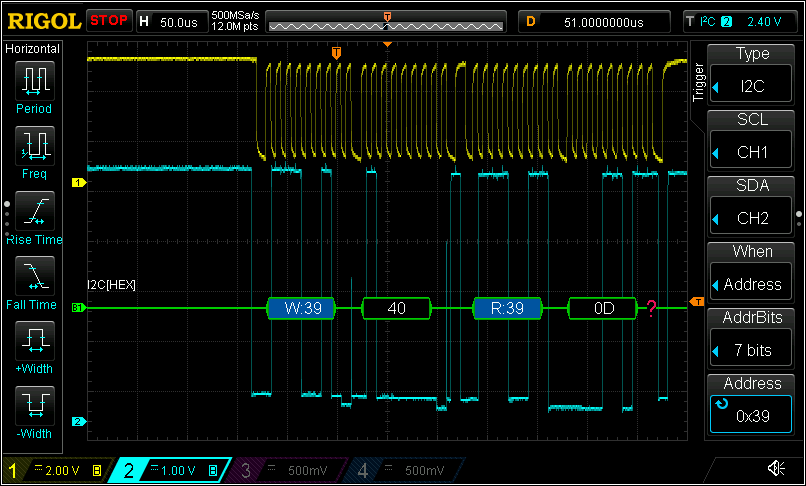
You may have to play with the Trigger Level a bit, and when that's set right, the scope will stop whenever the address 0X39 is used in i2c communication.

This isn't perfect yet. We get any communication. Not always the part where we want to read the light levels (as seen in the capture above).


An additional attribute we can use is the particular command used to get that data.

#define BH1749NUC_RED_DATA_LSB                  (0x50)


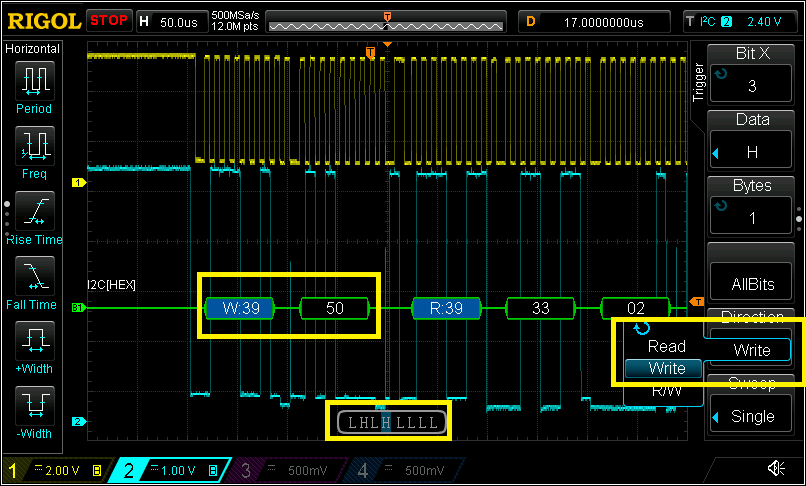
We can use a different When setting to trigger on an address + data sequence: A & D

Let's define the trigger that way. We already set the address to 0x39.

The data mask becomes visual when selecting the A&D option. You have to set it bit per bit.

The data value we want to filter on is 0x50, 0b01010000.

On the scope, where they use H and L instead of 1 and 0, you set the mask as LHLHLLLL.

image


Once that's done, the scope will trigger when the address is 0x39 and the data starts with 0x50.

In many cases that's exactly what you want. It 'll work most of the time.

But there may be unwanted occurrences: when the IC returns a data value of 0x50 for RED (as seen in the capture above)

In that case, you also get a sequence of 0x39 and 0x50.


Here is where we can use a third refinement to only trigger when 0x50 is used in a write sequence. Not in a read sequence.

image


This is a very sturdy setup. The oscilloscope will only trigger when it asks the IC to return RGB + ir levels. All other data sequences are ignored.


Decode and Inspect the Data


Now that we're able to capture the exact point of interest, let's review the payload.

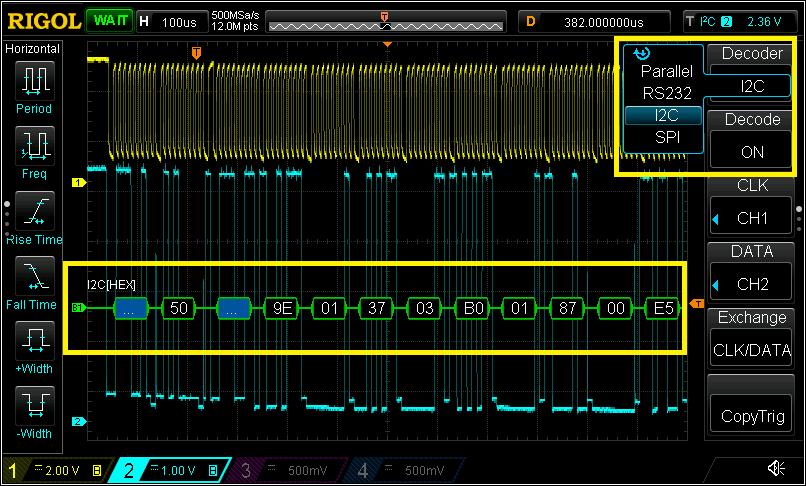
The i2c decoder is available via the Math button.

image


A little trick to allow you to zoom out from the current capture window is to use the maximum amount of sample memory available.

This is again a standard option when you purchased the scope in 2019 or later.

Press Acquire, then Mem Depth -> 12M.


Standard, the math signal shows the data. You can select the formatting. I used HEX. Ascii may also be useful, if text data is exchanged.

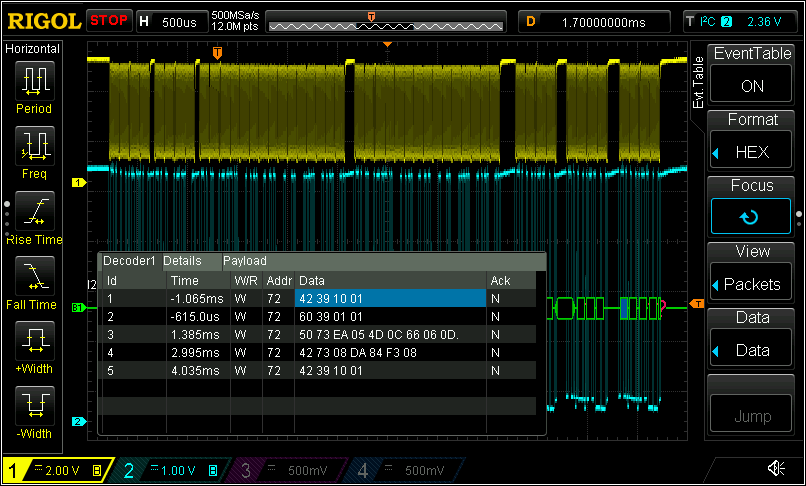
There's also a table view, available in the same Math -> Decode menu.

This one gives a better view of the full packet, without the need to enlarge the time base and scroll through the signal.

image


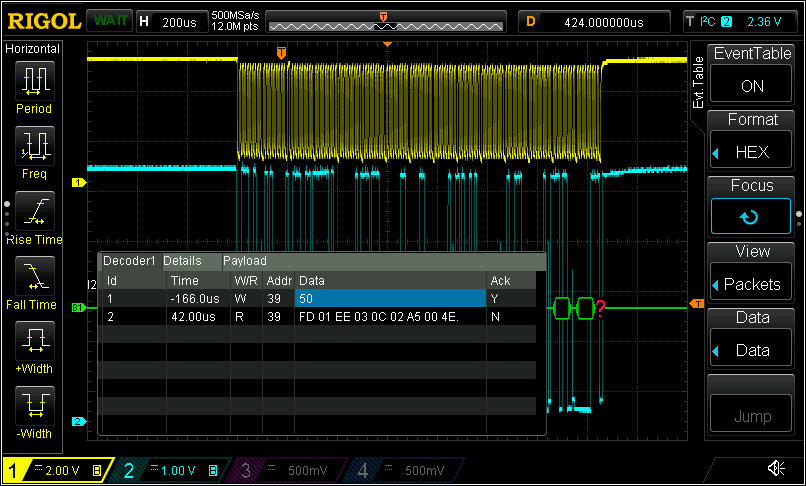
Here is another example, using the same hardware but different firmware.

It's Adafruit's library and sample code for the same IC. It uses higher communication rate.

In this example you see the value of big memory. We also can show a part of the communication before the trigger point.

Spot that the trigger is again exactly at the data point we've set.

image


Another interesting aspect of the captured data is the integrity of the analogue signal.

We're working with an oscilloscope, and that's what it's specialised in - the actual physical signal on the i2c lines.

image

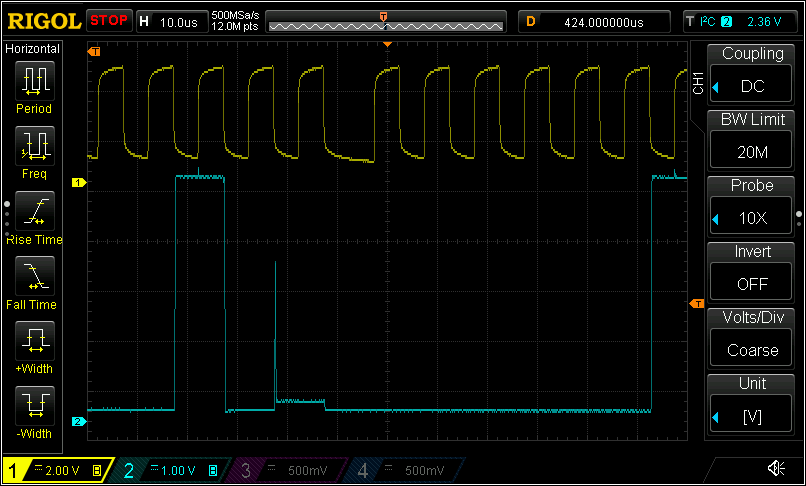
If you have intermittent communication issues, this view may help you to detect if poor signal integrity is at play.

  • Sign in to reply

Top Comments

  • gervasi
    gervasi over 5 years ago +4
    It's nice that it's free. I've seen that feature offered for $1000, and another $1000 if you want to decode SPI.
  • Jan Cumps
    Jan Cumps over 5 years ago in reply to genebren +2
    genebren wrote: ... I will have to go back and study my PicoScope to see if I can specify a 'trigger when' condition... Not yet: https://www.picotech.com/support/topic40355.html
  • Jan Cumps
    Jan Cumps over 4 years ago in reply to davidbitton +2
    It's a normal capture: The i2c decode and trigger are licensed features. If the scope is sold after 2017, these options are part of the purchase. Else they are payable. Often on sale at the major distributors…
  • davidbitton
    davidbitton over 4 years ago in reply to Jan Cumps

    it's the "zoom out" that has me tripped up.

    • Cancel
    • Vote Up 0 Vote Down
    • Sign in to reply
    • More
    • Cancel
  • Jan Cumps
    Jan Cumps over 4 years ago in reply to davidbitton

    From memory (the scope is on my bench but I don't have an i2c circuit under test):

    - set memory capture to maximum in the Acquire settings

    - capture

    - zoom out


    I'd have to redo the exercise to remember how I did it. Feels natural when I have the scope in action. Hard to recall from memory...

    • Cancel
    • Vote Up +1 Vote Down
    • Sign in to reply
    • More
    • Cancel
  • davidbitton
    davidbitton over 4 years ago in reply to Jan Cumps

    I have a recent enough 1054z to have I2C Decode from the factory. BTW, how do you "open" the blue ... boxes?

    • Cancel
    • Vote Up 0 Vote Down
    • Sign in to reply
    • More
    • Cancel
  • Jan Cumps
    Jan Cumps over 4 years ago in reply to davidbitton

    It's a normal capture:

    image

    The i2c decode and trigger are licensed features. If the scope is sold after 2017, these options are part of the purchase. Else they are payable. Often on sale at the major distributors.

    • Cancel
    • Vote Up +2 Vote Down
    • Sign in to reply
    • More
    • Cancel
  • davidbitton
    davidbitton over 4 years ago

    In the very top pic, it appears like you have more data being displayed than my 1054z. Is that somehow zoomed out? Thanks.

    • Cancel
    • Vote Up 0 Vote Down
    • Sign in to reply
    • More
    • Cancel
>
element14 Community

element14 is the first online community specifically for engineers. Connect with your peers and get expert answers to your questions.

  • Members
  • Learn
  • Technologies
  • Challenges & Projects
  • Products
  • Store
  • About Us
  • Feedback & Support
  • FAQs
  • Terms of Use
  • Privacy Policy
  • Legal and Copyright Notices
  • Sitemap
  • Cookies

An Avnet Company © 2025 Premier Farnell Limited. All Rights Reserved.

Premier Farnell Ltd, registered in England and Wales (no 00876412), registered office: Farnell House, Forge Lane, Leeds LS12 2NE.

ICP 备案号 10220084.

Follow element14

  • X
  • Facebook
  • linkedin
  • YouTube