element14 Community
element14 Community
    Register Log In
  • Site
  • Search
  • Log In Register
  • Community Hub
    Community Hub
    • What's New on element14
    • Feedback and Support
    • Benefits of Membership
    • Personal Blogs
    • Members Area
    • Achievement Levels
  • Learn
    Learn
    • Ask an Expert
    • eBooks
    • element14 presents
    • Learning Center
    • Tech Spotlight
    • STEM Academy
    • Webinars, Training and Events
    • Learning Groups
  • Technologies
    Technologies
    • 3D Printing
    • FPGA
    • Industrial Automation
    • Internet of Things
    • Power & Energy
    • Sensors
    • Technology Groups
  • Challenges & Projects
    Challenges & Projects
    • Design Challenges
    • element14 presents Projects
    • Project14
    • Arduino Projects
    • Raspberry Pi Projects
    • Project Groups
  • Products
    Products
    • Arduino
    • Avnet Boards Community
    • Dev Tools
    • Manufacturers
    • Multicomp Pro
    • Product Groups
    • Raspberry Pi
    • RoadTests & Reviews
  • Store
    Store
    • Visit Your Store
    • Choose another store...
      • Europe
      •  Austria (German)
      •  Belgium (Dutch, French)
      •  Bulgaria (Bulgarian)
      •  Czech Republic (Czech)
      •  Denmark (Danish)
      •  Estonia (Estonian)
      •  Finland (Finnish)
      •  France (French)
      •  Germany (German)
      •  Hungary (Hungarian)
      •  Ireland
      •  Israel
      •  Italy (Italian)
      •  Latvia (Latvian)
      •  
      •  Lithuania (Lithuanian)
      •  Netherlands (Dutch)
      •  Norway (Norwegian)
      •  Poland (Polish)
      •  Portugal (Portuguese)
      •  Romania (Romanian)
      •  Russia (Russian)
      •  Slovakia (Slovak)
      •  Slovenia (Slovenian)
      •  Spain (Spanish)
      •  Sweden (Swedish)
      •  Switzerland(German, French)
      •  Turkey (Turkish)
      •  United Kingdom
      • Asia Pacific
      •  Australia
      •  China
      •  Hong Kong
      •  India
      •  Korea (Korean)
      •  Malaysia
      •  New Zealand
      •  Philippines
      •  Singapore
      •  Taiwan
      •  Thailand (Thai)
      • Americas
      •  Brazil (Portuguese)
      •  Canada
      •  Mexico (Spanish)
      •  United States
      Can't find the country/region you're looking for? Visit our export site or find a local distributor.
  • Translate
  • Profile
  • Settings
Test & Tools
  • Technologies
  • More
Test & Tools
Blog Programmable Electronic Load - Java GUI Part 1: Basic Functionality
  • Blog
  • Forum
  • Documents
  • Files
  • Members
  • Mentions
  • Sub-Groups
  • Tags
  • More
  • Cancel
  • New
Join Test & Tools to participate - click to join for free!
  • Share
  • More
  • Cancel
Group Actions
  • Group RSS
  • More
  • Cancel
Engagement
  • Author Author: Jan Cumps
  • Date Created: 5 Jul 2019 12:54 PM Date Created
  • Views 3076 views
  • Likes 6 likes
  • Comments 6 comments
  • gui
  • cross-platform
  • eload
  • scpi
  • java
Related
Recommended

Programmable Electronic Load - Java GUI Part 1: Basic Functionality

Jan Cumps
Jan Cumps
5 Jul 2019

I'm building a GUI for the electronic load we made here on element14.

The development will be in a few incremental steps.

  • communication with the instrument
  • basic GUI with a SCPI command line and results
image

In the next iterations:

  • add error logging
  • make the LCD display emulation work
  • a few dedicated controls to set current and enable / disable input


Functionality in the 1st Iteration


The application has its basic layout and one function implemented.

I want to start with a layout because it's easier to dry-run that and see if it would be up to the job when there isn't any application logic yet.

In this case, I used the NetBeans IDE's (see next section for more info) graphic designer to lay out the application.

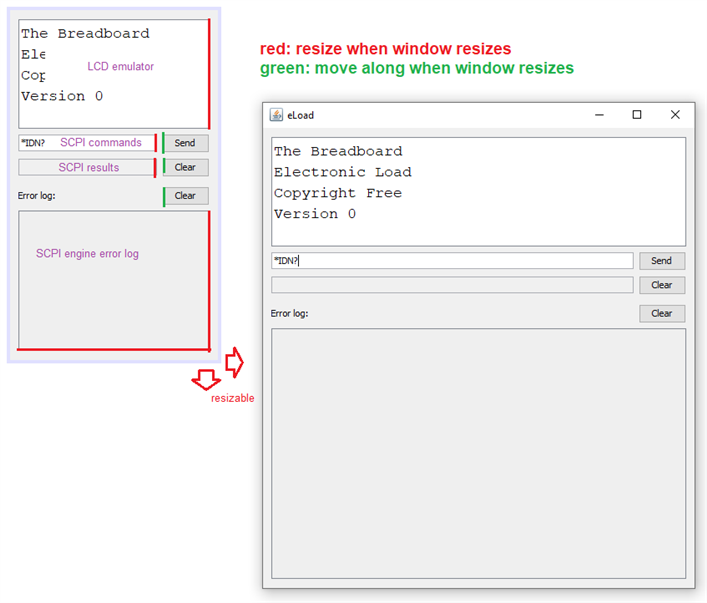
Like most Java dialog designers, it lets you place elements on the window frame and choose what objects stay fixed, who moves and who resizes if the window size changes.

You can see below how I want the application to behave upon resize:

image


Here you can see the first iteration in action. The video is edited for brevity, but all actions are real.


You don't have permission to edit metadata of this video.
Edit media
x
image
Upload Preview
image


The intended functionality:

  • the top frame emulates the LCD screen on the eLoad. It should always display the same info as the physical screen on the instrument. No user interaction.
  • then four controls that work together: the SCPI command line interface.
    • a command entry box with send button. When you click the button, the command in the entry box is sent to the instrument
    • then the instrument reply is read and the result shows in the text display button
    • the clear button empties the reply display.
  • at the bottom, the error log. Here, SCPI engine errors will be displayed. At this moment, I plan to only call this when you submit a command.
    The clear button next to it clears the log.
  • GUI and instrument functions separated. GUI should only ask and retrieve.


Functionality in this blog: the layout done and SCPI command + response working. Separate object to handle instrument logic.


Development  Environment: Java and NetBeans IDE


I've chosen Java as language. Because I know it and I find it the easiest solution to have cross-platform GUI with little dependencies.

The graphic framework is Swing.

I'm using two additional libraries: JSerialComm for USB access and commons-cli for command line parsing.

The editor is NetBeans. I created a project with the utility Maven as its build engine and dependency manager.

The NetBeans + Maven combination allows you to select add the two additional libraries as dependencies. The toolset then arranges download and version management of those.

The Jave JDK I use is openjdk version "1.8.0_212".

I'm developing on Windows 10. I expect that the program will work without adaptions on most Linux flavours (including on a Pi if you didn't install the headless Raspbian OS).


Instrument Object


The important methods are connect(), disconnect(), write() and read():


package net.cumps.eloadgui;

import com.fazecast.jSerialComm.SerialPort;
import java.io.IOException;
import java.io.InputStream;
import java.io.InputStreamReader;
import java.io.OutputStream;
import java.io.Reader;
import java.util.logging.Level;
import java.util.logging.Logger;

/**
 *
 * @author jancu
 */
public class Instrument {

    private static final Logger log = Logger.getLogger(Instrument.class.getName());
    private SerialPort comPort = null;
    private final char[] buffer;

    public Instrument() {
        buffer = new char[100];
    }


    public void init() {
    }


    public boolean connect(USBParams usbParams) {
        comPort = SerialPort.getCommPort(usbParams.getConnectionName());
        comPort.setBaudRate(usbParams.getBaud());
//        comPort.setComPortTimeouts(SerialPort.TIMEOUT_READ_SEMI_BLOCKING, 1000, 0);
        comPort.setComPortTimeouts(SerialPort.TIMEOUT_READ_BLOCKING, 100, 0);
        boolean bResult = false;
        if (comPort.openPort()) {
            bResult = true;
            log.log(Level.INFO, "Open port succeeeded");
        } else {
            comPort = null;
            log.log(Level.SEVERE, "Open port failed");
        }
        return bResult;
    }

    public void disconnect() {
        if (comPort != null) {
            if (comPort.closePort()) {
                log.log(Level.INFO, "Closing port succeeeded");
            } else {
                log.log(Level.INFO, "Closing port failed");
            }
            comPort = null;
        }
    }

    public String read() {
        Reader in = new InputStreamReader(comPort.getInputStream());
        String s = null;
        try {
            int len = in.read(buffer, 0, buffer.length);
            s = new String(buffer, 0, len);
            in.close();
        } catch (IOException e) {
            s = null;
//            e.printStackTrace();
        }
        return s;
    }


    public int write(String s) {
        OutputStream out = comPort.getOutputStream();
        int retval = -1;
        try {
            out.write(s.getBytes());
            out.close();
            retval = 0;
        } catch (Exception e) {
            e.printStackTrace();
        }
        return retval;
    }

}


I have taken a shortcut here to deal with SCPI commands that don't give a reply.

Instead of checking the command to see if there's a question mark; or checking if the serial port has data available, I let the reply reader block with timeout.

If the timeout happens, I consider that as a "no reply". Lazy.


Application and Main Window Object


image


The layout is done with the graphic editor.

I then added initialisation code.


In the main method, before the visual objects are set up, the startup command line is checked for COM port name and baud rate.

Then the Instrument object is primed.


    /**
     * @param args the command line arguments
     */
    public static void main(String args[]) {

        USBParams usbParams = new USBParams();
        new Cli(args).parse(usbParams);

        if (instrument.connect(usbParams)) {
            instrument.init();
        }        

        /* Set the Nimbus look and feel */
// generated GUI code here ...


Then I create event handlers for the Send and Clear button.


    private void jButtonSCPISendActionPerformed(java.awt.event.ActionEvent evt) {                                                
        instrument.write(jTextFieldSCPICmd.getText() + '\n');
        String s = instrument.read();
        jTextFieldSCPIReply.setText(s);
    }                                               

    private void jButtonSCPIResultClearActionPerformed(java.awt.event.ActionEvent evt) {                                                       
        jTextFieldSCPIReply.setText("");
    }          


I've attached the zipped NetBeans project - source, project settings and compiled JAR. The code is also on GitHub: https://github.com/jancumps/eLoadGui.

To test it, you can import it into NB and run from there.


To execute it without the editor on Linux or Windows, use these commands:


If you run it from Linux , you can use a command prompt similar to this (assuming you copied all the jars in the current working directory):

java -cp ./eloadGui-1.0-SNAPSHOT.jar:./commons-cli-1.4.jar:jSerialComm-2.5.0.jar net.cumps.eloadgui.MainFrame -usb "/dev/ttyACM0" -baud 9600 


If you run on WIndows (here I assumed the dependency jars are in a maven managed location):

D:\users\jancu\Documents\NetBeansProjects\eLoad\eloadGui\target>java -cp .\eloadGui-1.0-SNAPSHOT.jar;D:\NetBeans\maven_libs\commons-cli\commons-cli\1.4\commons-cli-1.4.jar;D:\NetBeans\maven_libs\com\fazecast\jSerialComm\2.5.0\jSerialComm-2.5.0.jar net.cumps.eloadgui.MainFrame -usb "COM9" -baud 9600


image


Related Blog
Programmable Electronic Load
Programmable Electronic Load - Java GUI Part 1: Basic Functionality
Programmable Electronic Load - Java GUI Part 2: Support for Current Mode, Input On/Off, Error Log
Attachments:
eLoad.zip
  • Sign in to reply

Top Comments

  • Jan Cumps
    Jan Cumps over 5 years ago +3
    I added synchronisation to the instrument request - rponse: private void jButtonSCPISendActionPerformed(java.awt.event.ActionEvent evt) { String s; synchronized (instrument) { instrument.write(jTextFieldSCPICmd…
  • genebren
    genebren over 5 years ago +2
    Jan, The interface is looking pretty cool. I really like how your windows resize so nicely. Keep up the good work! Gene
  • ralphjy
    ralphjy over 5 years ago +2
    Nice clean interface. A couple of thoughts - It might be useful if the log window would display command and response history in addition to errors and have a scrollbar to peruse it. And it would be nice…
  • Jan Cumps
    Jan Cumps over 5 years ago

    The app now is usable:


    You don't have permission to edit metadata of this video.
    Edit media
    x
    image
    Upload Preview
    image


    • LCD display works. Shows mode, status, set value, measured current and voltage.
    • Input on/off button
    • Set constant current
    • Error logging. Button turns red and shows error count. Clicking the button retrieves the errors.
      Clicking the button when it's green (0 errors waiting) clears the log
    • SCPI command inteface to second tab.


    You can see a bug in the resize logic. By accident I let the LCD screen resize vertically. It should be the Error Log that resizes. I've fixed that.

    • Cancel
    • Vote Up +1 Vote Down
    • Sign in to reply
    • More
    • Cancel
  • Jan Cumps
    Jan Cumps over 5 years ago in reply to DAB

    The GUI isn't difficult. The hard part is developing the firmware on the load with the right functionality so that it can be controlled in a meaningful way from commands, GUI, LabVIEW, hardware front panel, etc ...

    • Cancel
    • Vote Up +2 Vote Down
    • Sign in to reply
    • More
    • Cancel
  • DAB
    DAB over 5 years ago

    Nice post.


    The process looks straight forward.


    DAB

    • Cancel
    • Vote Up +2 Vote Down
    • Sign in to reply
    • More
    • Cancel
  • Jan Cumps
    Jan Cumps over 5 years ago

    I added synchronisation to the instrument request - rponse:


        private void jButtonSCPISendActionPerformed(java.awt.event.ActionEvent evt) {                                                
            String s;
            synchronized (instrument) {
                instrument.write(jTextFieldSCPICmd.getText() + '\n');
                s = instrument.read();
            }
            jTextFieldSCPIReply.setText(s);
        }         


    This avoids that there's a command sent to the instrument while I haven't finished reading the previous reply.

    There's room for improvement here, but this is the simplest way I could see this happening.

    I think it 'll do for this application and prevents that I have to do puzzling with the reply. I know no new command will be sent before I have the chance to read the previous reply.

    It's my responsibility to optimise the time spent in a single conversation and keep out any logic that does not have anything to do with the interaction with the load....

    • Cancel
    • Vote Up +3 Vote Down
    • Sign in to reply
    • More
    • Cancel
  • ralphjy
    ralphjy over 5 years ago

    Nice clean interface.  A couple of thoughts - It might be useful if the log window would display command and response history in addition to errors and have a scrollbar to peruse it.  And it would be nice if the command entry box had a pulldown to enable repeating a previous command.  Haven't used Swing.  It's great that it is a cross platform implementation.

    • Cancel
    • Vote Up +2 Vote Down
    • Sign in to reply
    • More
    • Cancel
>
element14 Community

element14 is the first online community specifically for engineers. Connect with your peers and get expert answers to your questions.

  • Members
  • Learn
  • Technologies
  • Challenges & Projects
  • Products
  • Store
  • About Us
  • Feedback & Support
  • FAQs
  • Terms of Use
  • Privacy Policy
  • Legal and Copyright Notices
  • Sitemap
  • Cookies

An Avnet Company © 2025 Premier Farnell Limited. All Rights Reserved.

Premier Farnell Ltd, registered in England and Wales (no 00876412), registered office: Farnell House, Forge Lane, Leeds LS12 2NE.

ICP 备案号 10220084.

Follow element14

  • X
  • Facebook
  • linkedin
  • YouTube