element14 Community
element14 Community
    Register Log In
  • Site
  • Search
  • Log In Register
  • Community Hub
    Community Hub
    • What's New on element14
    • Feedback and Support
    • Benefits of Membership
    • Personal Blogs
    • Members Area
    • Achievement Levels
  • Learn
    Learn
    • Ask an Expert
    • eBooks
    • element14 presents
    • Learning Center
    • Tech Spotlight
    • STEM Academy
    • Webinars, Training and Events
    • Learning Groups
  • Technologies
    Technologies
    • 3D Printing
    • FPGA
    • Industrial Automation
    • Internet of Things
    • Power & Energy
    • Sensors
    • Technology Groups
  • Challenges & Projects
    Challenges & Projects
    • Design Challenges
    • element14 presents Projects
    • Project14
    • Arduino Projects
    • Raspberry Pi Projects
    • Project Groups
  • Products
    Products
    • Arduino
    • Avnet Boards Community
    • Dev Tools
    • Manufacturers
    • Multicomp Pro
    • Product Groups
    • Raspberry Pi
    • RoadTests & Reviews
  • Store
    Store
    • Visit Your Store
    • Choose another store...
      • Europe
      •  Austria (German)
      •  Belgium (Dutch, French)
      •  Bulgaria (Bulgarian)
      •  Czech Republic (Czech)
      •  Denmark (Danish)
      •  Estonia (Estonian)
      •  Finland (Finnish)
      •  France (French)
      •  Germany (German)
      •  Hungary (Hungarian)
      •  Ireland
      •  Israel
      •  Italy (Italian)
      •  Latvia (Latvian)
      •  
      •  Lithuania (Lithuanian)
      •  Netherlands (Dutch)
      •  Norway (Norwegian)
      •  Poland (Polish)
      •  Portugal (Portuguese)
      •  Romania (Romanian)
      •  Russia (Russian)
      •  Slovakia (Slovak)
      •  Slovenia (Slovenian)
      •  Spain (Spanish)
      •  Sweden (Swedish)
      •  Switzerland(German, French)
      •  Turkey (Turkish)
      •  United Kingdom
      • Asia Pacific
      •  Australia
      •  China
      •  Hong Kong
      •  India
      •  Korea (Korean)
      •  Malaysia
      •  New Zealand
      •  Philippines
      •  Singapore
      •  Taiwan
      •  Thailand (Thai)
      • Americas
      •  Brazil (Portuguese)
      •  Canada
      •  Mexico (Spanish)
      •  United States
      Can't find the country/region you're looking for? Visit our export site or find a local distributor.
  • Translate
  • Profile
  • Settings
Test & Tools
  • Technologies
  • More
Test & Tools
Blog Programmable Electronic Load - LCD Display
  • Blog
  • Forum
  • Documents
  • Files
  • Members
  • Mentions
  • Sub-Groups
  • Tags
  • More
  • Cancel
  • New
Join Test & Tools to participate - click to join for free!
  • Share
  • More
  • Cancel
Group Actions
  • Group RSS
  • More
  • Cancel
Engagement
  • Author Author: Jan Cumps
  • Date Created: 23 Mar 2018 1:05 PM Date Created
  • Views 1042 views
  • Likes 6 likes
  • Comments 4 comments
  • metrology
  • lcd
  • boosterpack
  • rtos
  • msp432
  • ti_rtos
  • launchpad
  • laboratory
  • instrument
Related
Recommended

Programmable Electronic Load - LCD Display

Jan Cumps
Jan Cumps
23 Mar 2018

This blog focuses on the LCD for the electronic load that Robert Peter Oakes, jc2048 and Jan Cumps are designing.


image

The post shows what's displayed on the screen and how that info is retrieved..
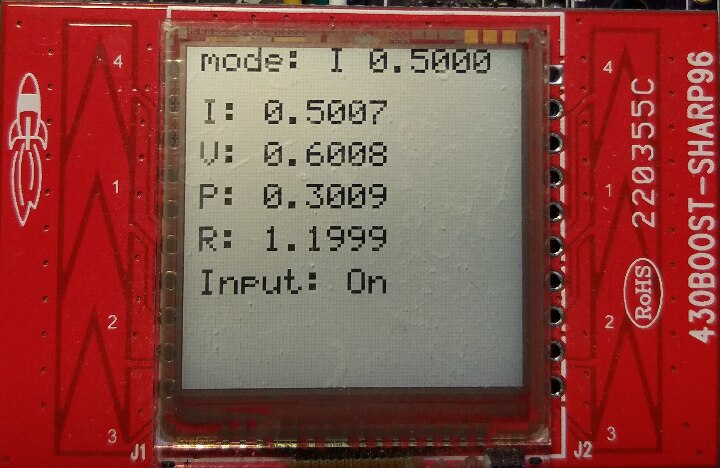
 

The Layout


The LCD shows the mode, status, set and measured values.

image


The Display


The optional display is a boosterpack, Product LinkProduct Link. The load doesn’t need the display to operate.

It was added for two reasons: it served as a debug tool at the beginning of the project when the SCPI commands weren,t implemented.

And it’s a test case to ensure that presentation layer is independent of instrument code.

Both SCPI module and display use the load’s api to control and query the app.


The boosterpack has a monochrome 96 x 96 graphic LCD with reflective back plane.

That display was used on early Nokia mobile phones and is made by SHARP.


image


The Firmware


The firmware uses the drivers that come with  SimpleLink TI-RTOS. The eload uses standard functionality only.


The code to manage the screen is very easy. A single RTOS task initialises the LCD, then refreshes all the content once per second.

That’s it.


Initialise

This code runs at the startup of the device. It initialises the display and shows a welcome message


void *threadDisplay(void *arg0);
#define THREAD_PRIORITY_DISPLAY 10
#define THREAD_SLEEP_DISPLAY 1
#define THREAD_STACK_DISPLAY 2048


    priParam.sched_priority = THREAD_PRIORITY_DISPLAY;
    pthread_attr_setschedparam(&attrs, &priParam);
    retc |= pthread_attr_setstacksize(&attrs, THREAD_STACK_DISPLAY);
    if (retc != 0) {
        /* pthread_attr_setstacksize() failed */
        while (1);
    }
    retc = pthread_create(&thread, &attrs, threadDisplay, NULL);
    if (retc != 0) {
        /* pthread_create() failed */
        while (1);
    }


void *threadDisplay(void *arg0)
{
    uint32_t i;
    char formatString[12];
    Display_init();
    /* Initialize display and try to open LCD type of display. */
    Display_Params params;
    Display_Params_init(&params);
    params.lineClearMode = DISPLAY_CLEAR_BOTH;
//    Display_Handle hLcd = Display_open(Display_Type_LCD | Display_Type_GRLIB, &params);
    Display_Handle hLcd = Display_open(Display_Type_LCD, &params);
    if (!hLcd) {
        return NULL; // we didn't get a display handle. Check if the following is defined: BOARD_DISPLAY_USE_LCD
    }
    Graphics_Context *context = DisplayExt_getGraphicsContext(hLcd);
    GrContextForegroundSet(context, ClrBlack);
    GrContextBackgroundSet(context, ClrWhite);


    GrClearDisplay(context);
    GrContextFontSet(context, &g_sFontCmss12);


    GrStringDraw(context, "The Breadboard", -1, 10, 15, 0);
    GrStringDraw(context, "Electronic Load", -1, 15, 30, 0);
    GrStringDraw(context, "Copyright Free", -1, 13, 45, 0);
    GrStringDraw(context, "Version 0", -1, 22, 60, 0);


    GrFlush(context);
    int8_t cMode;


    float fVoltage = 0.0f;
    float fCurrent = 0.0f;


Main Schedule

The loop is run once per second. It displays the constant mode, the current, voltage, power and resistance.


    while (1) {
        sleep(THREAD_SLEEP_DISPLAY);
        cMode = eloadGetChar();
        fVoltage = eloadGetVoltageDC();
        fCurrent = eloadGetCurrentDC();
        GrClearDisplay(context);
        GrContextFontSet(context, &g_sFontCmss12);

        sprintf(formatString, "mode: %c %02.4f\0", cMode, eloadGetSetpoint());
        GrContextFontSet(context, &g_sFontFixed6x8);
        GrStringDraw(context, (int8_t *)formatString, -1, 4, 0, 0);

        i = 0;
        sprintf(formatString, "I: %02.4f\0", fCurrent);
        GrContextFontSet(context, &g_sFontFixed6x8);
        GrStringDraw(context, (int8_t *)formatString, -1, 4, (15 + 12*i), 0);

        i = 1;
        sprintf(formatString, "V: %02.4f\0", fVoltage);
        GrContextFontSet(context, &g_sFontFixed6x8);
        GrStringDraw(context, (int8_t *)formatString, -1, 4, (15 + 12*i), 0);

        i = 2;
        sprintf(formatString, "P: %02.4f\0", fVoltage * fCurrent);
        GrContextFontSet(context, &g_sFontFixed6x8);
        GrStringDraw(context, (int8_t *)formatString, -1, 4, (15 + 12*i), 0);

        i = 3;
        if (fCurrent> 0.0f) {
            sprintf(formatString, "R: %02.4f\0", fVoltage / fCurrent);
        } else {
            sprintf( formatString, "R: --.--");
        }
        GrContextFontSet(context, &g_sFontFixed6x8);
        GrStringDraw(context, (int8_t *)formatString, -1, 4, (15 + 12*i), 0);

        i = 4;
        sprintf(formatString, "Input: O%s\0", eloadInputEnabled()? "n " : "ff");
        GrContextFontSet(context, &g_sFontFixed6x8);
        GrStringDraw(context, (int8_t *)formatString, -1, 4, (15 + 12*i), 0);


        GrFlush(context);


    }
}

  • Sign in to reply

Top Comments

  • genebren
    genebren over 7 years ago +2
    Very nice update on the project. From the LCD display, it looks like you are getting some pretty good results with your load. Keep up the good work! Gene
  • Jan Cumps
    Jan Cumps over 6 years ago +2
    Blog adapted to SimpleLink RTOS. There's no functional changes, just using the new idioms and POSIX API
  • Jan Cumps
    Jan Cumps over 5 years ago +1
    I'm changing the LCD display used in the load. The current one is a 96 x 96 Pixels LCD that's no longer available for purchase. Sharp doesn't produce the LCD anymore. I purchased the boosterpack with the…
  • Jan Cumps
    Jan Cumps over 5 years ago in reply to Jan Cumps

    OK. That was easy.


    image


    The code to initialise the display is:


    #ifndef BOARD_DISPLAY_SHARP_SIZE
    #define BOARD_DISPLAY_SHARP_SIZE    96
    #endif


    So to make it work for the 128 * 128 display, I had to add the correct predefine in the project properties:


    image

    When working with the 96*96 display, remove the define in the project file, or replace by "BOARD_DISPLAY_SHARP_SIZE=96".

    Project files aren't part of version control (they are IDE dependent and I don't add those - to not restrict the tool set someone prefers to develop), so getting the latest version from GITHUB will not break other people's setup.

    • Cancel
    • Vote Up +1 Vote Down
    • Sign in to reply
    • More
    • Cancel
  • Jan Cumps
    Jan Cumps over 5 years ago

    I'm changing the LCD display used in the load.

    The current one is a 96 x 96 Pixels LCD that's no longer available for purchase. Sharp doesn't produce the LCD anymore.


    I purchased the boosterpack with the Sharp 128. That one is still in active production.

    The boosterpack is pin compatible with the original - more expensive though. For some reason they added an SD Card connector.


    image


    I'll try to keep the firmware compatible with the Sharp 96 (hard to test, because both samples I have here suffer from intermittent contact in the flex cable).

    The new LCD works with the TI examples, but not with the load firmware. I'm using the same driver, so it must be something silly.

    If I need to make the code dependent on the display, I'll try to use compiler defines to keep backward compatibility where needed.

    • Cancel
    • Vote Up +1 Vote Down
    • Sign in to reply
    • More
    • Cancel
  • Jan Cumps
    Jan Cumps over 6 years ago

    Blog adapted to SimpleLink RTOS. There's no functional changes, just using the new idioms and POSIX API

    • Cancel
    • Vote Up +2 Vote Down
    • Sign in to reply
    • More
    • Cancel
  • genebren
    genebren over 7 years ago

    Very nice update on the project.   From the LCD display, it looks like you are getting some pretty good results with your load.


    Keep up the good work!

    Gene

    • Cancel
    • Vote Up +2 Vote Down
    • Sign in to reply
    • More
    • Cancel
element14 Community

element14 is the first online community specifically for engineers. Connect with your peers and get expert answers to your questions.

  • Members
  • Learn
  • Technologies
  • Challenges & Projects
  • Products
  • Store
  • About Us
  • Feedback & Support
  • FAQs
  • Terms of Use
  • Privacy Policy
  • Legal and Copyright Notices
  • Sitemap
  • Cookies

An Avnet Company © 2025 Premier Farnell Limited. All Rights Reserved.

Premier Farnell Ltd, registered in England and Wales (no 00876412), registered office: Farnell House, Forge Lane, Leeds LS12 2NE.

ICP 备案号 10220084.

Follow element14

  • X
  • Facebook
  • linkedin
  • YouTube