element14 Community
element14 Community
    Register Log In
  • Site
  • Search
  • Log In Register
  • Community Hub
    Community Hub
    • What's New on element14
    • Feedback and Support
    • Benefits of Membership
    • Personal Blogs
    • Members Area
    • Achievement Levels
  • Learn
    Learn
    • Ask an Expert
    • eBooks
    • element14 presents
    • Learning Center
    • Tech Spotlight
    • STEM Academy
    • Webinars, Training and Events
    • Learning Groups
  • Technologies
    Technologies
    • 3D Printing
    • FPGA
    • Industrial Automation
    • Internet of Things
    • Power & Energy
    • Sensors
    • Technology Groups
  • Challenges & Projects
    Challenges & Projects
    • Design Challenges
    • element14 presents Projects
    • Project14
    • Arduino Projects
    • Raspberry Pi Projects
    • Project Groups
  • Products
    Products
    • Arduino
    • Avnet Boards Community
    • Dev Tools
    • Manufacturers
    • Multicomp Pro
    • Product Groups
    • Raspberry Pi
    • RoadTests & Reviews
  • Store
    Store
    • Visit Your Store
    • Choose another store...
      • Europe
      •  Austria (German)
      •  Belgium (Dutch, French)
      •  Bulgaria (Bulgarian)
      •  Czech Republic (Czech)
      •  Denmark (Danish)
      •  Estonia (Estonian)
      •  Finland (Finnish)
      •  France (French)
      •  Germany (German)
      •  Hungary (Hungarian)
      •  Ireland
      •  Israel
      •  Italy (Italian)
      •  Latvia (Latvian)
      •  
      •  Lithuania (Lithuanian)
      •  Netherlands (Dutch)
      •  Norway (Norwegian)
      •  Poland (Polish)
      •  Portugal (Portuguese)
      •  Romania (Romanian)
      •  Russia (Russian)
      •  Slovakia (Slovak)
      •  Slovenia (Slovenian)
      •  Spain (Spanish)
      •  Sweden (Swedish)
      •  Switzerland(German, French)
      •  Turkey (Turkish)
      •  United Kingdom
      • Asia Pacific
      •  Australia
      •  China
      •  Hong Kong
      •  India
      •  Korea (Korean)
      •  Malaysia
      •  New Zealand
      •  Philippines
      •  Singapore
      •  Taiwan
      •  Thailand (Thai)
      • Americas
      •  Brazil (Portuguese)
      •  Canada
      •  Mexico (Spanish)
      •  United States
      Can't find the country/region you're looking for? Visit our export site or find a local distributor.
  • Translate
  • Profile
  • Settings
Test & Tools
  • Technologies
  • More
Test & Tools
Blog Programmable Electronic Load - Write a LabVIEW Library part 5: Input Control Block
  • Blog
  • Forum
  • Documents
  • Files
  • Members
  • Mentions
  • Sub-Groups
  • Tags
  • More
  • Cancel
  • New
Join Test & Tools to participate - click to join for free!
  • Share
  • More
  • Cancel
Group Actions
  • Group RSS
  • More
  • Cancel
Engagement
  • Author Author: Jan Cumps
  • Date Created: 16 Mar 2018 3:44 PM Date Created
  • Views 594 views
  • Likes 6 likes
  • Comments 1 comment
  • msp432
  • labview
  • scpi
  • electronic load
Related
Recommended

Programmable Electronic Load - Write a LabVIEW Library part 5: Input Control Block

Jan Cumps
Jan Cumps
16 Mar 2018

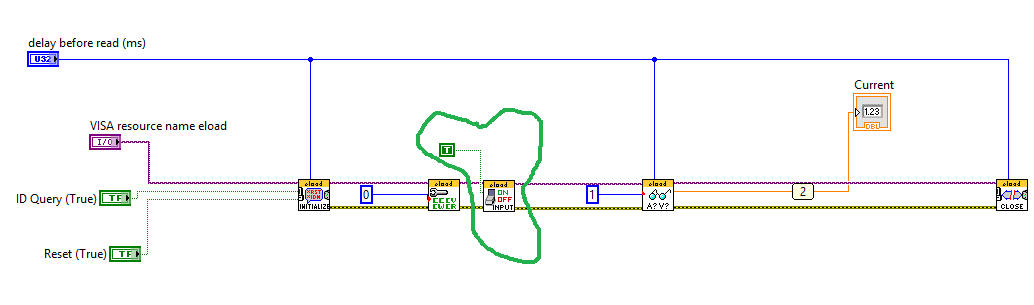
Peter, Jon and I are building a Programmable Electronic Load. In this series of blogs I'm building a LabVIEW library of reusable components

image


In this fifth article: Enable and Disable the Input.


LabVIEW has a set of blocks to build flows with serial communication devices. Those blocks work well with our instrument.

However, inspired by what many instruments do (in this case, the BK Precision 85xx series), I'm creating more abstract blocks.


Input Control Block


This blog is also easy. It enables and disables the load input.


image


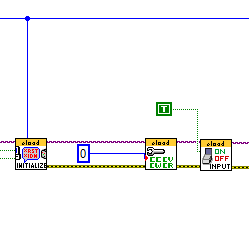
For the Input Control block, the input parameters are

  • VISA resource name eload
  • Enable Input Terminals (True, 1, ON: On - False, 0, OFF: Off)
  • error in (no error)

The output parameters are

  • VISA resource name out
  • error out

After running this block, the following functionality is performed:

  • The load inputs are either disabled or enabled.
    When disabled, the output FET is not driven and the inputs are at their highest resistance.
    When enabled, the load is active and the current that it tries to draw is defined by what you have asked the instrument draw.

  • If an error is detected, the VISA resource is closed and error info is passed to the caller.
    Else the block passes the measured value to the calling flow via the Measurement parameter.


image


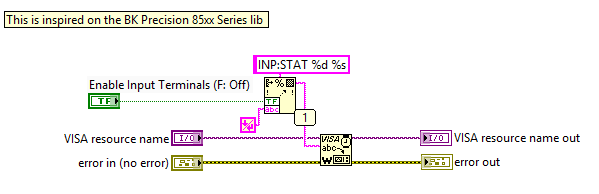
Setting the Function


image

Depending on the value you pass (in this example True: On), it will set the instrument input to Off (false) or On (true).


LABView blocks
LabVIEW Library part 1: Initialise Block
LabVIEW Library part 2: Read Output Block
LabVIEW Library part 3: Close Block
LabVIEW Library part 4: Function Set Block
LabVIEW Library part 5: Input Control Block
LabVIEW Library part 6: Raw DAC Block
LabVIEW Library part 7: Raw ADC Block
Real World Examples
Programmable Electronic Load - Automating a DC Switcher Efficiency Test with LabVIEW
  • Sign in to reply
  • three-phase
    three-phase over 7 years ago

    Nice series of blogs demonstrating the build up of the LabView blogs. Long may it continue!


    Kind regards

    • Cancel
    • Vote Up 0 Vote Down
    • Sign in to reply
    • More
    • Cancel
element14 Community

element14 is the first online community specifically for engineers. Connect with your peers and get expert answers to your questions.

  • Members
  • Learn
  • Technologies
  • Challenges & Projects
  • Products
  • Store
  • About Us
  • Feedback & Support
  • FAQs
  • Terms of Use
  • Privacy Policy
  • Legal and Copyright Notices
  • Sitemap
  • Cookies

An Avnet Company © 2025 Premier Farnell Limited. All Rights Reserved.

Premier Farnell Ltd, registered in England and Wales (no 00876412), registered office: Farnell House, Forge Lane, Leeds LS12 2NE.

ICP 备案号 10220084.

Follow element14

  • X
  • Facebook
  • linkedin
  • YouTube