|
scottiebabe suggested a change to the PST firmware: use the Pico unique ID in the USB enumeration string.
|
Let's do that!
The TinyUSB USBTMC example was the starting point for this project. It uses a fixed string 123456 as serial number

If you connect a single device, this is OK. You get into issues when connecting more than one Pico USBTMC device. scottiebabe's suggestion will solve that.
This is also an ideal hook to try shabaz ' Creating a Pi Pico based High-Resolution Measurement Instrument tutorial.
Housekeeping
housekeeping 1: I created an issue for this, on the GitHub repository page:
In a few steps, when I create a feature branch, I will associate it with this issue.
housekeeping 2: I don't fork the GitHub repo (because I can't)
We're suggesting that contributors fork the GitHub project. And then start their own branches in that forked repo. When finished, create a pull request from fork into the original repo.
Because I'm the owner of the original repo, that doesn't work for me. I can't fork @self.
This means that there will be these 2 small differences in the approach:
- the feature branch will be in the original repo instead of a fork
- the pull request in the end, will be between that feature branch and the project branch. Again both in the same repo.
This doesn't impact the process. I'll flag the few places where an action is different
Create a feature branch based on the development branch
I already have a healthy local repo on my laptop. I use VS Code to do the development. I'll use the VS Code menu to create my feature branch.
difference: my remote repo is the original GitHub repository. You would have cloned this from your fork. update: use git clone xxxxx --recurse-submodules
First step is to take care that I start from the current development branch. That will be the base for the changes:
It's good to sync that branch with the server, before creating your feature branch. There are buttons to do that.
Then, I create a new branch, with a name that refers to the work I'll be doing: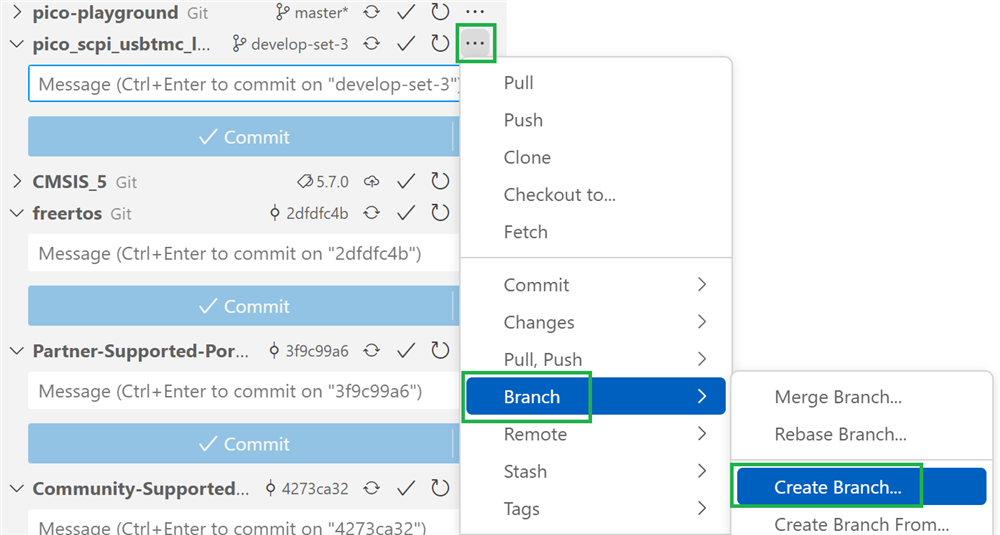
I use a reference to the GitHub issue, and a very short context:
I immediately push that to the server. That 'll take care that my work is backed up. And changes are easily pushed during the dev work.
Then, I assosiate the new branch with the issue I'm working on:

Do development
First, let's find where the TinyUSB code defines and uses the fixed string. This is the definition:
// array of pointer to string descriptors
char const* string_desc_arr [] =
{
  (const char[]) { 0x09, 0x04 }, // 0: is supported language is English (0x0409)
  "TinyUSB",                     // 1: Manufacturer
  "TinyUSB Device",              // 2: Product
  "123456",                      // 3: Serials, should use chip ID
  "TinyUSB USBTMC",              // 4: USBTMC
};

static uint16_t _desc_str[32];
You see that the TinyUSB team has given an indicator that the fixed number should be replaced.
The string is composed in this function:
// Invoked when received GET STRING DESCRIPTOR request
// Application return pointer to descriptor, whose contents must exist long enough for transfer to complete
uint16_t const* tud_descriptor_string_cb(uint8_t index, uint16_t langid)
This is the one to change. And luckily, one of the existing Pico TinyUSB (dev_hid_composite) examples has already done that.
Declaration:
#include "pico/unique_id.h"

// ...

// buffer to hold flash ID
char serial[2 * PICO_UNIQUE_BOARD_ID_SIZE_BYTES + 1];

// array of pointer to string descriptors
char const* string_desc_arr [] =
{
  (const char[]) { 0x09, 0x04 }, // 0: is supported language is English (0x0409)
  "TinyUSB",                     // 1: Manufacturer
  "TinyUSB Device",              // 2: Product
  serial,                        // 3: Serials, uses the flash ID
… and sending that value upon request:
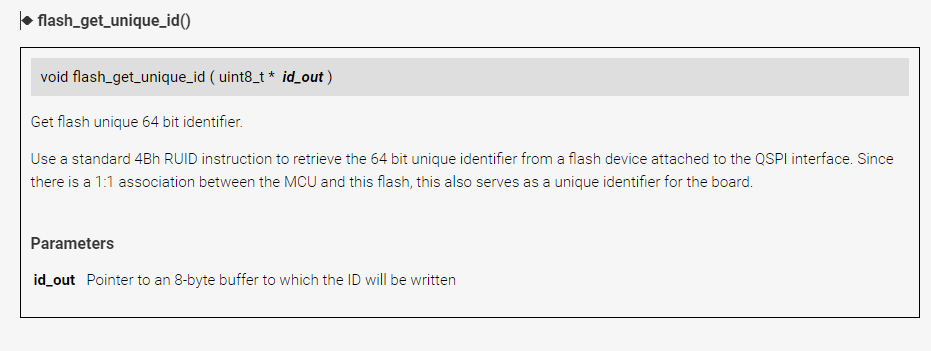
if (index == 3) pico_get_unique_board_id_string(serial, sizeof(serial));
The CMake file needs one update, to add the pico_unique_id lib.
target_link_libraries(pico_scpi_usbtmc_labtool PUBLIC pico_stdlib tinyusb_device tinyusb_board hardware_gpio hardware_adc hardware_pwm hardware_i2c pico_unique_id)
I commit and push before testing (I did this sequence several times while trying things out):

Because I push everything, GitHub is aware of my activities. That's useful as backup. The real value is when you are working together. You share your work in progress.

Test
In your feature branch, you can commit and push as often as you want. The more the merrier. When creating a pull request for merge with a managed branch, there are different criteria.
At that time, you should be confident of your code. It should be clean, formatted and tested.
That's what I'll do now. I'll see if
- the device pops up in resource lists
- works with NI's MAX and VISA Interactive Tester apps
- works with LabVIEW
- works with PyVISA.
yes: does it pop up in a resource list?
yes: does it work with NI MAX?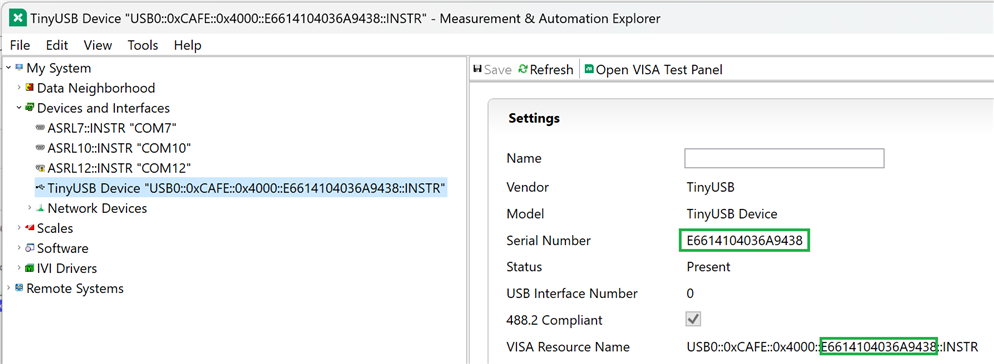
yes: does it work with NI VISA Interactive Tester?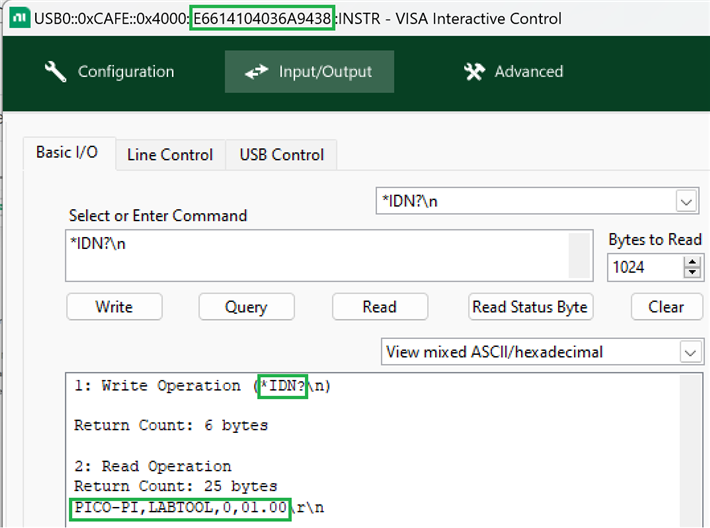
yes: does it work with LabVIEW?
find: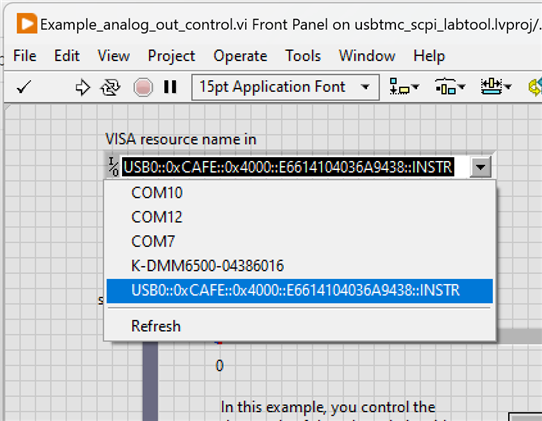
execute:
yes: does it work with PyVISA?
All tests passed. And the code is clean and formatted. Ready for ...
Create pull request on GitHub
The development branch is managed. You can't commit to it. The proper way to get my changes into the development branch is by creating a pull request in GitHub.
Because I kept the remote repository updated at all times, this step is straightforward. GitHub even comes up with the suggestion:![]()
watch-out: select the correct target. I'm creating new functionality for a next release, so it should merge with the development branch. Here we go.
difference: my source is the original GitHub repository. You would create a pull request from your GitHub fork's home page.
I assigned the review to shabaz . 
Once he's OK with my development, we can merge.
Once that happened, the functionality will be added to the development branch. When we release that, it'll be "publicly available" as a GitHub release. We'll add a precompiled version then.
In the meanwhile, you can check out the development branch and build from source.
shabaz reviewed the changes. The pull request is now ready for merge: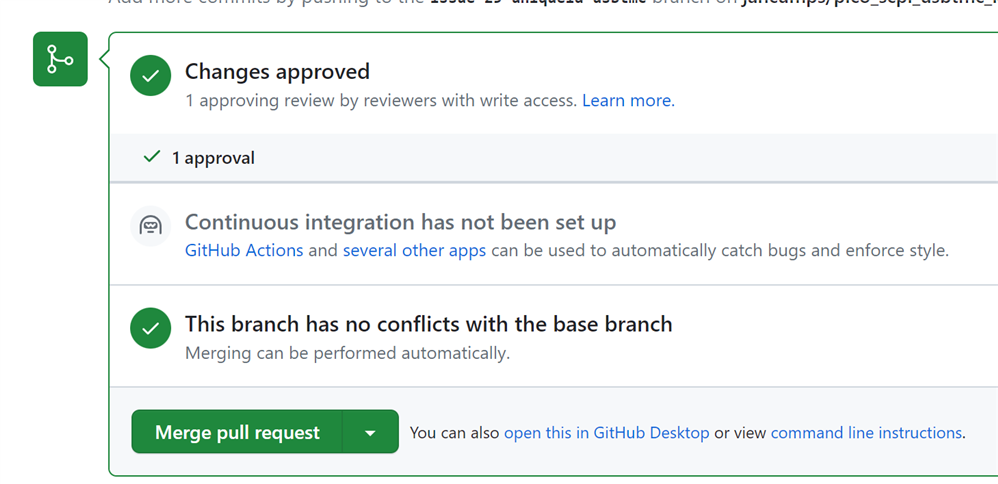
I merged it, then deleted the feature branch from GitHub and my local repo. This is now part of the development branch. Ready to be included in a next release.
Here's how the development branch looks like, after the exercise:


-

Jan Cumps
-
Cancel
-
Vote Up
0
Vote Down
-
-
Sign in to reply
-
More
-
Cancel
Comment-

Jan Cumps
-
Cancel
-
Vote Up
0
Vote Down
-
-
Sign in to reply
-
More
-
Cancel
Children