


Hello all. Hope everyone is ok and safe.
In this series of posts I will describe how everything is wired, connected and talks with each other .
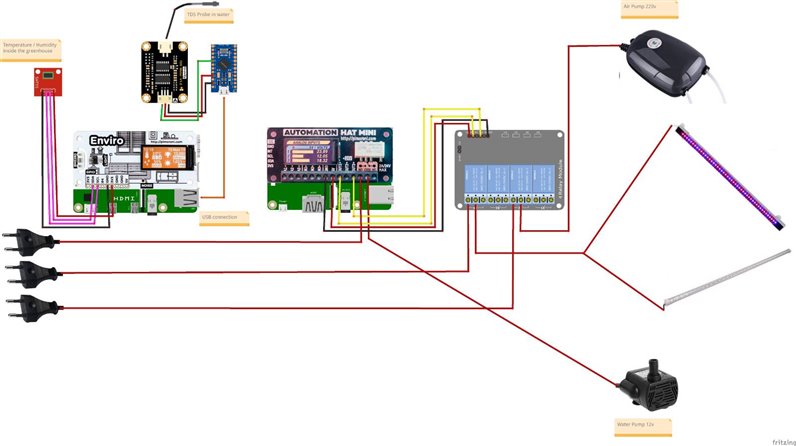
The following image shows what each Raspberry PI controls and how everything is wired
Relay 4 channels
I had to use a relay because the Air Pump is 220v and the Automation Hat MINI cannot handle that much voltage.
Although the lights are 12v, my first attempts to control the lights just using the outputs weren't successful. Using the outputs to control the relay to turn the lights on or off proved much more successful so it stayed that way.
I've separated each HAT and the Raspberry PI zero into it's own blog post to explain the code and it's functions.
Very briefly :
- The Raspberry PI 4B 2GB controls everything. It tells the Automation HAT MINI what to turn on or off and when (but it's the client). It also reads the environmental conditions and stores it in a SQLite3 database. It also runs a Flask webserver to serve web services for the Raspberry PI Zero W. It has connections to:
- humidity / temperature SHT21 sensor
- Arduino Pro Micro (through USB port)
- TDS sensor
- The Automation HAT MINI is connected to a Raspberry PI 3B+. The Automation HAT MINI is connected to:
- The lights (through the relay)
- The water pump (The HAT relay - the water pump is 12v)
- The air pump (through the relay)
You can read my previous post - Space Vegetables - #6 : Software Design - for a more detailed read on how everything is related
For more information on each Raspberry PI, just view the following blogs (URL updates when ready):
- Space Vegetables Web Services
- Raspberry PI Zero W Twitter Updates
- Space Vegetables Server
- Space Vegetables Client
Top Comments