


Table of Contents
Introduction
After seeing the sensor interface and serial write on Cortex M4 (CM4) core ((+) AtTheCore: Blog #2 - Interfacing LED Bar with ALS), this blog is about capsense button, slider interfacing and using PWM to control the duty cycle output of the signal channel all on Cortex M0+ (CM0+) core. This is the main building block of the project involving touch and motor control feature integration. The project requires 2 PWM channels for motor control via the IFX007T motor control shield and the configuration, linking with capsense is discussed here and upcoming is the testing and some scope views 
Configuring Capsense
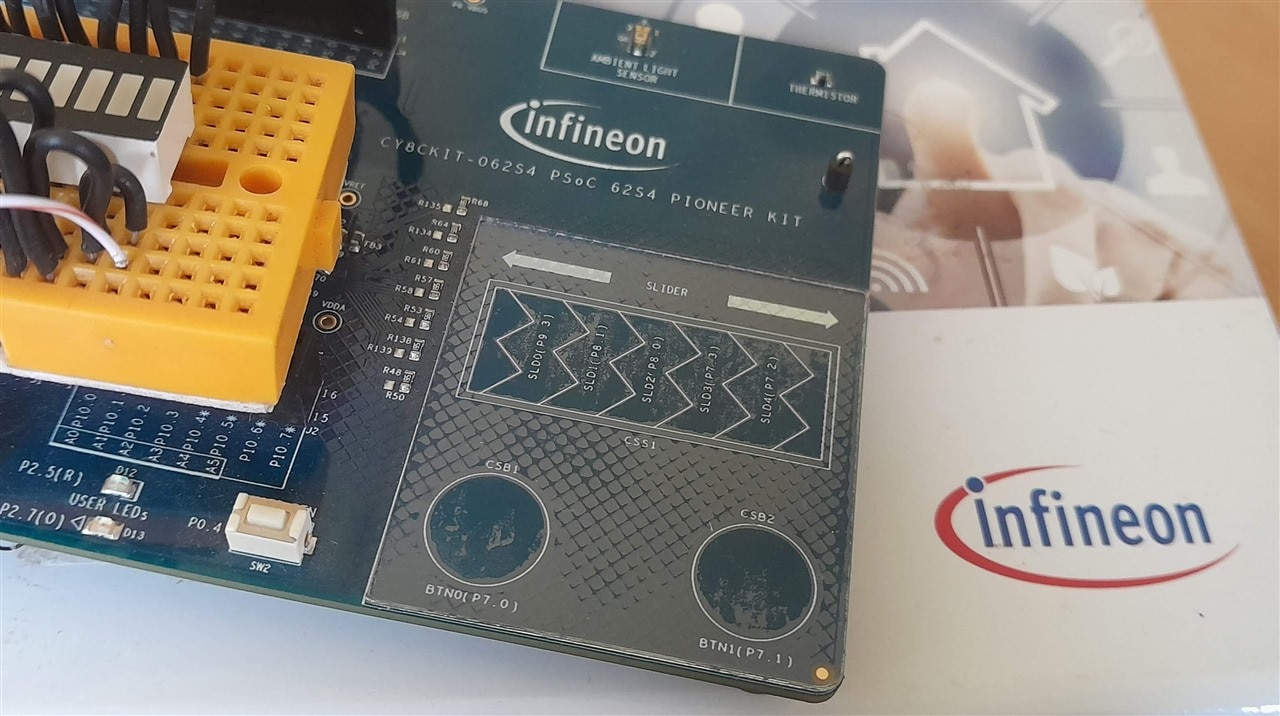
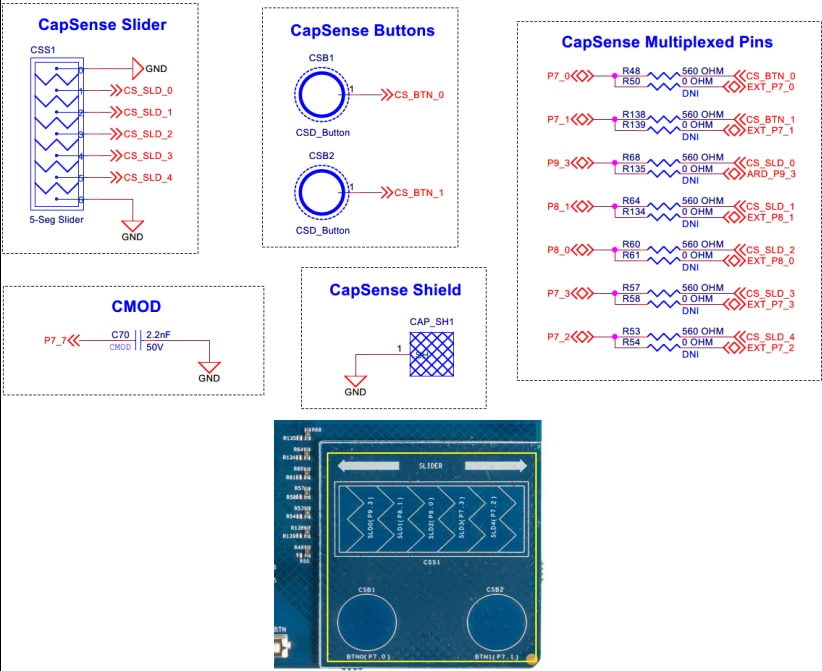
Capsese is an interesting feature offered in many of Infineon's PSoC MCUs which is a capacitive touch sensing solution involving no physical pushbuttons or mechanical switch. This particular CY8CKIT-062S4 comes with 2 Capsense buttons and one Capsense slider. The IDE comes with integrated tools for configuring and tuning the Capsense application specific to the user.
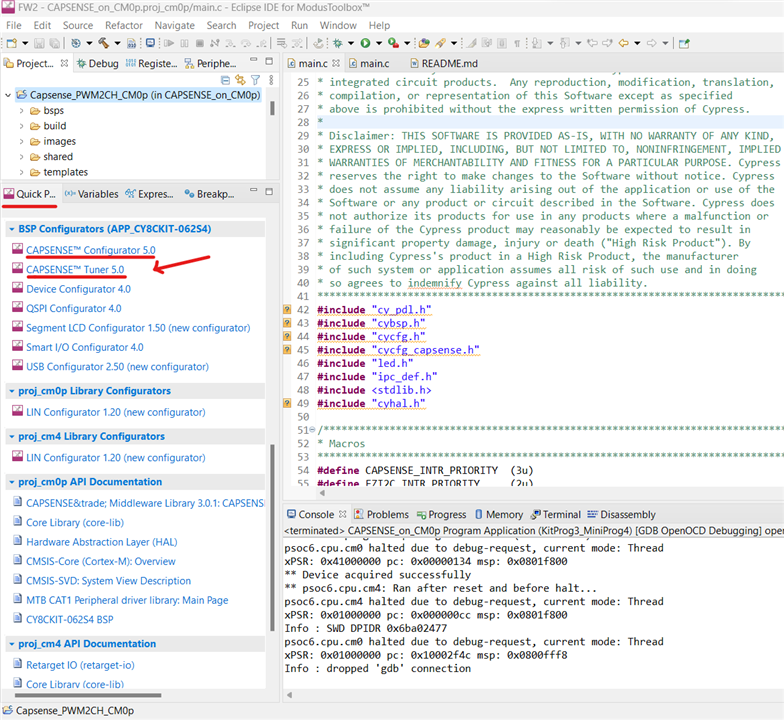
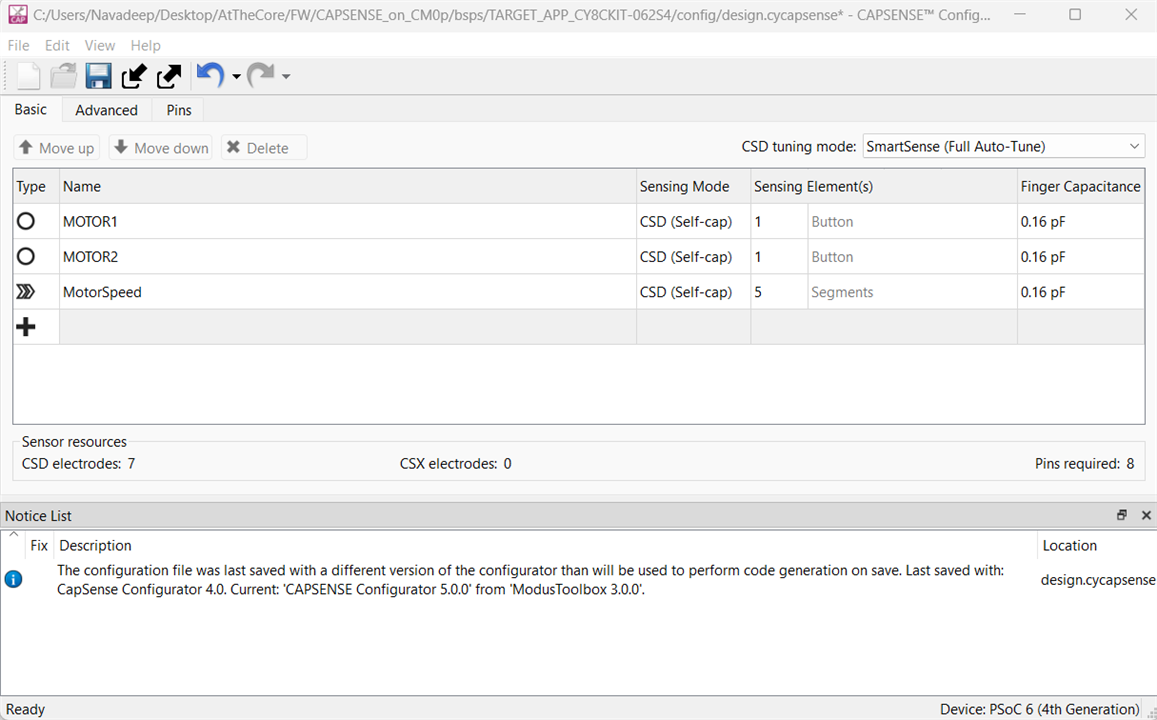
Capsense Configurator
Capsense Tuner
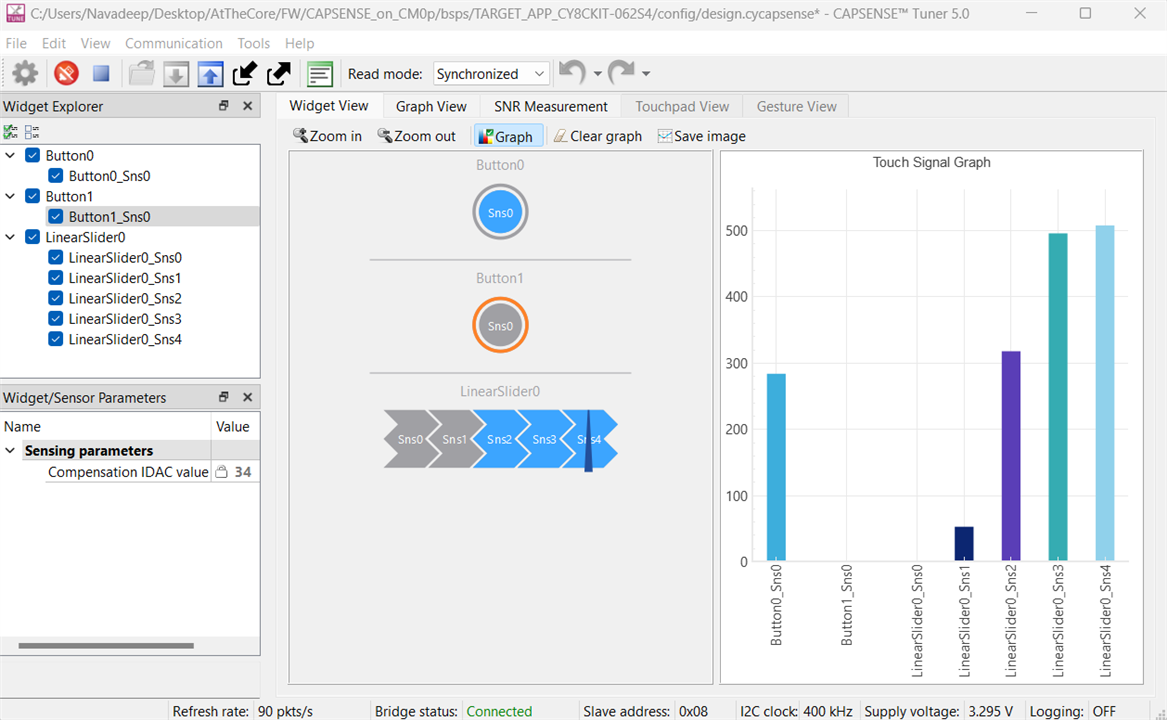
The slider consists of multiple capsense units integrated sequentially and based on the touch signal weight as in the above plot, it judges the sliding movement.
Schematic
The capsense initialization is done at the beginning of the program and the main for loop (Cortex M0+) runs the following routine:
        if (capsense_scan_complete)
        {
            /* Process all widgets */
            Cy_CapSense_ProcessAllWidgets(&cy_capsense_context);

            /* Process touch input */
            process_touch();

            /* Initiate next scan */
            Cy_CapSense_ScanAllWidgets(&cy_capsense_context);

            capsense_scan_complete = false;
         }
Extending for 2-channel PWM
The basic capsense example comes with the implementation of LED brightness control and for this project, it is extended to 2 channels. Initially, here I am using 2 onboard LEDs to configure and test out the functionality of PWM with the slider. Additional LED and PWM channel is added in the code as in the prototype definition.
led.h
/*******************************************************************************
* Function prototypes
*******************************************************************************/
void initialize_led(void);
void update_led1_state(led_data_t *led1_data);
void update_led2_state(led_data_t *led2_data);
led.c
void update_led1_state(led_data_t *led1_data)
{
    if ((led1_state_cur == LED_OFF) && (led1_data->state == LED_ON))
    {
        /* Enable PWM */
        Cy_TCPWM_PWM_Enable(PWM1_HW, PWM1_NUM);

        #if(CY_IP_MXTCPWM_VERSION > 1)
        {
            /* Start PWM */
            Cy_TCPWM_TriggerStart_Single(PWM1_HW, PWM1_NUM);
        }
        #else
        {
            /* Start PWM */
            Cy_TCPWM_TriggerStart(PWM1_HW, PWM1_MASK);
        }
        #endif

        led1_state_cur = LED_ON;
        led1_data->brightness = LED_MAX_BRIGHTNESS;
    }
    else if ((led1_state_cur == LED_ON) && (led1_data->state == LED_OFF))
    {
        /* Disable PWM to turn off the LED */
        Cy_TCPWM_PWM_Disable(PWM1_HW, PWM1_NUM);
        led1_state_cur = LED_OFF;
        led1_data->brightness = 0;
    }
    else
    {
    }

    if ((LED_ON == led1_state_cur) || ((LED_OFF == led1_state_cur) && (led1_data->brightness > 0)))
    {
        /* Enable PWM */
        Cy_TCPWM_PWM_Enable(PWM1_HW, PWM1_NUM);

        #if(CY_IP_MXTCPWM_VERSION > 1)
        {
            /* Start PWM */
            Cy_TCPWM_TriggerStart_Single(PWM1_HW, PWM1_NUM);

        }
        #else
        {
            /* Start PWM */
            Cy_TCPWM_TriggerStart(PWM1_HW, PWM1_MASK);

        }
        #endif

        uint32_t brightness = (led1_data->brightness < LED_MIN_BRIGHTNESS) ? LED_MIN_BRIGHTNESS : led1_data->brightness;

        /* Drive the LED with brightness */
        Cy_TCPWM_PWM_SetCompare0(PWM1_HW, PWM1_NUM, brightness);

        led1_state_cur = LED_ON;
    }
}

void update_led2_state(led_data_t *led2_data)
{
    if ((led2_state_cur == LED_OFF) && (led2_data->state == LED_ON))
    {
        /* Enable PWM */
        Cy_TCPWM_PWM_Enable(PWM2_HW, PWM2_NUM);

        #if(CY_IP_MXTCPWM_VERSION > 1)
        {
            /* Start PWM */
            Cy_TCPWM_TriggerStart_Single(PWM2_HW, PWM2_NUM);
        }
        #else
        {
            /* Start PWM */
            Cy_TCPWM_TriggerStart(PWM2_HW, PWM2_MASK);
        }
        #endif

        led2_state_cur = LED_ON;
        led2_data->brightness = LED_MAX_BRIGHTNESS;
    }
    else if ((led2_state_cur == LED_ON) && (led2_data->state == LED_OFF))
    {
        /* Disable PWM to turn off the LED */
        Cy_TCPWM_PWM_Disable(PWM2_HW, PWM2_NUM);
        led2_state_cur = LED_OFF;
        led2_data->brightness = 0;
    }
    else
    {
    }

    if ((LED_ON == led2_state_cur) || ((LED_OFF == led2_state_cur) && (led2_data->brightness > 0)))
    {
        /* Enable PWM */
        Cy_TCPWM_PWM_Enable(PWM2_HW, PWM2_NUM);

        #if(CY_IP_MXTCPWM_VERSION > 1)
        {
            /* Start PWM */
            Cy_TCPWM_TriggerStart_Single(PWM2_HW, PWM2_NUM);

        }
        #else
        {
            /* Start PWM */
            Cy_TCPWM_TriggerStart(PWM2_HW, PWM2_MASK);

        }
        #endif

        uint32_t brightness = (led2_data->brightness < LED_MIN_BRIGHTNESS) ? LED_MIN_BRIGHTNESS : led2_data->brightness;

        /* Drive the LED with brightness */
        Cy_TCPWM_PWM_SetCompare0(PWM2_HW, PWM2_NUM, brightness);

        led2_state_cur = LED_ON;
    }
}

/*******************************************************************************
* Function Name: initialize_led
********************************************************************************
* Summary:
*  Initializes a PWM resource for driving an LED.
*
* Parameters:
*  none
*
* Return
*  cy_rslt_t rslt - status of operation
*
*******************************************************************************/
void initialize_led(void)
{
    /* Configure the TCPWM for PWM operation */
    Cy_TCPWM_PWM_Init(PWM1_HW, PWM1_NUM, &PWM1_config);
    Cy_TCPWM_PWM_Init(PWM2_HW, PWM2_NUM, &PWM2_config);

    /* Enable PWM */
    Cy_TCPWM_PWM_Enable(PWM1_HW, PWM1_NUM);
    Cy_TCPWM_PWM_Enable(PWM2_HW, PWM2_NUM);

    /* Drive the LED with brightness */
    Cy_TCPWM_PWM_SetCompare0(PWM1_HW, PWM1_NUM, LED_MAX_BRIGHTNESS);
    Cy_TCPWM_PWM_SetCompare0(PWM2_HW, PWM2_NUM, LED_MAX_BRIGHTNESS);

    #if(CY_IP_MXTCPWM_VERSION > 1)
    {
        /* Start PWM */
        Cy_TCPWM_TriggerStart_Single(PWM1_HW, PWM1_NUM);
        Cy_TCPWM_TriggerStart_Single(PWM2_HW, PWM2_NUM);
    }
    #else
    {
        /* Start PWM */
        Cy_TCPWM_TriggerStart(PWM1_HW, PWM1_MASK);
        Cy_TCPWM_TriggerStart(PWM2_HW, PWM2_MASK);

    }
    #endif
}
Toggle Button Control Logic
For this project, I am interested to have the 2 capsense buttons to independently turn ON/OFF the motors or thereby the PWM signals driving them. As we have seen above in the CM0+ for main loop, process_touch() function is called and so the hint was to go there and add what I want to do as a part of processing the touch captured by the button. The flow goes so:
Get button status -> Get slider status -> Detect new touch on the button {do user defined action} -> Detect new touch on the slider {do user defined action} -> Update states (LED for example)
This block of code is written to toggle the LED status when a touch is detected on the button.
main.c (CM0+)
    /* Detect new touch on Button0 */
    if((0u != button0_status) &&
       (0u == button0_status_prev))
    {
        /* Turn USER LED1 ON/OFF */
    	if(led1_data.state){
        led1_data.state = LED_OFF;
        led1_update_req = true;
    	}
    	else{
            led1_data.state = LED_ON;
            led1_update_req = true;
    	}
    }

    /* Detect new touch on Button1 */
    if((0u != button1_status) &&
       (0u == button1_status_prev))
    {
        /* Turn the USER LED2 ON/OFF */
    	if(led2_data.state){
        led2_data.state = LED_OFF;
        led2_update_req = true;
    	}
    	else{
            led2_data.state = LED_ON;
            led2_update_req = true;
    	}
    }
Sneak Peek
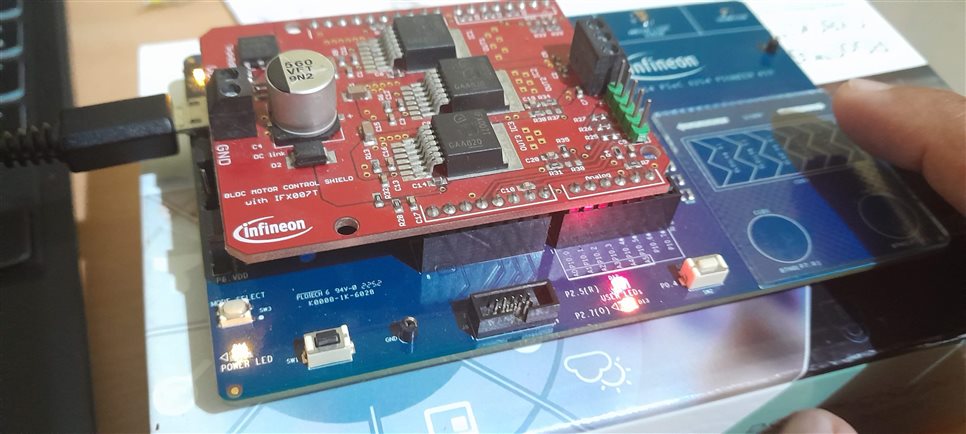

Further, I am working on integrating the modules developed to run on and the link between two different cores by using semaphores. In the next blog, we'll test this out and then explore the usage of motor driver shields to run two motors separately by the user signal through Capsense. Thanks for reading all the way through and do share your comments or if you think something is interesting. Thank you
