


This is the 3rd blog in a series of 5 blogs for the At The Core Design Challenge.
This blog post describes my notes on my migration of the the GitHub - Infineon/mtb-example-psoc6-dual-cpu-ipc-pipes on the Infineon repo. This example is not available as an example project available yet for the PSoC 62S4 BSP examples. I was able to get it from the Infineon GitHub repo here https://github.com/Infineon/mtb-example-psoc6-dual-cpu-ipc-pipes..I was able to get this implemented with my MTB 2.4 version, but I needed to migrate it to MTB 3.0, to be able to use it in my project.
 This example demonstrates how to use the inter-processor communication (IPC) driver to implement a message pipe in PSoC 6 MCU. The pipe is used to send messages between CPUs.
The results of this exercise is to get another dual-core IPC example besides the only available semaphore example. I found this KBA article from October 06,2022 at KBA: Migrating ModusToolbox applications from version 2.x to version 3.x – KBA236134
KBA236134 is a technical article or knowledge base article (KBA) that provides guidelines and instructions on how to migrate applications created using version 2.x of ModusToolbox to version 3.x of the tool. The article outlines the steps involved in the migration process, including upgrading the software, modifying the makefile, and updating the code to use the new APIs and libraries in version 3.x. The article also provides important information on compatibility issues and the implications of migration, such as the inability to use version 2.x after migrating to version 3.x.
ModusToolbox 3.x provides many new features, including multi-core support for your applications. The release comes with a new BSP Assistant tool, Library Manager 2.0, Device Configurator 4.0, and minor updates to other tools to improve your development experience.
There might have been changes made to the ModusToolbox tools package and if you want to learn more about them, you can refer to the mt_release_notes file located in the docs_3.x directory of the ModusToolbox installation directory. Additionally, you can refer to the ModusToolbox tools package user guide for more information.
The ModusToolbox 3.x release is able to support most applications created in version 2.x, but users can only access the 3.x features after migrating. However, once an application has been migrated, it may no longer work in the ModusToolbox version 2.x environment. Users who wish to continue using the ModusToolbox version 2.x ecosystem should not migrate their applications to ModusToolbox version 3.x. Additionally, most dual-core code examples and some single-core code examples for creating new applications on the Infineon GitHub repository have already been migrated to the ModusToolbox 3.x environment.
Exceptions on backward compatibility: Although ModusToolbox 3.x provides backward compatibility with most of the single-core applications created in version 2.x, note the following exceptions:
- Older BSPs are not compatible with version 3.x applications. If you are using a custom 2.x BSP, you need to migrate it to version 3.x or create a new BSP before updating the application.
- Some make variables supported in ModusToolbox version 2.4 are not supported in version 3.x. If you are using any of these variables in your application, you must update them with compatible variables from core-make or recipe-make-cat1a.
"Dual core App "PSoC 6 MCU: Dual-CPU IPC pipes" project example Migration Steps
Steps for migration:
here is a step-by-step guide for migrating ModusToolbox applications from version 2.x to version 3.x:
Step 1: Install the software
- Install the ModusToolbox tools package 3.x version.
- DONE
- Create a new empty Eclipse IDE workspace for your application.
- I created an empty folder on my root file system called WP_MIGRATION
Step 2: Modify files on the disk
- Manually copy or move the existing application on the disk to the location of the new Eclipse workspace.
- I unzipped the repo Archive to the WP_MIGRATION folder.
- I unzipped the repo Archive to the WP_MIGRATION folder.
- Remove any TARGET_<BSP-NAME>.mtb files from the deps folder because they are no longer required.
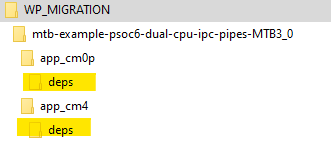
- Deleted 1 each, from each of the above folders
- Delete the libs folder if it exists.
- This folder does not EXIST.
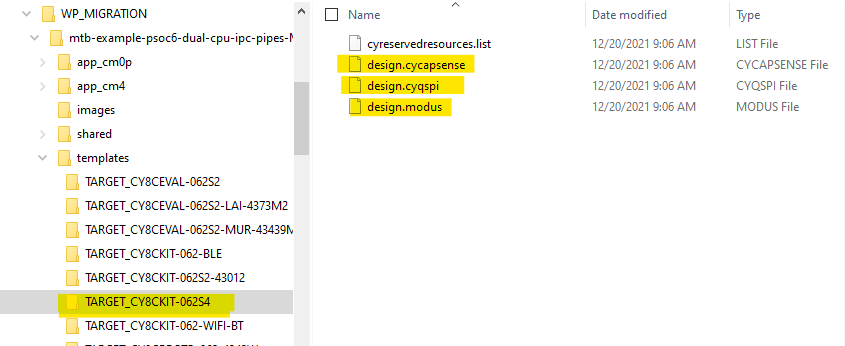
- If there are custom design configuration files in the COMPONENT_CUSTOM_DESIGN_MODUS/<TARGET_BSP> folder
- Four Files are present
 :
:
- Rename the COMPONENT_CUSTOM_DESIGN_MODUS folder to templates. This templates folder should be present under the root application directory
- Is the file cyreservedresources.list needed?
- Create a config subdirectory. Move all the configuration files into the config directory.
- what are the config files? need help to determine which ones ..... look at a MTB30 project semaphore
- Semaphore project an MTB30 example.
- What are all the extra FOLDERS? DO I need them in my template? or ar they created with the BSP when I create a new project?

- Semaphore project an MTB30 example.
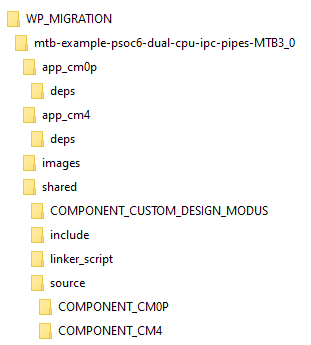
- S0 I moved the 3 files to a config Directory that I created
- RESULTS
- what are the config files? need help to determine which ones ..... look at a MTB30 project semaphore
- If present, remove the following from the existing Makefile of each project:
- COMPONENTS+= CUSTOM_DESIGN_MODUS
- DISABLE_COMPONENTS+= BSP_DESIGN_MODUS
- RESULTS:
- app_cm4 Makefile has a different setting for DISABLE_COMPONENTS+=CM0P_SLEEP BSP_DESIGN_MODUS so I keep it
- disabled COMPONENTS in both by adding a comment char.
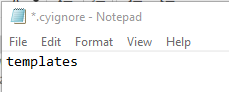
- Add a .cyignore file (or modify it if already exists) with a line containing templates. Keep this file under the root application directory.
- Create it and added one line as follows:

- Four Files are present

Please Note: The templates folder is intended to keep custom design configurations and linker scripts, which will be copied to the bsps/TARGET_<BSP-name> folder after updating the application using the Library Manager. The hierarchy of the file in the templates directory must exactly match the hierarchy in the BSP to the file in order for this to work properly. See Verify the directory structure for more details.
Step 3: Update the Makefile(s)
- For multi-core applications, see the Dual-CPU Empty Application Template for the multi-core application template.
- Modify your application as per the template
- What does this mean exactly? creating folders like the template app? or copying folders awith make files?
- I copied the files highlighted to the root of my project.

- What about the3 folders highlighted in RED?
- I DID not COPY them to my root project directory..
- HOPE THIS IS OK?
- You will notice that there is an application level and a sub-directory for each project within the application. The application and each project have their own Makefiles
- I made the following changes to the existing Makefiles
- In the application Makefile (which was copied):
- MTB_TYPE=APPLICATION
- MTB_PROJECTS=app_cm0p app_cm4
- In the project Makefiles (note I did these changes on the existing makefiles in the original project , I did not copy the Makefiles from the DUAL_CORE_EMPTY APP):
- MTB_TYPE=PROJECT
- APPNAME=<Project Name>
- CM0+
- APPNAME=app_cm0p
- CM4
- APPNAME=app_cm4
- CM0+
- CORE_NAME=<CPU Core used by the Project (CM0P_0/CM4_0)>
- CM0+
- CORE_NAME=CM4_0
- CM4
- # Set this application to run at the CM0+
CORE=CM4
CORE_NAME=CM4_0
- # Set this application to run at the CM0+
- CM0+
- Remove CY_EXTAPP_PATH & DEPENDENT_APP_PATH
- In the application Makefile (which was copied):
Please Note: The files common.mk and common_app.mk (located at the application level) from the Dual-CPU Empty Application Template are included in some of the Makefiles to reduce the duplication of the Makefile variables across multiple projects. You can see that TARGET, TOOLCHAIN, and CONFIG variables are moved to the common.mk file and are being used by the project Makefiles.
Step 4: Add the BSP
- Open the Library Manager.
- Specify the application directory using the Browse button.
- Click Add BSP and select a standard Infineon BSP or add a custom BSP by clicking Browse.
- Click OK to close the dialog.
- Ensure the new BSP is selected as active and then click Update.
- This will create an application-owned folder (TARGET_<BSP-NAME>) under the bsps directory.
Step 5: Update the libraries
- If applicable, use the Library Manager to update the dependency libraries.
- For applications using CAPSENSE, add the library again.
RESULTS for steps 4 & 5
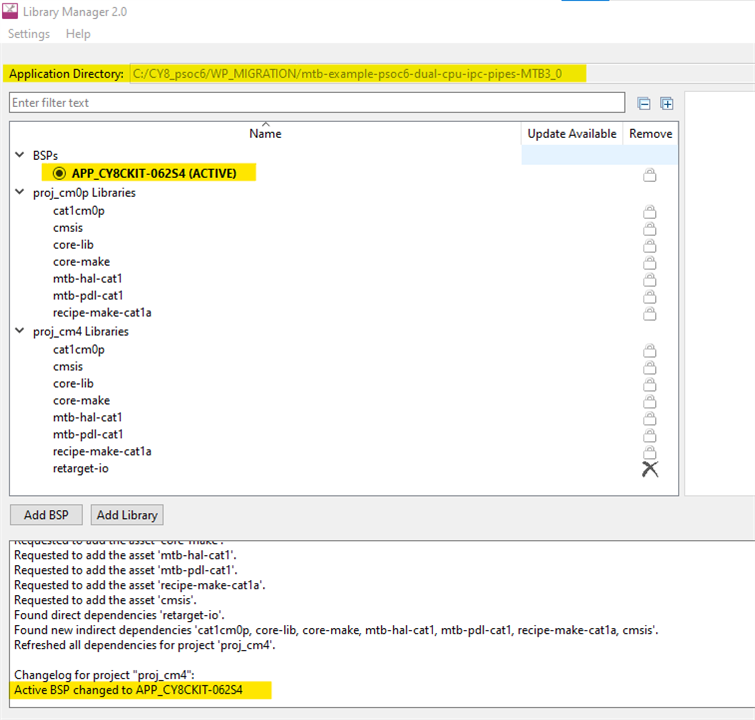
- I opened the library manager on my windows PC.
- I followed the steps in 4 & 5 browsing to the directory that I have been migrating in the previous steps.
- I selected the ADD BSP button and selected CY8CKIT-062S4
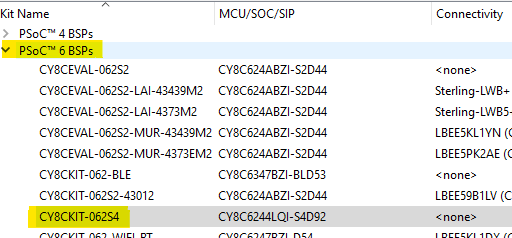
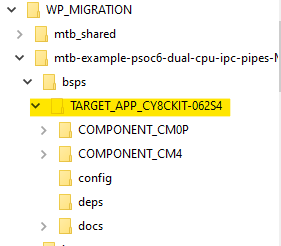
- The BSP updated and created the bsps directory
- and created an application-owned folder (TARGET_<BSP-NAME>) under the bsps directory
-
- I then pressed the ADD library button. And the libraries were added for both core projects and a MTB_Shared folder was created.
- I don't think I need the shared folder anymore?
- I will see.
The results are shown here
Step 6: Import the application
- Use a supported IDE or the command line to import the application. This example uses the Eclipse IDE for ModusToolbox.
- In the Eclipse IDE, import the application using the Import Existing Application In-Place link in the Quick Panel.
- Browse to the location for the migrated application to import.
RESULTS:
PROBLEM1 I received an error as follows

the error in the console:
Import scheduled. As projects are imported, they will appear in Project Explorer.
Problem creating subproject mtb-example-psoc6-dual-cpu-ipc-pipes-master: Error while executing the "Dual-CPU_Empty_PSoC6_App" operation
Problem creating project at C:\CY8_psoc6\WP_MIGRATION2\mtb-example-psoc6-dual-cpu-ipc-pipes-master
Problem getting project description for app_cm0p
Problem getting project description for app_cm4

I think I know what it might be
I renamed the project file folders from app_<core> to proj_<core>
do I need to rename the folders back to app_<core> and change the APPNAME=<Project Name> in the project Makefiles?
Now the library manager does not load? using that directory
Redid it all over again!!!!
Still doesn't work. Have a call into Infineon on this to resolve it
Step 7: Verify the directory structure:
- Make sure that the directory structure is correct according to the ModusToolbox version 3.x flow.
- The libs and bsps folders will be created by the Library Manager after the BSP is added.
- ApplicationName
- Makefile (MTB_TYPE=APPLICATION)
- common.mk
- common_app.mk
- bsps
- TARGET_BSP1 (not an Infineon Git repo; completely app-owned)
- templates
- TARGET_BSP1
- COMPONENT_CM0P (contains linker files for different toolchain)
- COMPONENT_CM4 (contains linker files for different toolchain)
- config
- design.modus
- design.capsense
- TARGET_BSP1
- project1
- Makefile (MTB_TYPE=PROJECT)
- deps
- lib3.mtb (local)
- lib4.mtb (shared)
- libs
- lib3 (Infineon Git repo)
- main.c
- project1_helper.h
- project1_helper.c
- project2
- Makefile (MTB_TYPE=PROJECT)
- deps
- lib5.mtb (local)
- lib6.mtb (shared)
- libs
- lib5 (Infineon Git repo)
- main.c
- project2_helper.h
- project2_helper.c
- mtb_shared
- lib4/... (Infineon Git repo)
- lib6/... (Infineon Git repo)
The directories listed above are verified
The only difference is that
- mdb shared folder is outside of the app project folder
- 2 files from the EMPY Dual App are not in the list above
- .cproject
- .project
Step 8: Use the Device Configurator
I did not do this step.. the example that I'm trying to migrate does not to my knowledge have a custom design modus file?
If your application has a custom design.modus file from ModusToolbox version 2.x, you might need to fix some personalities
- Open your application in the ModusToolbox IDE.
- In the Project Explorer, select your application name and click on the Device Configurator icon in the Quick Panel (or right-click and select "Device Configurator" from the context menu).
- This will open the Design.modus file for your application in the Device Configurator tool.
- If you receive a message about an older file format, click OK to close it.
- Check the Notice List for any reported errors. If you see any errors, fix them by selecting the correct personality for each item.
- Click File > Update All Personalities to apply the changes.
- After fixing all errors, save the file and close the Device Configurator tool.
The Migrated Project on my GitHub repo
I placed the example project here:
Migrating-an-example-MTB-2.x-to-version-3.x-
Conclusion
That's it! These steps should help you migrate your ModusToolbox applications from version 2.x to version 3.x. Don't forget to refer to the ModusToolbox tools package user guide and mt_release_notes to learn more about the changes in the ModusToolbox tools package.
APPENDIX 1 -- Running different versions of ModusToolbox on the same Windows PC.
I noticed that I could not run ModusToolboc 2.4 after installing MTB 3.0? I was unable to use Project creator from the MTD2.5 IDE? I received this problem using File/New. when the Project creator.
The following Error was presented in a dialog box?
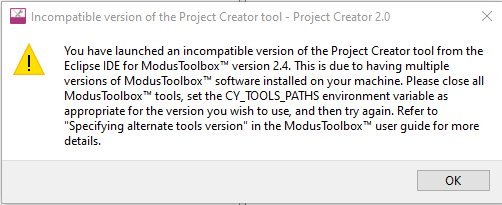
I received advise from the Infineon forum, that I needed to add a system environment (CY_TOOLS_PATHS) variable. as described here:
If you want to create the project in ModusToolbox2.4, first set the environment variable:
CY_TOOLS_PATHS = C:/<path>/ModusToolbox/tools_2.4
NOTE: the forward slashes "/" in the path this is very important!!!

Once I did that, I could run Project Creator with no error dialog and that I was using version1.40 but now I had another problem in this version of project creator loading the manifest from the network.?

Again a solution from the Infineon forum as follows:
|
Hi A change in the way GitHub handles URL redirects has resulted in ModusToolbox being unable to access manifest files for BSPs, middleware or applications. The problem presents itself in Project Creator and Library Manager, which fail to display any content. A workaround has been given in this discussion. Please refer to it and check if it helps. Thanks and Regards, |
results:
the discussion link brought up the page below:
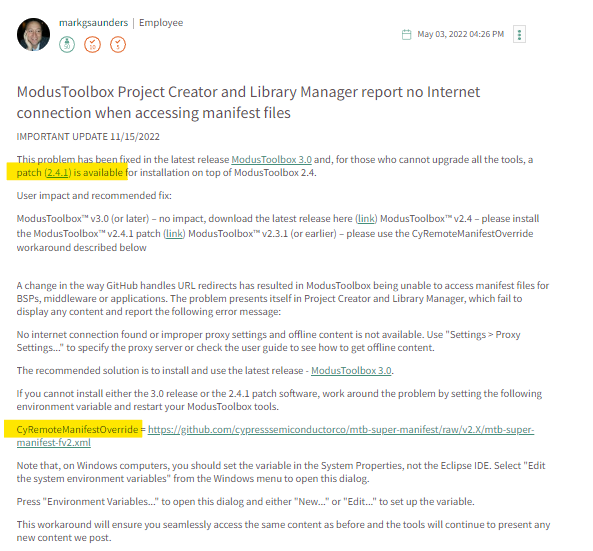
At the time the patch link brought me to an empty page : patch (2.4.1) is available for installation on top of ModusToolbox 2.4.
But, setting the windows system variable
CyRemoteManifestOverride = https://github.com/cypresssemiconductorco/mtb-super-manifest/raw/v2.X/mtb-super-manifest-fv2.xml
worked:

conclusions
Now the Link is working and the patch is available but I have not tried it patch my version of 2.4
Appendix 2 - loading a GitHub repo into MTD 2.4
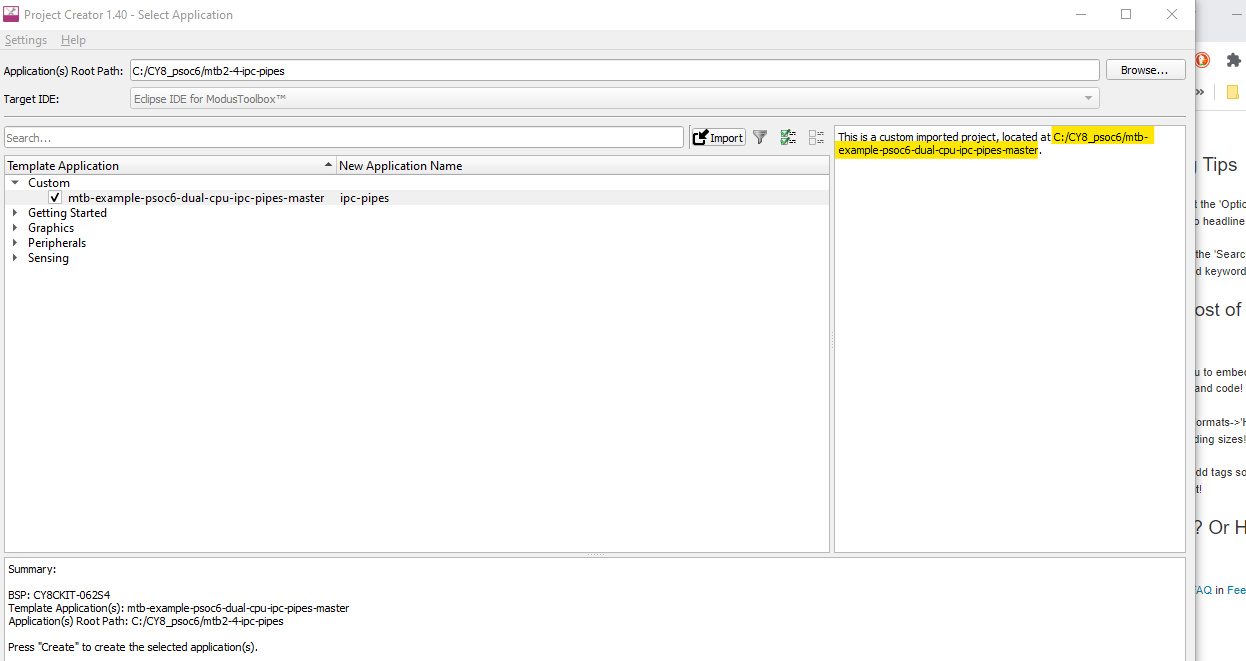
To import a repo project into MTD2.4, I imported the https://github.com/Infineon/mtb-example-psoc6-dual-cpu-ipc-pipes repo.
I wanted to test this example, here are the steps I took.
To import the code example to ModusToolbox2.4, please clone the example to your local system and follow the below steps:
- Open ModusToolbox, navigate to New application.
- Select the desired BSP to be used.
- select the IMPORT button on the
- Browse to the cloned code example folder where unzipped the archive. In my case_____
- Select the project as shown above and click on the create button

PROBLEM
CAN Build but now I'm getting an error that it can't find device?
CONSOLE:
| Open On-Chip Debugger 0.11.0+dev-4.3.0.1746 (2021-09-16-07:59) Licensed under GNU GPL v2 For bug reports, read http://openocd.org/doc/doxygen/bugs.html Info : auto-selecting first available session transport "swd". To override use 'transport select <transport>'. Started by GNU MCU Eclipse adapter speed: 2000 kHz adapter srst delay: 25 adapter srst pulse_width: 25 ** Auto-acquire enabled, use "set ENABLE_ACQUIRE 0" to disable cortex_m reset_config sysresetreq cortex_m reset_config sysresetreq Warn : SFlash programming allowed for regions: USER, TOC, KEY Warn : could not read product string for device 0x04b4:0xf155: Pipe error Warn : could not read product string for device 0x04b4:0xf155: Pipe error Error: unable to find a matching CMSIS-DAP device |
IDE VIEW:
 4
4
It turns out to not be a problem. But I just did not have the USB cable plugged in properly!!
You can now debug by debugging the CM0 or CM4 firmware but not both at the same time. This is one of the fundamental differences between MTB2.x and MTB3.0. In MTB3.0 you can debug firmware on both cores at the SAME TIME!
conclusions
I noticed that the CM0 app was included in the librry manager? There must be a Programmer mapping somewhere to load in the cm0 and cm4 firmware.
So to use MTB2.4 on a WINDOWS PC that has MTB3.0 also you need to set 2 system environment varibles:
- CY_TOOLS_PATHS = C:/<path>/ModusToolbox/tools_2.4
- CyRemoteManifestOverride = https://github.com/cypresssemiconductorco/mtb-super-manifest/raw/v2.X/mtb-super-manifest-fv2.xml
If you going back to using MTB3.0, don't forget to disable these variables so MTB3.0 will use the proper tools!
| BLOG#1-Introduction |
| Blog#2--Design |
| Blog#3- Migrating an example MTB 2.x to version 3.x |
| BLOG#4-Testing |
| BLOG#5-Implementation and Challenge Conclusion |