


This is the 4th blog in a series of 5 blogs for the At The Core Design Challenge.
The blog post, describes the Testing that I did to debug and unit test subsystems used in the implementation
Here is my functional design showing the tech I'm going to use in my implementation. These blocks are broken out into test examples that I will use to unit test each block Then in blog # 5, I will tie all these blocks together into my final design. and implementation of my idea.
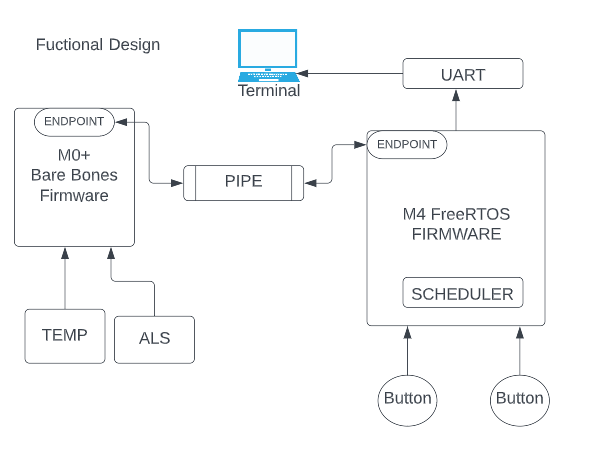
There are 4 TEST block sections:
- IPC PIPES,
- Thermistor, Ambient Light Sensor (ALS),
- FreeRTOS Scheduler,
- Capsense Buttons
Each test block section contains a Design, Implementation with Code and test run(s) of the block.
- The purpose of each test, is to verify the functionality and performance of the code example.
- Each test produces a code example, which implements one or two of the
- The test results will verify the reliability and accuracy of the code example.
- Any discrepancies or issues found during testing will be addressed and fixed until the desired results are achieved.
- When all test are running to the spec, then the code will be put together to implement the final system for the challenge,
CAPSENSE BUTTONS
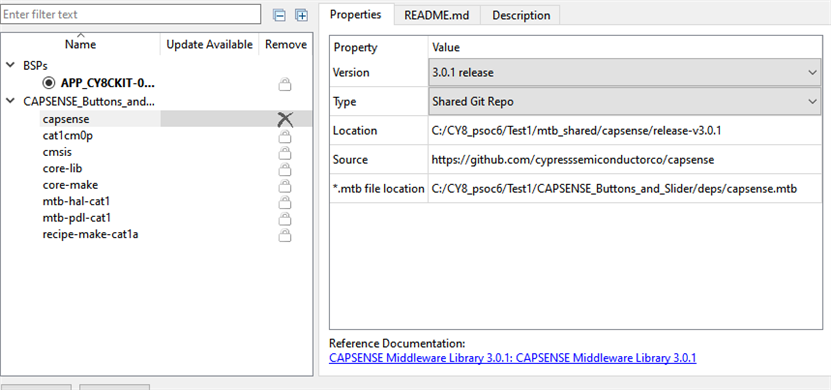
This is my design of a CAPSENSE button implementation for my project. This is created using the template to create the project. The main.c of the project is based on the "CAPSENSE_Buttons_and_Slider" example. The cy_retarget_io library was implemented to print the message to the terminal.
Functional Spec:
This minimal firmware test will check which CAPSENSE button (BTN1 or BTN2) has been pressed and print which one pressed, out to the terminal;.
Technical Spec:
library(s) used
cpsense --used for the 2 buttons
INCLUDES
/*******************************************************************************
* Header Files
*******************************************************************************/
#include "cybsp.h"
#include "cyhal.h"
#include "cycfg.h"
#include "cycfg_capsense.h"
#include "cy_retarget_io.h"
/*******************************************************************************
* Function Prototypes
*******************************************************************************/
static uint32_t initialize_capsense(void);
static void process_touch(void);
static void capsense_callback();
static void capsense_isr(void);
API Functions Used (HAL or PDL)
CAPSENSE--
-
- Cy_CapSense_Init
- Cy_CapSense_Enable
- Cy_CapSense_RegisterCallback
- Cy_CapSense_InterruptHandler
- Cy_CapSense_ScanAllWidgets
- Cy_CapSense_ProcessAllWidgets
- Cy_CapSense_IsSensorActive
FLOWCHART
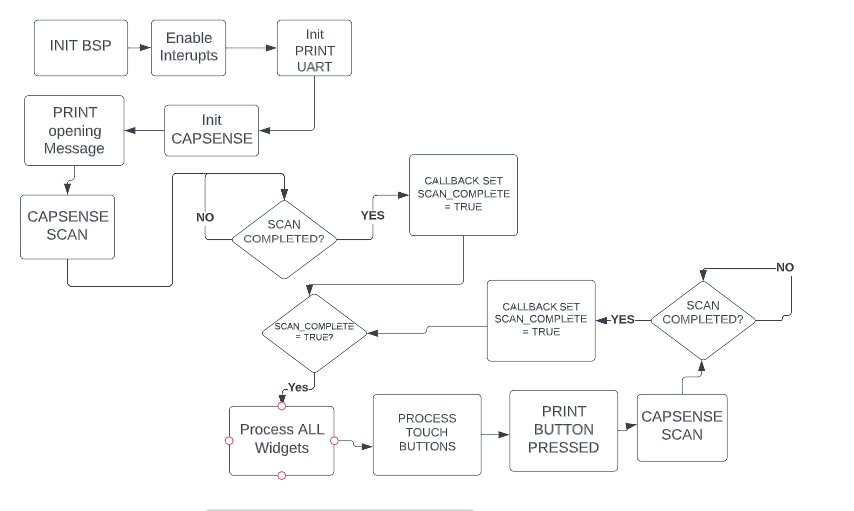
- Initialize the device and board peripherals
- Enable global interrupts
- Initialize the debug UART
- Print opening message
- Initialize CAPSENSE [func: initialize_capsense()]
- CAPSENSE Init
- Initialize CapSense interrupt
- Initialize the CapSense firmware modules
- Assign a callback function to indicate end of CapSense scan
- Initiate first scan
- NOTE When the scan is complete and interupt is fired and the callback set the capsense_scan_complete flag to = true
- LOOP
- if capsense_scan_complete = true;
- Process all widgets
- Process touch input [func: process_touch()]
- Print button touched
- Initiate next scan
- capsense_scan_complete = false;
- if capsense_scan_complete = true;
CODE
- Started with the empty app.
- added the 2 libraries in Library Manager
- Copied main.c contents from the example project "CAPSENSE_Buttons_and_Slider" into main.c of the new project I called "Test-Minimal_CAPSENSE_Buttons"
- Took out code that was not needed, like tuner, slider code and added Printf() support.
/*******************************************************************************
* PROJECT:	   Test-Minimal_CAPSENSE_Buttons
* File Name:   main.c
*
* Description: This minimal firmware test will check which CAPSENSE button
*              (BTN1 or BTN2) has been pressed and print which one out to
*              the terminal;.
*
* TODO ---- Related Document: See README.md
*
*
********************************************************************************

/*******************************************************************************
* Header Files
*******************************************************************************/
#include "cybsp.h"
#include "cyhal.h"
#include "cycfg.h"
#include "cycfg_capsense.h"
#include "cy_retarget_io.h"


/*******************************************************************************
* Macros
*******************************************************************************/
#define CAPSENSE_INTR_PRIORITY      (7u)

/*******************************************************************************
* Global Variables
*******************************************************************************/
volatile bool capsense_scan_complete = false;

/*******************************************************************************
* Function Prototypes
*******************************************************************************/
static uint32_t initialize_capsense(void);
static void process_touch(void);
static void capsense_callback();
static void capsense_isr(void);


/*******************************************************************************
* Function Definitions
*******************************************************************************/

/*******************************************************************************
* Function Name: main
********************************************************************************
* Summary:
*  System entrance point. This function performs
*  - initial setup of device
*  - initialize CapSense
*  - initialize tuner communication
*  - scan touch input continuously and update the LED accordingly.
*
* Return:
*  int
*
*******************************************************************************/
int main(void)
{
    cy_rslt_t result;
    #if defined (CY_DEVICE_SECURE)
        cyhal_wdt_t wdt_obj;

        /* Clear watchdog timer so that it doesn't trigger a reset */
        result = cyhal_wdt_init(&wdt_obj, cyhal_wdt_get_max_timeout_ms());
        CY_ASSERT(CY_RSLT_SUCCESS == result);
        cyhal_wdt_free(&wdt_obj);
    #endif

    /* Initialize the device and board peripherals */
    result = cybsp_init();

    /* Board init failed. Stop program execution */
    if (result != CY_RSLT_SUCCESS)
    {
        CY_ASSERT(0);
    }

    /* Enable global interrupts */
    __enable_irq();


    /* Initialize the debug uart */
    result = cy_retarget_io_init(CYBSP_DEBUG_UART_TX, CYBSP_DEBUG_UART_RX,
                                     CY_RETARGET_IO_BAUDRATE);
    if (result != CY_RSLT_SUCCESS)
    {
        CY_ASSERT(0);
    }

    /* Print opening message */
    /* \x1b[2J\x1b[;H - ANSI ESC sequence for clear screen */
    printf("\x1b[2J\x1b[;H");
    printf("---------------------------------------------------------------------------\r\n");
    printf("Test-Minimal_CAPSENSE_Buttons\r\n");
    printf("---------------------------------------------------------------------------\r\n\n");


    //Initialize CAPSENSE

    result = initialize_capsense();

    if (CYRET_SUCCESS != result)
    {
        /* Halt the CPU if CapSense initialization failed */
        CY_ASSERT(0);
    }

    /* Initiate first scan */
    Cy_CapSense_ScanAllWidgets(&cy_capsense_context);

    for (;;)
    {
        if (capsense_scan_complete)
        {
            /* Process all widgets */
            Cy_CapSense_ProcessAllWidgets(&cy_capsense_context);

            /* Process touch input */
            process_touch();


            /* Initiate next scan */
            Cy_CapSense_ScanAllWidgets(&cy_capsense_context);

            capsense_scan_complete = false;
        }

    }

}

/*******************************************************************************
* Function Name: process_touch
********************************************************************************
* Summary:
*  Gets the details of touch position detected, processes the touch input
*  and updates the LED status.
*
*******************************************************************************/
static void process_touch(void)
{
    uint32_t button0_status;
    uint32_t button1_status;

    static uint32_t button0_status_prev;
    static uint32_t button1_status_prev;

    /* Get button 0 status */
    button0_status = Cy_CapSense_IsSensorActive(
        CY_CAPSENSE_BUTTON0_WDGT_ID,
        CY_CAPSENSE_BUTTON0_SNS0_ID,
        &cy_capsense_context);

    /* Get button 1 status */
    button1_status = Cy_CapSense_IsSensorActive(
        CY_CAPSENSE_BUTTON1_WDGT_ID,
        CY_CAPSENSE_BUTTON1_SNS0_ID,
        &cy_capsense_context);


    /* Detect new touch on Button0 */
    if ((0u != button0_status) &&
        (0u == button0_status_prev))
    {
    	//print button0 touched
        printf("button0 touched   Value: %d\r\n", button0_status);

    }

    /* Detect new touch on Button1 */
    if ((0u != button1_status) &&
        (0u == button1_status_prev))
    {
    	//print button1 touched
        printf("button1 touched   Value: %d\r\n", button1_status);
    }

    /* Update previous touch status */
    button0_status_prev = button0_status;
    button1_status_prev = button1_status;

}


/*******************************************************************************
* Function Name: initialize_capsense
********************************************************************************
* Summary:
*  This function initializes the CapSense and configure the CapSense
*  interrupt.
*
*******************************************************************************/
static uint32_t initialize_capsense(void)
{
    uint32_t status = CYRET_SUCCESS;

    /* CapSense interrupt configuration parameters */
    static const cy_stc_sysint_t capSense_intr_config =
    {
        .intrSrc = csd_interrupt_IRQn,
        .intrPriority = CAPSENSE_INTR_PRIORITY,
    };

    /* Capture the CSD HW block and initialize it to the default state. */
    status = Cy_CapSense_Init(&cy_capsense_context);
    if (CYRET_SUCCESS != status)
    {
        return status;
    }

    /* Initialize CapSense interrupt */
    cyhal_system_set_isr(csd_interrupt_IRQn, csd_interrupt_IRQn, CAPSENSE_INTR_PRIORITY, &capsense_isr);
    NVIC_ClearPendingIRQ(capSense_intr_config.intrSrc);
    NVIC_EnableIRQ(capSense_intr_config.intrSrc);

    /* Initialize the CapSense firmware modules. */
    status = Cy_CapSense_Enable(&cy_capsense_context);
    if (CYRET_SUCCESS != status)
    {
        return status;
    }

    /* Assign a callback function to indicate end of CapSense scan. */
    status = Cy_CapSense_RegisterCallback(CY_CAPSENSE_END_OF_SCAN_E,
            capsense_callback, &cy_capsense_context);
    if (CYRET_SUCCESS != status)
    {
        return status;
    }

    return status;
}

/*******************************************************************************
* Function Name: capsense_isr
********************************************************************************
* Summary:
*  Wrapper function for handling interrupts from CapSense block.
*
*******************************************************************************/
static void capsense_isr(void)
{
    Cy_CapSense_InterruptHandler(CYBSP_CSD_HW, &cy_capsense_context);
}

/*******************************************************************************
* Function Name: capsense_callback()
********************************************************************************
* Summary:
*  This function sets a flag to indicate end of a CapSense scan.
*
* Parameters:
*  cy_stc_active_scan_sns_t* : pointer to active sensor details.
*
*******************************************************************************/
void capsense_callback(cy_stc_active_scan_sns_t * ptrActiveScan)
{
    capsense_scan_complete = true;
}


/* [] END OF FILE */
WRAPUP
The takeaways from this test are:
- Working from an empty app
- Understanding how CAPSENSE buttons are implemented.
- Understanding of how the cy_retarget_io library is implemented
Get the project up to my Github repo
TODO
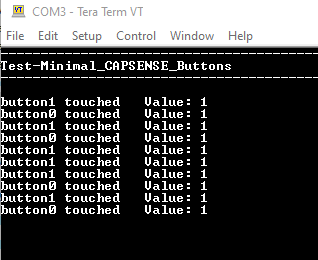
Here the terminal screen of the run
FreeRTOS Task Scheduler
This is my design for a FreeRTOS Task Scheduler implementation to be used in my final design. It uses the example project CAPSENSE_Buttons_and_Slider_FreeRTOS as a base. I then added my design functionality to test FreeRTOS concepts that will be used in my design.
Functional Spec:
This minimal firmware test will:
- Using FreeRTOS to execute the tasks required by this application
- The following tasks are used:
- CAPSENSE
 task: Initializes the CAPSENSE hardware block, processes the touch input, and sends a command to the LED task to update the LED status.
- Modified to:
- uses the logic from the CAPSENSE to send a command to the new print task
- only processes the button touch input.
- Use the logic that sends a command to the LED task to update the LED status to send a message to the PrintMSG TASK
- Modified to:
- LED task: Not USED
- Initializes the TCPWM in PWM mode for driving the LED, and updates the status of the LED based on the received command.
- PrintMSG TASK: NEW TASK to generate a message
- uses the logic from the LED task to print messages to the terminal.
- Receives messages from other TASK
- A FreeRTOS-based timer is used for making the CAPSENSE scan periodic; a queue is used for communication between the CAPSENSE task and other task. FreeRTOSConfig.h contains the FreeRTOS settings and configuration.
- Task priority levels
- capsense=MAX-1
- print=MAX-2
Technical Spec:
library(s) used.
MAIN.c
#include "cybsp.h"
#include "FreeRTOS.h"
#include "task.h"
#include "queue.h"
#include "capsense_task.h"
#include "printmsg_task.h"
capsense_task.c
#include "capsense_task.h"
#include "cybsp.h"
#include "cyhal.h"
#include "cycfg.h"
#include "cycfg_capsense.h"
#include "FreeRTOS.h"
#include "task.h"
#include "queue.h"
#include "timers.h"
#include "printmsg_task.h"
#include "string.h"
printmsg_task.com
#include "printmsg_task.h"
#include "cybsp.h"
#include "cyhal.h"
#include "FreeRTOS.h"
#include "task.h"
#include "queue.h"
#include "cycfg.h"
#include "cy_retarget_io.h"
API Functions Used (HAL or PDL)
- main.c
- cybsp_init()
- __enable_irq()
- QueueCreate()
- xTaskCreate()()
- vTaskStartScheduler()
- capsense_task.c
- xTimerCreate()
- xTimerStart()
- xQueueReceive()
- Cy_CapSense_IsBusy()
- Cy_CapSense_ScanAllWidgets()
- Cy_CapSense_ProcessAllWidgets()
- Cy_CapSense_IsSensorActive()
- xQueueSendToBack()
- Cy_CapSense_Init()
- Cy_CapSense_Enable()
- Cy_CapSense_Wakeup()
- Cy_CapSense_InterruptHandler()
- printmsg_task.com
- cy_retarget_io_init()
- xQueueReceive()
- printf(()
FLOWCHART
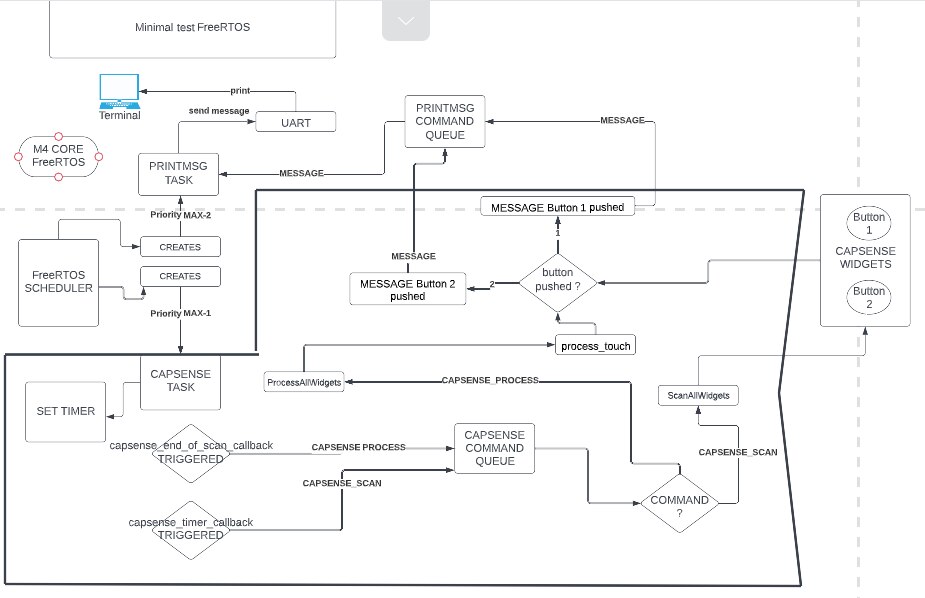
MAIN.c
- Set task priority
- capsense=high-1
- print=high-2
- set stack sizes for task
- capsense=256
- print=minimal_stack_size
- set Queue lengths of message queues used
- Initialize the device and board peripherals
- Enable global interrupts
- Create the queues.
- print_command_data_q
- capsense_command_q
- Create the user tasks. calls to xTaskCreate()
- "CapSense Task"
- " PrintMsg Task
- Start the RTOS scheduler. This function should never return
- -vTaskStartScheduler();
- end of main
CAPSENSE TASK
- Initialize timer for periodic CapSense scan
- Initialize CapSense block
- Start the timer */
- LOOP
- Block until a CapSense command has been received over queue
- received command?
- CAPSENSE_SCAN then call ScanAllWidgets
- When the scan is finished it fires the Scan Callback function (see below)
- CAPSENSE_PROCESS then call ProcessAllWidgets
- call process_touch
- Determine which CAPESENSE button was pushed?
- Construct a message with the button that was pressed.
- Send the message to the PRINTMSG QUeue to be read by the PrintMSG task
- call process_touch
- CAPSENSE_SCAN then call ScanAllWidgets
- When the timer goes OFF then the TIMER Callback:
- sends a CAPSENSE_SCAN command to the CAPSENSE Command Queue.
- If a scan ends the scan callback is called
- this sends a CAPSENSE_PROCESS command to the CAPSENSE Command Queue
PRINTMSG TASK
- Initialize the debug uart
- Print opening message
- LOOP
- Block until a command has been received over queue
- If a command is received
- check the command
- if PRINT_MESSAGE is the command print the message of the command to the terminal.
- check the command
CODE
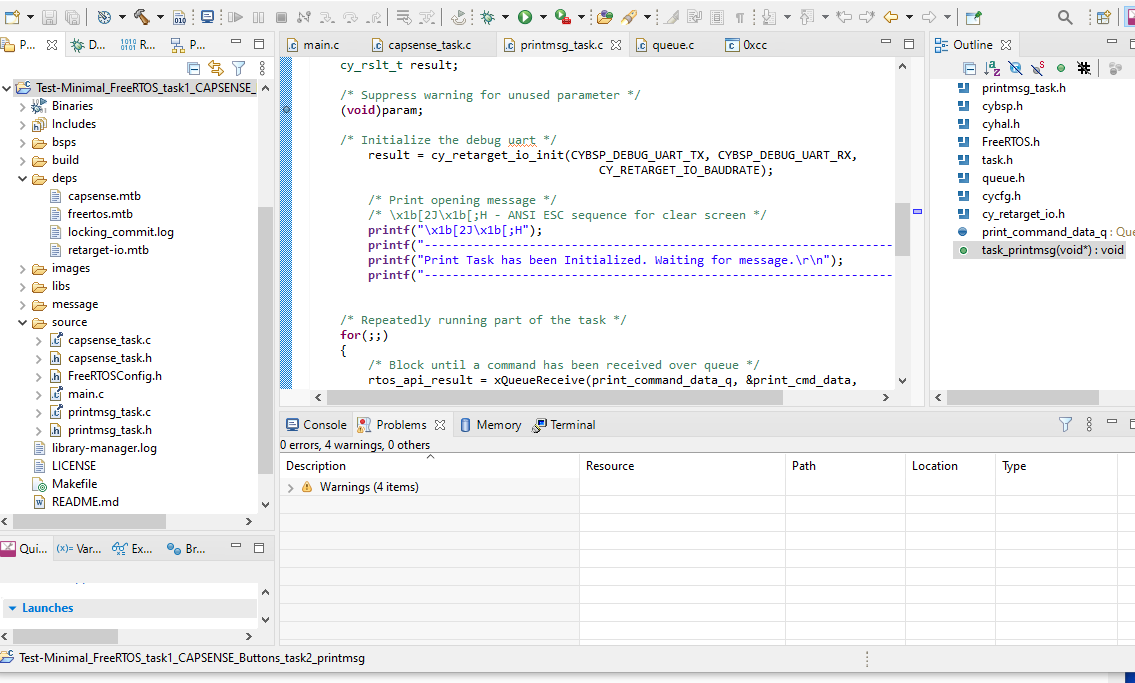
- I started with the example project CAPSENSE_Buttons_and_Slider_FreeRTOS and copied the project to Test-Minimal_FreeRTOS_task1_CAPSENSE_Buttons_task2_printmsg
- Code a new print task printmgs.c and printmgs.h
- then I modified the capsense source file to only use the buttons. and send a print message to a newly developed print task.
- I had to send the print comand from the CAPSense Task to the Print Task
Here is the code on my GitHub repo. Check it out
Test-Minimal_FreeRTOS_task1_CAPSENSE_Buttons_task2_printmsg
WRAPUP
The takeaways from this test are:
- FreeRTOS task
- Creating a new FreeRTOS schedular task
- Task to Task communication using queues.
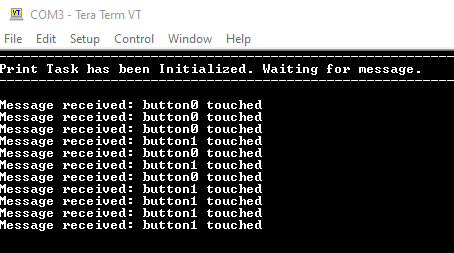
Here the terminal screen of the run
Thermistor and Ambient Light Sensors
I used the example project "SAR_ADC_Low_Power_Sensing_-_Thermistor_and_ALS" to test the sensors.. My intent is to use the code to implement the sensor design into the M0+ core of my dual code project.
I stated by using the semaphore dual core example " Dual-CPU_IPC_Semaphore" and I copied the code from the ALS/Themistor example project to the main.c file in the CM0 project of the dual core example
Now that I have copied code from 'SAR_ADC_Low_Power_Sensing_-_Thermistor_and_ALS" to the CMO project under the dual core project,
I build the project ..
build Results
- 1st pass Undeclared errors? FIX THIS... HOW
my code can be found on my Gitgub repo at Test_Dual-CPU_IPC_Semaphore_ALS_Termistor
IPC PIPES
This test will use the Dual core App "PSoC 6 MCU: Dual-CPU IPC pipes" project example. This example is not available as an example project available yet for the PSoC 62S4 BSP examples. I was able to get it from the Infineon GitHub repo here https://github.com/Infineon/mtb-example-psoc6-dual-cpu-ipc-pipes
This blog post describes my notes on my migration of the the GitHub - Infineon/mtb-example-psoc6-dual-cpu-ipc-pipes on the Infineon repo. This example is not available as an example project available yet for the PSoC 62S4 BSP examples. I was able to get it from the Infineon GitHub repo here https://github.com/Infineon/mtb-example-psoc6-dual-cpu-ipc-pipes..I was able to get this implemented with my MTB 2.4 version, but I needed to migrate it to MTB 3.0, to be able to use it in my project.
I was able to migrate the example to Modustoolbox 3.0 as I described in my previous Blog#3.
I placed the example project here:
Migrating-an-example-MTB-2.x-to-version-3.x-
CONCLUSION
- I had some problems copying code from one example project to the m0+ core. I needed to modify the make scripts to recognize resources in the new file structure. It was not as easy as copying code to the main.c file as I had thought.
- The FreeRTOS test went really well. I was able to learn more about it and was pleased with my results.
| BLOG#1-Introduction |
| Blog#2--Design |
| Blog#3- Migrating an example MTB 2.x to version 3.x |
| BLOG#4-Testing |
| BLOG#5-Implementation and Challenge Conclusion |
Top Comments