


For all the parts to this project, click here! Smart Doorbell System
Introduction
The Smart Doorbell System is an idea for a wireless and portable bell-push/chime system with better range and features than expected from existing systems!
This blog post concentrates on the entire right side of the diagram below; the chime module.

If you’re interested to know more about the doorbell project then click the link above to all the earlier parts of the project, otherwise read on here, to see the design considerations for constructing a circuit for digital audio output to a speaker, and self-charging for battery backup, so that the chime module can be unplugged from indoors and taken outside into the garden.
Main board (LaunchPad) and Daughterboard Overview
The heart of the design is based around the CC2640R2F chip from Texas Instruments. It is available on a dev-board called the CC2640R2 LaunchPadCC2640R2 LaunchPad. The CC2640R2F contains a microcontroller and Bluetooth LE functionality. For more detail on it, see here: Smart Doorbell System - Part 1 - Getting to know the CC2640R2
The CC2640R2 LaunchPad (TI calls their microcontroller development boards LaunchPads) also contains debugger/programmer functionality and it has a USB port that connects to a PC in order to program it. There are two 20-way headers with input/output capability.
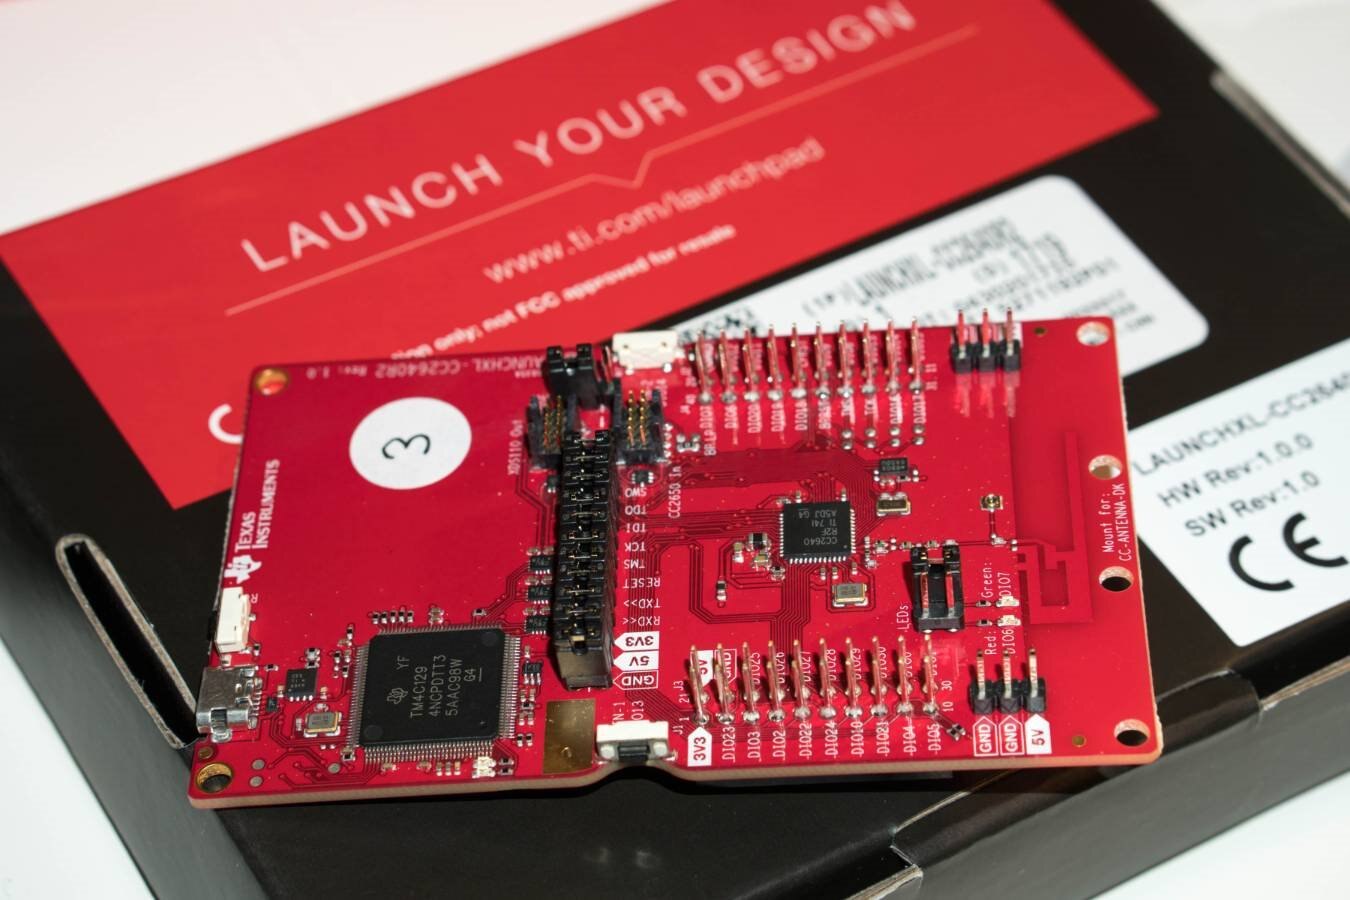
For the chime module, it was decided to create a plug-on daughterboard, which in Texas Instruments terminology would be called a BoosterPack. The daughterboard or BoosterPack would have all the remainder functionality to create the chime module, and would attach to those 20-way headers on the LaunchPad. The main functionality the BoosterPack requires is the digital to analog converter (DAC) and audio amplifier. For portability, a battery charger also needs to be implemented on the BoosterPack.
Audio Circuit Design
The DAC portion of the design was taken from an older BeagleBone Black project I developed a long time ago, based on TI’s PCM5101APCM5101A integrated circuit. I tested it with the CC2640R2 LaunchPad in Part 4 of this project, so why mess with something that works : ) The PCM5101A provides very high quality audio.
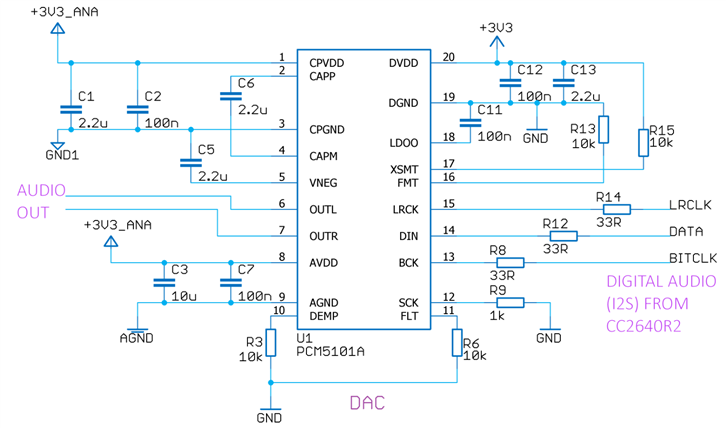
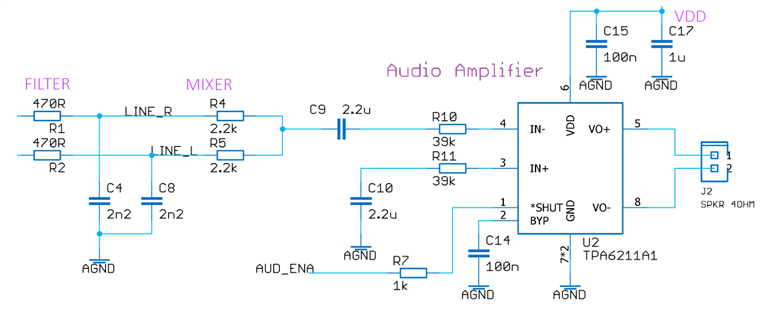
The analog audio output from the PCM5101A is at line level and needs filtering, and mixing down to mono, followed by an amplifier. For the audio amplifier portion, I wanted to have something that could supply at least 1W of output, and preferably a bit more. In the end I selected the Texas Instruments TPA6211A1TPA6211A1 chip. It operates in Class AB mode so it is not as efficient as a Class D amplifier, however the audio output is only rarely needed (i.e. when someone operates the bell push) so Class D levels of efficiency are not needed for this use-case. At all times when there is no chime/announcement, the amplifier will be in shutdown mode. I liked that the TPA6211A1 operates from a low voltage supply and can provide several watts of output into a 4 ohm speaker. With a good speaker, this will create a very loud chime module.
Battery Charging Circuit
The deployment scenario for the chime module is that it is expected to be plugged into the mains (via a DC power brick) inside the home, but if the user occasionally goes outside, then it can be temporarily unplugged and taken with them, and it should switch to battery power.
I wanted a design that was safe, would allow operation for many years before the rechargeable batteries failed, and would provide power for at least a full weekend of outdoor use. My deployment scenario does not expect permanent outdoor use, although different variant chime modules could be designed in future with longer outdoor life and fast-charge capability. Some bounds were needed, and I felt that an entire weekend outdoors, followed by a few days of indoor use, or a different pattern such as half a day outdoors every day all week, was a good goal to aim for.
Nickel Metal Hydride is still attractive for some scenarios. I decided to implement a trickle charger design, because it means I don’t need to perform coulomb-counting, or implement voltage or slope detection. The trickle charge current needs to be very low however, so if the battery is fully drained then it could take several days to charge the battery to 100%. It could be possible to detect a very drained battery and increase the charge rate for a certain period to mitigate this, but I have not implemented this in the current design. The resistor R21 sets the charge current to a value of 1.25 divided by the resistance. The constant current portion of the design is based on the TL431 datasheet.
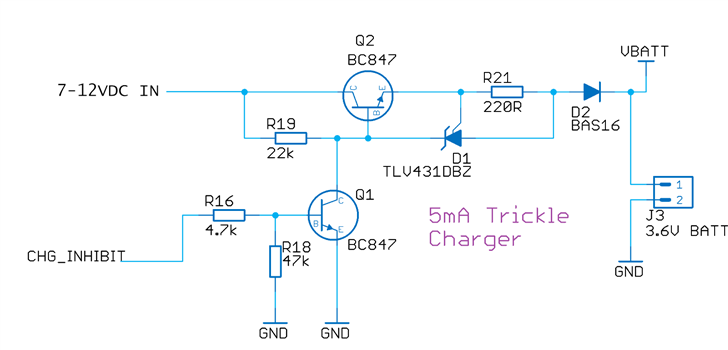
With trickle charging, the battery can survive many years (perhaps five years or longer). I decided an easy feature to implement would be to switch off the trickle charge after several days of uninterrupted mains-powered charging, so that users who very rarely use it outdoors will have a battery that lasts longer than five years. This feature is very simple, it uses a couple of resistors to sense the supply source so that it can be read by one of the ADC pins on the microcontroller, and a transistor and couple of resistors are used to inhibit the charging circuitry upon command of the microcontroller.
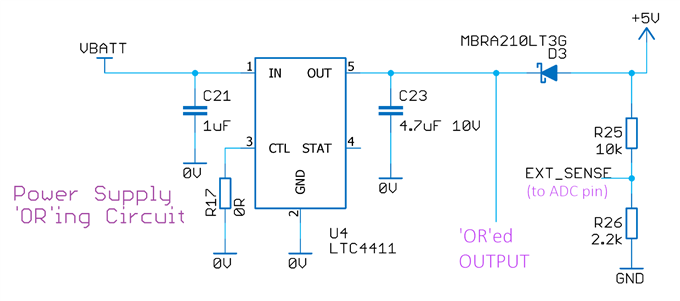
The switching between the external DC supply (from the mains) and the battery is done using diode OR’ing. For this revision 1 circuit I used an off-the-shelf ideal diode integrated circuit due to project time constraints, otherwise a discrete MOSFET circuit could be used to save costs.
Putting it all Together
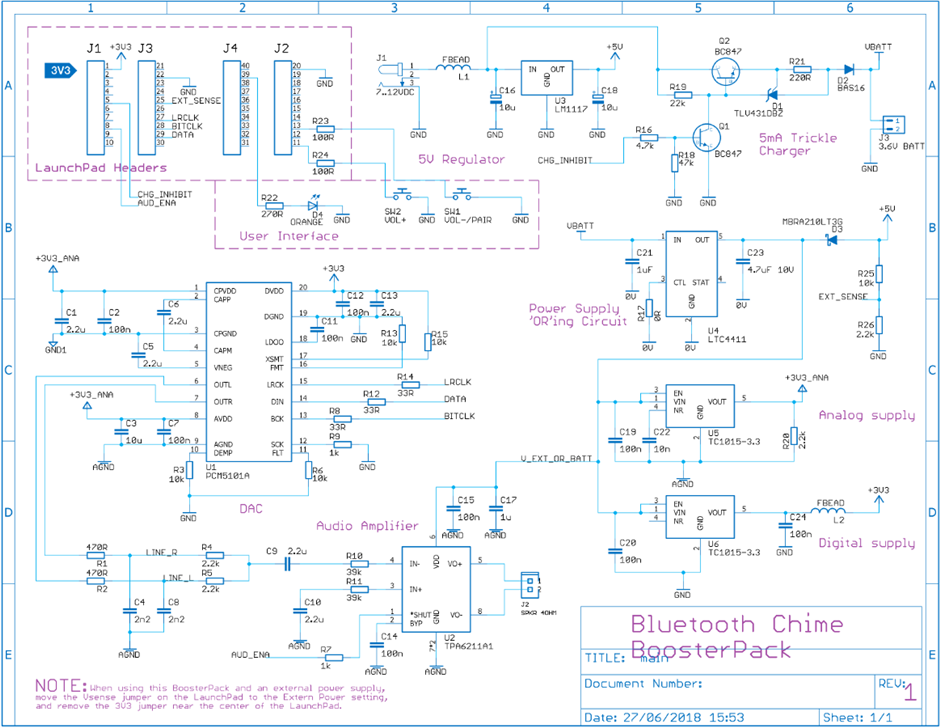
The complete circuit is shown below (click to enlarge). For the user interface, a couple of buttons are used. They will allow setting of the volume (the input to the DAC will be scaled to perform this feature) and pairing operations with the bell push module.
Two 3.3V regulators are used to power the LaunchPad board, and the DAC. The power source for them is taken from either a +5V supply derived from the external DC power brick, or from the battery, using the OR'ing circuit. The reason to have two separate 3.3V regulators is to limit noise getting into the DAC analog circuitry, to maintain audio quality.
Summary
The Chime BoosterPack module contains a fair bit of circuitry, and will allow for very loud announcements, with adjustable volume.
The module also contains the capability to allow outdoor operation seamlessly, by self-charging a battery and switching the supply automatically whenever the device is unplugged from the mains DC power brick and taken outside. For the next step the PCB needs to be created!

EDIT: This blog post was updated on 27th July 2018 to correct for an error in the schematic.
Top Comments
-

genebren
-
Cancel
-
Vote Up
+2
Vote Down
-
-
Sign in to reply
-
More
-
Cancel
Comment-

genebren
-
Cancel
-
Vote Up
+2
Vote Down
-
-
Sign in to reply
-
More
-
Cancel
Children