


| Previous posts | Description |
|---|---|
| BIBoP 1 - Introduction, game plan and rationale | Introduction to the project and overview, creators bios |
| Using a custom Makefile for development of Arduino code, flashing and debugging code | |
| BIBoP 3 - Blood Pressure Inference - Machine Learning | The process of creating a Machine Learning model for Blood Pressure estimation, data cleaning and training the model |
| Next posts | Description |
|---|---|
| BIBoP 5 - Power efficency and interrupts | Utilizing low power modes of SAMD21 and other peripherals to wake up on a button press and manage their power states |
| Assembly and debugging | Assembly, 3D designing and debugging of the project |
| Galvanometer creation | Process of creating my own galvanometer |
| Sensor processing algorithms | Overview of various medical algorithms for detecting abnormalities in the cardiovascular activities |

Introduction
Hello! In case this is your first time with BIBoP it is a smart armband designed for remote patient monitoring and overall health assessment. It is based on Arduino Nano 33 IoT and some external sensors (PPG, Galvanometer and IMU).
Be sure to regularly check the official repository of this project!
After reading this blog post you will be able to deploy your own AWS Lambda function, test it offline, create AWS IoT Core Things, forward MQTT messages to AWS Lambda and receive them from the Lambda. Along the way I will show some rough edges and how to circumvent them.
Why AWS?
Amazon Web Services is one of the most popular cloud providers on the web. I chose it mostly because of the mythical AWS Lambda and the powerful capabilities it supposedly entails (and I was not surprised  ). Also, it seems to have a decent pool of tutorials and support, although as it turns out in several places I was on my own
  . Also AWS is very scalable and is the go-to solution (one of) if you want to "Go Big TM "
Creating a Lambda
While creating the Lambda is a fairly easy step, it requires a little bit of hassle during its deployment and subsequent modifications (thus increasing iteration time).
We will go step-by-step and first define our requirements:
- We want to send PPG samples from the device to the endpoint/topic
- We want the data to be over a secure channel
- We want the communication to be quite fast
- We want to receive the inferred BP from the server to the device
- We want to alert medical staff if the BP is dangerous
In case you want to see the complete solution - here is the repository with code for the Lambda. In this case we will be using Serverless Application Model (SAM) but you can create Lambdas from the GUI and edit them on the AWS website.
Creation from a template
Since we need SAM we should install it on our operating system. Thankfully, AWS provides several methods to do so (preferably use your system's package manager).
When it is already installed, run sam init and answer following questions:
- Which template source would you like to use?
AWS Quick Start Templates What package type would you like to use?
Image (artifact is an image uploaded to an ECR image repository)
- Which base image would you like to use?
amazon/python3.*
- Project name [sam-app]:
Choose your name here - AWS quick start application templates:
Hello World Lambda Image Example
After initialization you can start developing your code in the app directory.
You also have the template.yaml file which is responsible for setting appropriate services in CloudFormation. It looks as follows:
AWSTemplateFormatVersion: '2010-09-09'
Transform: AWS::Serverless-2016-10-31

Globals:
  Function:
    Timeout: 50
    MemorySize: 5000

Resources:
  InferenceFunction:
    Type: AWS::Serverless::Function # More info about Function Resource: https://github.com/awslabs/serverless-application-model/blob/master/versions/2016-10-31.md#awsserverlessfunction
    Properties:
      PackageType: Image
      Events:
        Inference:
          Type: Api # More info about API Event Source: https://github.com/awslabs/serverless-application-model/blob/master/versions/2016-10-31.md#api
          Properties:
            Path: /classify
            Method: post
    Metadata:
      Dockerfile: Dockerfile
      DockerContext: ./app
      DockerTag: python3.8-v1

Outputs:
  # ServerlessRestApi is an implicit API created out of Events key under Serverless::Function
  # Find out more about other implicit resources you can reference within SAM
  # https://github.com/awslabs/serverless-application-model/blob/master/docs/internals/generated_resources.rst#api
  InferenceApi:
    Description: "API Gateway endpoint URL for Prod stage for Inference function"
    Value: !Sub "https://${ServerlessRestApi}.execute-api.${AWS::Region}.amazonaws.com/Prod/classify_digit/"
  InferenceFunction:
    Description: "Inference Lambda Function ARN"
    Value: !GetAtt InferenceFunction.Arn
  InferenceFunctionIamRole:
    Description: "Implicit IAM Role created for Inference function"
    Value: !GetAtt InferenceFunction.Arn
This file provides both an API Gateway and an AWS Lambda, sets up the entry point and the runtime language (Python3.8).
Now we can move to the main handler creation:
import joblib
import base64
import numpy as np
import json
import boto3

from data_preparation import prepare_data

model_file = '/opt/ml/model'
model = joblib.load(model_file)


def lambda_handler(event, context):
  print(event)
  stringized = str(event).replace('\'', '"')
  ppg = json.loads(stringized)['data']

  ppg = np.array(ppg)
  prepared = prepare_data(ppg)

  prediction = model.predict(prepared.reshape(1, -1))[0]
  sbp = prediction[0]
  dbp = prediction[1]
  print(f"Predictions {sbp} {dbp}")

  pred_json = json.dumps(
  {
  "SBP": sbp,
  "DBP": dbp,
  })
  client = boto3.client('iot-data')

  response = client.publish(topic='bibop/incoming',
                           qos=0,
                           payload=pred_json)
What we do here is read the data from the JSON file and create a NumPy array from it, preprocess it to fit the model input (extract features) and finally feed the model with the data. After the model infers the Systolic and Diastolic Blood Pressure the MQTT message is published on an incoming topic which is listened to by the BIBoP device.
But before we wander too far, let's check how the heck our model gets loaded into the Docker image we are using for this Lambda.
Model serialization
We need to take a step back and look how our model is serialized in BIBoP 3 - Blood Pressure Inference - Machine Learning. This is done with help of the joblib Python library which serializes and compresses our model.
This is done like this:
# joblib
import joblib

pkl_name = 'bp-compressed.pkl'
joblib.dump(model, pkl_name, compress=3)
Easy, isn't it?
We load the models like this:
model_file = '/opt/ml/model'
model = joblib.load(model_file)
Deployment
Having our model, we simply copy it to our Lambda folder and then prepare the Dockerfile:
FROM public.ecr.aws/lambda/python:3.8

COPY app.py data_preparation.py requirements.txt ./
COPY model /opt/ml/model

RUN python3.8 -m pip install -r requirements.txt -t .

CMD ["app.lambda_handler"]
In case you are unfamiliar with what Docker is - it is a containerization system, which is simply setting up an isolated environment in which our programs can execute and not mess up our original systems.
The syntax of this file is quite self-explanatory, we first load the base image, copy all necessary files, install the prerequisites from requirements.txt and finally run the main function with the CMD command.
It is almost all you have to do from the console, now we need to build the image and publish it to AWS.
- First, run sam build and fix any build errors.
- Then it would be prudent to test the Lambda offline with sam local start-api and use for example curl to send exemplary data to the endpoint. I initially tested it with just HTTP requests (the code was slightly different - you can find it on the GH repo), but you can also test MQTT with curl.
- Once you are done with testing, get ready to deploy your solution with sam deploy --guided
If you are deploying for a second time, the samconfig.toml file will contain unnecessary line starting with image_repositories which I delete before any new deploy.
Now you should see something similar to this picture:

We have our Lambda with an API Gateway meaning we can send HTTP requests to an endpoint. Unfortunately I could not send HTTP POST messages from the Arduino over the secure channel and after several (more like several dozen) hours of fruitless pursuit I decided to switch to MQTT and for this I had to prepare several other things.
We will talk about MQTT more later - it is a protocol used for communication between IoT devices.
We will use the word policy to describe a set of rules which allow/deny the components of AWS to communicate between themselves and more!
Go to IAM and create a new policy:

In this policy we allow the policy holder to Publish to a topic /bibop/* (* - is a wildcard, meaning that any other child topic will match).
We now have to add this policy to our Lambda:

As you can see, we have two policies added: AWSLambdaBasicExecutionRole and BIBOP-Publish(our custom policy).
Now all we need to do is create a hook which will subscribe to a particular MQTT topics and forward our messages to the Lambda.
For that we will add a custom Rule which will trigger whenever there is a published message to a topic bibop/outgoing:

The rule looks as follows (it utilizes an SQL-like language for specifying conditions and a choice of actions).

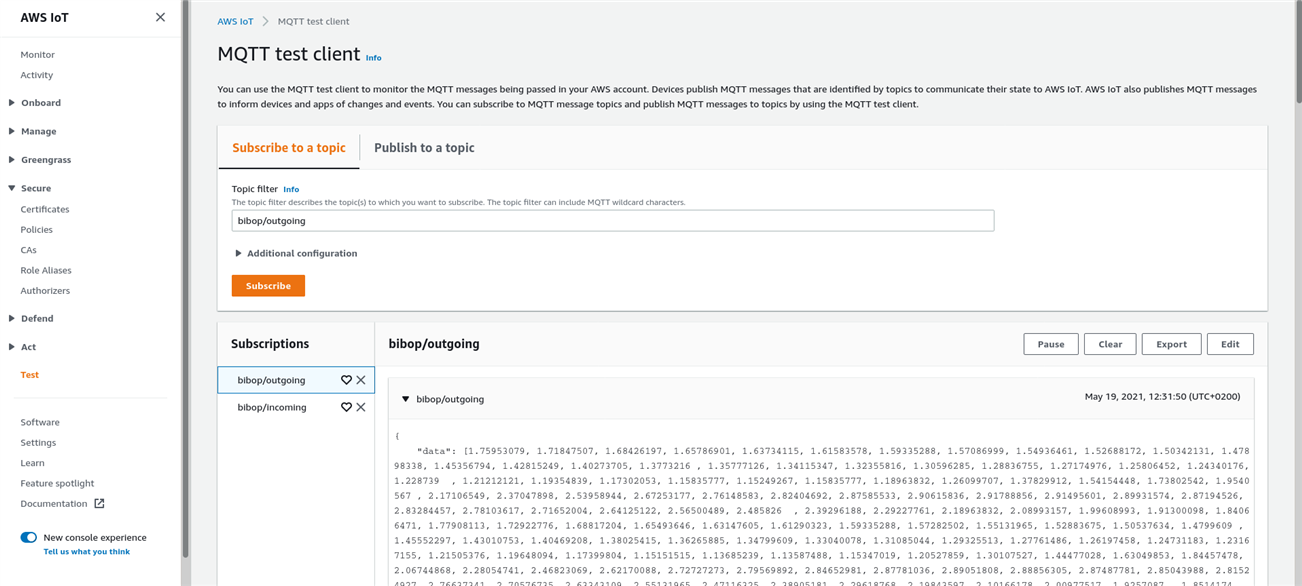
We can test our functionality by utilizing AWS IoT Test panel, where we can subscribe and publish to topics:
Securing the connection
So far we were building our backend but we haven't yet configured our Things - devices which will be talking in our network. We will do so in the same subsystem we have used for MQTT configuration - AWS IoT Core.
In there we need to Create our Thing:

- On the first page just give a meaningful name to your Thing.
- On the second one, you will be generating a certificate for it, and in my case I decided to Create it with CSR(Certificate Signing Request), which I generated using following script.
- After obtaining the CSR and saving it, you can upload it to the AWS and proceed with the registration.
- Next you have to attach a policy and/or create it - I chose to allow all actions for all resources in this case, but in a production environment you should use less permissive settings.
- Finally you obtain your certificates and keys which you can use for authentication
We are using SSL/TLS for securing our connection - standards for ensuring security. If you are unfamiliar with them, take a while to read about it here.
In order to use SSL/TLS you first need hardware capable of handling somewhat heavy cryptographic calculations, and thankfully Arduino Nano 33 IoT boasts its ATECC608A secure element which handles these computations in hardware!
Now we need to load the certificate of the device and the root certificate (in our case the CA is AWS) on the device and initialize a secure connection (the libraries will handle the TLS handshake and subsequent ciphering and deciphering of the payloads.
In case you are curious about the process, Arduino has a decent introduction to the topic and for more tenacious of you - here is yet another resource on mutual SSL authentication.
The high level overview of networking solution looks like this:

HTTP Troubles - Enter MQTT
Because of unknown reasons, I was not able to send my HTTP POST requests - they hanged forever until AWS Gateway dropped our connection. A viable alternative was to set up an MQTT broker and set up some triggers like we did above.
But what on Earth is MQTT you may ask?
I won't go into nitty gritty details of the protocol itself and instead say that it is a lightweight protocol for IoT, which is build around publisher-subscriber scheme, and which involves brokers (devices which act as packet switches in regular networks, transmitting the messages to whoever is subscribed to them).
If you peruse the attached code, you will get a grasp of how it works. Also the image above should shed some light on the subject if you are confused.
Implementation
For implementing and testing this I created a fresh sketch and only after being satisfied with did I integrate the code into existing codebase.
In the next blog post you will learn about power management in this project and the power states in which the device collects and transmits the data. For now, let's assume that the device transmits the data to the broker periodically and after the Lambda finishes inference it receives the result.
The sketch can be viewed below:
#include <ArduinoBearSSL.h>
#include <ArduinoECCX08.h>
#include <ArduinoMqttClient.h>
#include <WiFiNINA.h> // change to #include <WiFi101.h> for MKR1000

#define TX_PAYLOAD_BUFFER_SIZE 2048

char ssid[] = "";        // your network SSID (name)
char pass[] = "";    // your network password (use for WPA, or use as key for WEP)
const char broker[]      = "broker url";

String outgoingTopic     = "bibop/outgoing";
String incomingTopic     = "bibop/incoming";
int port                 = 8883;

const char client_cert[] = R"(-----BEGIN CERTIFICATE-----
Your cert here :)
-----END CERTIFICATE-----
)";

const char root_ca[]     = R"(-----BEGIN CERTIFICATE-----
MIIDQTCCAimgAwIBAgITBmyfz5m/jAo54vB4ikPmljZbyjANBgkqhkiG9w0BAQsF
ADA5MQswCQYDVQQGEwJVUzEPMA0GA1UEChMGQW1hem9uMRkwFwYDVQQDExBBbWF6
b24gUm9vdCBDQSAxMB4XDTE1MDUyNjAwMDAwMFoXDTM4MDExNzAwMDAwMFowOTEL
MAkGA1UEBhMCVVMxDzANBgNVBAoTBkFtYXpvbjEZMBcGA1UEAxMQQW1hem9uIFJv
b3QgQ0EgMTCCASIwDQYJKoZIhvcNAQEBBQADggEPADCCAQoCggEBALJ4gHHKeNXj
ca9HgFB0fW7Y14h29Jlo91ghYPl0hAEvrAIthtOgQ3pOsqTQNroBvo3bSMgHFzZM
9O6II8c+6zf1tRn4SWiw3te5djgdYZ6k/oI2peVKVuRF4fn9tBb6dNqcmzU5L/qw
IFAGbHrQgLKm+a/sRxmPUDgH3KKHOVj4utWp+UhnMJbulHheb4mjUcAwhmahRWa6
VOujw5H5SNz/0egwLX0tdHA114gk957EWW67c4cX8jJGKLhD+rcdqsq08p8kDi1L
93FcXmn/6pUCyziKrlA4b9v7LWIbxcceVOF34GfID5yHI9Y/QCB/IIDEgEw+OyQm
jgSubJrIqg0CAwEAAaNCMEAwDwYDVR0TAQH/BAUwAwEB/zAOBgNVHQ8BAf8EBAMC
AYYwHQYDVR0OBBYEFIQYzIU07LwMlJQuCFmcx7IQTgoIMA0GCSqGSIb3DQEBCwUA
A4IBAQCY8jdaQZChGsV2USggNiMOruYou6r4lK5IpDB/G/wkjUu0yKGX9rbxenDI
U5PMCCjjmCXPI6T53iHTfIUJrU6adTrCC2qJeHZERxhlbI1Bjjt/msv0tadQ1wUs
N+gDS63pYaACbvXy8MWy7Vu33PqUXHeeE6V/Uq2V8viTO96LXFvKWlJbYK8U90vv
o/ufQJVtMVT8QtPHRh8jrdkPSHCa2XV4cdFyQzR1bldZwgJcJmApzyMZFo6IQ6XU
5MsI+yMRQ+hDKXJioaldXgjUkK642M4UwtBV8ob2xJNDd2ZhwLnoQdeXeGADbkpy
rqXRfboQnoZsG4q5WTP468SQvvG5
-----END CERTIFICATE-----)";

const char request_body[] = "{\n    \"data\": [1.75953079, 1.71847507, 1.68426197, 1.65786901, 1.63734115, 1.61583578, 1.59335288, 1.57086999, 1.54936461, 1.52688172, 1.50342131, 1.47898338, 1.45356794, 1.42815249, 1.40273705, 1.3773216 , 1.35777126, 1.34115347, 1.32355816, 1.30596285, 1.28836755, 1.27174976, 1.25806452, 1.24340176, 1.228739  , 1.21212121, 1.19354839, 1.17302053, 1.15835777, 1.15249267, 1.15835777, 1.18963832, 1.26099707, 1.37829912, 1.54154448, 1.73802542, 1.9540567 , 2.17106549, 2.37047898, 2.53958944, 2.67253177, 2.76148583, 2.82404692, 2.87585533, 2.90615836, 2.91788856, 2.91495601, 2.89931574, 2.87194526, 2.83284457, 2.78103617, 2.71652004, 2.64125122, 2.56500489, 2.485826  , 2.39296188, 2.29227761, 2.18963832, 2.08993157, 1.99608993, 1.91300098, 1.84066471, 1.77908113, 1.72922776, 1.68817204, 1.65493646, 1.63147605, 1.61290323, 1.59335288, 1.57282502, 1.55131965, 1.52883675, 1.50537634, 1.4799609 , 1.45552297, 1.43010753, 1.40469208, 1.38025415, 1.36265885, 1.34799609, 1.33040078, 1.31085044, 1.29325513, 1.27761486, 1.26197458, 1.24731183, 1.23167155, 1.21505376, 1.19648094, 1.17399804, 1.15151515, 1.13685239, 1.13587488, 1.15347019, 1.20527859, 1.30107527, 1.44477028, 1.63049853, 1.84457478, 2.06744868, 2.28054741, 2.46823069, 2.62170088, 2.72727273, 2.79569892, 2.84652981, 2.87781036, 2.89051808, 2.88856305, 2.87487781, 2.85043988, 2.81524927, 2.76637341, 2.70576735, 2.63343109, 2.55131965, 2.47116325, 2.38905181, 2.29618768, 2.19843597, 2.10166178, 2.00977517, 1.9257087 , 1.8514174 , 1.78690127]\n}";


WiFiClient    wifiClient;            // Used for the TCP socket connection
BearSSLClient sslClient(wifiClient); // Used for SSL/TLS connection, integrates with ECC508
MqttClient    mqttClient(sslClient);

unsigned long lastMillis = 0;
unsigned long pollMillis = 0;

void setup() {
  Serial.begin(9600);
  while (!Serial);

  if (!ECCX08.begin()) {
    Serial.println("No ECCX08 present!");
    while (1);
  }

  // Set a callback to get the current time
  // used to validate the servers certificate
  ArduinoBearSSL.onGetTime(getTime);

  // Note how the certificate is formed
  String(certificate) = String(client_cert) + String(root_ca);

  // Set the ECCX08 slot to use for the private key
  // and the accompanying public certificate for it
  sslClient.setEccSlot(0, certificate.c_str());

  // Optional, set the client id used for MQTT,
  // each device that is connected to the broker
  // must have a unique client id. The MQTTClient will generate
  // a client id for you based on the millis() value if not set
  //
  //mqttClient.setId("BIBOP0");

  // Set the message callback, this function is
  // called when the MQTTClient receives a message
  mqttClient.onMessage(onMessageReceived);
  mqttClient.setConnectionTimeout(50 * 1000L);
  //mqttClient.setCleanSession(false);
  //Serial.println(request_body);
}

void loop() {
  if (WiFi.status() != WL_CONNECTED) {
    connectWiFi();
  }

  if (millis() - pollMillis > 1000) {
    pollMillis = millis();

    if (!mqttClient.connected()) {
      // MQTT client is disconnected, connect
      Serial.println(mqttClient.connectError());
      connectMQTT();
    }

    // poll for new MQTT messages and send keep alives
    mqttClient.poll();

  }
  // publish a message roughly every 20 seconds.
  if (millis() - lastMillis > 60000) {
    lastMillis = millis();

    publishMessage();
  }
}

unsigned long getTime() {
  // get the current time from the WiFi module
  return WiFi.getTime();
}

void connectWiFi() {
  Serial.print("Attempting to connect to SSID: ");
  Serial.print(ssid);
  Serial.print(" ");

  while (WiFi.begin(ssid, pass) != WL_CONNECTED) {
    // failed, retry
    Serial.print(".");
    delay(5000);
  }
  Serial.println();

  Serial.println("You're connected to the network");
  Serial.println();
}

void connectMQTT() {
  Serial.print("Attempting connection to MQTT broker: ");
  Serial.print(broker);
  Serial.println(" ");

  while (!mqttClient.connect(broker, port)) {
    // failed, retry
    Serial.print(".");
    delay(5000);
  }
  Serial.println();

  Serial.println("You're connected to the MQTT broker");
  Serial.println();

  // subscribe to a topic
  mqttClient.subscribe(incomingTopic);
}

void publishMessage() {
  Serial.println("Publishing message");

  // send message, the Print interface can be used to set the message contents
  mqttClient.beginMessage(outgoingTopic, false, 1);
  //mqttClient.print("{\"data\": \"hello world\"}");
  mqttClient.print(request_body);
  mqttClient.endMessage();
}

void onMessageReceived(int messageSize) {
  // we received a message, print out the topic and contents
  Serial.print("Received a message with topic '");
  Serial.print(mqttClient.messageTopic());
  Serial.print("', length ");
  Serial.print(messageSize);
  Serial.println(" bytes:");

  // use the Stream interface to print the contents
  while (mqttClient.available()) {
    Serial.print((char)mqttClient.read());
  }
  Serial.println();

  Serial.println();
}
The integrated code will be shown in the next post not to spoil the power thingies `
I was long baffled why my MQTT messages were truncated in the AWS IoT Core dashboard, like this:

Who would have thought that the developers of the ArduinoMQTTClient library had a surprise waiting for me (and not the most pleasant one by the way...) - they limited the TX message length to 256 characters, and the library distributed in Arduino library manager has this value hardcoded (0.1.5). The one upstream already has a define guard which allows the user to change it, but this option is absent in the documentation of the library. Thus, if you want to send longer buffers: set the TX_PAYLOAD_BUFFER_SIZE to your desired size.
Another obstacle encountered along the way was having disconnects as soon as I published the message. It turned out that BearSSL adds some bytes to the message payload and the library checked if the bytes transferred were equal to the message payload. I proposed a solution in this GH issue.
When I thought I have a neat and working solution, yet again I was surprised by a cosmic event - I was getting disconnects every second message I published, making me come up with nasty hacks, such as: connect, send a message, disconnect, repeat...
Summary
Hopefully this article was a semi-deep dive into setting up your own AWS Lambda along with a MQTT broker in an IoT Core. As you can see, getting things done in a scalable environment is slightly more complicated than using out of the box solutions which do not allow for such scalability. Nevertheless, it was a valuable lesson for me and allowed me to deeply understand AWS and MQTT protocol.
I was also quite disappointed that MQTT support is not top-notch and the connections were dropped so often I had to resort to hacks. Maybe in the future we will have reliable networking with Embedded Systems .
Next post will go in depth into power management handling on SAMD21 and my trials (and errors) with register control over it. Also we will discuss power considerations and battery choice and its charger construction.
Jakub & Szymon & Michał
| Next post |
|---|
| BIBoP 5 - Power efficency and interrupts |
Top Comments