


INFRARED THERMOMETER WITH THINGSPEAK, PART 1
In this post, I will use another IoT server to demonstrate the compatibility of Arduino NANO 33 IoT in solving the problem of remote health monitoring of elderly or disabled patients.
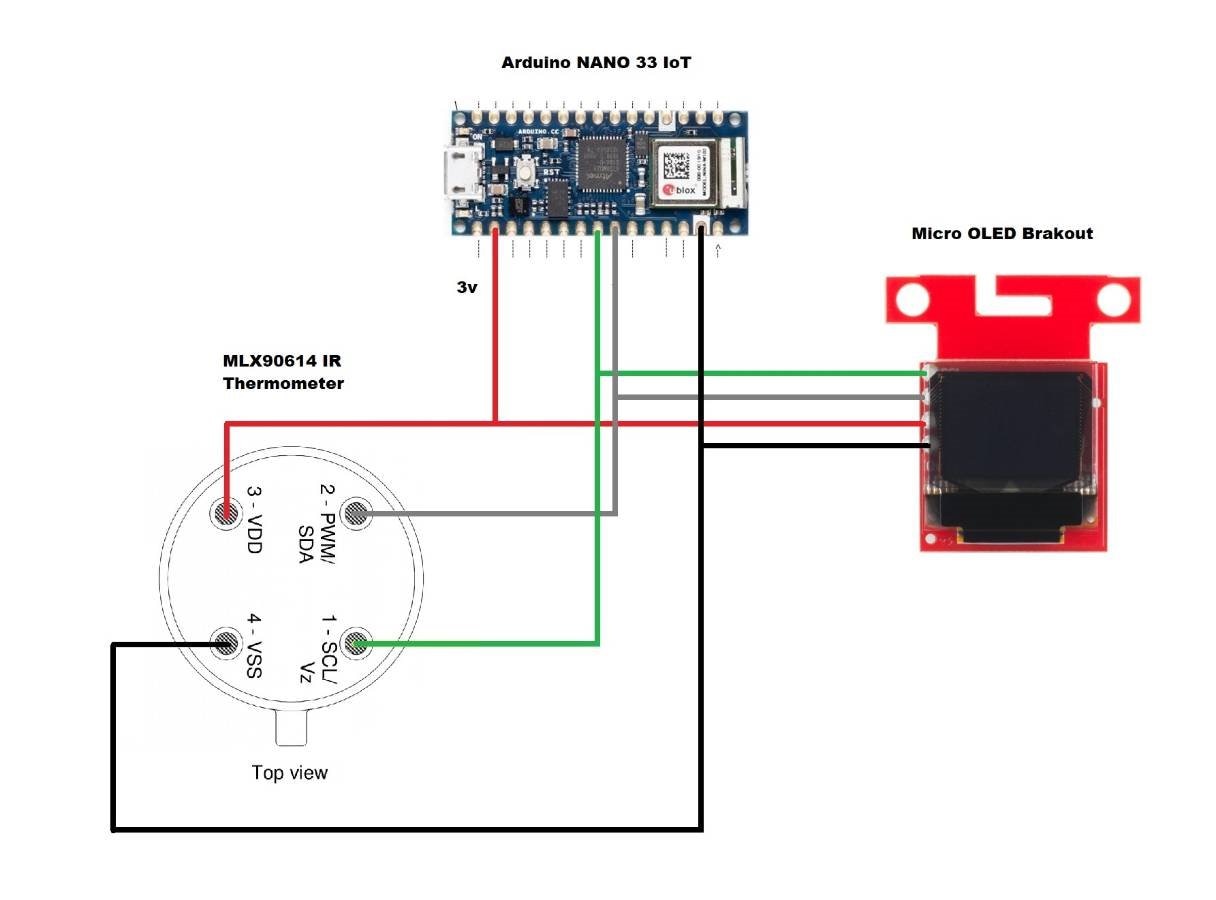
HARDWARE
Here we use the same schematic diagram from the chapter: Blog #3
HOW DOES IT WORK?
First, the WiFi connection is established between the Arduino NANO 33 IoT board and the Modem;
The infrared thermometer detects two temperatures: 1) the ambient temperature, and 2) the temperature of the aimed object;
Both temperature values (ambient and object) are printed on the serial port and the Micro OLED Breakout screen for 5 seconds approx ;
Every 15 seconds the object temperature value is sent to the IoT server.
We will use the service provider IoT ThingSpeak, and the configuration will be seen in the next chapter.
SOFTWARE
PREREQUISITES FOR ARDUINO IDE:
Download and install the Micro OLED Breakout display library here.
Download and install the MLX90614 Infrared Thermometer library here
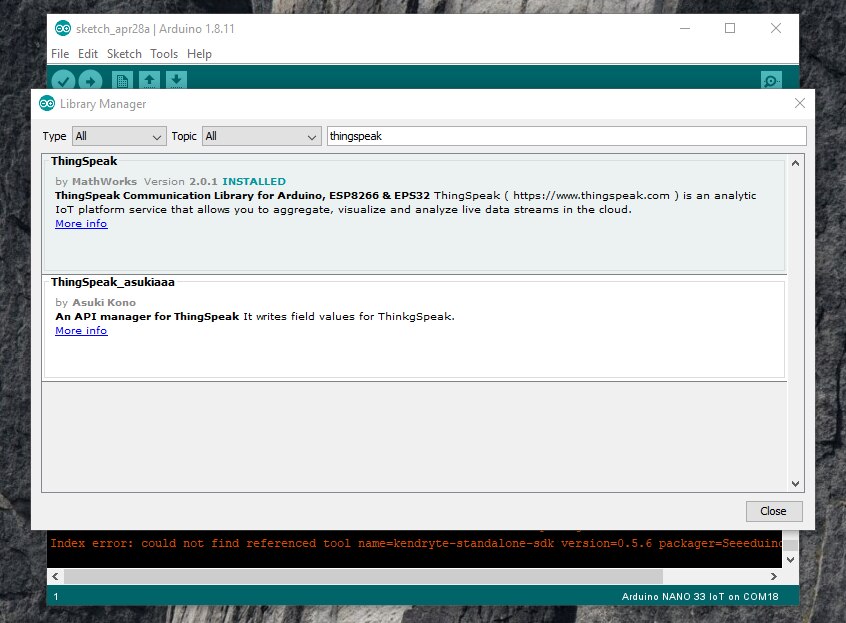
Install the ThingSpeak library, go to: Sketch> Include Library> Manage Libraries ...
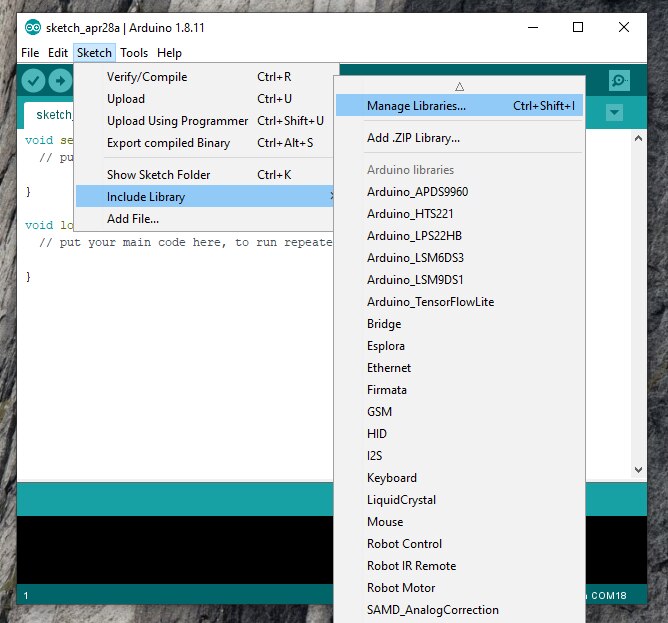
Find and install the ThingSpeak library, by MathWorks
Once the library was installed, I used the Arduino IDE 1.8.11 to compile and upload the code to the Arduino NANO 33 IoT board. The code and comments are shown below: "thingspeak_temp.ino"
// AUTHOR: GUILLERMO PEREZ GUILLEN
#include <Wire.h> // I2C library, required for MLX90614
#include <SparkFunMLX90614.h> //Click here to get the library: http://librarymanager/All#Qwiic_IR_Thermometer by SparkFun
#include <SFE_MicroOLED.h> // display
#include <WiFiNINA.h>
#include "secrets.h"
#include "ThingSpeak.h" // always include thingspeak header file after other header files and custom macros
#define PIN_RESET 9 // display
#define DC_JUMPER 1 // display
MicroOLED oled(PIN_RESET, DC_JUMPER); // display, I2C declaration
IRTherm therm; // Create an IRTherm object to interact with throughout
char ssid[] = SECRET_SSID; // your network SSID (name)
char pass[] = SECRET_PASS; // your network password
int keyIndex = 0; // your network key Index number (needed only for WEP)
WiFiClient client;
unsigned long myChannelNumber = SECRET_CH_ID;
const char * myWriteAPIKey = SECRET_WRITE_APIKEY;
int number = 0;
void setup() {
Serial.begin(115200); // Initialize serial
while (!Serial) {
; // wait for serial port to connect. Needed for Leonardo native USB port only
}
// check for the WiFi module:
if (WiFi.status() == WL_NO_MODULE) {
Serial.println("Communication with WiFi module failed!");
// don't continue
while (true);
}
String fv = WiFi.firmwareVersion();
if (fv != "1.0.0") {
Serial.println("Please upgrade the firmware");
}
ThingSpeak.begin(client); //Initialize ThingSpeak
Wire.begin(); //Joing I2C bus
oled.begin(); // Initialize the OLED
oled.clear(ALL); // Clear the display's internal memory
oled.display(); // Display what's in the buffer (splashscreen)
if (therm.begin() == false){ // Initialize thermal IR sensor
Serial.println("Qwiic IR thermometer did not acknowledge! Freezing!");
while(1);
}
Serial.println("Qwiic IR Thermometer did acknowledge.");
therm.setUnit(TEMP_C); // Set the library's units to Farenheit
// Alternatively, TEMP_F can be replaced with TEMP_C for Celsius or
// TEMP_K for Kelvin.
pinMode(LED_BUILTIN, OUTPUT); // LED pin as output
delay(100);
oled.clear(PAGE); // display, Clear the buffer.
}
void loop() {
// Connect or reconnect to WiFi
if(WiFi.status() != WL_CONNECTED){
Serial.print("Attempting to connect to SSID: ");
Serial.println(SECRET_SSID);
while(WiFi.status() != WL_CONNECTED){
WiFi.begin(ssid, pass); // Connect to WPA/WPA2 network. Change this line if using open or WEP network
Serial.print(".");
delay(5000);
}
Serial.println("\nConnected.");
}
digitalWrite(LED_BUILTIN, HIGH);
// Call therm.read() to read object and ambient temperatures from the sensor.
if (therm.read()) // On success, read() will return 1, on fail 0.
{
for (int i = 1; i < 21; i++) { // 5 SECS APPROX
Serial.print("Object: " + String(therm.object(), 2));
Serial.println("C");
Serial.print("Ambient: " + String(therm.ambient(), 2));
Serial.println("C");
Serial.println();
oled.clear(PAGE); // Clear the display
oled.setCursor(0, 0); // Set cursor to top-left
oled.setFontType(0); // Smallest font
oled.print("TO:"); // Print "T0"
oled.setFontType(2); // 7-segment font
oled.print(String(therm.object(), 1)); // Print
oled.setCursor(0, 20); // Set cursor to top-middle-left
oled.setFontType(0); // Repeat
oled.print("TA:");
oled.setFontType(2);
oled.print(String(therm.ambient(), 1));
oled.display();
delay(250);
digitalWrite(LED_BUILTIN, LOW);
}
String value = String(therm.object(), 1);
float temperature = value.toFloat();
// Write to ThingSpeak. There are up to 8 fields in a channel, allowing you to store up to 8 different
// pieces of information in a channel. Here, we write to field 1.
int x = ThingSpeak.writeField(myChannelNumber, 1, temperature, myWriteAPIKey);
if(x == 200){
Serial.println("Channel update successful.");
}
else{
Serial.println("Problem updating channel. HTTP error code " + String(x));
}
}
delay(10000); // Wait 10 seconds to update the channel again
}
Finally we edit the file: secrets.h
// Use this file to store all of the private credentials
// and connection details
#define SECRET_SSID "*********" // replace MySSID with your WiFi network name
#define SECRET_PASS "************" // replace MyPassword with your WiFi password
#define SECRET_CH_ID ******* // replace 0000000 with your channel number
#define SECRET_WRITE_APIKEY "****************" // replace XYZ with your channel write API Key
INSTRUCTIONS:
- You can download the code here: thingspeak_temp.rar
- In the next chapter (Blog #8) I will show you how to get the SECRET_CH_ID, and SECRET_WRITE_APIKEY of your Dashboard created. Once done, please type the information in the secrets.h file.
- Also type the name of your SSID and password in the secrets.h file.
- Finally verify and upload the code to the Arduino NANO 33 IoT board