element14 Community
element14 Community
    Register Log In
  • Site
  • Search
  • Log In Register
  • About Us
  • Community Hub
    Community Hub
    • What's New on element14
    • Feedback and Support
    • Benefits of Membership
    • Personal Blogs
    • Members Area
    • Achievement Levels
  • Learn
    Learn
    • Ask an Expert
    • eBooks
    • element14 presents
    • Learning Center
    • Tech Spotlight
    • STEM Academy
    • Webinars, Training and Events
    • Learning Groups
  • Technologies
    Technologies
    • 3D Printing
    • FPGA
    • Industrial Automation
    • Internet of Things
    • Power & Energy
    • Sensors
    • Technology Groups
  • Challenges & Projects
    Challenges & Projects
    • Design Challenges
    • element14 presents Projects
    • Project14
    • Arduino Projects
    • Raspberry Pi Projects
    • Project Groups
  • Products
    Products
    • Arduino
    • Avnet Boards Community
    • Dev Tools
    • Manufacturers
    • Multicomp Pro
    • Product Groups
    • Raspberry Pi
    • RoadTests & Reviews
  • Store
    Store
    • Visit Your Store
    • Choose another store...
      • Europe
      •  Austria (German)
      •  Belgium (Dutch, French)
      •  Bulgaria (Bulgarian)
      •  Czech Republic (Czech)
      •  Denmark (Danish)
      •  Estonia (Estonian)
      •  Finland (Finnish)
      •  France (French)
      •  Germany (German)
      •  Hungary (Hungarian)
      •  Ireland
      •  Israel
      •  Italy (Italian)
      •  Latvia (Latvian)
      •  
      •  Lithuania (Lithuanian)
      •  Netherlands (Dutch)
      •  Norway (Norwegian)
      •  Poland (Polish)
      •  Portugal (Portuguese)
      •  Romania (Romanian)
      •  Russia (Russian)
      •  Slovakia (Slovak)
      •  Slovenia (Slovenian)
      •  Spain (Spanish)
      •  Sweden (Swedish)
      •  Switzerland(German, French)
      •  Turkey (Turkish)
      •  United Kingdom
      • Asia Pacific
      •  Australia
      •  China
      •  Hong Kong
      •  India
      •  Korea (Korean)
      •  Malaysia
      •  New Zealand
      •  Philippines
      •  Singapore
      •  Taiwan
      •  Thailand (Thai)
      • Americas
      •  Brazil (Portuguese)
      •  Canada
      •  Mexico (Spanish)
      •  United States
      Can't find the country/region you're looking for? Visit our export site or find a local distributor.
  • Translate
  • Profile
  • Settings
Design For A Cause 2021
  • Challenges & Projects
  • Design Challenges
  • Design For A Cause 2021
  • More
  • Cancel
Design For A Cause 2021
Blog Open Source EMDR Machine #4. Breadboard layout and Schematics
  • Blog
  • Forum
  • Documents
  • Polls
  • Files
  • Mentions
  • Sub-Groups
  • Tags
  • More
  • Cancel
  • New
  • Share
  • More
  • Cancel
Group Actions
  • Group RSS
  • More
  • Cancel
Engagement
  • Author Author: ilvyanyatka
  • Date Created: 18 Apr 2021 7:29 PM Date Created
  • Views 2167 views
  • Likes 8 likes
  • Comments 10 comments
  • health care
  • breadboard
  • open source emdr machine
  • design for a cause - design challenge
  • schematic
  • medical
  • arduino nano 33 iot
  • design_for_a_cause_2021
Related
Recommended

Open Source EMDR Machine #4. Breadboard layout and Schematics

ilvyanyatka
ilvyanyatka
18 Apr 2021

Open Source EMDR Machine. The Whole Blog.


So there is some bad news. I started working with my Arduino Nano 33 IoT board and tried to implement the Bluetooth communication part first. And I successfully burned (fried?) my board. Not sure why exactly but it died when I was uploading/running for the first time my sketch with Bluetooth code. Previous simple version with just lights and without Bluetooth communication was working fine.


While I am waiting for a new one, I will continue working on my old Arduino UNO, postponing Bluetooth implementation and just connecting all hardware parts and making sure they work. I also have to supplement DFPlayer for Piezo disks. I will see how it works out and most likely get back to using the DFPlayer module after I get my new Arduino Nano 33 IoT board.


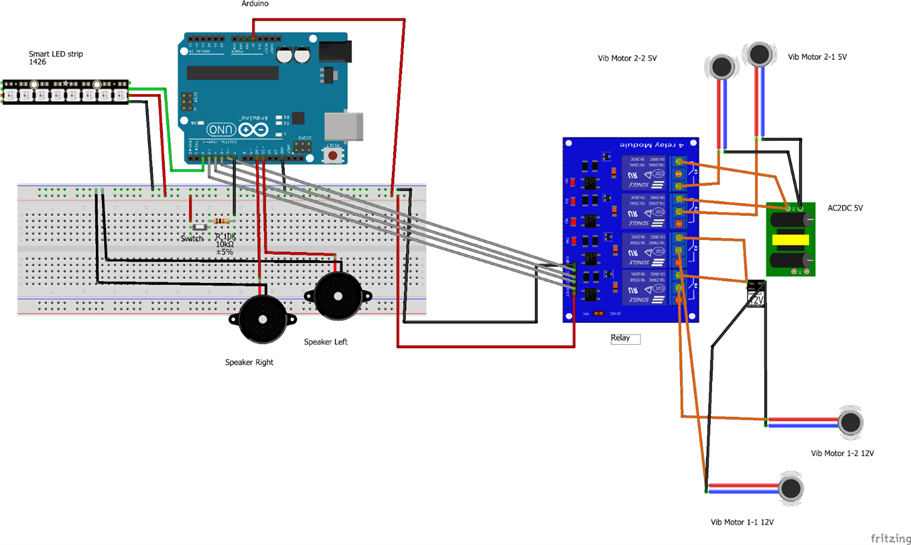
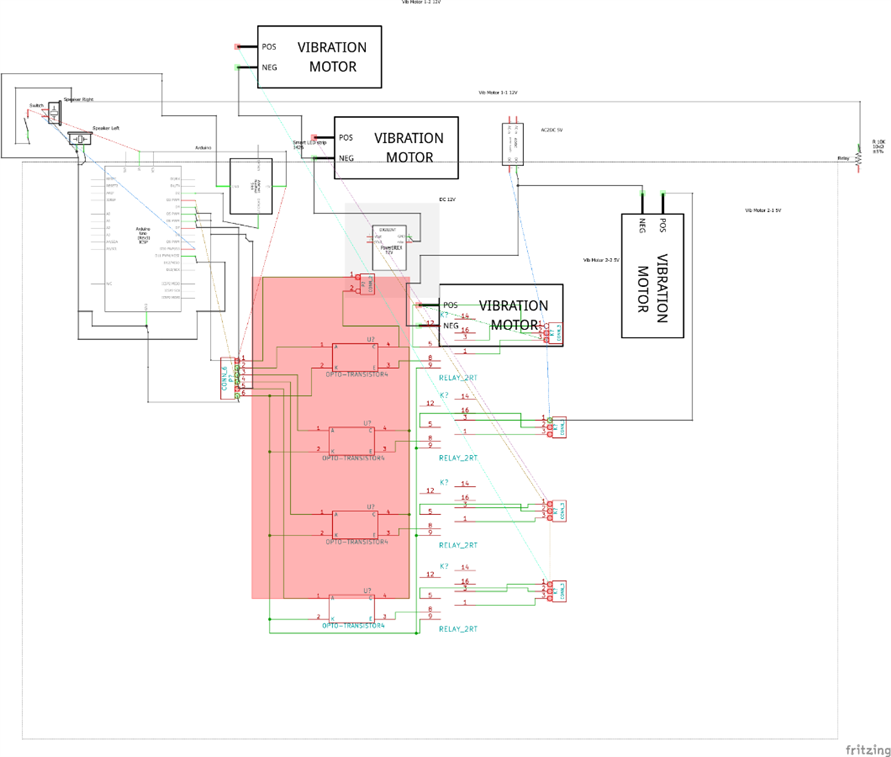
Here are the images of my Fritzing breadboard layout and Schematics. For some reason I cannot attach the full Fritzing file to this post. When I make this project public on GitHub I will add a link to the Fritzing file itself. Both use Arduino UNO as it is preliminary design, when I am done testing it, I will make a new layout and schematic using Arduino Nano 33 IoT.


Breadboard layout:


image


Schematic:


image

  • Sign in to reply

Top Comments

  • javagoza
    javagoza over 4 years ago in reply to ilvyanyatka +3
    Hi, Victoria, Press the reset button on the board twice before loading the new binary. The two LEDs on the board will illuminate, indicating that it is in boot load mode. It will change the serial connection…
  • cjodrey
    cjodrey over 4 years ago +2
    Nice schematics!
  • fmilburn
    fmilburn over 4 years ago +2
    Are you having a problem with the DFPlayer? I used it successfully on a recent project so just curious but perhaps could help if you ran into an issue.
Parents
  • ilvyanyatka
    ilvyanyatka over 4 years ago

    Hi Enrique,


    Wow, I didn't know that! I thought limitations are the same as other Arduinos have. Where can I read about it more?


    I was testing my LED functionality, powering it from 3.3V pin and everything was working fine. I assume it was totally save based on (other Arduinos) specs - 200 mA max for 3.3V pin and the fact that I have only 1 LED on at any given time.

    Then I added code for Bluetooth, using ArduinoBLE library. On the first upload ,or maybe the first run after upload, (I got distracted so I missed the exact time) my Arduino Nano hangs. One LED stays On all the time and not moving. When disconnecting/connection Nano again I get the same result.  I tried to reupload the code both though ArduinoIDE and Eclipse but no success - IDEs hang for good 5-10 minutes with the message "Uploading", and then return me generic error "Error happened when uploading".


    So I assumed my Bluetooth code burned the board somehow. I think more correct English word will be "fried".  I am clueless how exactly though.


    Now, after your comment, I have a question: I was planning to power my Nano from old computer PSU unit, putting 5V on Vin. Is it safe? If not - is it safe to power it with 3,3V on Vin? What about Powerbank (I assume any USB cable connected to it will give me 5V)? I really don't want to power it from a computer.


    Thank you!

    • Cancel
    • Vote Up 0 Vote Down
    • Sign in to reply
    • More
    • Cancel
  • javagoza
    javagoza over 4 years ago in reply to ilvyanyatka

    Hi, Victoria,


    Press the reset button on the board twice before loading the new binary. The two LEDs on the board will illuminate, indicating that it is in boot load mode. It will change the serial connection port of the board but the IDE will be able to find it. Try to upload the binary again as usual with the upload button.


    You have more information in the official start guide:

         https://www.arduino.cc/en/Guide/NANO33IoT

    and in the unofficial guide

         https://github.com/ostaquet/Arduino-Nano-33-IoT-Ultimate-Guide


    Lastly, you can power the board with 5V by Vin port without problem, it supports up to 21v.

    I am using 9v and 12v batteries through the Vin port with no problems.

    VenTTracker #06 -  Window Sensor Prototype


    Vin: This pin can be used to power the board with a DC voltage source. If the power is fed through this pin, the USB power source is disconnected. This pin is an INPUT. Respect the voltage limits to assure the proper functionality of the board. The MPM3610 Step Down Converter specifications indicate an input range between 4.5V and 21V, so you're safe with 5V DC

    • Cancel
    • Vote Up +3 Vote Down
    • Sign in to reply
    • More
    • Cancel
Comment
  • javagoza
    javagoza over 4 years ago in reply to ilvyanyatka

    Hi, Victoria,


    Press the reset button on the board twice before loading the new binary. The two LEDs on the board will illuminate, indicating that it is in boot load mode. It will change the serial connection port of the board but the IDE will be able to find it. Try to upload the binary again as usual with the upload button.


    You have more information in the official start guide:

         https://www.arduino.cc/en/Guide/NANO33IoT

    and in the unofficial guide

         https://github.com/ostaquet/Arduino-Nano-33-IoT-Ultimate-Guide


    Lastly, you can power the board with 5V by Vin port without problem, it supports up to 21v.

    I am using 9v and 12v batteries through the Vin port with no problems.

    VenTTracker #06 -  Window Sensor Prototype


    Vin: This pin can be used to power the board with a DC voltage source. If the power is fed through this pin, the USB power source is disconnected. This pin is an INPUT. Respect the voltage limits to assure the proper functionality of the board. The MPM3610 Step Down Converter specifications indicate an input range between 4.5V and 21V, so you're safe with 5V DC

    • Cancel
    • Vote Up +3 Vote Down
    • Sign in to reply
    • More
    • Cancel
Children
  • ilvyanyatka
    ilvyanyatka over 4 years ago in reply to javagoza

    Thank you Enrique,

    It is very helpful!

    • Cancel
    • Vote Up +1 Vote Down
    • Sign in to reply
    • More
    • Cancel
element14 Community

element14 is the first online community specifically for engineers. Connect with your peers and get expert answers to your questions.

  • Members
  • Learn
  • Technologies
  • Challenges & Projects
  • Products
  • Store
  • About Us
  • Feedback & Support
  • FAQs
  • Terms of Use
  • Privacy Policy
  • Legal and Copyright Notices
  • Sitemap
  • Cookies

An Avnet Company © 2025 Premier Farnell Limited. All Rights Reserved.

Premier Farnell Ltd, registered in England and Wales (no 00876412), registered office: Farnell House, Forge Lane, Leeds LS12 2NE.

ICP 备案号 10220084.

Follow element14

  • X
  • Facebook
  • linkedin
  • YouTube