


Intro
During my last year's project I have deployed array of sensors to monitor environmental parameters inside three enclosures:
- Hammond 1554VA2GYCL that was then tested (along with the array of waterproof - mainly RF - connectors) and which was the same as the current model,
- reference unsealed enclosure,
- reference IP65 rated enclosure, but without any openings,
and compared them with data about current weather obtained from METAR reports.
During that contest I have identified some shortcomings, which I intend to remedy in the current project.
Reference data quality
During the previous competition, I have used data in METAR (Meteorogical Aerodome Report) format, provided by National Oceanic and Atmospheric Administration of US for more than 4000 airports around the world. They are published hourly and include information about - among other parameters - current temperature, dew point temperature and atmospheric pressure for the given observation station (located usually at the airport).
From dew point temperature I have then calculated relative humidity and store those values as a baseline for the readings obtained from the enclosures.
METAR data can be obtained using, for example Gnu/Linux utility metar, that can also decode reports to provide easy to obtain and free source of information about current weather. Example run (for airport with code EHGR - Gilze Rijen Air Base, Breda Netherlands):
$ metar -d ehgrEHGR 171425Z AUTO 31010KT 290V010 9999 BKN016 OVC020 17/14 Q1008 REDZ WHTStation : EHGRDay : 17Time : 14:25 UTCWind direction: 310 (NW)Wind speed : 10 KTWind gust : 10 KTVisibility : 9999 MTemperature : 17 CDewpoint : 14 CPressure : 1008 hPaClouds : BKN at 1600 ft OVC at 2000 ft
The problem was - as I was not living at the airport at the time, but several kilometers from it - some values were more trustworthy than the rest. For example - atmospheric pressure at the area is usually similar, but the temperature or humidity can vary.
To overcome this challenge I have decided to use wireless outdoor sensors from weather station I have learned to read in the meantime.
The setup is the same as I have described a few times (for example, in PlutoSDR RoadTest) - basically, an (RTL-)SDR dongle, rtl433 software, InfluxDB as a database and Grafana for visualization.
Initial tests were like below (green dots are from METAR data, other two from local sources):
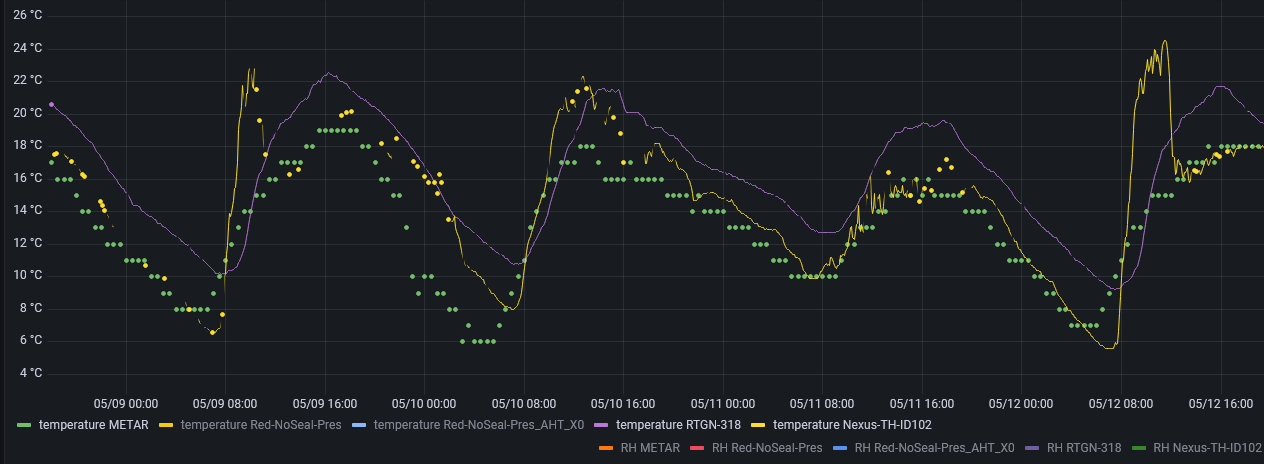
As you can see, something is amiss - local data seems shifted. After some investigation, problem was found - mechanism used was not taking into consideration local timezone: database plugin was happily inserting data using local time without timezone, which was interpreted as UTC by the database. Quick workaround later (setting local timezone to UTC at blue, vertical, dotted line)
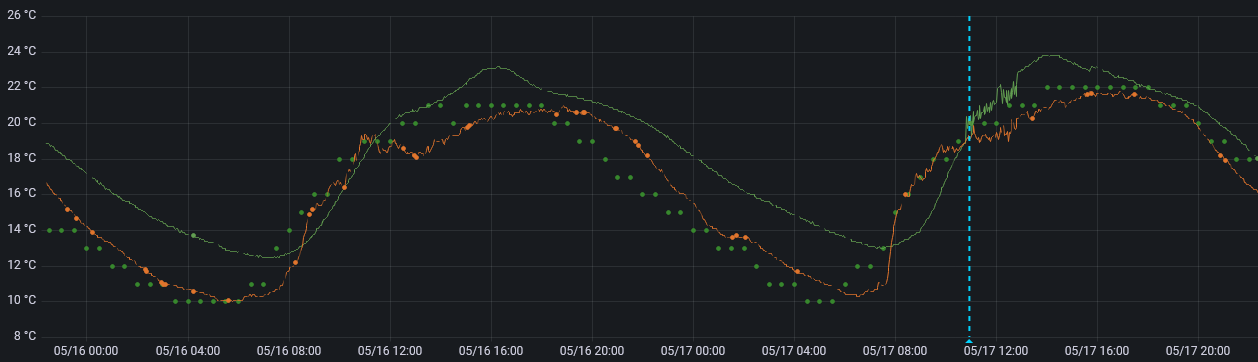
and it seems that local data series fit more closely METAR measurements now.
Hardware unification
As a cost-reduction feature, I was previously using two (or three - with two generations of one module) hardware platforms (selected from group of four, using lowest idle power consumption criteria).
| {gallery}Modules of old |
|---|

|
Each sensor was equipped with the 18650 cell package (retrofitted from old laptop batteries) and charger/step-up converter (like below)

by the way - this module is an interesting one: it integrates battery charger with step-up converter, that is allowing for longer battery operation time than most popular charger-only modules (which - lacking step-up part - are usually capable of powering 3.3V device only if battery voltage is at least 3.4-3.5V [taking into consideration voltage drop on next stage power supplies], which leaves much of the battery capacity unusable). It also lacks power-saving features of typical power-bank module, which proved problematic during wake-up phase (when processor was sleeping, converter reduced voltage to the level preventing SoC from reliably waking-up).
It has one drawback through - it does not include undervoltage protection, which was observed to result in undesirable behavior: not only batteries were depleted to 0V (limiting their lifespan) but processor modules, powered from too low voltage, were prone to enter undefined state (they were consuming power like in active state but without any visible effect).
To remedy this, each battery pack was modified by adding local BMS module (which includes undervoltage cut-off)

Sensor types were also unified: from the group:
- AHT20
- DHT22 a.k.a. AM2302
- BMP280
- BME280
BME280 was removed (as I had only one such module), resulting in two sets of sensors:
- DHT22 board
- AHT20 and BMP280 board
Processor boards, from previously used
- Wemos D1 mini clone v.2
- Wemos D1 mini clone v.3
- ESP32 develoment kit
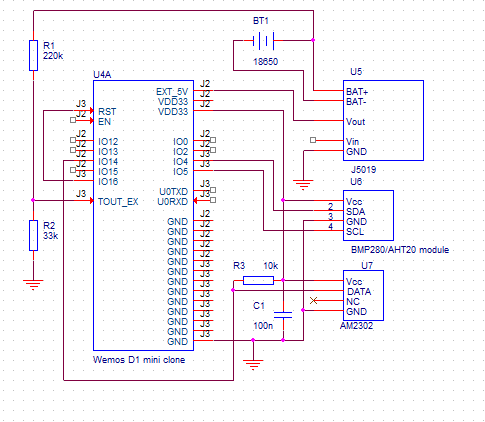
were reduced to Wemos D1 mini clone v.3, that was considered most energy-efficient at the time, resulting in the circuit as below:
Sensor to be used in Hammond enclosure was also simplified - from the construction made from 2mm laminate, then thinned at the edges to fit in (1.5mm) vertical guides of the enclosure, with processor and power-supply PCBs screwed on both sides (top one), to the halves of universal PCB (15x9cm) with parts of circuit soldered directly (bottom two - one for each Hammond enclosure).
This way, sensor construction was much faster, but it has two drawbacks:
- PCB is too thin for it's guide (some means of fixing would be needed in more permanent setups),
- laminate itself is prone to bending, especially after installation of heavier components (like battery pack) - and, as it is not typical fiberglass-epoxy type but something cheaper (maybe CEM type) it could probably be damaged in case of sudden movement/vibrations,
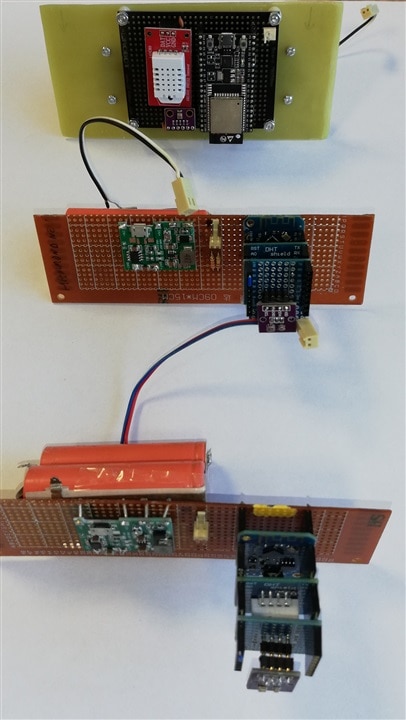
Sensor construction was done in main part as tower-of-modules - as a mean of increasing flexibility (one can easily exchange individual modules) - like below:
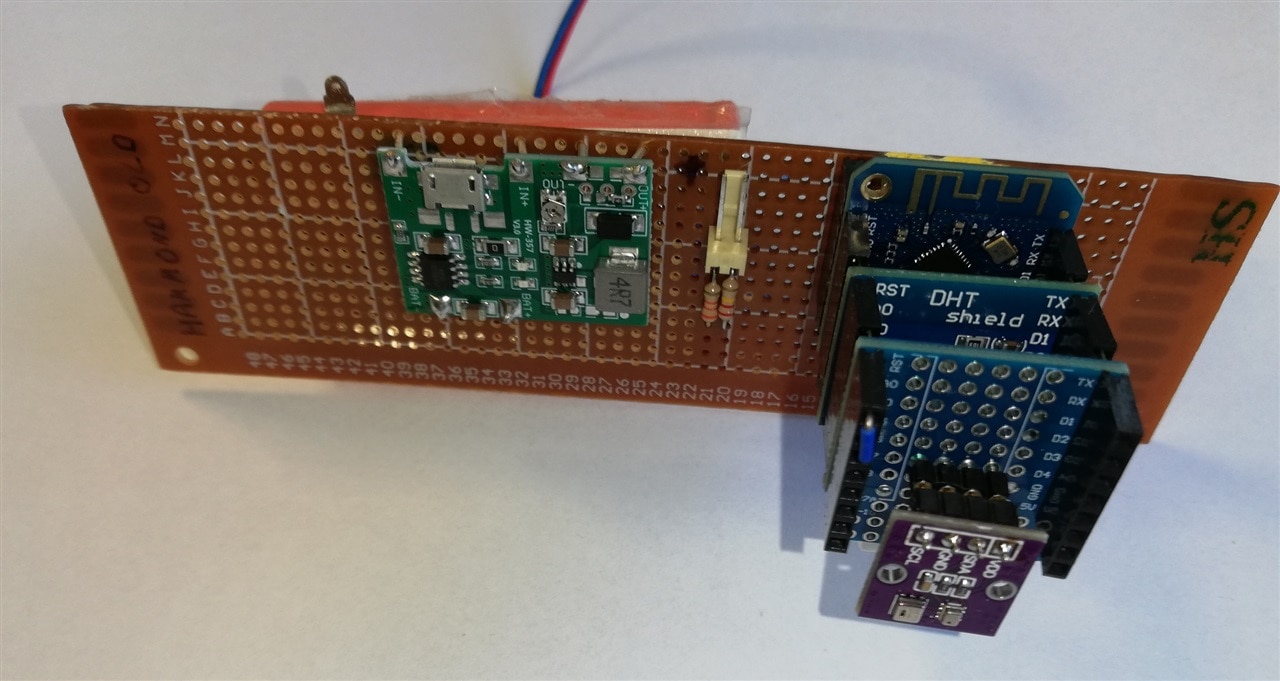
but several problems were observed:
- precision socket (between purple AHT20/BMS280 daughterboard and base module) - never problematic when using DIL packages, was found prone to contact problems when using in such a short run as SIL (single in line) setup,
- extended goldpin contacts (working as sockets at the one side of PCB and pins at the other and allowing for easy stacking) turned out to be thinner than usual goldpin, easily bending and also creating some connectivity issues,
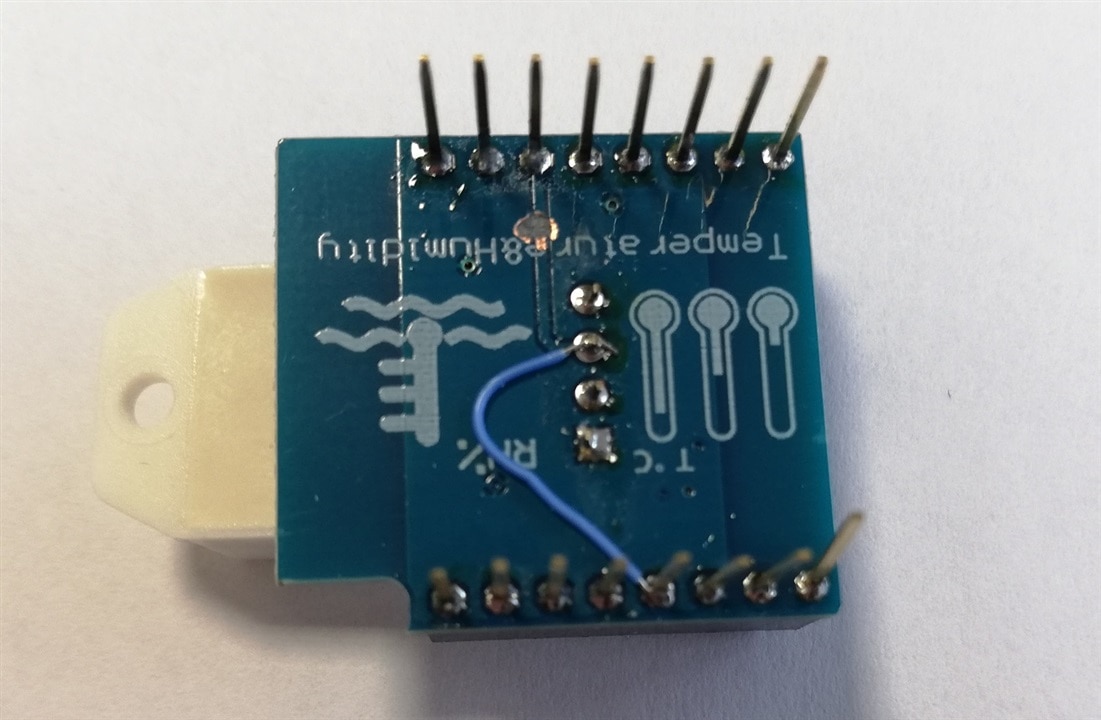
DHT22 modules for Wemos D1 mini had to be modified (moving data line from D4 to D5 GPIO), because originally they were using the same pin as connected to the LED on main board, preventing communication:
Into each enclosure, bag of humidity absorbing silica gel was added - mainly to set initial parameters for the test (and absorb any stray humidity that could be inside before test). Color changing version was used, as an additional humidity increase indicator. This gel type can be regenerated - when put in hot and dry place, it dries, gradually restoring water wapor absorbing properties (and color).
Based on experience from last year project, two different sizes of gel bags were prepared - as Hammond enclosure volume is about three times the volume of reference enclosures, bigger gel bags were prepared for them (21g vs. 7g).

Final installation of sensor inside Hammond enclosure is shown at the photo below.

Power consumption
Measuring power consumption of the system optimized for battery operation has it's own difficulties. Such a system is usually designed to be in power-saving mode most of the time, waking up from time to time to do actual work and then entering sleep state again. Activity pattern like this makes doing measurements using - for example - multimeter largely meaningless. One can usually measure sleep mode current draw, but how much energy is consumed during activity phases is still unknown.
In the previous year, power consumption estimation was done using improvised means (Arduino based measurement system), but this year I had an opportunity to use Nordic Semiconductor Power Profiler Kit II (which I have won as a prize in one of Element14 Project14 competitions and for which I would like to thank Element14 team, specially tariq.ahmad ). After installation of nRF Connect for Desktop software (and finding compatible machine for it - is seems that MS Windows 7 is no longer compatible, Ubuntu Gnu/Linux version had some difficulties connecting to the hardware and finally MS Windows 10 installation has found the profiler, flashed it with the firmware and allowed for measurements), basic operation is really straight-forward: one can set output voltage, enable output and start recording, resulting in data like below (for Wemos D1 mini v.3 clone hardware with three sensors: AHT20, DHT22 and BMS280)
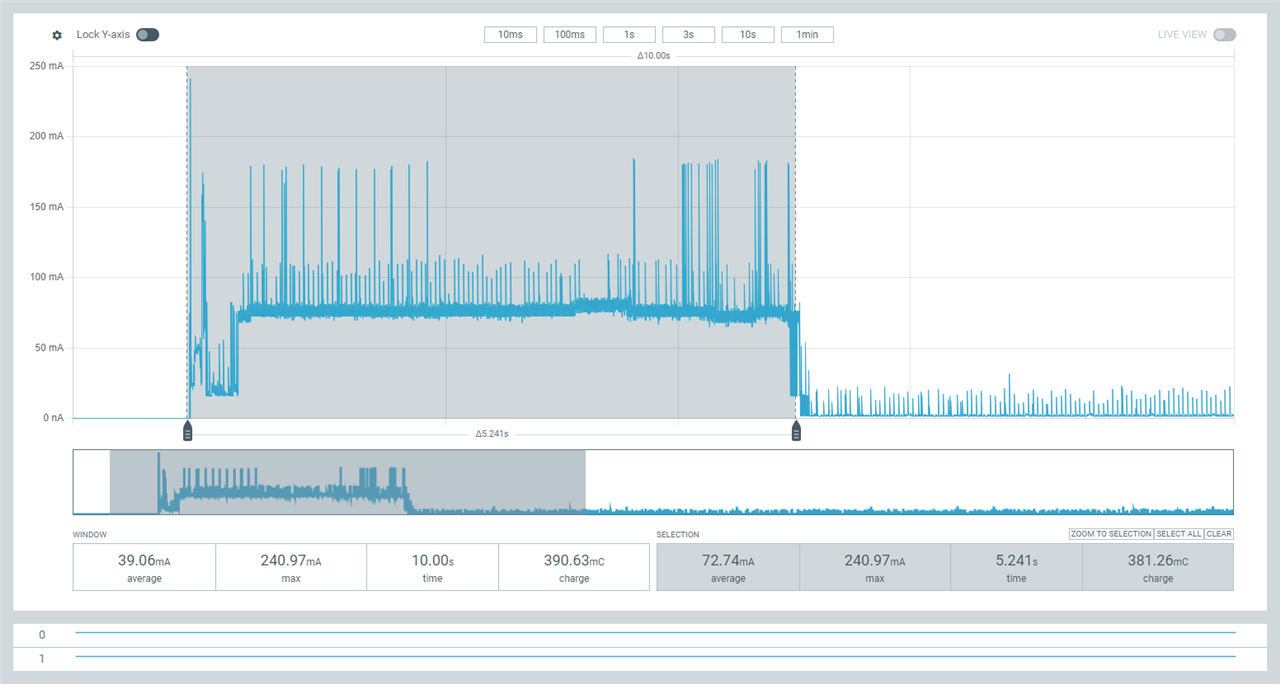

which corresponds with the log generated by the sensor (as below)
18:34:15.928 -> Pressure = 100967.31 Pa
18:34:15.928 -> Temp: 25.30
18:34:15.928 -> Hum: 41.10
18:34:15.928 -> Columbia Dew point: 13.52
18:34:15.928 -> Arizona Dew point: 11.14
18:34:15.928 -> Vbat: 266.67
18:34:15.928 -> Cannot resume WiFi connection, connecting via begin...
18:34:20.974 -> Duration: 5.059000
18:34:23.873 -> SUCCESS
18:34:23.873 -> headers processed
18:34:24.009 -> SUCCESS
18:34:24.009 -> headers processed
18:34:24.111 -> Done.
One can assume that high-power phase is mainly consumed by WiFi connection setup (initial connection is logged as elapsing about 5s) and power-saving phase consumes about 2mA in average.
Conclussions
During this phase, hardware unification was performed. SoC version count was reduced to one: ESP8266 installed on Wemos D1 mini v.3 clone board. All sensors obtained the same sensor sets for measuring temperature, humidity and pressure (AHT20, DHT22, BMP280). Power subsystem was redesigned by adding cell undervoltage protection.
New design of sensor hardware for Hammond enclosure was prepared - which limited amount of work needed for construction by using more COTS components. Amount of humidity absorbing silica gel was changed to better fit each enclosure's volume.
Reference data obtained from METAR reports was validated against local measurements from commercial weather station sensors.
References
Arduino based Improvised Power Profiler
Experimenting with Waterproof Connectors: Metar Weather Reports extra credit blog
Experimenting with Waterproof Connectors: Sensors extra credit blog
Experimenting with Waterproof Connectors: Final Setup extra credit blog
Experimenting with Waterproof Connectors: Final Results blog

