element14 Community
element14 Community
    Register Log In
  • Site
  • Search
  • Log In Register
  • About Us
  • Community Hub
    Community Hub
    • What's New on element14
    • Feedback and Support
    • Benefits of Membership
    • Personal Blogs
    • Members Area
    • Achievement Levels
  • Learn
    Learn
    • Ask an Expert
    • eBooks
    • element14 presents
    • Learning Center
    • Tech Spotlight
    • STEM Academy
    • Webinars, Training and Events
    • Learning Groups
  • Technologies
    Technologies
    • 3D Printing
    • FPGA
    • Industrial Automation
    • Internet of Things
    • Power & Energy
    • Sensors
    • Technology Groups
  • Challenges & Projects
    Challenges & Projects
    • Design Challenges
    • element14 presents Projects
    • Project14
    • Arduino Projects
    • Raspberry Pi Projects
    • Project Groups
  • Products
    Products
    • Arduino
    • Avnet Boards Community
    • Dev Tools
    • Manufacturers
    • Multicomp Pro
    • Product Groups
    • Raspberry Pi
    • RoadTests & Reviews
  • Store
    Store
    • Visit Your Store
    • Choose another store...
      • Europe
      •  Austria (German)
      •  Belgium (Dutch, French)
      •  Bulgaria (Bulgarian)
      •  Czech Republic (Czech)
      •  Denmark (Danish)
      •  Estonia (Estonian)
      •  Finland (Finnish)
      •  France (French)
      •  Germany (German)
      •  Hungary (Hungarian)
      •  Ireland
      •  Israel
      •  Italy (Italian)
      •  Latvia (Latvian)
      •  
      •  Lithuania (Lithuanian)
      •  Netherlands (Dutch)
      •  Norway (Norwegian)
      •  Poland (Polish)
      •  Portugal (Portuguese)
      •  Romania (Romanian)
      •  Russia (Russian)
      •  Slovakia (Slovak)
      •  Slovenia (Slovenian)
      •  Spain (Spanish)
      •  Sweden (Swedish)
      •  Switzerland(German, French)
      •  Turkey (Turkish)
      •  United Kingdom
      • Asia Pacific
      •  Australia
      •  China
      •  Hong Kong
      •  India
      •  Korea (Korean)
      •  Malaysia
      •  New Zealand
      •  Philippines
      •  Singapore
      •  Taiwan
      •  Thailand (Thai)
      • Americas
      •  Brazil (Portuguese)
      •  Canada
      •  Mexico (Spanish)
      •  United States
      Can't find the country/region you're looking for? Visit our export site or find a local distributor.
  • Translate
  • Profile
  • Settings
Experimenting with Extreme Environments
  • Challenges & Projects
  • Design Challenges
  • Experimenting with Extreme Environments
  • More
  • Cancel
Experimenting with Extreme Environments
Forum Driving the LCD - share your experience
  • Blog
  • Forum
  • Documents
  • Files
  • Members
  • Mentions
  • Sub-Groups
  • Tags
  • More
  • Cancel
  • New
Join Experimenting with Extreme Environments to participate - click to join for free!
Actions
  • Share
  • More
  • Cancel
Forum Thread Details
  • Replies 35 replies
  • Subscribers 39 subscribers
  • Views 3825 views
  • Users 0 members are here
Related

Driving the LCD - share your experience

Anthocyanina
Anthocyanina over 1 year ago

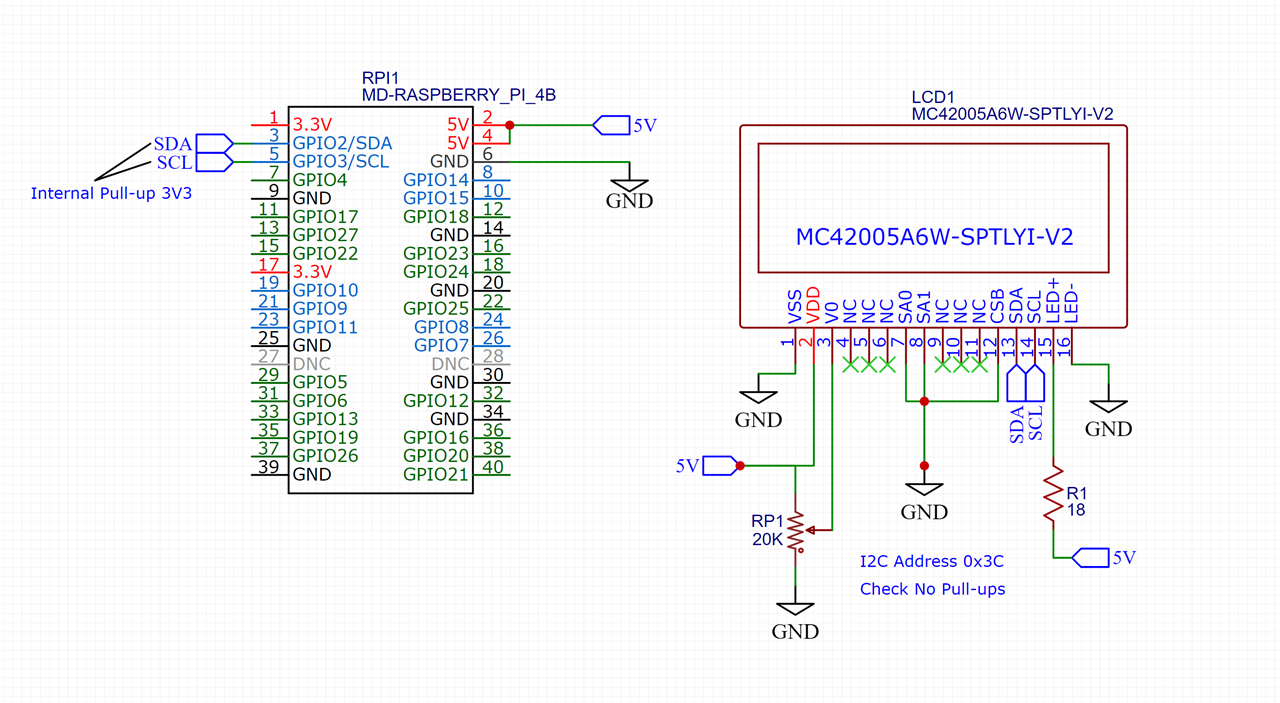
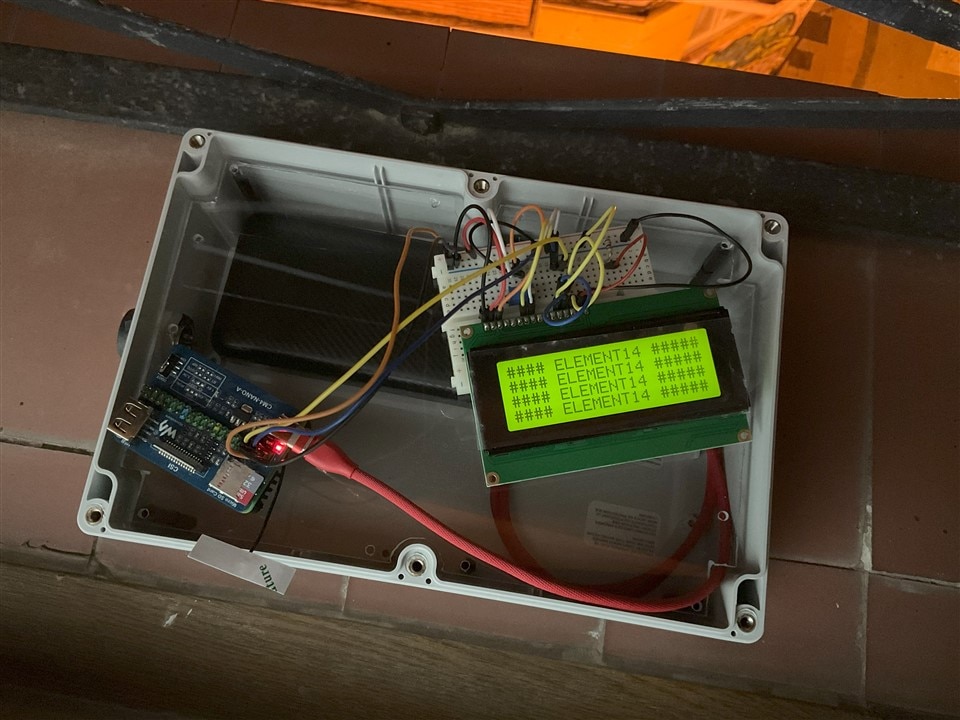
Hi! So, I've been working on the software for this challenge and have reached the point where i need to figure out the LCD. The datasheet has a character map and and the addresses for the position of each character. I don't have much experience with driving LCDs so I'm struggling with where to start. Have any of you figured out the LCD yet? 

I found a couple threads on the arduino forum that talk about this display, with people saying you could use the HD44780 libraries, or similar to drive it. I'll be trying that with an arduino board first, but still would like to hear about your experience with this display so far. 

Thank you!

  • Sign in to reply
  • Cancel

Top Replies

  • javagoza
    javagoza over 1 year ago in reply to BigG +5
    This one is even simpler.. github.com/.../cfah2004ac community.element14.com/.../IMG_5F00_1443.mov
  • javagoza
    javagoza over 1 year ago in reply to jc2048 +5
    jc2048 A quick adaptation of your script. Works! Thanks for sharing! from smbus2 import SMBus LCD_CLEARDISPLAY = 0x01 LCD_FUNCTIONSET_4LINE_5x8DOTS_BITMODE = 0x38 LCD_DISPLAYCONTROL_ON = 0x0C LCD_ENTRYMODESET_LEFT…
  • Anthocyanina
    Anthocyanina over 1 year ago in reply to shabaz +4
    update time! when i soldered the board to the LCD, which also served as an I2C breakout board, the flux residue was so hard to clean, i couldn't get it all out. I decided to remove that board, which i…
  • Anthocyanina
    Anthocyanina over 1 year ago in reply to javagoza

    That looks great! Thanks for sharing!

    • Cancel
    • Vote Up 0 Vote Down
    • Sign in to reply
    • Cancel
  • javagoza
    javagoza over 1 year ago in reply to Anthocyanina

    This is the wiring that I am using for testing with the Raspberry Pi CM4 module.

    image

    If you leave unconnected SA0 and SA1 the I2C address is 0x3F

    image

    image

    • Cancel
    • Vote Up +3 Vote Down
    • Sign in to reply
    • Cancel
  • javagoza
    javagoza over 1 year ago in reply to jc2048

    image

     jc2048 A quick adaptation of your script. Works! Thanks for sharing!

    from smbus2 import SMBus
    
    LCD_CLEARDISPLAY = 0x01
    LCD_FUNCTIONSET_4LINE_5x8DOTS_BITMODE = 0x38
    LCD_DISPLAYCONTROL_ON = 0x0C
    LCD_ENTRYMODESET_LEFT = 0x06
    LCD_1LINE = 0x80
    LCD_2LINE = 0xC0
    LCD_3LINE = 0x94
    LCD_4LINE = 0xD4
    
    
    # initialise the LCD panels
    # and write the static first line
    bus = SMBus(1)
    
    firstLineString = "#### ELEMENT14 #####"
    
    displayBuffer = [0,0,0,0,0,0,0,0,0,0,0,0,0,0,0,0,0,0,0,0]
    for i in range (0, 20):
      displayBuffer[i] = ord(firstLineString[i])
    
    bus.write_i2c_block_data(0x3C , 0x00, [LCD_FUNCTIONSET_4LINE_5x8DOTS_BITMODE])
    time.sleep(0.015)
    bus.write_i2c_block_data(0x3C , 0x00, [LCD_DISPLAYCONTROL_ON])
    time.sleep(0.001)
    bus.write_i2c_block_data(0x3C , 0x00, [LCD_CLEARDISPLAY])
    time.sleep(0.001)
    bus.write_i2c_block_data(0x3C , 0x00, [LCD_ENTRYMODESET_LEFT])
    time.sleep(0.01)
    bus.write_i2c_block_data(0x3C , 0x00, [LCD_1LINE])
    bus.write_i2c_block_data(0x3C , 0x40, displayBuffer)
    time.sleep(0.01)
    bus.write_i2c_block_data(0x3C , 0x00, [LCD_2LINE])
    bus.write_i2c_block_data(0x3C , 0x40, displayBuffer)
    time.sleep(0.01)
    bus.write_i2c_block_data(0x3C , 0x00, [LCD_3LINE])
    bus.write_i2c_block_data(0x3C , 0x40, displayBuffer)
    time.sleep(0.01)
    bus.write_i2c_block_data(0x3C , 0x00, [LCD_4LINE])
    bus.write_i2c_block_data(0x3C , 0x40, displayBuffer)

    • Cancel
    • Vote Up +5 Vote Down
    • Sign in to reply
    • Cancel
  • javagoza
    javagoza over 1 year ago

    You don't have permission to edit metadata of this video.
    Edit media
    x
    image
    Upload Preview
    image

    I just created a first version of a Raspberry Pi python library for the RW1063 LCD controller of the MIDAS Display.
    I will update as I add new functionality to the library. You are free to use it however you want, without any guarantee, I haven't tested it thoroughly yet.

    https://github.com/javagoza/lcdrw1063

    • Cancel
    • Vote Up +2 Vote Down
    • Sign in to reply
    • Cancel
  • Anthocyanina
    Anthocyanina over 1 year ago in reply to javagoza

    oh wow, that's amazing! thank you for sharing. i think i might end up using it in this challenge. i tried writing a library myself, but i can barely handle loops and ifs in software! :P

    • Cancel
    • Vote Up 0 Vote Down
    • Sign in to reply
    • Cancel
  • javagoza
    javagoza over 1 year ago in reply to Anthocyanina

    You and anyone else are welcome to use that library.

    In any case, after having studied the data sheet and the controller manual well, I think that any library that works for the HD44780 could work for you.

    Aspects to configure:

    • I2C communication. It should allow the address to be configured to any of these values: 0x3C, 0x3D, 0x3E or 0x3F
    • Data length 8 bits, this is important, since many libraries that work with parallel communication only implement 4-bit communications
    • Configuration of the 2-line display, although the display has 4 lines, it is configured as two 2-line displays working in parallel with two LCD drivers.
    • Only write mode is allowed for I2C, instruction write, and memory write operations can be used. It is not possible to use read operations, the display only asserts with ACK, it does not send data via I2C.
    • The DDRAM memory addresses of the four display lines are 7 bits: 0x00, 0x40, 0x14, 0x54
    • The CGRAM memory addresses for custom characters are 6 bits, from 0x00 to 0x56, each 5x8 bit character you need to send 8 bytes to configure it.

    Some of the aspects that I want to improve in my implementation are:

    • Add digital port for controlling the Chip Select (CS) state from the library.
    • Add a digital port to turn the LCD backlight on/off.
    • Add configuration of number of columns and rows.
    • Property for setting cursor at specific row and column position. cursor_pos = (0, 5)
    • Encapsulate private methods.

    Finally, I must remind myself that the purpose of this challenge is to test the Hammond enclosure, that this is an accessory aspect and although I am having a great time, the box is calling me in my dreams.

    • Cancel
    • Vote Up +3 Vote Down
    • Sign in to reply
    • Cancel
  • Anthocyanina
    Anthocyanina over 1 year ago in reply to javagoza

    actual dreams? i want to experiment with makeshift magnetic connectors to interface with the outside world. i tried with a piece of polycarbonate, and it went so bad i ended up actually having a bit of a nightmare about the actual enclosure breaking and falling apart when i tried the magnetic connector in an actual dream, hahahaha

    • Cancel
    • Vote Up +1 Vote Down
    • Sign in to reply
    • Cancel
  • javagoza
    javagoza over 1 year ago in reply to Anthocyanina

    I have ordered a capacitive sensor, the cheapest I have found, I want to do tests to see if it is capable of detecting my fingers behind the lid. Good idea about the magnetic sensor, it could be put on one of the sides.

    • Cancel
    • Vote Up +1 Vote Down
    • Sign in to reply
    • Cancel
  • javagoza
    javagoza over 1 year ago in reply to Anthocyanina

    Some time ago I built a magnetic quadrature encoder with magnetic reed switches.

    This encoder can be hidden on the internal lateral sides of the enclosure.

    You don't have permission to edit metadata of this video.
    Edit media
    x
    image
    Upload Preview
    image

    VenTTracker #07 - Adjusting the window sensor

    You don't have permission to edit metadata of this video.
    Edit media
    x
    image
    Upload Preview
    image

    • Cancel
    • Vote Up +1 Vote Down
    • Sign in to reply
    • Cancel
  • Anthocyanina
    Anthocyanina over 1 year ago in reply to javagoza

    oh, i meant a magnetic connector, like these

     image

    my idea was to have ferromagnetic contacts, melting through the plastic to make a waterproof seal, and then use a cable attached to tiny magnets to get signals into and out of the box, more than the 2 we can get out of it with the included connector. but my experiments with a polycarbonate piece i had were not successful at getting a waterpoof seal or even a good melting! I'll be showing that in a blog :P

    • Cancel
    • Vote Up +1 Vote Down
    • Sign in to reply
    • Cancel
<>
element14 Community

element14 is the first online community specifically for engineers. Connect with your peers and get expert answers to your questions.

  • Members
  • Learn
  • Technologies
  • Challenges & Projects
  • Products
  • Store
  • About Us
  • Feedback & Support
  • FAQs
  • Terms of Use
  • Privacy Policy
  • Legal and Copyright Notices
  • Sitemap
  • Cookies

An Avnet Company © 2025 Premier Farnell Limited. All Rights Reserved.

Premier Farnell Ltd, registered in England and Wales (no 00876412), registered office: Farnell House, Forge Lane, Leeds LS12 2NE.

ICP 备案号 10220084.

Follow element14

  • X
  • Facebook
  • linkedin
  • YouTube