element14 Community
element14 Community
    Register Log In
  • Site
  • Search
  • Log In Register
  • About Us
  • Community Hub
    Community Hub
    • What's New on element14
    • Feedback and Support
    • Benefits of Membership
    • Personal Blogs
    • Members Area
    • Achievement Levels
  • Learn
    Learn
    • Ask an Expert
    • eBooks
    • element14 presents
    • Learning Center
    • Tech Spotlight
    • STEM Academy
    • Webinars, Training and Events
    • Learning Groups
  • Technologies
    Technologies
    • 3D Printing
    • FPGA
    • Industrial Automation
    • Internet of Things
    • Power & Energy
    • Sensors
    • Technology Groups
  • Challenges & Projects
    Challenges & Projects
    • Design Challenges
    • element14 presents Projects
    • Project14
    • Arduino Projects
    • Raspberry Pi Projects
    • Project Groups
  • Products
    Products
    • Arduino
    • Avnet Boards Community
    • Dev Tools
    • Manufacturers
    • Multicomp Pro
    • Product Groups
    • Raspberry Pi
    • RoadTests & Reviews
  • Store
    Store
    • Visit Your Store
    • Choose another store...
      • Europe
      •  Austria (German)
      •  Belgium (Dutch, French)
      •  Bulgaria (Bulgarian)
      •  Czech Republic (Czech)
      •  Denmark (Danish)
      •  Estonia (Estonian)
      •  Finland (Finnish)
      •  France (French)
      •  Germany (German)
      •  Hungary (Hungarian)
      •  Ireland
      •  Israel
      •  Italy (Italian)
      •  Latvia (Latvian)
      •  
      •  Lithuania (Lithuanian)
      •  Netherlands (Dutch)
      •  Norway (Norwegian)
      •  Poland (Polish)
      •  Portugal (Portuguese)
      •  Romania (Romanian)
      •  Russia (Russian)
      •  Slovakia (Slovak)
      •  Slovenia (Slovenian)
      •  Spain (Spanish)
      •  Sweden (Swedish)
      •  Switzerland(German, French)
      •  Turkey (Turkish)
      •  United Kingdom
      • Asia Pacific
      •  Australia
      •  China
      •  Hong Kong
      •  India
      •  Korea (Korean)
      •  Malaysia
      •  New Zealand
      •  Philippines
      •  Singapore
      •  Taiwan
      •  Thailand (Thai)
      • Americas
      •  Brazil (Portuguese)
      •  Canada
      •  Mexico (Spanish)
      •  United States
      Can't find the country/region you're looking for? Visit our export site or find a local distributor.
  • Translate
  • Profile
  • Settings
Experimenting with Waterproof Connectors
  • Challenges & Projects
  • Design Challenges
  • Experimenting with Waterproof Connectors
  • More
  • Cancel
Experimenting with Waterproof Connectors
Experimenting with Waterproof Connectors Forum Tips on Writing the Final Summary Blog and Winning the Big Prizes
  • Blog
  • Forum
  • Documents
  • Files
  • Members
  • Mentions
  • Sub-Groups
  • Tags
  • More
  • Cancel
  • New
Join Experimenting with Waterproof Connectors to participate - click to join for free!
Actions
  • Share
  • More
  • Cancel
Forum Thread Details
  • Replies 32 replies
  • Subscribers 34 subscribers
  • Views 4870 views
  • Users 0 members are here
  • experimenting with Waterproof Connectors
Related

Tips on Writing the Final Summary Blog and Winning the Big Prizes

rscasny
rscasny over 2 years ago

Hi all participants.

The Experimenting with Waterproof Connectors is winding down with the final extra credit blogs due today.

On June 6th, I'll review the Forum participation and add points earned for each participant.

That leaves the big one task left to do: The Final Summary Blog.

The final summary blog is worth 300 points. I'll hand them over to the judges who will score them. Since I have two judges, I will average their individual scores into a final score and add them to the points earned for the rest of the blogs.

I wanted to offer some tips on writing the final summary blog.

1. The final blog should summarize all the work and experimenting you ghave done with waterproof connectors. Hence, a focus on the waterproof connectors should be prominent in the final blog.

2. The intro blog and the 5 extra credit blogs were added to the program for a specific reason: They can help you write the final blog (while adding points). Rather than simply linking these supplement blogs in the final blog, use the information they have to write a self-contained final blog. Now, if you want to add links to your intro/extracredit blogs in your discussion, that's fine. But our intention is to give the judges your final blog to grade your efforts.

3. The final blog should demonstrate the technical merit and your creativity around employing waterproof connectors in an electronics design. So, providing images, screenshots, and other media to lend to your tech finesse and creativity should be utilized.

4. Beyond the waterproof connectors, we provided the latte panda SBC in the kit. Show the reader how you used it, how you prepared it, and how you connected it to the waterproof connectors.

5. Articulate what your experiments were and how they turned out.

6. Draw some conclusions about participating in this program. They can range from what you may have learned about waterproofing an electronics design to what the successes and challenges were.

7. Make sure your final blog flows with some logical structure. The judges are going to read it for the first time. They want so see not only what you did but how your experiments evolved. Of course, this depends on what you did.

Like I said, the final summary blog is worth 300 points. We want the final blog to be an authoritative document. The more comprehensive it is, the closer it will get to the 300 points.

Good luck.

  • Sign in to reply
  • Cancel

Top Replies

  • Gough Lui
    Gough Lui over 2 years ago in reply to shabaz +4
    I use MS Word too - but I don't strip the formatting. I find that you can easily use styles (e.g. Heading 2, 3), bullet-points, bold/italics and they will transfer right over with no hassle. Just don…
  • michaelkellett
    michaelkellett over 2 years ago in reply to Gough Lui +3
    My method is very similar to this except that I don't do quite so much formatting in the Word document. I would much rather use a non Microsoft tool but when I tried Libre Office it was fine except for…
  • rscasny
    rscasny over 2 years ago +3
    I see that there have been some great suggestions regarding approaches to writing the final blog. Just to recap: The final blog should not simply be a table of contents to linked blogs you have produced…
Parents
  • rscasny
    rscasny over 2 years ago

    I see that there have been some great suggestions regarding approaches to writing the final blog.

    Just to recap:

    The final blog should not simply be a table of contents to linked blogs you have produced. The final blog should be able to be read and enjoyed, that is, stand on its own without the need for the reader to jump to a bunch of the external content to understand your main points, experiments, testing, results etc.

    This was done for two reasons:

    1. In at least a couple of experimenting challenges, I handed the judges links to 30 or 40 blogs (maybe even more). That's a heck of a lot of blogs to go through. Some of these blogs I would call filler blogs.

    2. Our sponsor reads the blogs. They are busy people. So, they are looking for the high points of their products and what you did. They will pass your blog across their business unit. Therefore, the blog should be able to stand on its own.

    It's Sunday here and I had a little time to skim through the community to see if there were some examples of detailed blog writing that could be models for you. (I only had 10 minutes to do this, so I'm sure I have missed many.) But these two blogs capture the spirit of good blog writing. They are organized. They stand on their own. Links are used sparingly but the reader doesn't necessarily have to go off the blog to understand the main points. The information has both technical merit and creativity in the sense that "the story" is told both in text and pictures. 

    Blog Example #1: 

    Blog Example #2: 

    In marketing, we use the term "the story" a lot. What is the story of the product(s)? What you are doing here is telling the story of how you experimented with waterproof connectors and what you discovered. Great stories can be enjoyed by many different audiences. Good luck.

    Randall Scasny

    Program Manager, Experimenting with Waterproof connectors

    • Cancel
    • Vote Up +3 Vote Down
    • Sign in to reply
    • Cancel
Reply
  • rscasny
    rscasny over 2 years ago

    I see that there have been some great suggestions regarding approaches to writing the final blog.

    Just to recap:

    The final blog should not simply be a table of contents to linked blogs you have produced. The final blog should be able to be read and enjoyed, that is, stand on its own without the need for the reader to jump to a bunch of the external content to understand your main points, experiments, testing, results etc.

    This was done for two reasons:

    1. In at least a couple of experimenting challenges, I handed the judges links to 30 or 40 blogs (maybe even more). That's a heck of a lot of blogs to go through. Some of these blogs I would call filler blogs.

    2. Our sponsor reads the blogs. They are busy people. So, they are looking for the high points of their products and what you did. They will pass your blog across their business unit. Therefore, the blog should be able to stand on its own.

    It's Sunday here and I had a little time to skim through the community to see if there were some examples of detailed blog writing that could be models for you. (I only had 10 minutes to do this, so I'm sure I have missed many.) But these two blogs capture the spirit of good blog writing. They are organized. They stand on their own. Links are used sparingly but the reader doesn't necessarily have to go off the blog to understand the main points. The information has both technical merit and creativity in the sense that "the story" is told both in text and pictures. 

    Blog Example #1: 

    Blog Example #2: 

    In marketing, we use the term "the story" a lot. What is the story of the product(s)? What you are doing here is telling the story of how you experimented with waterproof connectors and what you discovered. Great stories can be enjoyed by many different audiences. Good luck.

    Randall Scasny

    Program Manager, Experimenting with Waterproof connectors

    • Cancel
    • Vote Up +3 Vote Down
    • Sign in to reply
    • Cancel
Children
  • JWx
    JWx over 2 years ago in reply to rscasny

    Thank you for clarification!

    Frankly speaking, when asking about possible linking with previous blogs I wasn't planning to make some sort of table of contents, maybe something like:

    I have reinstalled A with B to do C, there is some quick summary, if you want all the gory details there is a detailed procedure (link)

    Then I have built  D using E to do F with short description (additional info here)

    And there is some new content that wasn't previously presented:

    - additional info

    - experiment results

    - conclusions

    to not repeat work already done - but I understand that it would be against the rules so I am aggregating all the information into one complete blog entry

    • Cancel
    • Vote Up +1 Vote Down
    • Sign in to reply
    • Cancel
  • shabaz
    shabaz over 2 years ago in reply to JWx

    Hi JWx ,

    Regarding the comment "I am aggregating all the information into one complete blog entry", do you mean a copy-paste of all the extra credit blogs into the final blog? If so, I think this will result in some bits of content that doesn't address the main points of the project, but this is just a personal opinion.

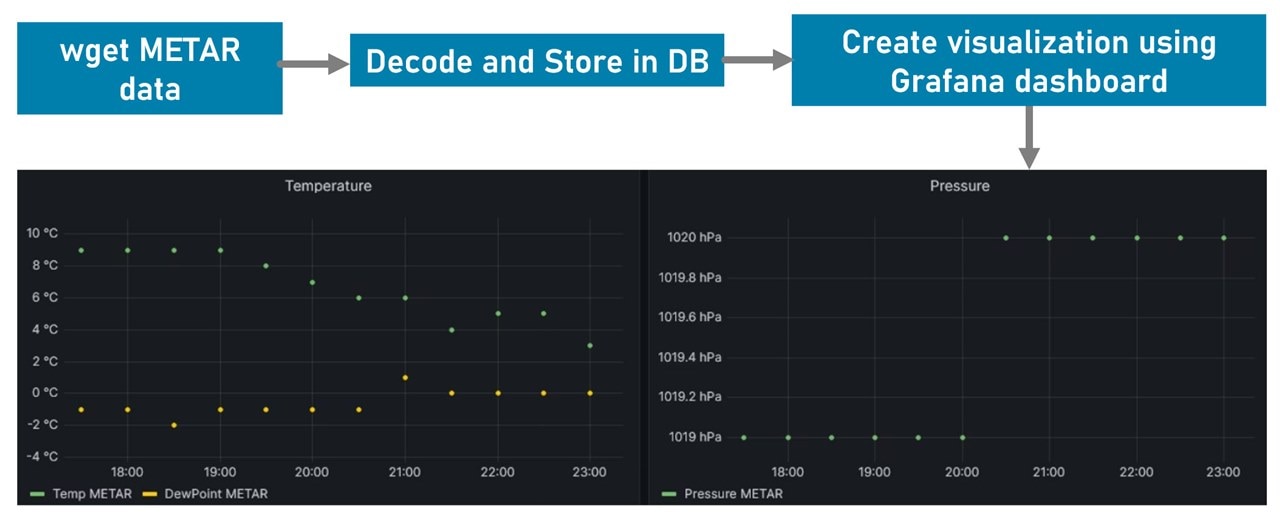
    For example, looking at the extra credit blog  Monitoring station for Underground Cold Storage (Monitoring station, add METAR weather reports - extra credit blog 2) 

    It contains the installation of Linux, and quite a lot of the blog (about 40%) covers Linux localization i.e. for keyboard and timezone settings etc. However localization isn't an objective, it's just a step that you had to go through to install Linux.

    The overall objective of that blog post I think was: "Install Linux, a database, and other middleware". Personally if it were a final blog, I'd just state that objective and mention anything interesting, without that finer detail, and use a descriptive hyperlink that explicitly makes clear that the detail is in that blog #2, for instance, something like:

    "The LattePanda device runs Linux. Ubuntu was installed, plus a database and middleware, specifically InfluxDB, Grafana and a METAR client tool. The reason these software components were selected is because... "

    That way, the hyperlink clearly is the place to go to see the guts of that objective, you've already made the effort to describe it there, and it will be clear to readers including judges that that is where that detail is. By doing this the blog still stands on its own.

    Personally I'd want to know why the specific components were installed and what they do, and their benefits/disadvantages perhaps, and snippets of code or screenshots or diagrams to make any interesting points (e.g. I think just a diagram in this case, see below), and then if a user wanted to replicate or learn the software detail, they could click on the hyperlink and see that detail.

    The interesting part of the blog is what you managed to do with the software components, and it would be super-clear to the judges and readers, with say a diagram like this, and you could mention that the code to perform the decode and store is in blog 2, or a hyperlink to Github or wherever is convenient.

    image

    I'm sure others will have different ideas, it is a personal thing after all to decide what content should go where and in what detail, since everyone will be interested in different things, I just wanted to offer one reader data point.

    • Cancel
    • Vote Up +1 Vote Down
    • Sign in to reply
    • Cancel
  • JWx
    JWx over 2 years ago in reply to shabaz

    Hello! This was precisely my line of thinking - post well described summary of previous work with links to detailed procedures, so I have started asking questions if this is recommended approach and - as far as I understand - recommendations were different (publish self contained blog to not force readers to chop to external material). So I have started to aggregate all the previous work into one detailed blog (fortunately - omitting this detailed Linux customization part  Slight smile )

    • Cancel
    • Vote Up 0 Vote Down
    • Sign in to reply
    • Cancel
  • shabaz
    shabaz over 2 years ago in reply to JWx

    I think there's some confusion here, unless I'm severely misunderstanding what is meant by aggregate.

    From my interpretation of the tips, the final blog needs to be a blog that is readable, stands on it's own, and contains all the main points. That can be achieved without aggregating all previous blogs. It would be really hard to follow if the final blog contained the majority of all the previous blogs. The final blog is the opportunity to structure things and give priority to the interesting points. 

    50% of blog 1 contains Linux installation and network connectivity detail, and repeating that to me sounds odd, because a blog can stand on it's own by stating (say) Linux was installed and an SSH server was enabled; the LattePanda board* had sufficient resources for a complete Ubuntu 16.04 operating system. That single sentence can easily replace 50\% of blog 1, and still be a standalone read. Perhaps in the final blog there could be a diagram showing the software stack that was put on the LattePanda board, showing Ubuntu at the bottom, and then the middleware layer, and then the application, and any arrows from a cloud showing where the data is fetched from (I don't know anything about METAR yet, I have still to read about it).

    Apologies if I've either misinterpreted what you meant by aggregate, or if I've misunderstood the guidelines/tips, I don't want to be blamed if I've got the wrong end of the stick! But to me it seems this is what the intent of the tips was, to make the blog comprehensive through a level of explanation easier at the end of a project, that makes it standalone and readable without having the need to repeat the CLI-level detail of how Linux and OpenSSH was installed since there can be a hyperlink for that, and now the explanation can show the broader picture too, which people might miss otherwise.

    * Also an explanation of what the LattePanda board is, maybe a block diagram of it (there may be one in a datasheet), since that's not been explained so far. I don't know what it is, and possibly many readers might not know either. Also a photo of the board, or maybe a photo of it next to (say) a Pi so that people can easily visually compare it. These are just ideas, they may not be relevant.

    Similarly, some detail of METAR, where the data originates from (is it from satellites?) maybe a couple of sentences of the history of METAR etc, is it global, or US specific etc. 

    • Cancel
    • Vote Up +1 Vote Down
    • Sign in to reply
    • Cancel
  • JWx
    JWx over 2 years ago in reply to shabaz

    Thank you for valuable opinion - I am trying to trim unnecessary descriptions. Do you think that sensor construction part should also be trimmed? It is more design-oriented but maybe not exactly in the main line of experiment...

    • Cancel
    • Vote Up +1 Vote Down
    • Sign in to reply
    • Cancel
  • JWx
    JWx over 2 years ago in reply to JWx

    and METAR is meteorological report for aviation and is issued from local meteorological centers. And as it has simple format and is freely available (in contrast to some other meteorological data that is often limited to paying customers)  it could be treated as a quick reference

    • Cancel
    • Vote Up +1 Vote Down
    • Sign in to reply
    • Cancel
  • shabaz
    shabaz over 2 years ago in reply to JWx

    If it were me, I'd add sensor info, such as how it was connected or waterproofed, a photo showing that and some of the typical readings, perhaps a table or chart of typical readings through the day. Personally I find that sort of stuff interesting. For sure that detail may be in the other 5 blogs but the final blog could show where in the enclosure it was installed, and tips or tricks sealing it and the results. 

    • Cancel
    • Vote Up +1 Vote Down
    • Sign in to reply
    • Cancel
  • JWx
    JWx over 2 years ago in reply to shabaz

    The beautiful part is that no special waterproofing was needed - after installing all the connectors and closing the lid enclosure was waterproof (submersion test passed) - and charts and tables will be present - it is main part of experiment (first 5 blogs were about preparations)

    • Cancel
    • Vote Up +1 Vote Down
    • Sign in to reply
    • Cancel
element14 Community

element14 is the first online community specifically for engineers. Connect with your peers and get expert answers to your questions.

  • Members
  • Learn
  • Technologies
  • Challenges & Projects
  • Products
  • Store
  • About Us
  • Feedback & Support
  • FAQs
  • Terms of Use
  • Privacy Policy
  • Legal and Copyright Notices
  • Sitemap
  • Cookies

An Avnet Company © 2025 Premier Farnell Limited. All Rights Reserved.

Premier Farnell Ltd, registered in England and Wales (no 00876412), registered office: Farnell House, Forge Lane, Leeds LS12 2NE.

ICP 备案号 10220084.

Follow element14

  • X
  • Facebook
  • linkedin
  • YouTube