

Table of contents

Abstract
A modern ultrasonic parking assistant is designed for older vehicles lacking sensors. Using a TDK USSM sensor and an ESP32-S3 MCU, the system provides visual and audible indicators for precise parking in a compact residential garage.
Project
Motivation
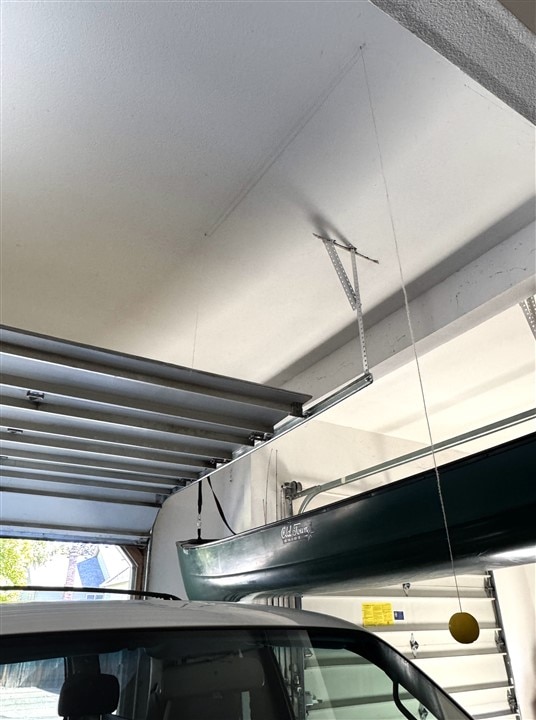
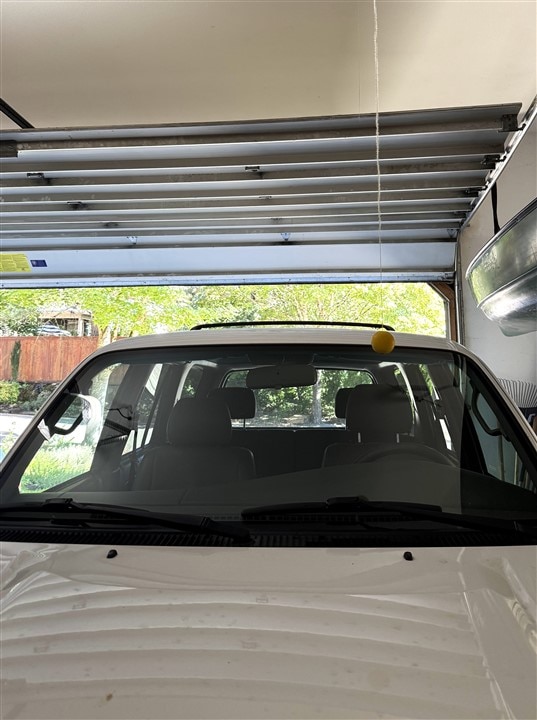
I have a requirement for a parking assistance indicator that will indicate when a vehicle is parked at the appropriate position in a residential two car garage. Many cars and trucks built in the last 5-10 years have collision avoidance sensors and/or cameras to indicate that they are at a safe distance into the garage. I own a couple of older vehicles that do not have those sensors and have been using the old ball and string technique that lowers a ball from the ceiling when the garage door opens to indicate the correct parking position. The TDK Ultrasonic Sensor provides an opportunity for me to create a modern and more reliable parking system with visual and audible indicators.
TDK USSM1.0 Plus-FS Demo Kit
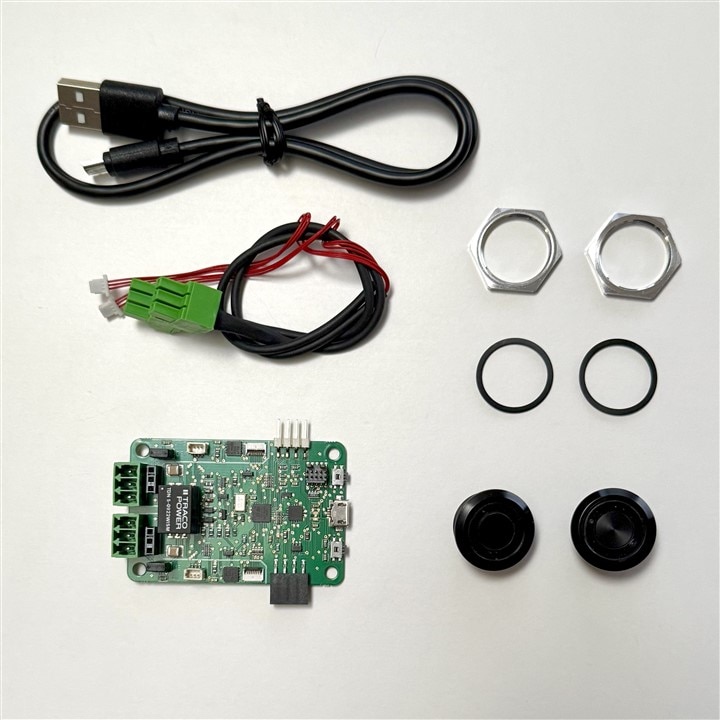
The Demo Kit includes the following components:
- TDK Demo Board
- USB-A to micro-B cable
- Two Ultrasonic Sensor Modules
- Two sensor cables
- Two gaskets and nuts
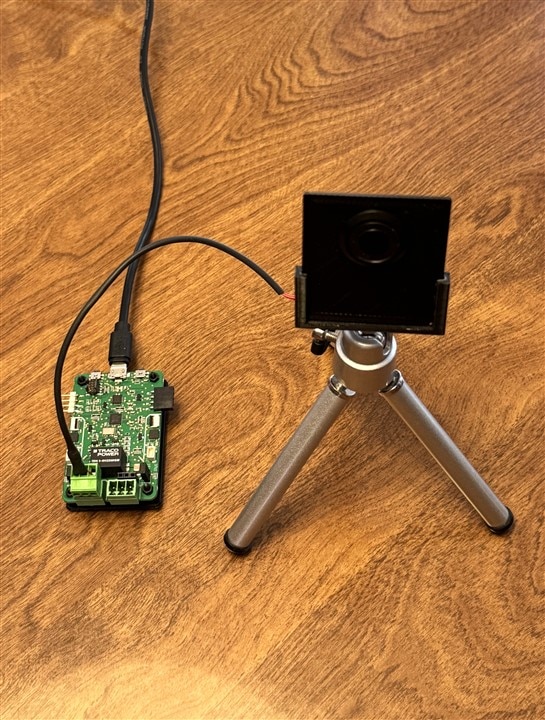
I printed a mounting plate and a tripod mount to use for sensor characterization.
Links to the kit documentation are in the References section.
Sensor Characterization
The TDK USSM1.0 PLUS-FS sensor module uses the elmos E524-33 ASIC. This is a pulse-echo module that uses a single piezo sensor for sending and receiving (to measure very short range (4cm), two modules can be used to send/receive). The module operates at 74.5 KHz and has a single sensor range of (18cm-5m). My application requires a range of 50cm to 200cm, so I only characterized the single sensor mode.
This is a highly configurable module that can be tuned for specific measurement environments. The following parameters can be adjusted:
- Transmit Burst Power: Adjusts the energy of the ultrasonic pulse. Higher power is generally used for longer ranges.
- Receiver Sensitivity (Gain): Controls how faint an echo the sensor can detect. Higher sensitivity is needed for longer ranges, while lower sensitivity helps prevent false echoes from nearby objects. The E524.33 features advanced settings for the dynamic gain curve.
- Threshold Levels: Digital signal processing compares the received echo against programmable threshold levels. You can set a primary and a secondary threshold.
- Burst Length and Frequency: Defines the duration and frequency of the ultrasonic pulse.
- Damping Algorithm: For near-field measurements, the "Smart Damping" algorithm can be configured to minimize the transducer's "settling time" or "blind zone" after transmitting the burst.
For my application I found that most of the default parameter settings were okay and the most important parameters were the threshold vs distance parameters which helps to minimize multi-path noise (secondary echoes).
Configuration Registers
The USSM sensor internal registers contain the following information:
- ID, EEPROM, Wakeup, Standby
- Sensor calibration
- Measurement configuration
- Threshold setting for profiles A and B. C uses one of them
- Status: measurement context and feedback, near-field flag
- Temperature
These registers contain 93 values that are stored in volatile memory.
There is also non-volatile EEPROM memory that stores the factory calibration data and default setup values. After power-up the calibration data is copied into the volatile memory, and the default values are written to the Measurement Setup and Threshold Setup A/B registers.
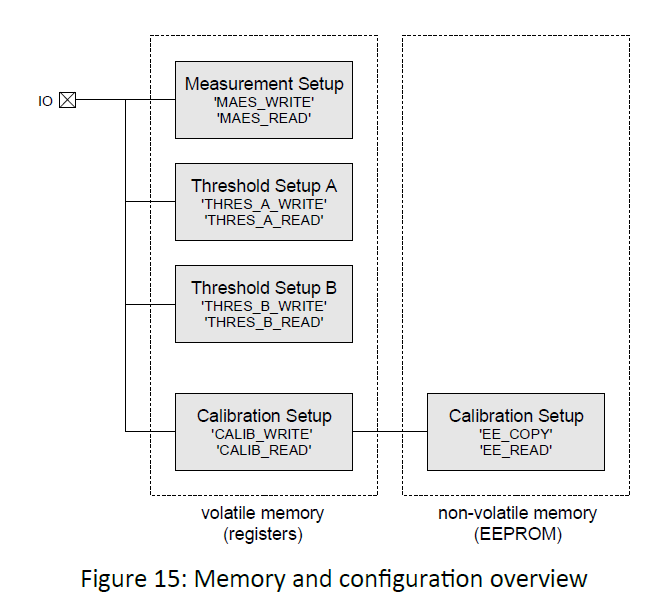
The 4 registers "Measurement Setup", "Threshold Setup A", "Threshold Setup B" and "Calibration Setup" are used to configure the device. During characterization I needed to determine the correct measurement modes and threshold values. These values will need to be written to registers after power-up.
The Threshold Setups allow the configuration of 10 Threshold vs Time zones that set the detection sensitivity at different distances. The default values lower the detection thresholds as distance increases. I only require a single setup, so I used Threshold A which provides the values for the measurement commands (e.g. SEND_A, ENV_SEND_A, etc.). The default values are shown below:
TdkUssm[1].THRESHOLD_A[20] = {
0 | 75 | 5 | 31 |THVAL_A1 | 31 | 155.000 lsb |THVAL_A1
1 | 72 | 3 | 1 |THPOS_A1 | 1 | 256.000 us |THPOS_A1
2 | 67 | 5 | 15 |THVAL_A2 | 15 | 38.000 lsb |THVAL_A2
3 | 64 | 3 | 2 |THPOS_A2 | 2 | 512.000 us |THPOS_A2
4 | 59 | 5 | 15 |THVAL_A3 | 15 | 38.000 lsb |THVAL_A3
5 | 56 | 3 | 2 |THPOS_A3 | 2 | 512.000 us |THPOS_A3
6 | 51 | 5 | 10 |THVAL_A4 | 10 | 22.000 lsb |THVAL_A4
7 | 48 | 3 | 2 |THPOS_A4 | 2 | 512.000 us |THPOS_A4
8 | 43 | 5 | 10 |THVAL_A5 | 10 | 22.000 lsb |THVAL_A5
9 | 40 | 3 | 4 |THPOS_A5 | 4 |2048.000 us |THPOS_A5
10 | 35 | 5 | 10 |THVAL_A6 | 10 | 22.000 lsb |THVAL_A6
11 | 32 | 3 | 4 |THPOS_A6 | 4 |2048.000 us |THPOS_A6
12 | 27 | 5 | 5 |THVAL_A7 | 5 | 11.000 lsb |THVAL_A7
13 | 24 | 3 | 4 |THPOS_A7 | 4 |2048.000 us |THPOS_A7
14 | 19 | 5 | 5 |THVAL_A8 | 5 | 11.000 lsb |THVAL_A8
15 | 16 | 3 | 5 |THPOS_A8 | 5 |4096.000 us |THPOS_A8
16 | 11 | 5 | 5 |THVAL_A9 | 5 | 11.000 lsb |THVAL_A9
17 | 8 | 3 | 5 |THPOS_A9 | 5 |4096.000 us |THPOS_A9
18 | 3 | 5 | 0 |THVAL_A10 | 0 | 0.000 lsb |THVAL_A10
19 | 0 | 3 | 5 |THPOS_A10 | 5 |4096.000 us |THPOS_A10}
My initial tests with the default parameters showed that I was getting a fair amount of noise. Here is a sample of a STREAMOUT measurement at a distance of 160cm and the noise is about 10%.
The sensor specification indicates that the reference target is a cylindrical pole, 75mm diameter, 1m height. That should provide a good primary reflection and scattering of any of the sound waves that do not strike perpendicular to the target. That should minimize the amplitude of multipath reflections.
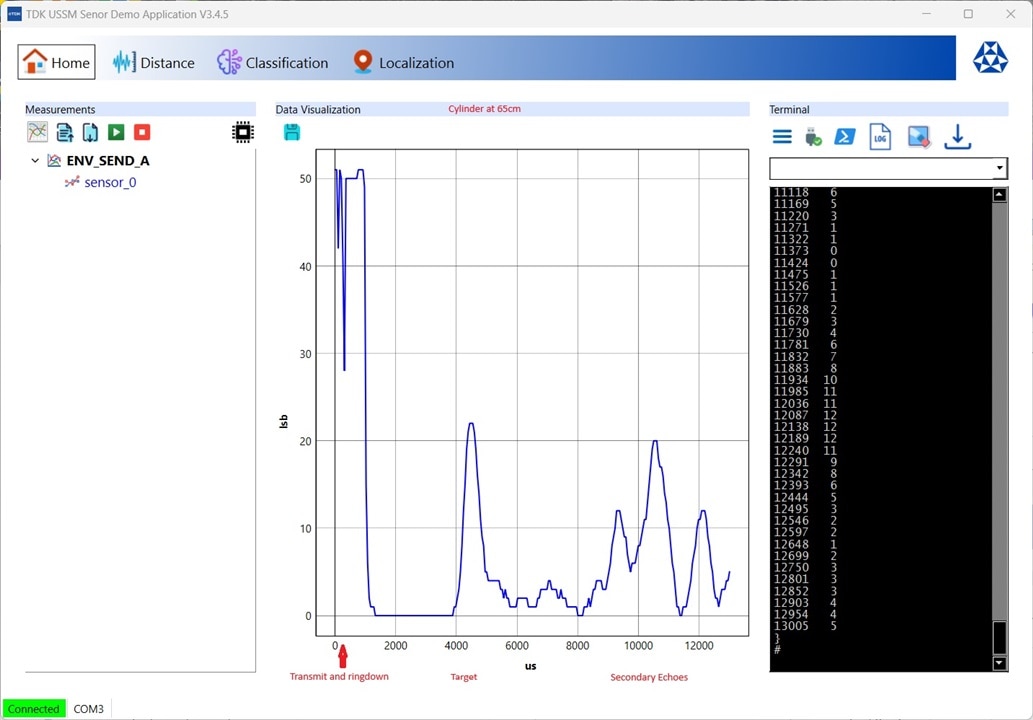
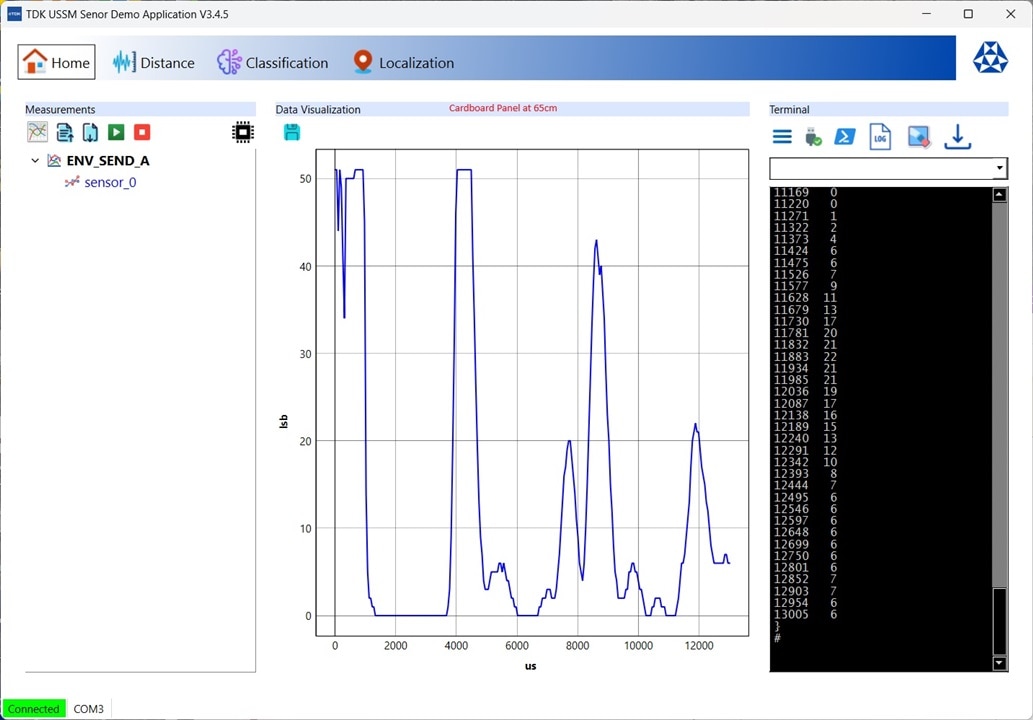
To test this out I used the Envelope measurement which provides an analog measurement of the amplitude and time of received echoes.
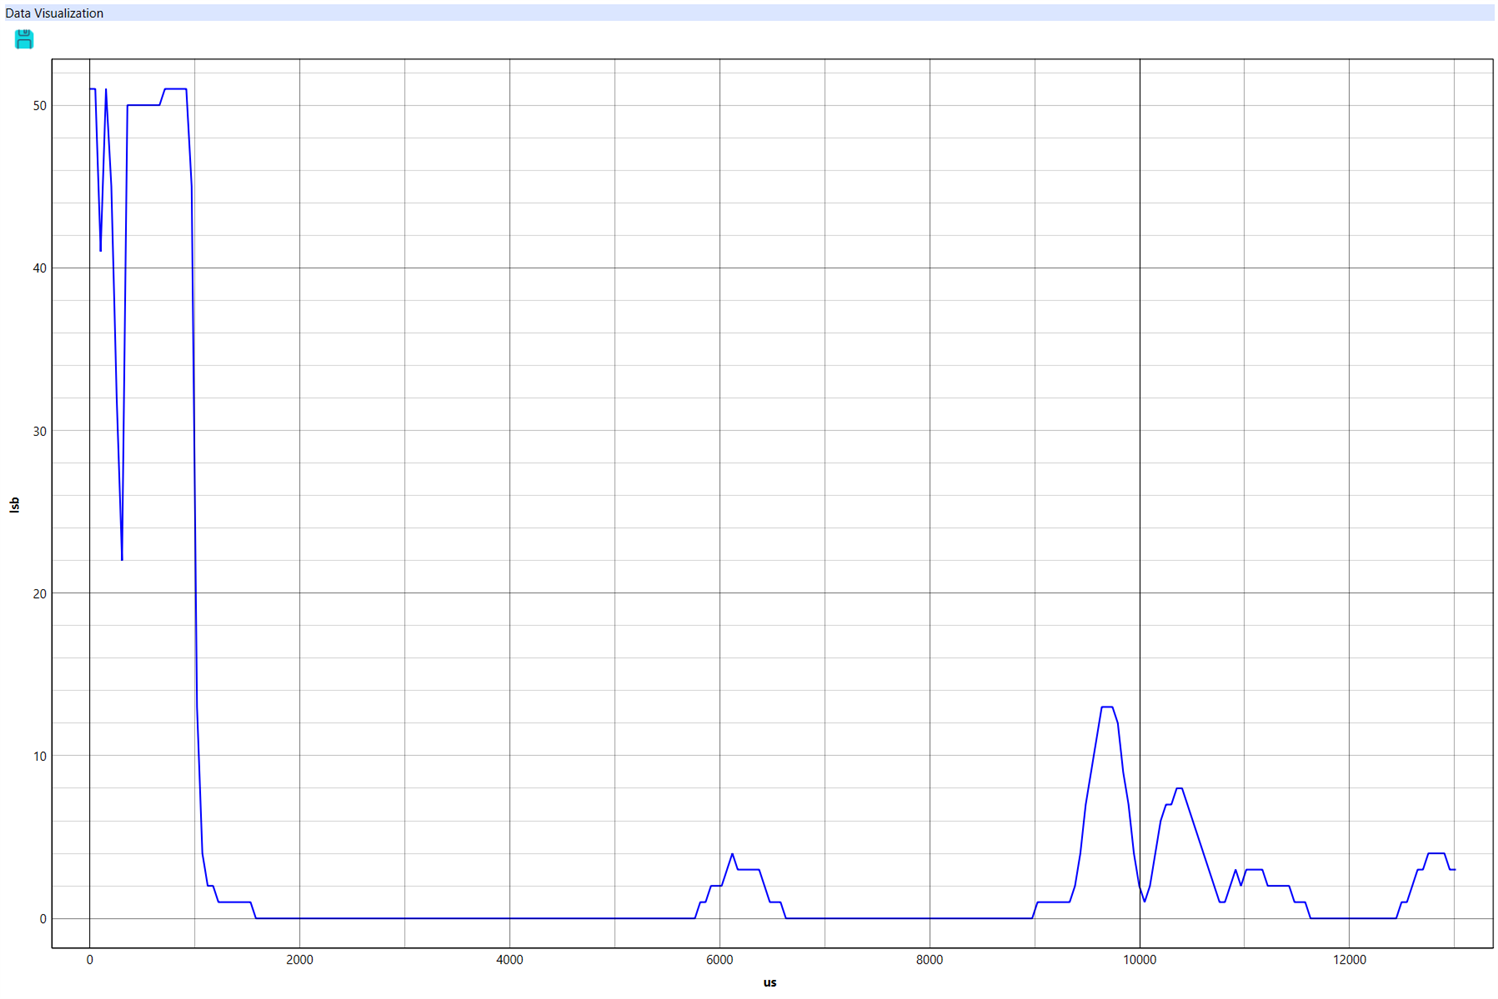
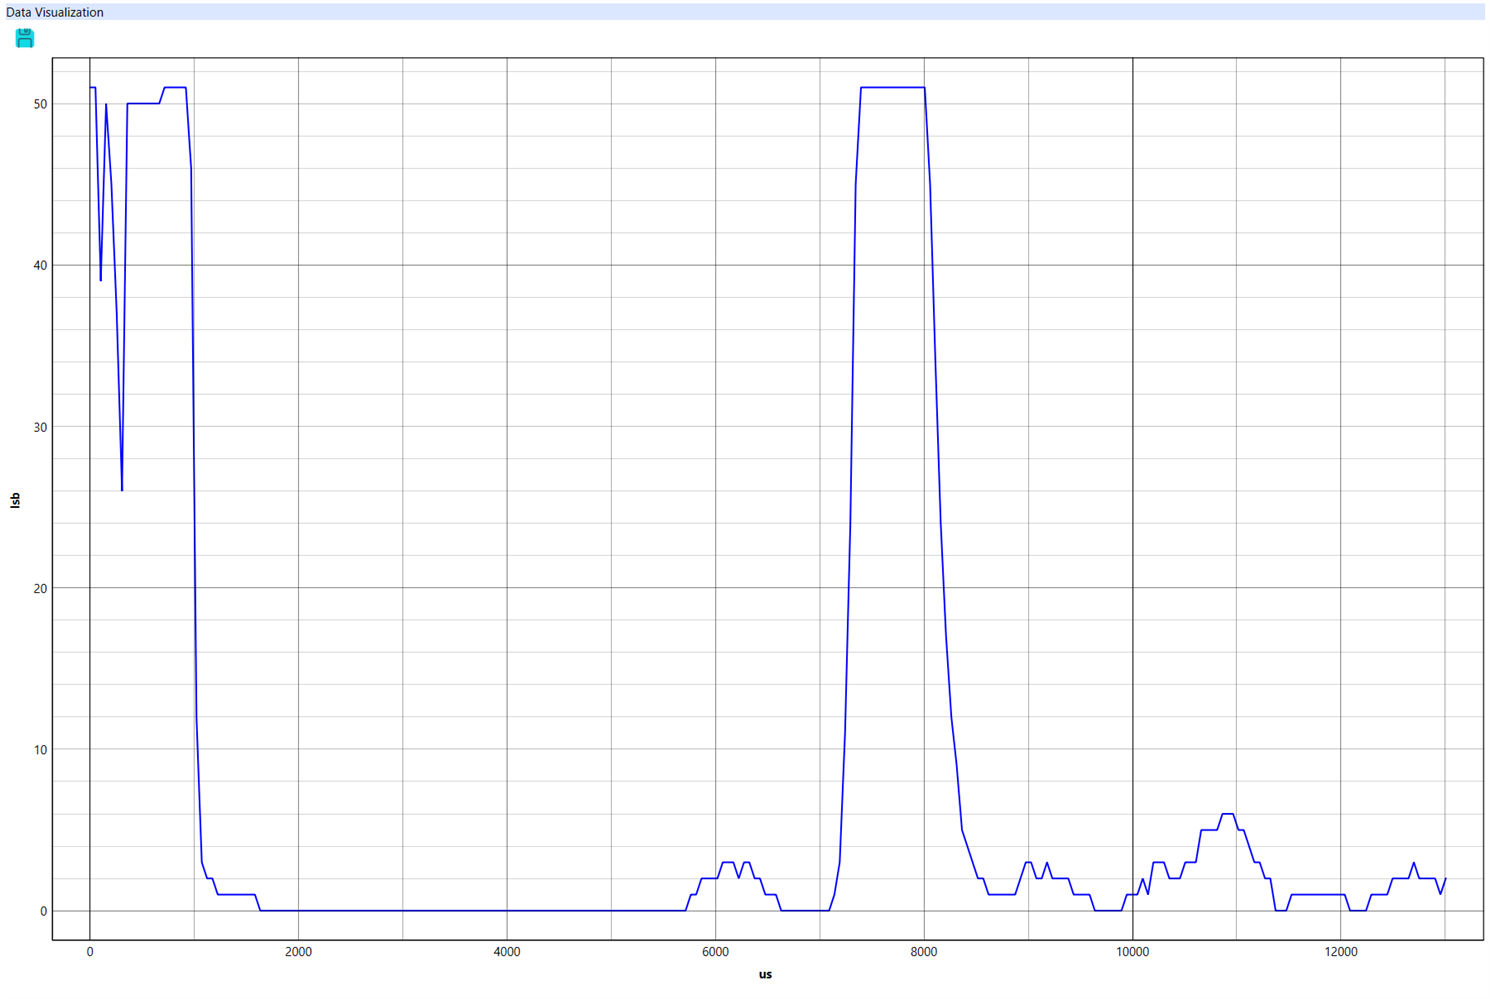
Here is a comparison of the Envelope measurement of a cylinder and a cardboard panel at 65cm. In the initial 1000us or so of both plots you see the initial transmission pulse and the ringdown period (time for the piezo element to settle). During this period the receiver is clipping. The target reflection occurs around 4000us and in the case of the cardboard panel the echo is strong enough to drive the receiver to clip while in the case of the cylinder it only has around 40% of that amplitude. The secondary multipath reflections are also significantly larger for the cardboard panel. The secondary reflections are also a lot earlier in time. This demonstrates that if the receiver gain and threshold are set for a faraway target that a near target measurement will suffer from significant multipath noise. Or if there is no near target it could mistake a multipath echo in its field of view (FOV) as the target. The shift in time of the secondary reflections shows the effect of the shape and size of the target surface relative to the location of other reflecting surfaces in the environment.
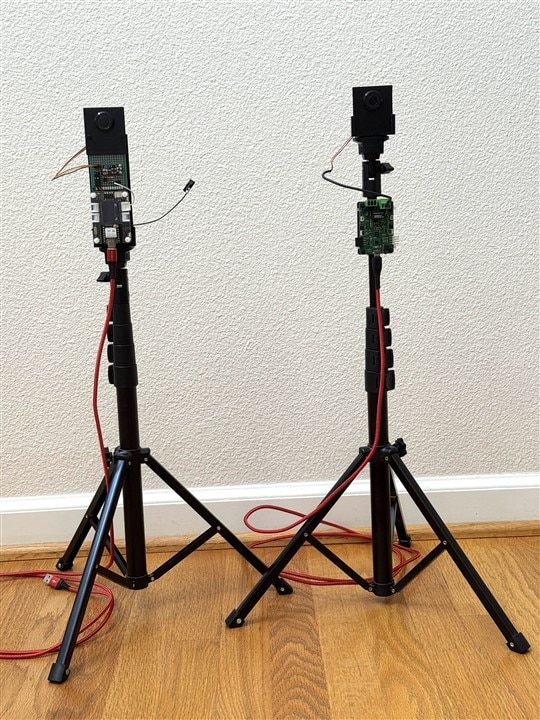
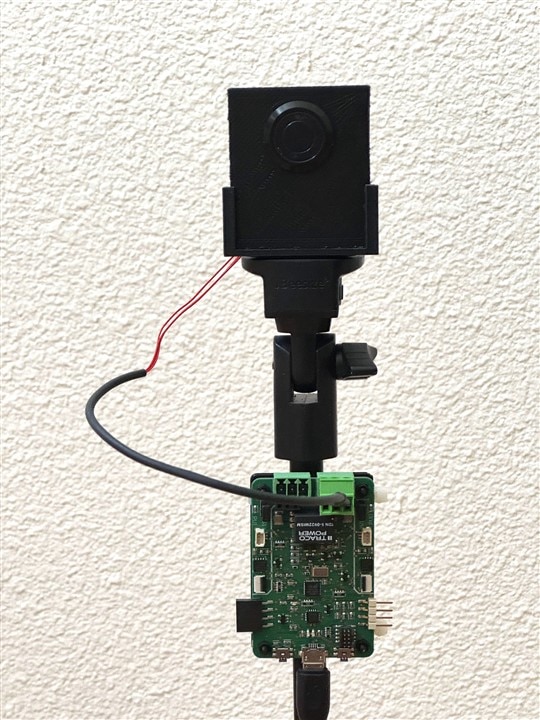
My project target is the front of a vehicle which is not solid or flat, so it is obvious that I needed to do my sensor characterization and parameter tuning in the garage with the vehicle. To that end, I built two tripod mounted measurement setups. The kit has two sensors, and I am doing single sensor measurements, so I have one sensor attached to the Demo Board so that I can leverage the capabilities of the Demo GUI software and I have the other sensor attached to the Xiao ESP32-S3 in my project configuration in order to test my application program.
Sound Trumpet
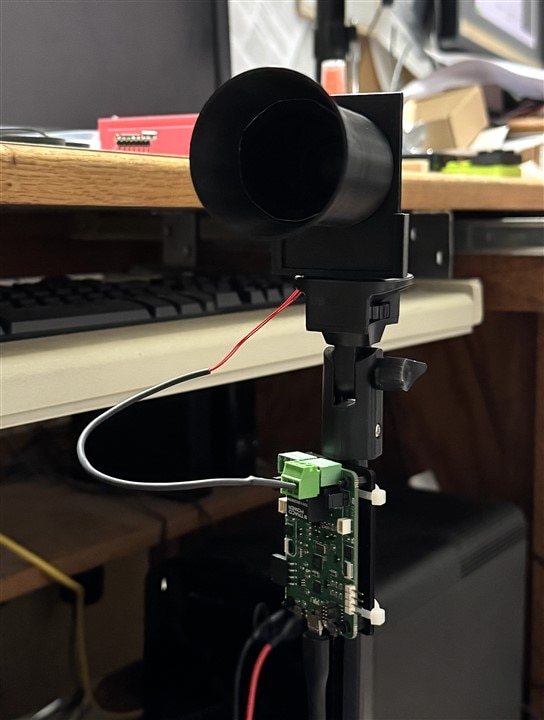
My testing in the garage indicated that I was still getting a fair amount of multi-path noise, so I decided to try a sound tube to create a directional filter for the reflections received by the sensor (reducing the FOV). Working from a design I saw on Thingiverse for a 40KHz sensor, I ended up trying a 40mm cylinder with a 30mm cone on top as it was quick to design and print.
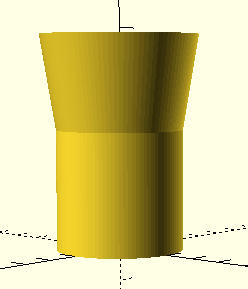
I then printed a new mounting plate for the sensor and here is the new setup (I call it the sound trumpet in honor of Dave Beacon who originally suggested it):

Here are the results of a series of envelope plots that I ran to test the effect of the trumpet:
No trumpet, no target
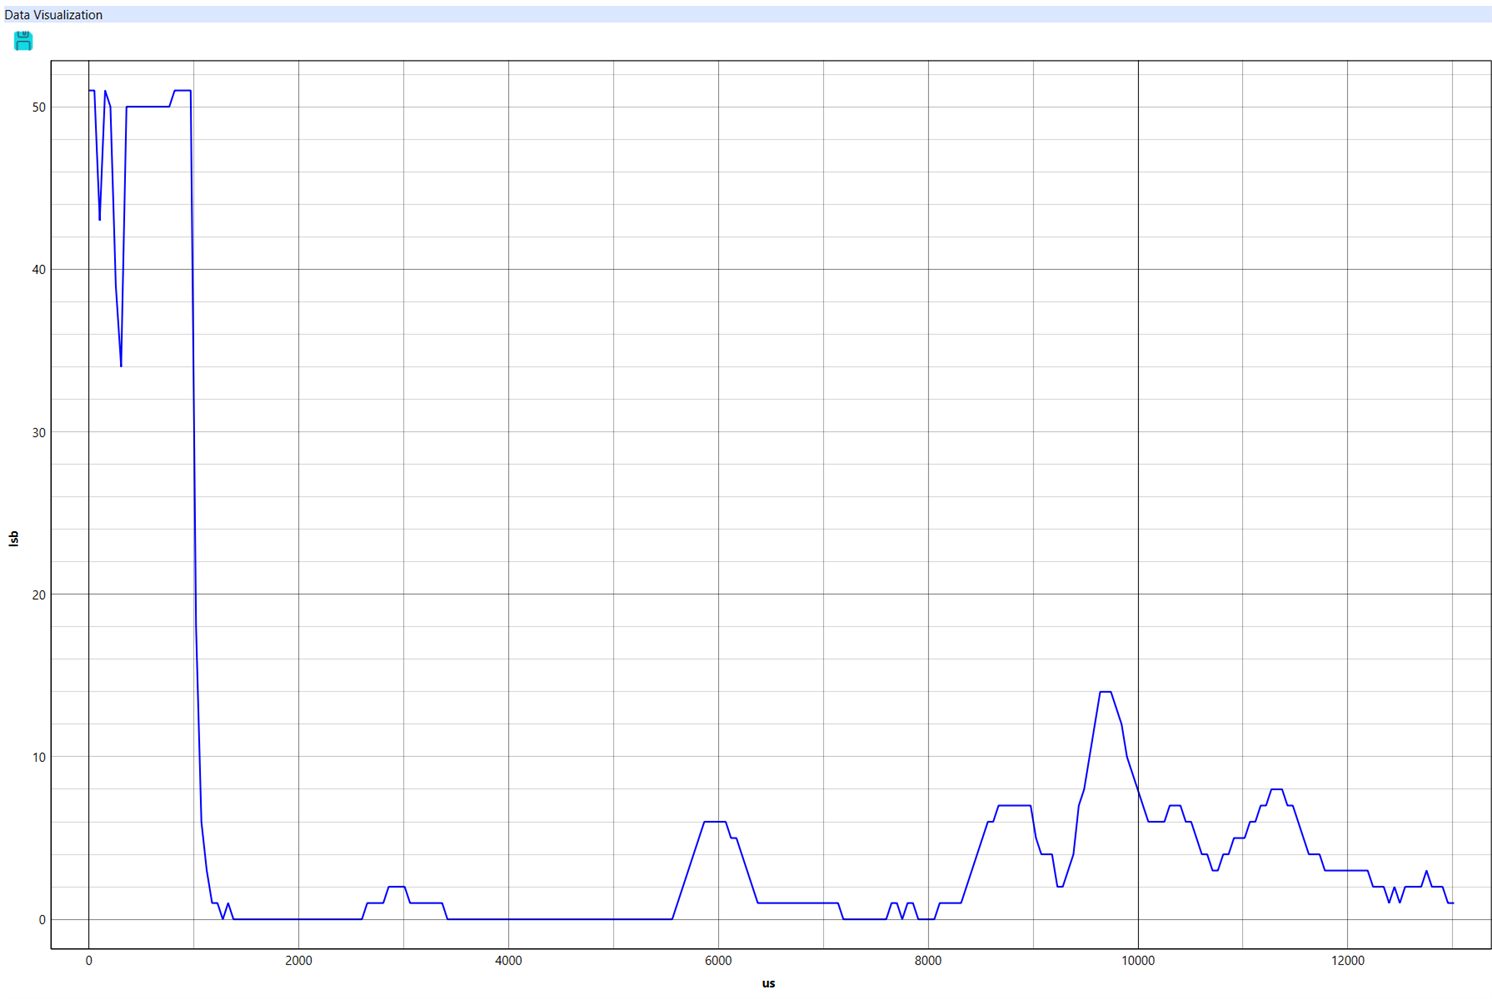
No trumpet, square panel target at 120cm
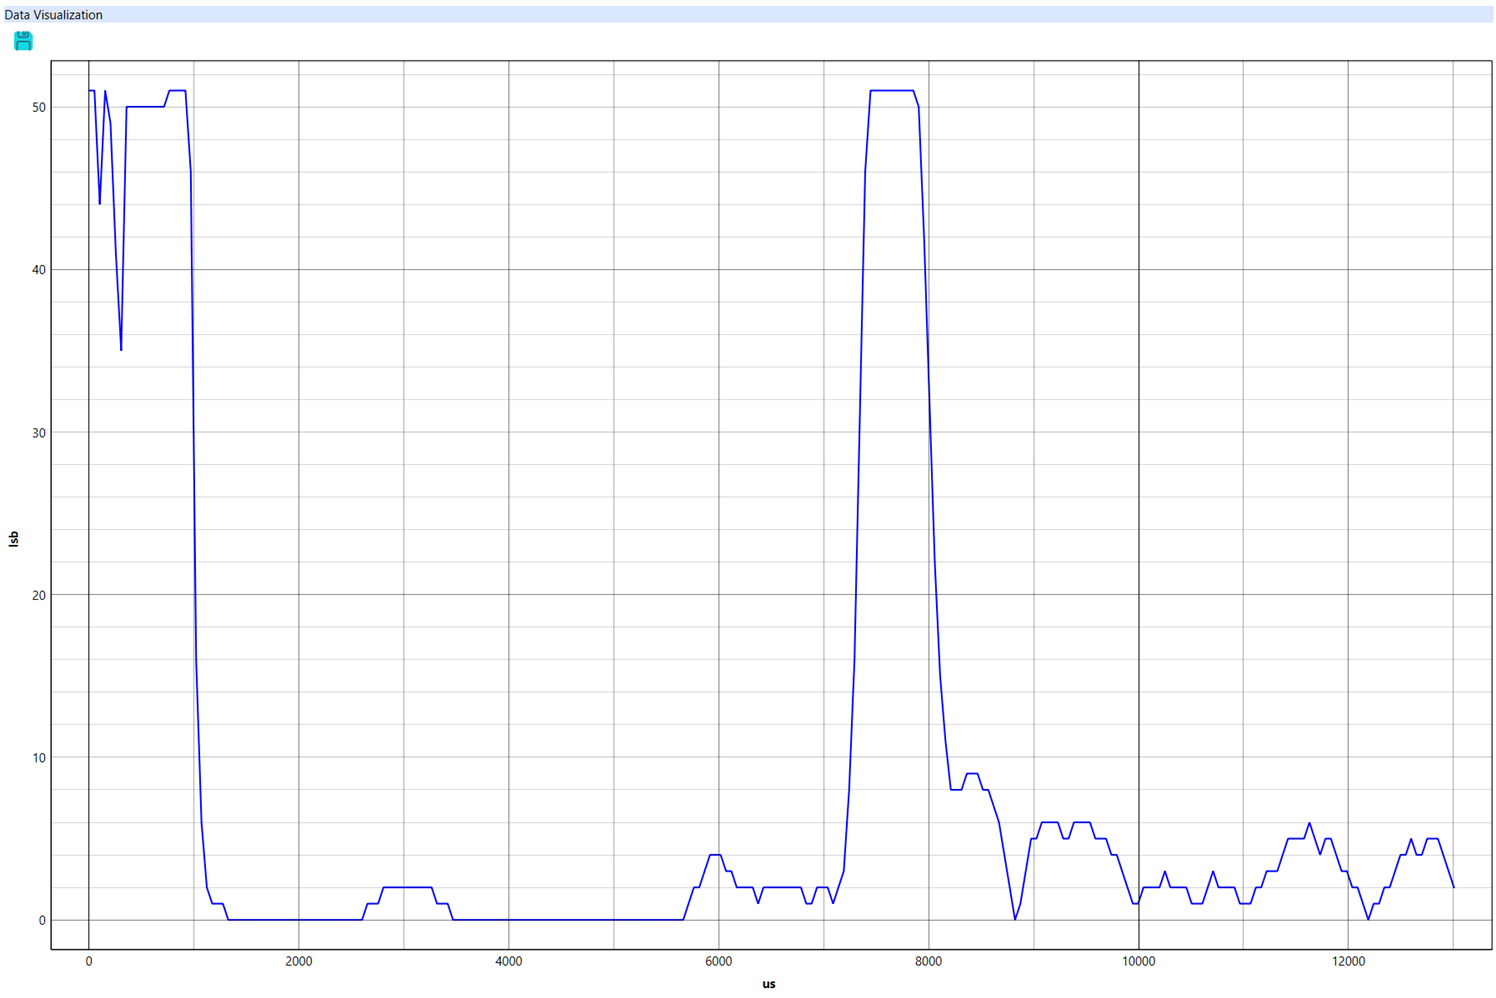
Trumpet added, square panel target at 120cm
I'll admit that looking at the envelope data, I couldn't determine that I'd improved anything. It looks like the amplitudes all increased and shifted in time. The primary echo was wider.
What really surprised me were the Streamout readings. Without the tube it was measuring 90cm and with the tube it was measuring 50cm. I was using default thresholds, so I was probably catching the first secondary echo which had more amplitude with the trumpet added.
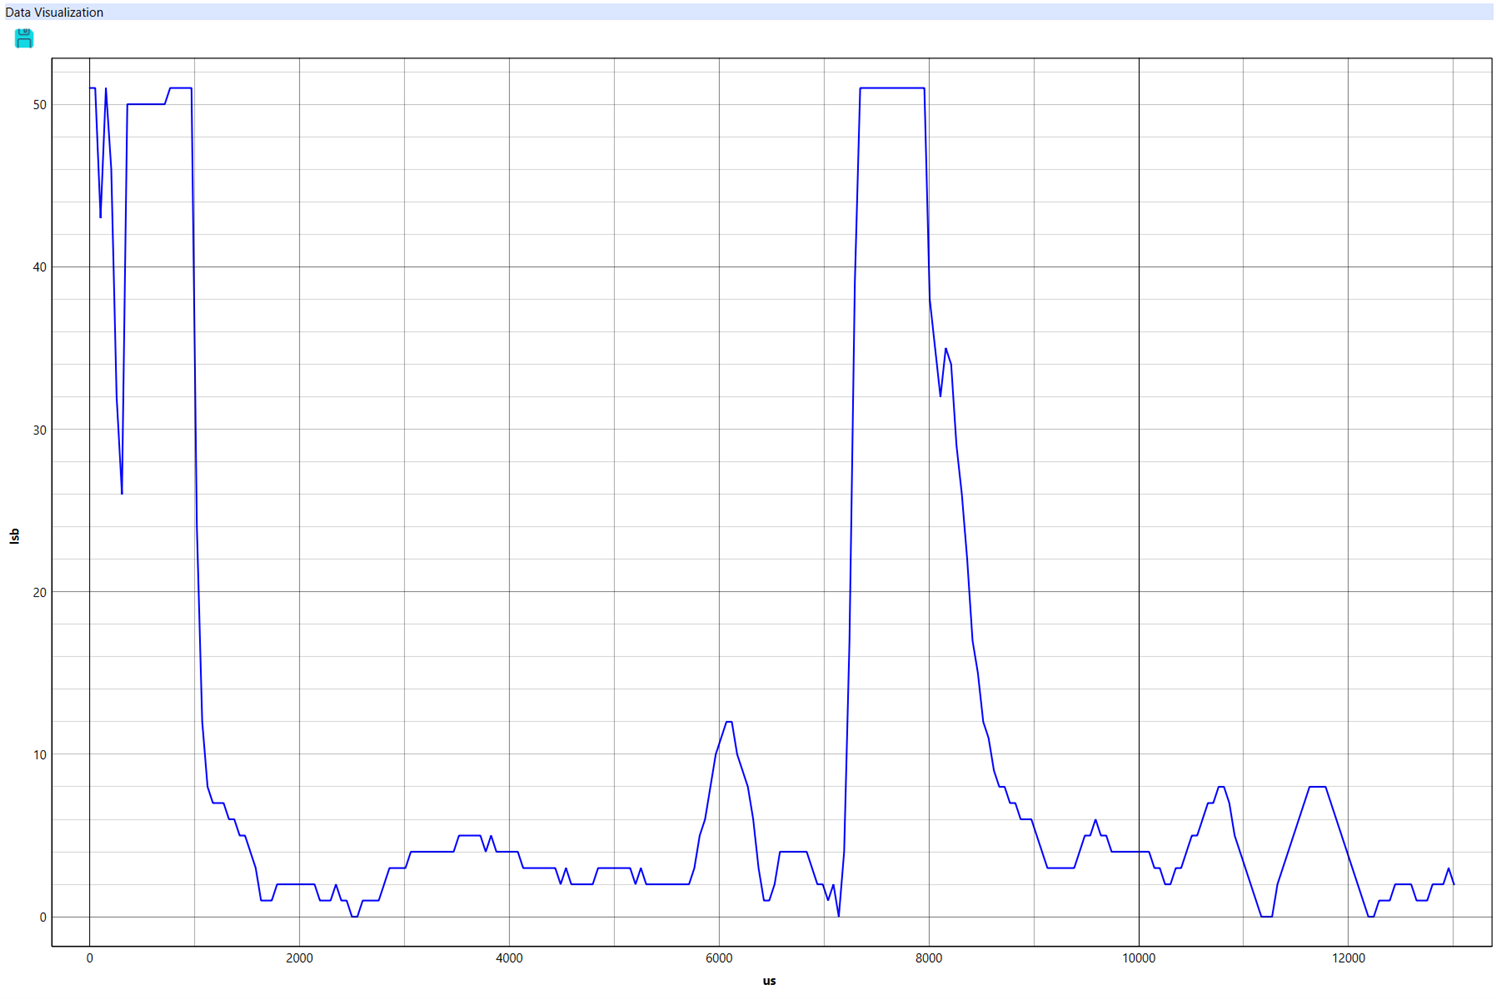
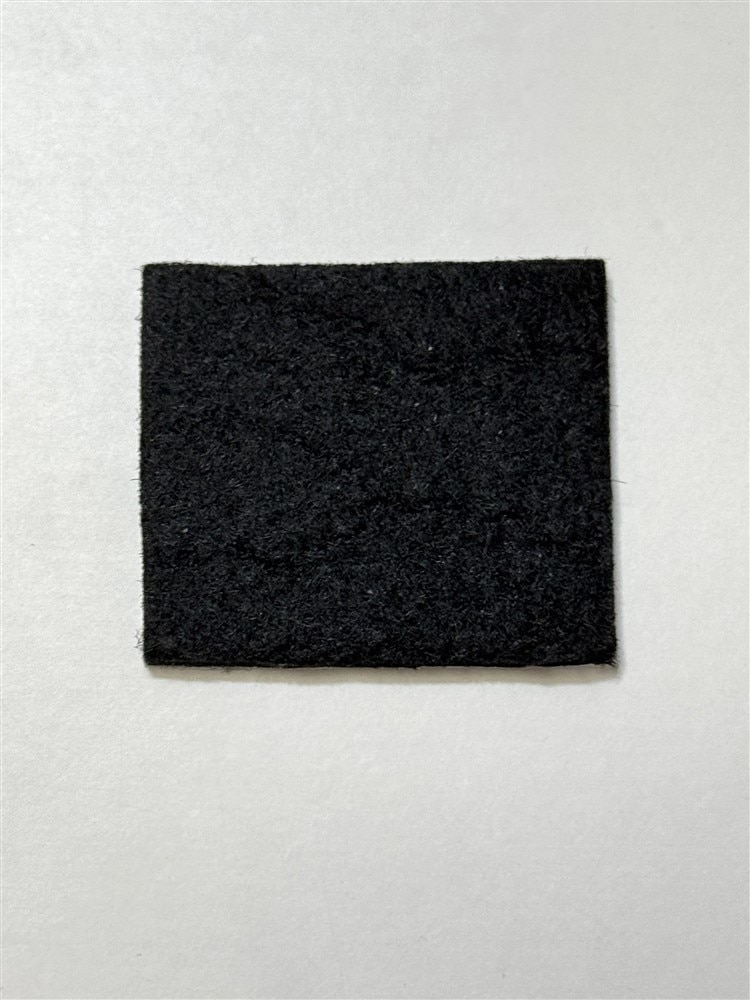
I had read that it might help to line the tube with sound absorbing material to prevent getting reflections from the tube walls caused by the transmit pulse. So, I tried lining the tube with 1/8" felt that is used for furniture pads.
Re-ran the envelope tests.
Trumpet with felt lining, no target
Trumpet with Felt Lining, square panel target at 120cm
I was somewhat surprised at the how well that worked. The Streamout data now shows 128cm and it is extremely stable (quiet)
I, then modified the thresholds (increased them for near echoes) and Streamout showed 123cm and it was even more stable.
So, I was extremely happy with the results. I modified the project setup to use the trumpet and verified the results with additional tests in the garage.
Project Description
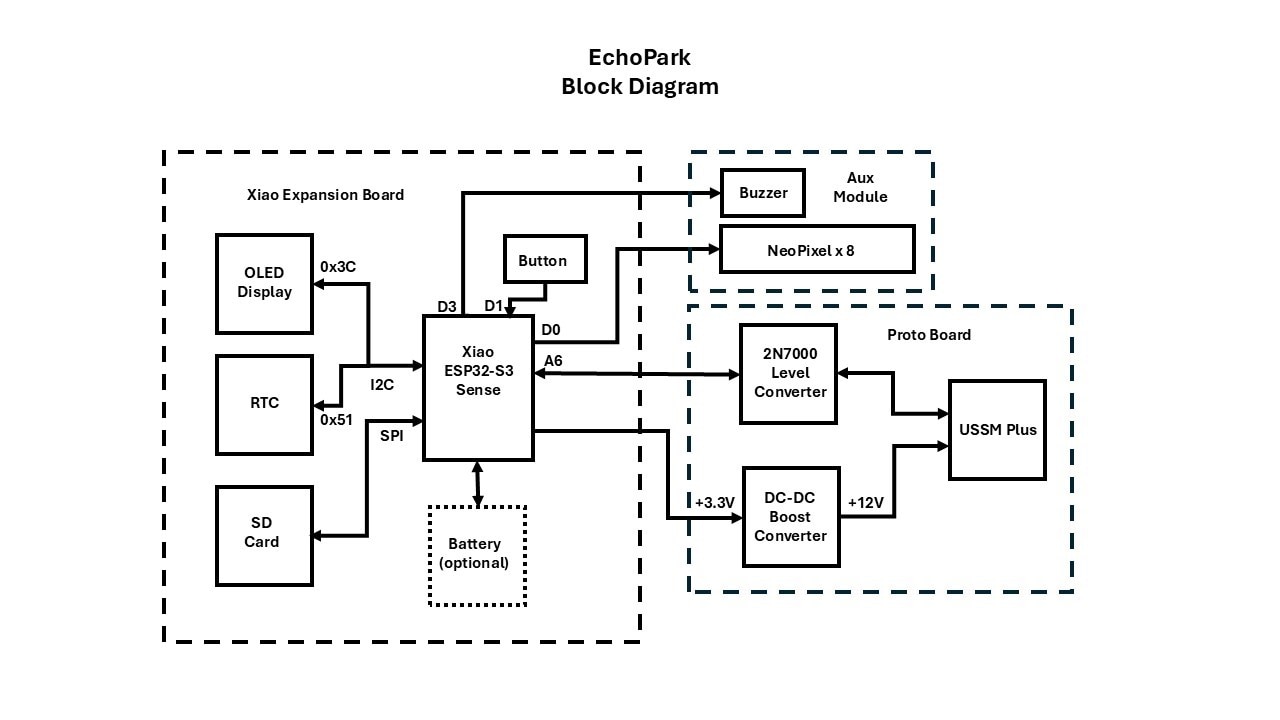
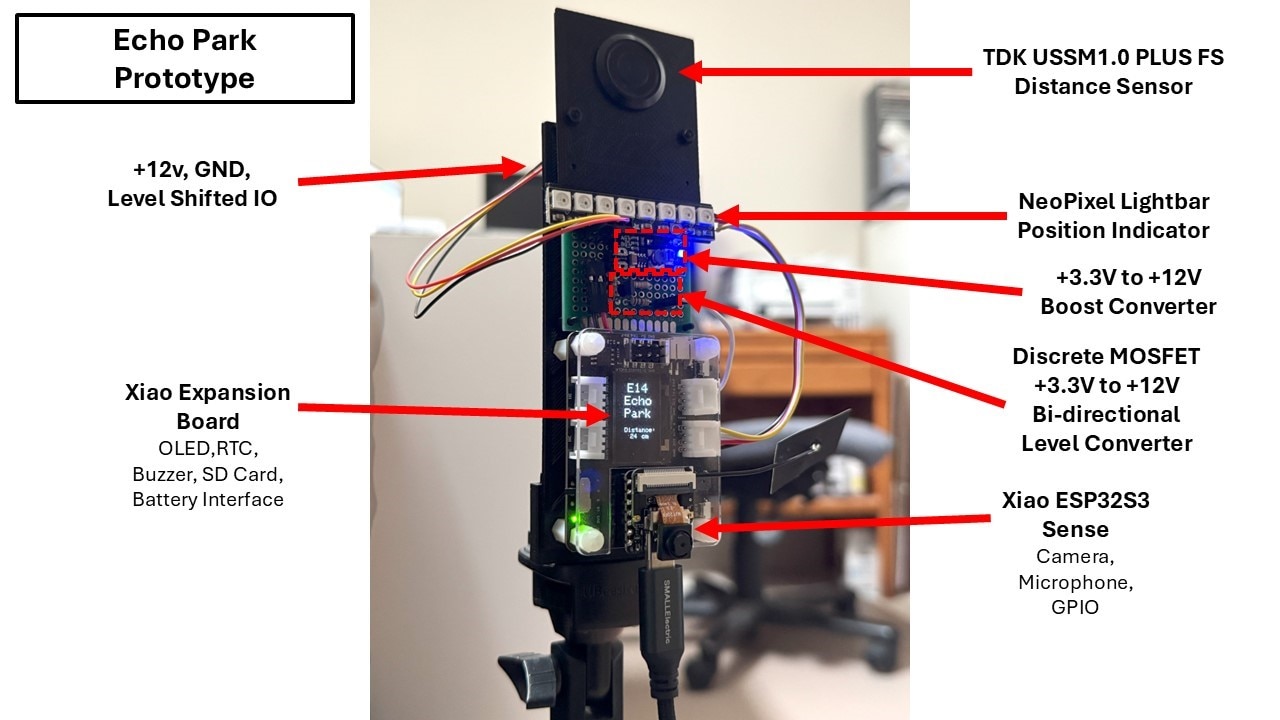
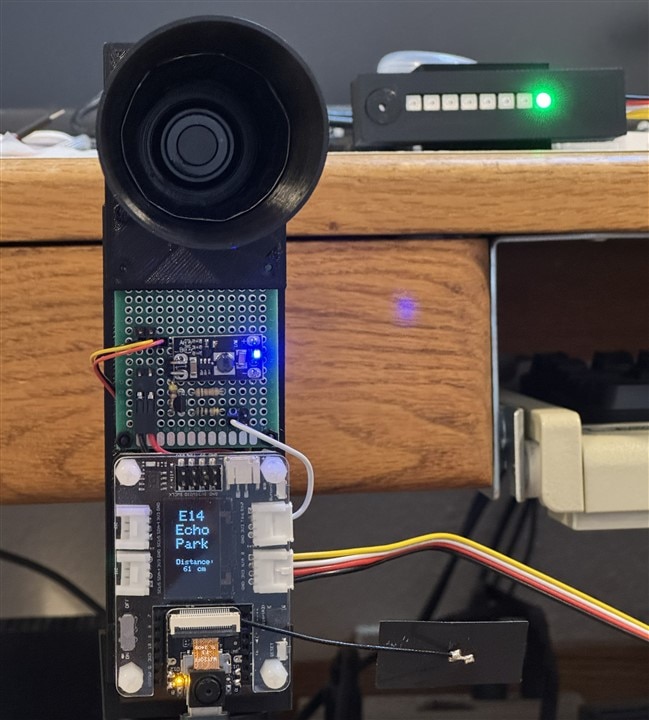
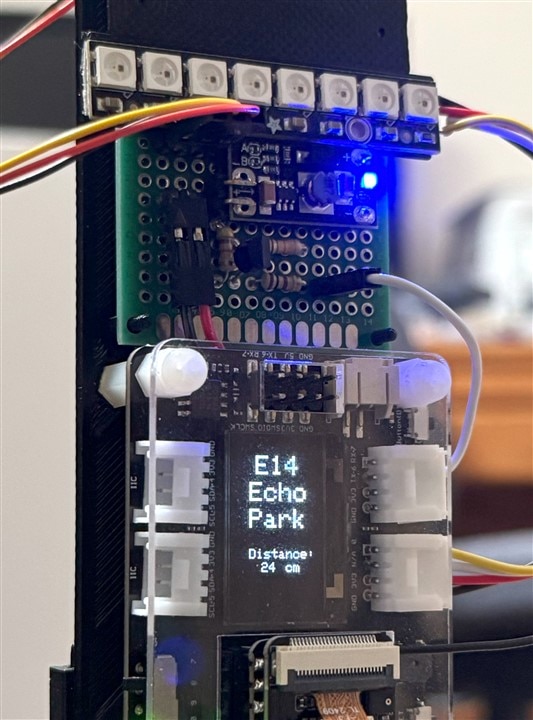
The initial operation and characterization of the sensors was done using the USSM Demo board, but the actual project uses the sensor with a standalone MCU and supporting peripherals. The Seeed Xiao ESP32-S3 Sense is the MCU. It will be mounted on a Xiao Expansion board. This configuration provides a camera, OLED display, real-time clock (RTC), Grove interfaces for external IO (RGB LEDs, Buzzer, and USSM Data), and WiFi/BLE communication in the main module which includes the Xiao Expansion Board and the USSM sensor, DC-DC converter, and IO level converter mounted on a Proto Board. I put the buzzer and NeoPixels in a separate module that is connected to the Xiao Expansion Board with a 50cm Grove cable. This allows me to have the main module in proper position for the sensor to measure the distance to the front of the vehicle and have the camera with a good view of the license plate. The buzzer and NeoPixels are mounted above to be visible and audible to the vehicle driver.
Parts List
| Component | Description | Qty | Link |
| TDK USSM1.0 PLUS-FS | ULTRASONIC SENSOR, 74.5KHZ | 1 | www.newark.com/.../82AK9947 |
| Xiao ESP32S3 Sense | Xiao ESP32S3 with OV2640 Camera | 1 | www.seeedstudio.com/Seeed-Studio-XIAO-ESP32S3-Sense-Pre-Soldered-p-6335.html |
| Xiao Expansion Board | Xiao Expansion Board with 0.96 OLED | 1 | www.seeedstudio.com/Seeeduino-XIAO-Expansion-board-p-4746.html |
| DC-DC Boost Converter | 3.3V to 12V Boost Converter | 1 | www.amazon.com/.../B08M19C7MM |
| 2N7000 MOSFET | N-Channel MOSFET 200mA 60V | 1 | |
| DC 5V Active Buzzer | Electromagnetic Buzzer 2300Hz 85dB @10cm | 1 | |
| Carbon Film Resistors | Various values 5% 1/4W | 3 | |
| NeoPixel Stick | 8 x 5050 RGB LED with Integrated Drivers | 1 | www.adafruit.com/.../1426 |
| JST SH 1.0mm pigtail | 3 Pin Male Connector with 20AWG 20cm wires | 1 |
Functional Description
- Parking - NeoPixel Display indicates range from >250cm to >75cm in 25cm steps
- Park position- NeoPixel Display flashes all pixels red and buzzer beeps when <=75cm
- Parked - NeoPixel Display and Buzzer turn off after 4 seconds <=75cm
- License Plate Recognition - after Parked the camera captures the vehicle image and posts request to Gemini for plate data
- MQTT - Parked Status and LPR data published
- Node-Red Dashboard - displays camera image, Parked Status and LPR data and Time
Prototype Hardware
Original Version
The original version of the prototype hardware is shown below.
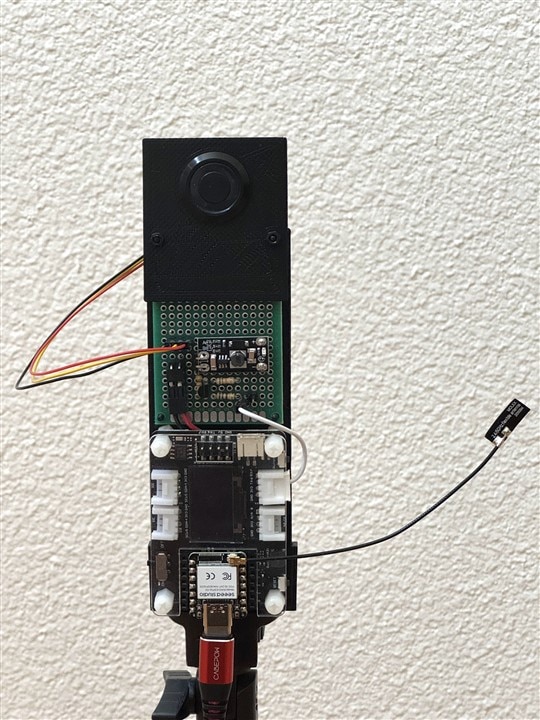
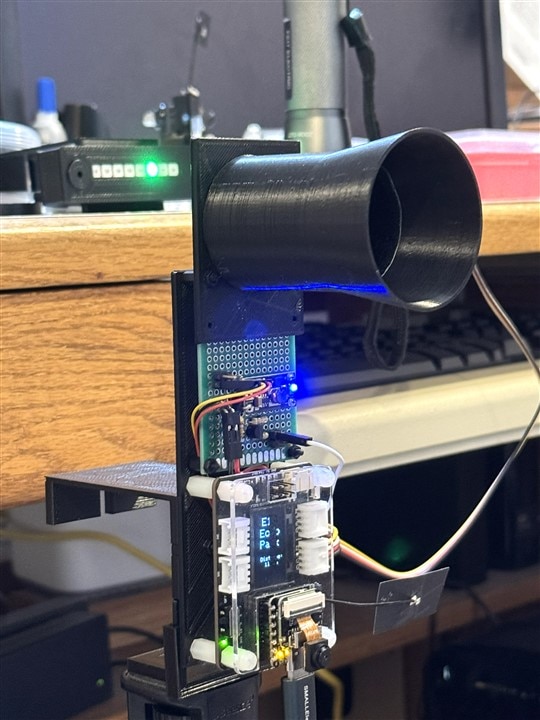
Final Version
And here is the final version with the following changes:
- The passive buzzer (driven with PWM) on the Expansion board wasn't loud enough to be heard, so I replaced it with an external active buzzer.
- The buzzer and NeoPixels are now in a separate module.
- A sound trumpet with felt lining has been added to reduce the multi-path reflections received by the USSM sensor.
IO Level Converter
The only custom circuit that was required for the project was the bi-directional level converter to translate the levels between the ESP32S3 (+3.3V) and the USSM Sensor (+12V). Since this is a single IO pin interface, I chose to build the circuit from discrete components.
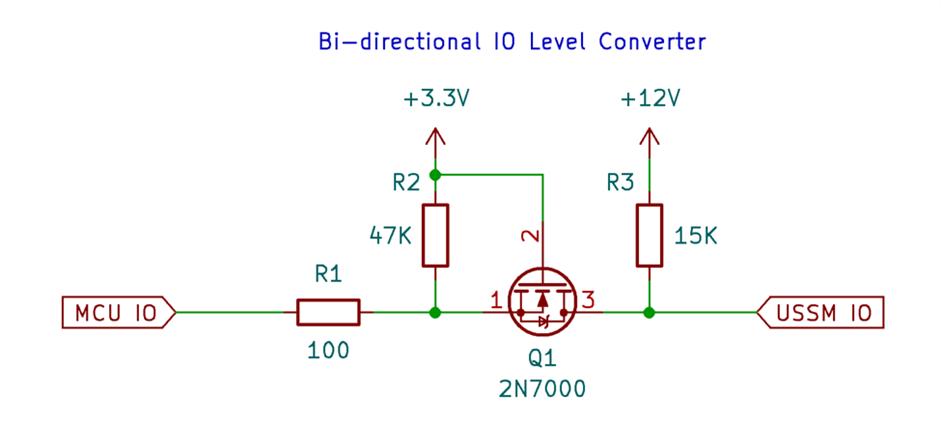
The circuit has been functioning reliably, but I learned that the +12V pullup resistor value which I got from the documentation expected an additional 10K resistor in parallel in the sensor cable. As part of the project cleanup I decided to look at the signals on the scope.
Here is a scope capture of SEND_A transaction with the timebase at 500us/div. The top trace is the +3.3V side and the bottom trace is the +12V side.
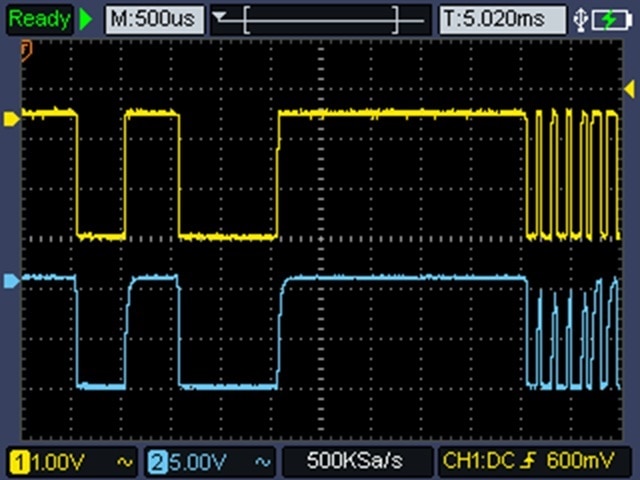
And a more zoomed in view of the data transitions at 50us/div.
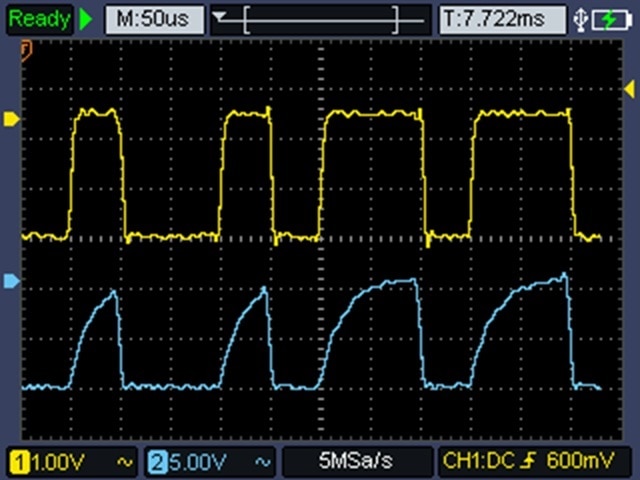
It is clear that I should have a stiffer pullup, but I did not want to risk damaging the circuit so close to finishing the operational documentation for the challenge - so I am going to add a parallel 10K pullup later.
The signals are cleanly making switching thresholds, but I'm not sure how timing margin is available with the added rising edge delay.
Prototype Software
Parking Distance
I used the USSM Arduino Library to initialize the sensor and perform the distance measurement. I initially had issues with a conflict between the USSM library and the ESP32 board library (which I'll discuss in the summary), but once I got past that everything was pretty straightforward. Just had to add a few lines to the code:
- #include <TDK_USSM.h> // include library
- TDK_USSM tdkUssm(D6); // instantiate object and configures the communications pin
- int rawDistance = tdkUssm.GetDistanceCm(); // first command establishes the communication interface, in this case just measure the distance in centimeters
I found it interesting there was no requirement for a begin() or init() function call that I'm accustomed to using for serial interfaces.
Distance Visual Feedback
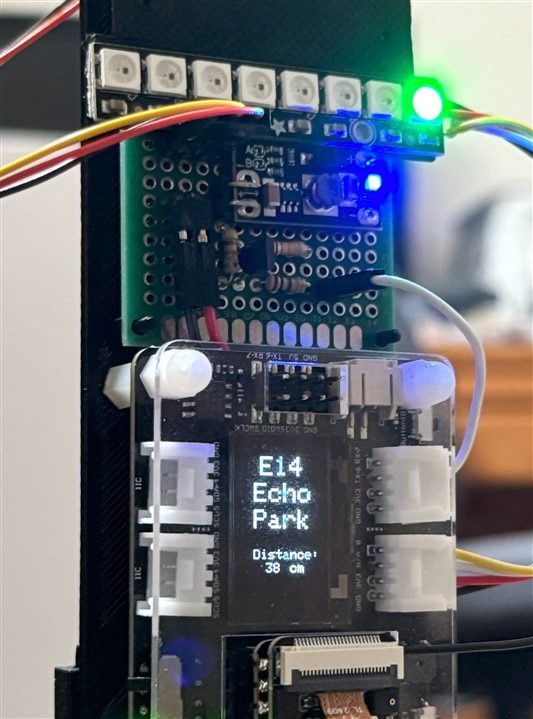
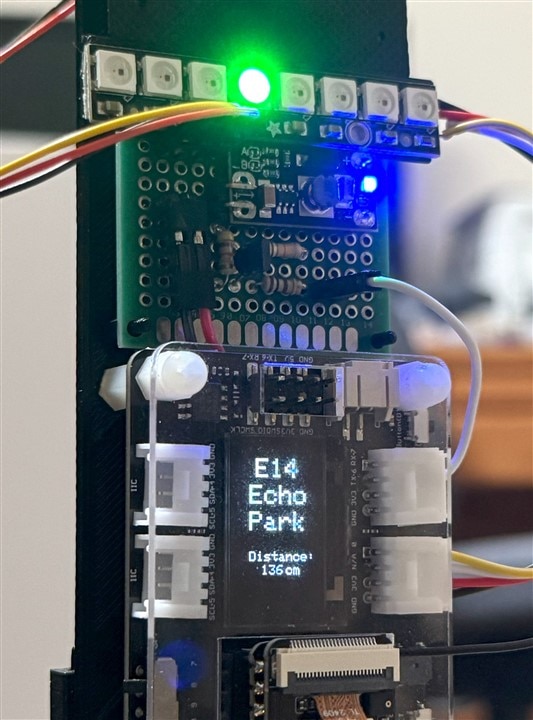
I am using an 8 NeoPixel strip for visual distance feedback that covers my parking zone. Each pixel represents a 25cm bucket that covers a range from 250cm to 75cm. The leftmost pixel is the furthest range.
Below is my first implementation where my range was 200cm to 25cm. Less than 25cm and all pixels were out.
My current implementation(final?) blinks all pixels red for about 4 seconds when the distance stays in the correct parked position (<75cm). It also sounds the buzzer for that period. I set a parkedFlag that is reset when the distance moves out of range. I forgot to do that initially and the alarm went off whenever I walked in front of the sensor. The correct implementation is shown in the final project video.
License Plate Recognition
I had not originally intended to do license plate recognition as part of the project, but I saw a project on Hackster that used an ESP32 and the Gemini API for LPR which looked easy to implement since I am using a Xiao ESP32S3 Sense which has a camera and WiFi (project link is in References).
Here is the basic flow that I implemented:
- Capture QVGA Image using OV2640 sensor on Xiao ESP32S3
- Encode image into Base64 format
- Send image via MQTT to Node-Red for display
- Send an HTTP request (with encoded image) to Gemini Vision API to detect and extract the license plate characters
- Send JSON doc with timestamp and license plate data via MQTT to Node-Red for display
- Send Status (Parked/Unparked) via MQTT to Node-Red for display
I have 3 different trigger modes to initiate image capture and LPR:
- Capture button on Node-Red display that sends request via MQTT
- Local user pushbutton on the Xiao Expansion board
- New Parked Status indication from the distance measurement routine
I wrote a standalone program to test the LPR (did not include the USSM Sensor).
Here is the Serial Monitor output showing the program flow:
- WiFi connect
- Camera initialization
- Sync RTC
- Connect MQTT
- MQTT request image capture
- Capture image
- MQTT Publish Image
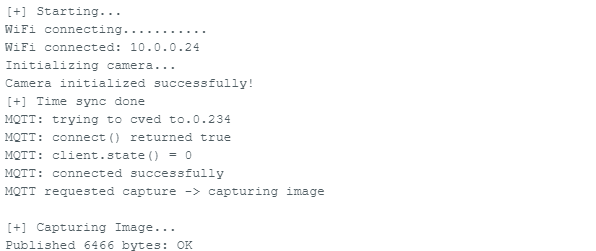
- Send data to Gemini
- Gemini response
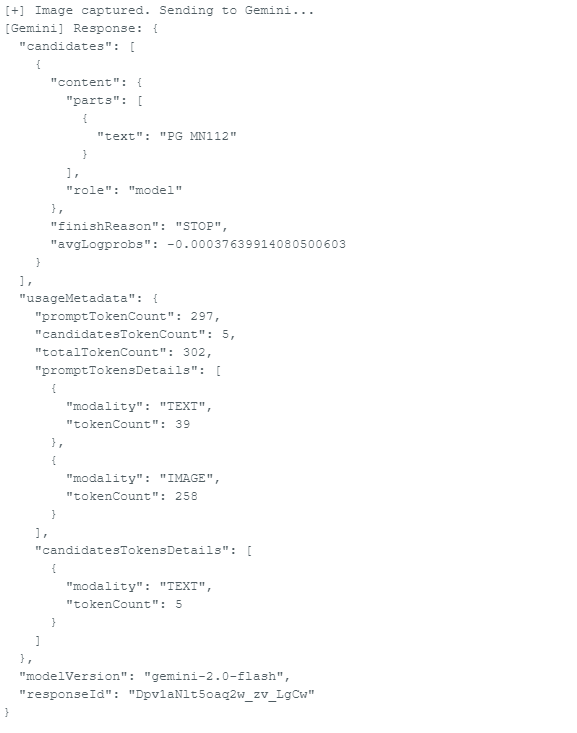
- Parsed data
- MQTT Publish Time and PlateNumber

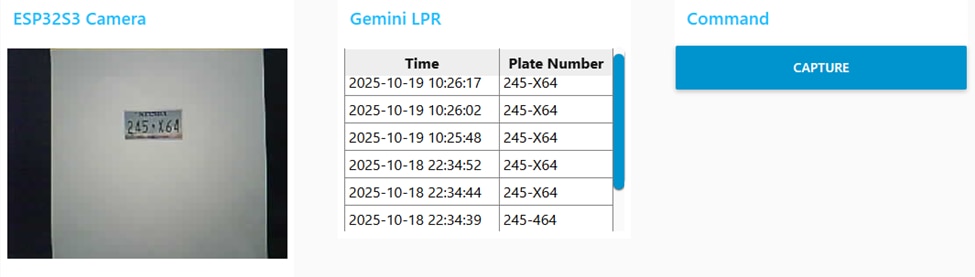
Node-Red Dashboard for LPR
There are 3 groups on the dashboard:
- ESP32S3 Camera - displays the last captured image
- Gemini LPR - displays up to the last 10 plate data responses from Gemini, latest is on top
- Command - Capture button to send capture request
Video demonstrating LPR dashboard operation:
- Images are various sizes of license plate images downloaded from the Internet
- Initially you will see stale data in the Gemini table
- The mouse pointer will move over the Capture button to select it
- The image will update immediately
- The Gemini table will update after the the Gemini response which gives a sense of the processing time
- All images in this test are printed on white paper
Project Node-Red Dashboard
This is the project dashboard updated to incorporate the parking status indicator.
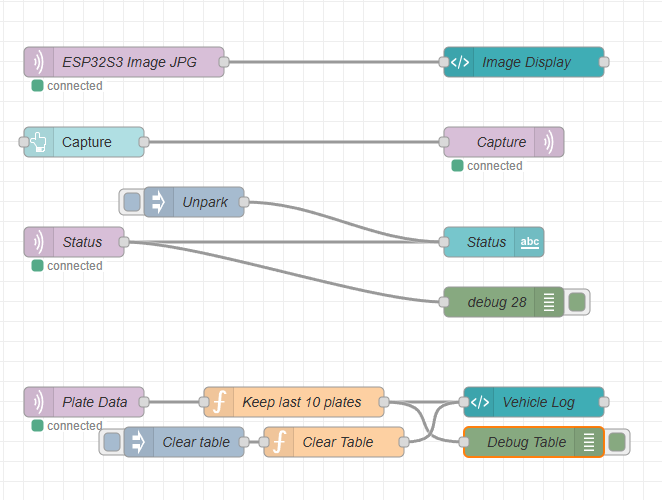
Node-Red Flow Diagram
- Receive Image Data and display on dashboard
- Send Capture request when dashboard button is pushed
- Receive Parking Status and display on dashboard
- Receive Time and Plate Number and display on dashboard table
Short video showing the dashboard updating as the vehicle is parking. When the parkedFlag is set, the Status will change from Unparked to Parked and the image will update. After the Gemini response time the License Plate table will update.
Unfortunately, it's hard to see when the image updates because the previous image was essentially the same. Since this is not a live image feed, I leave the last image captured on the dashboard. It might make sense to update the image when the parkedFlag is reset (vehicle leaves). I'll update that in the next version.
Project Demonstration
So, here's the almost final project shown working in my garage. I say almost because I'm sure I'll be tweaking it for a while and I also want to make a sturdier enclosure for the sensor module.
The video shows the green NeoPixel moving to the right as the distance decreases and then all NeoPixels flashing red and the buzzer beeping when the parking position is reached. The alarm stops after the vehicle is parked for 4-5 seconds. The process resets when the vehicle pulls out.
Summary
Another fun Design Challenge. Thanks to E14 for providing the Sensor Kit.
This challenge was much more difficult than I expected due to issues with the sensor software and documentation.
Issues
- Library conflicts between the USSM Arduino library and the ESP32 board library. I first encountered the problem when I tried to compile a program using the latest USSM library (1.0.2) and the latest ESP32 board library (3.3.3). This resulted in compilation errors due to the redeclaration of the reserved keyword "STATUS". I switched to using a 3.0.2 version of the ESP32 library that was released in the same timeframe as the USSM library and that compiled and produced a working program. However, when I was working on the LPR program that required using a secure certificate with Gemini, I ran into an issue with DNS resolving an ipV6 DNS address. I traced that to the ESP32 library and verified that issue did not exist with the 3.3.3 version. Using a binary search I was able to determine that version 3.0.5 was the latest library that would fix the DNS issue and still work with the USSM library and that's the combination that I used for the project. An alternative approach would have been to edit a couple of lines in the tdk_ussm_config.h file to redefine "STATUS", but not having knowledge of the library I was concerned about any unintended consequences. I did verify that I could compile and run the program at that point with those edits, but elected not to do it unless I encountered other problems with the 3.0.5 version of the ESP32 library.
- No accessible repository of current or prior versions of TDK USSM programs or documentation. The only way that I have found to obtain the USSM software and documentation is using links on the TDK website and those links are only available to download the latest versions. The reason this issue came up is that the 2024 Demo Kit Reference manual refers to the previous version of the Demo GUI which required setup using a Windows installer. That version appears to be no longer available. The 2024 User Interface User Guide does describe the latest GUI version that is just an executable that does not need to be installed. Just had me confused for a bit. I would have actually preferred the old interface as it uses a more standard Windows interface. It lacks the new Machine Learning functionality, but I'm not using that.
- No user support forum. I was surprised that TDK does not have a product support forum. I submitted a request for support using their contact form, but never got a response.
Overall impression
The USSM1.0 Plus-FS sensor is a highly capable and configurable sensor that has far more features than I required for my project. That being said, I am still figuring out how to properly configure it. I'll be interested to see if other challengers use the multi-target and masking capabilities. Maybe someone will use the Machine Learning.
There is a lot of documentation available for the sensor, maybe too much and somewhat confusing. I wish that the documentation had been better organized and fully updated. Somewhat frustrating trying to find information, but everything that I needed was somewhere in the documentation. I found that the Arduino USSM library examples and the elmos ASIC specification proved to be the most useful. The Demo kit board and GUI were easy to use and provided good operational insight and allowed for quick sensor characterization. Implementing the code on the ESP32S3 was a struggle until I figured out some of the quirks in the USSM Arduino library and example.
My project has met my planned objectives. More work is needed to put it into everyday service and I'll need to see what my wife thinks...
Code
Echo_Park_LPR_v1.ino
/*
* Echo Park Ultrasonic Parking Assistant
* with License Plate Recognition
* Version 1.0
* 11/07/25   Ralph Yamamoto
*/
// Include Necessary Libraries
#include <Arduino.h>
#include <TDK_USSM.h>
#include <movingAvg.h>
#include <RunningMedian.h> // Correct library for median filtering
#include <Adafruit_NeoPixel.h>
#include <Adafruit_GFX.h>
#include <Adafruit_SSD1306.h>
#include "Wire.h"
#include "Echo_Park.h"
#include <WiFi.h>
#include <HTTPClient.h>
#define MQTT_MAX_PACKET_SIZE 1024
#include <PubSubClient.h>
#include <ArduinoJson.h>
#include "arduino_secrets.h"
#include "esp_camera.h"
#include "time.h"
#include "base64.h"   // from Arduino base64 library


#define NPIN        D0 // The data pin the NeoPixel is connected to
#define NUMPIXELS 8 // Number of NeoPixels in your strip
Adafruit_NeoPixel strip(NUMPIXELS, NPIN, NEO_GRB + NEO_KHZ800);

#define SCREEN_WIDTH 128 // OLED display width, in pixels
#define SCREEN_HEIGHT 64 // OLED display height, in pixels

// Declaration for an SSD1306 display connected to I2C (SDA, SCL pins)
#define OLED_RESET     -1 // Reset pin # (or -1 if sharing Arduino reset pin)
#define SCREEN_ADDRESS 0x3C // For Xiao Expansion OLED
Adafruit_SSD1306 display(SCREEN_WIDTH, SCREEN_HEIGHT, &Wire, OLED_RESET);

// Sensor pin definitions
TDK_USSM tdkUssm(D6);

// Filter window sizes
const int medianWindowSize = 10;
const int averageWindowSize = 10;

// Initialize the filters
RunningMedian medianFilter = RunningMedian(medianWindowSize);
movingAvg averageFilter(averageWindowSize);

// Buzzer pin
const int bPin = D3;

// LED pin (using the built-in LED)
const int ledPin = LED_BUILTIN;
unsigned long previousBlinkTime = 0;
int blinkInterval = 0;

bool parkedFlag = false;
int parkedCount = 0;

const int buttonPin = D1;  // D1
volatile bool captureRequested = false; // set by mqtt callback (atomic-ish)
volatile bool mqttConnected = false;

#define CAMERA_MODEL_XIAO_ESP32S3 // Has PSRAM

// Pin definitions for XIAO_ESP32S3_Sense (OV2640)
#define PWDN_GPIO_NUM     -1
#define RESET_GPIO_NUM    -1
#define XCLK_GPIO_NUM     10
#define SIOD_GPIO_NUM     40
#define SIOC_GPIO_NUM     39

#define Y9_GPIO_NUM       48
#define Y8_GPIO_NUM       11
#define Y7_GPIO_NUM       12
#define Y6_GPIO_NUM       14
#define Y5_GPIO_NUM       16
#define Y4_GPIO_NUM       18
#define Y3_GPIO_NUM       17
#define Y2_GPIO_NUM       15
#define VSYNC_GPIO_NUM    38
#define HREF_GPIO_NUM     47
#define PCLK_GPIO_NUM     13

#define LED_GPIO_NUM      21

// ======= CONFIGURATION =======

// WiFi Credentials
//const char* ssid = "xxxxxxxx";
//const char* password = "xxxxxxxx";

// ---- MQTT ----
//const char* mqtt_server = "x.x.x.x";   // IP of your broker
//const int   mqtt_port   = 1883;
const char* mqtt_topic  = "esp32s3/camera/image";

WiFiClient espClient;
PubSubClient client(espClient);

// --- forward declares for your functions ---
void detectNumberPlate();   // your existing LPR function

// --- MQTT callback: do minimal work here! ---
void mqttCallback(char* topic, byte* payload, unsigned int length) {
  // convert payload to simple string small and quickly
  if (length == 7 && strncmp(topic, "esp32s3/camera/cmd", 19) == 0) {
    // compare payload to "capture" quickly
    if (length == 7) {
      bool match = true;
      const char target[] = "capture";
      for (unsigned int i = 0; i < 7; ++i) {
        if ((char)payload[i] != target[i]) { match = false; break; }
      }
      if (match) {
        captureRequested = true; // signal main loop
      }
    }
  }
}

// --- mqtt task (runs on core 0) ---
void mqttTask(void * pvParameters) {
  (void) pvParameters;

  client.setServer(mqtt_server, mqtt_port);
  client.setCallback(mqttCallback);

  unsigned long lastReconnectAttempt = 0;

  for (;;) {
    if (!client.connected()) {
        unsigned long now = millis();
        if (now - lastReconnectAttempt > 5000) { // attempt every 5s
            lastReconnectAttempt = now;

            Serial.printf("MQTT: trying to connect to %s:%u\n", mqtt_server, mqtt_port);

            if (WiFi.status() != WL_CONNECTED) {
            Serial.println("MQTT: WiFi not connected yet");
            continue;
            }

            IPAddress brokerIP;
            if (!WiFi.hostByName(mqtt_server, brokerIP)) {
            Serial.println("MQTT: DNS lookup failed");
            continue;
            } else {
            Serial.print("MQTT: broker IP resolved to ");
            Serial.println(brokerIP);
            }

            bool result = client.connect("ESP32S3Camera");
            Serial.printf("MQTT: connect() returned %s\n", result ? "true" : "false");
            Serial.printf("MQTT: client.state() = %d\n", client.state());

            if (result) {
            Serial.println("MQTT: connected successfully");
            client.subscribe("esp32s3/camera/cmd");
            mqttConnected = true;
            } else {
            Serial.println("MQTT: connection failed, will retry");
            mqttConnected = false;
            }
        }

    } else {
      // keep client loop running frequently (non-blocking within this task)
      client.loop();
      // small delay to yield the task and avoid pegging CPU
      vTaskDelay(pdMS_TO_TICKS(10));
    }
  }
}

// Gemini AI API Key
//const char* GEMINI_API_KEY = "xxxxxxxxxxxx";

// NTP Time
const char* ntpServer = "23.186.168.129";
const long gmtOffset_sec = -25200;
const int daylightOffset_sec = 3600;

// ======= BASE64 ENCODING =======
const char base64_table[] = "ABCDEFGHIJKLMNOPQRSTUVWXYZabcdefghijklmnopqrstuvwxyz0123456789+/";
String base64_encode(const uint8_t* data, size_t length) {
    String encoded = "";
    int i = 0;
    uint8_t array_3[3], array_4[4];

    while (length--) {
        array_3[i++] = *(data++);
        if (i == 3) {
            array_4[0] = (array_3[0] & 0xfc) >> 2;
            array_4[1] = ((array_3[0] & 0x03) << 4) + ((array_3[1] & 0xf0) >> 4);
            array_4[2] = ((array_3[1] & 0x0f) << 2) + ((array_3[2] & 0xc0) >> 6);
            array_4[3] = array_3[2] & 0x3f;

            for (i = 0; i < 4; i++)
                encoded += base64_table[array_4[i]];
            i = 0;
        }
    }

    if (i) {
        for (int j = i; j < 3; j++)
            array_3[j] = '\0';

        array_4[0] = (array_3[0] & 0xfc) >> 2;
        array_4[1] = ((array_3[0] & 0x03) << 4) + ((array_3[1] & 0xf0) >> 4);
        array_4[2] = ((array_3[1] & 0x0f) << 2) + ((array_3[2] & 0xc0) >> 6);
        array_4[3] = array_3[2] & 0x3f;

        for (int j = 0; j < i + 1; j++)
            encoded += base64_table[array_4[j]];

        while ((i++ < 3))
            encoded += '=';
    }

    return encoded;
}

// ======= GET DATE AND TIME =======
String getCurrentTime() {
    struct tm timeinfo;
    if (!getLocalTime(&timeinfo)) {
        return "Time Error";
    }
    char buffer[30];
    strftime(buffer, sizeof(buffer), "%Y-%m-%d %H:%M:%S", &timeinfo);
    return String(buffer);
}


// ======= DETECT LICENSE PLATE =======
void detectNumberPlate() {
    Serial.println("\n[+] Capturing Image...");
    camera_fb_t* fb = esp_camera_fb_get();
    if (!fb) {
        Serial.println("[-] Capture failed");
        return;
    }

    const char* topic = "esp32s3/camera/image";

    // Use PubSubClient's binary publish:
    bool ok = client.publish(topic, fb->buf, fb->len);
    Serial.printf("Published %u bytes: %s\n", fb->len, ok ? "OK" : "FAIL");

    String base64Image = base64_encode(fb->buf, fb->len);
    esp_camera_fb_return(fb);

    Serial.println("[+] Image captured. Sending to Gemini...");

    HTTPClient http;
    String url = "https://generativelanguage.googleapis.com/v1beta/models/gemini-2.0-flash:generateContent?key=" + String(GEMINI_API_KEY);
    http.begin(url);
    http.addHeader("Content-Type", "application/json");

    String payload = "{\"contents\":[{\"parts\":[";
    payload += "{\"inline_data\":{\"mime_type\":\"image/jpeg\",\"data\":\"" + base64Image + "\"}},";
    payload += "{\"text\":\"Detect and extract the vehicle number plate text from this image. If a number plate is present, return only the plate number in plain text. If no plate is found, return 'No Plate'.\"}";
    payload += "]}]}";

    int httpCode = http.POST(payload);
    if (httpCode > 0) {
        String response = http.getString();
        Serial.println("[Gemini] Response: " + response);

        DynamicJsonDocument doc(4096);
        DeserializationError error = deserializeJson(doc, response);
        if (error) {
            Serial.println("[-] JSON Parse Error: " + String(error.c_str()));
            return;
        }

        const char* aiText = doc["candidates"][0]["content"]["parts"][0]["text"];
        String plateNumber = String(aiText);

        // === Validate Number Plate ===
        String lower = plateNumber;
        lower.toLowerCase();
        plateNumber.trim();
        plateNumber.replace("\"", "");

        bool isValidPlate = (
            aiText &&
            plateNumber.length() >= 3 &&
            plateNumber.length() <= 15 &&
            lower.indexOf("no plate") == -1 &&
            lower.indexOf("i'm afraid") == -1 &&
            lower.indexOf("sorry") == -1 &&
            lower.indexOf("cannot") == -1
        );

        String dateTime = getCurrentTime();

        if (!isValidPlate) {
            Serial.println("[!] No valid number plate detected");
        //    return;
        } else {
        //String dateTime = getCurrentTime();
        Serial.println("\n======= License Plate Detected =======");
        Serial.println("🕒 Date and Time     : " + dateTime);
        Serial.println("🔢 Licence Plate No. : " + plateNumber);
        Serial.println("======================================");
        }

        // Create JSON object
        StaticJsonDocument<256> platedoc;
        if (!isValidPlate) {
            platedoc["Time"] = dateTime;
            platedoc["PlateNumber"] = "Invalid";
        } else {
            platedoc["Time"] = dateTime;
            platedoc["PlateNumber"] = plateNumber;
        }

        char jsonBuffer[256];
        serializeJson(platedoc, jsonBuffer);

        // Publish JSON
        //client.publish("esp32s3/platenumber", jsonBuffer);

        Serial.print("Publishing: ");
        Serial.println(jsonBuffer);
        bool ok = client.publish("esp32s3/platenumber", jsonBuffer);
        Serial.println(ok ? "Success" : "Failed");


    } else {
        Serial.println("[-] HTTP Request Failed: " + String(httpCode));
    }

    http.end();
}

void setupCamera() {
    Serial.println("Initializing camera...");

    camera_config_t config;
    config.ledc_channel = LEDC_CHANNEL_0;
    config.ledc_timer   = LEDC_TIMER_0;
    config.pin_d0       = Y2_GPIO_NUM;
    config.pin_d1       = Y3_GPIO_NUM;
    config.pin_d2       = Y4_GPIO_NUM;
    config.pin_d3       = Y5_GPIO_NUM;
    config.pin_d4       = Y6_GPIO_NUM;
    config.pin_d5       = Y7_GPIO_NUM;
    config.pin_d6       = Y8_GPIO_NUM;
    config.pin_d7       = Y9_GPIO_NUM;
    config.pin_xclk     = XCLK_GPIO_NUM;
    config.pin_pclk     = PCLK_GPIO_NUM;
    config.pin_vsync    = VSYNC_GPIO_NUM;
    config.pin_href     = HREF_GPIO_NUM;
    config.pin_sccb_sda = SIOD_GPIO_NUM;
    config.pin_sccb_scl = SIOC_GPIO_NUM;
    config.pin_pwdn     = PWDN_GPIO_NUM;
    config.pin_reset    = RESET_GPIO_NUM;
    config.xclk_freq_hz = 20000000;
    config.pixel_format = PIXFORMAT_JPEG;  // Only for testing capture
    config.frame_size   = FRAMESIZE_QVGA;  // 320x240
    config.jpeg_quality = 15;
    config.fb_count     = 2;
    config.fb_location  = psramFound() ? CAMERA_FB_IN_PSRAM : CAMERA_FB_IN_DRAM;
    config.grab_mode    = CAMERA_GRAB_LATEST;

    esp_err_t err = esp_camera_init(&config);
    if (err != ESP_OK) {
    Serial.printf("Camera init failed! Error: 0x%x\n", err);
    return;
    }

    Serial.println("Camera initialized successfully!");

    // Optional sensor tweaks
    sensor_t *s = esp_camera_sensor_get();
    if (s->id.PID == OV2640_PID) {
        s->set_vflip(s, 1);
        s->set_hmirror(s, 1);
        s->set_brightness(s, 1);
        s->set_saturation(s, -2);
    }
}

void reconnect() {
  while (!client.connected()) {
    if (client.connect("ESP32S3Camera")) break;
    delay(2000);
  }
}


// ======= SETUP =======
void setup() {
    Serial.begin(115200);
    delay(100);
    Serial.println("\n[+] Starting...");

    pinMode(buttonPin, INPUT_PULLUP);

    // connect WiFi
    WiFi.mode(WIFI_STA);
    WiFi.begin(ssid, password);
    Serial.print("WiFi connecting");
    while (WiFi.status() != WL_CONNECTED) {
        Serial.print(".");
        delay(250);
    }
    Serial.println("\nWiFi connected: " + String(WiFi.localIP().toString()));

    setupCamera();
    client.setServer(mqtt_server, mqtt_port);

    client.setBufferSize(8192);

    configTime(gmtOffset_sec, daylightOffset_sec, ntpServer);
    Serial.println("[+] Time sync done");

    // start the mqttTask on core 0; keep main on core1 (default)
    xTaskCreatePinnedToCore(
        mqttTask,          // task function
        "mqttTask",        // name
        4096,              // stack size (adjust up if needed)
        NULL,              // pvParameters
        1,                 // priority
        NULL,              // task handle
        0                  // run on core 0
    );

      pinMode(bPin, OUTPUT);

  strip.begin();           // INITIALIZE NeoPixel strip object (REQUIRED)
  strip.setBrightness(30);  // range is 0–255, lower = dimmer
  strip.show();            // Turn all pixels off

  pinMode(ledPin, OUTPUT);
  averageFilter.begin(); // Initialize the moving average filter

  Serial.println("TDK USSM Parking Assist (Combined Filters) Started");

    // SSD1306_SWITCHCAPVCC = generate display voltage from 3.3V internally
  if(!display.begin(SSD1306_SWITCHCAPVCC, SCREEN_ADDRESS)) { // Address 0x3C for 128x64
    Serial.println(F("SSD1306 allocation failed"));
    for(;;); // Don't proceed, loop forever
  }
  Serial.println("Display ready");
  setupOLED();


}


// --- main loop (core 1) ---
void loop() {
  long lastMsg = 0;
  uint32_t Now = millis();
  static bool lastState = HIGH;
  bool currentState = digitalRead(buttonPin);

  // edge detect for local button
  if (lastState == HIGH && currentState == LOW) {
    Serial.println("Local button pressed -> capturing image");
    // calls LPR function directly
    detectNumberPlate();
  }
  lastState = currentState;

  // handle capture requests from MQTT (triggered by mqttCallback)
  if (captureRequested) {
    captureRequested = false; // clear flag asap
    Serial.println("MQTT requested capture -> capturing image");
    detectNumberPlate();  // perform capture + upload
  }

  int rawDistance = tdkUssm.GetDistanceCm();

    // Add the raw reading to the median filter
  medianFilter.add(rawDistance);

  // Get the median value, which will have outliers removed
  int medianFilteredDistance = medianFilter.getMedian();

  // Apply the moving average filter to the result
  int combinedFilteredDistance = averageFilter.reading(medianFilteredDistance);

  long now = millis();
  if (now - lastMsg > 2000) {
    lastMsg = now;
    if (combinedFilteredDistance > 100){
      bool ok = client.publish("esp32s3/status", "Not Parked");
      //Serial.println(ok ? "Success" : "Failed");
    }

  }

  //Serial.print(combinedFilteredDistance);  // TMI
  //Serial.println("cm");
  setNeoPixel(combinedFilteredDistance);

  updateOLED(combinedFilteredDistance);

  // keep main loop responsive; don't block for long here
  delay(10);
}
Echo_park.h
#ifndef ECHO_PARK_H
#define ECHO_PARK_H

#include <Arduino.h>
#include <PubSubClient.h>
#include <Adafruit_NeoPixel.h>
#include <Adafruit_GFX.h>
#include <Adafruit_SSD1306.h>

// These are defined in the main .ino file
extern Adafruit_NeoPixel strip;
extern Adafruit_SSD1306 display;
extern PubSubClient client;

extern void detectNumberPlate();
extern bool parkedFlag;
extern int parkedCount;
extern const int bPin;
extern const int ledPin;

// Function declarations
//void controlLED(int distance);
void setNeoPixel(int distance);
void alarmBeep(int delayB);
void setupOLED();
void updateOLED(int distance);

#endif  // ECHO_PARK_H
Echo_Park.cpp
#include "Echo_Park.h"

void setupOLED() {
  display.clearDisplay();
  display.setRotation(1);
  display.setTextSize(2);               // pixel scale
  display.setTextColor(SSD1306_WHITE);  // Draw white text
  display.setCursor(15,10);               // Start at top-left corner
  display.println(F("E14"));
  display.setCursor(10,30);               // Start at top-left corner
  display.println(F("Echo"));
  display.setCursor(10,50);               // Start at top-left corner
  display.println(F("Park"));
  display.setTextSize(1);
  display.setCursor(10,80);               // Start at top-left corner
  display.println(F("Distance:"));
  display.display();
}

void updateOLED(int distance) {
  display.fillRect(20, 90, 20, 40, SSD1306_BLACK); // Fill rectangle with background color
  display.setTextColor(SSD1306_WHITE);  // Draw white text
  display.setTextSize(1);
  display.setCursor(20,90);               // Start at top-left corner
  display.println(distance);
  display.setCursor(40,90);               // Start at top-left corner
  display.println("cm");
  display.display();
}

void setNeoPixel(int distance) {
  int pixelIndex = 0; // which pixel to light

  // Example thresholds: 25, 50, 75, 100, 125, 150, 175, 200
  if (distance > 250) pixelIndex = 8;
  else if (distance > 225) pixelIndex = 7;
  else if (distance > 200) pixelIndex = 6;
  else if (distance > 175) pixelIndex = 5;
  else if (distance > 150)  pixelIndex = 4;
  else if (distance > 125)  pixelIndex = 3;
  else if (distance > 100)  pixelIndex = 2;
  else if (distance > 75)  pixelIndex = 1;
  else pixelIndex = 0;

  strip.clear();
  if (pixelIndex != 0) {
    strip.setPixelColor(pixelIndex - 1, strip.Color(0, 255, 0)); // green
    strip.show();
    parkedFlag = false;
    parkedCount = 0;
  }
  else
  {
    // strip.show();
    alarmBeep(200);
    parkedCount++;

    }

}

void alarmBeep(int delayB) {
  if (parkedFlag) return;
  if (parkedCount <= 10) {
    digitalWrite(bPin, HIGH); // Turns the buzzer on
    strip.fill(strip.Color(255, 0, 0));
    strip.show();
    delay(delayB);                    // Keeps it on for 1 second
    digitalWrite(bPin, LOW);  // Turns the buzzer off
    strip.clear();
    strip.show();
    delay(delayB);
  } else {
    strip.clear();
    strip.show();
    parkedFlag = true;
    delay(2000);
    if (parkedCount == 11) {
      Serial.println("Parked");
      bool ok = client.publish("esp32s3/status", "Parked");
      Serial.println(ok ? "Success" : "Failed");
      detectNumberPlate();
    }
  }

}
References
Forum Posts
- Echo Park – Ultrasonic Parking Assistant Post 1
- Echo Park – Sensor Characterization Setup Post 2
- Echo Park – Hardware Design Post 3
- Echo Park – License Plate Recognition Post 4
- Echo Park – Sound tube and Hardware Cleanup Post 5
TDK Documentation
- Ultrasonic Sensor Module
- USSM1.0 PLUS-FS
- Demo Kit Quick Start
- Demo Kit Reference Manual
- Demo Kit Software
- USSM Arduino Uno Setup Guide
- USSM Arduino Library
- elmos IC E524.33