element14 Community
element14 Community
    Register Log In
  • Site
  • Search
  • Log In Register
  • About Us
  • Community Hub
    Community Hub
    • What's New on element14
    • Feedback and Support
    • Benefits of Membership
    • Personal Blogs
    • Members Area
    • Achievement Levels
  • Learn
    Learn
    • Ask an Expert
    • eBooks
    • element14 presents
    • Learning Center
    • Tech Spotlight
    • STEM Academy
    • Webinars, Training and Events
    • Learning Groups
  • Technologies
    Technologies
    • 3D Printing
    • FPGA
    • Industrial Automation
    • Internet of Things
    • Power & Energy
    • Sensors
    • Technology Groups
  • Challenges & Projects
    Challenges & Projects
    • Design Challenges
    • element14 presents Projects
    • Project14
    • Arduino Projects
    • Raspberry Pi Projects
    • Project Groups
  • Products
    Products
    • Arduino
    • Avnet Boards Community
    • Dev Tools
    • Manufacturers
    • Multicomp Pro
    • Product Groups
    • Raspberry Pi
    • RoadTests & Reviews
  • Store
    Store
    • Visit Your Store
    • Choose another store...
      • Europe
      •  Austria (German)
      •  Belgium (Dutch, French)
      •  Bulgaria (Bulgarian)
      •  Czech Republic (Czech)
      •  Denmark (Danish)
      •  Estonia (Estonian)
      •  Finland (Finnish)
      •  France (French)
      •  Germany (German)
      •  Hungary (Hungarian)
      •  Ireland
      •  Israel
      •  Italy (Italian)
      •  Latvia (Latvian)
      •  
      •  Lithuania (Lithuanian)
      •  Netherlands (Dutch)
      •  Norway (Norwegian)
      •  Poland (Polish)
      •  Portugal (Portuguese)
      •  Romania (Romanian)
      •  Russia (Russian)
      •  Slovakia (Slovak)
      •  Slovenia (Slovenian)
      •  Spain (Spanish)
      •  Sweden (Swedish)
      •  Switzerland(German, French)
      •  Turkey (Turkish)
      •  United Kingdom
      • Asia Pacific
      •  Australia
      •  China
      •  Hong Kong
      •  India
      •  Korea (Korean)
      •  Malaysia
      •  New Zealand
      •  Philippines
      •  Singapore
      •  Taiwan
      •  Thailand (Thai)
      • Americas
      •  Brazil (Portuguese)
      •  Canada
      •  Mexico (Spanish)
      •  United States
      Can't find the country/region you're looking for? Visit our export site or find a local distributor.
  • Translate
  • Profile
  • Settings
In the Air Design Challenge
  • Challenges & Projects
  • Design Challenges
  • In the Air Design Challenge
  • More
  • Cancel
In the Air Design Challenge
Blog [AirCare] InTheAir - Week 11: CC3200, Energia and analogRead()
  • Blog
  • Forum
  • Documents
  • Polls
  • Files
  • Events
  • Mentions
  • Sub-Groups
  • Tags
  • More
  • Cancel
  • New
  • Share
  • More
  • Cancel
Group Actions
  • Group RSS
  • More
  • Cancel
Engagement
  • Author Author: fvan
  • Date Created: 9 Jan 2015 10:11 PM Date Created
  • Views 2175 views
  • Likes 4 likes
  • Comments 10 comments
  • eclipse_iot
  • mqtt
  • openhab
  • beaglebone_black
  • internet_of_things
  • in_the_air
  • texas_instruments
  • iot_sensor_nodes
  • cc3200
  • launchpad
Related
Recommended

[AirCare] InTheAir - Week 11: CC3200, Energia and analogRead()

fvan
fvan
9 Jan 2015

Previous posts for this project:

  • [AirCare] InTheAir - Project Description
  • [AirCare] InTheAir - Week 1: Getting a Launchpad to Blink
  • [AirCare] InTheAir - Week 2: Preparing the Beaglebone Black
  • [AirCare] InTheAir - Week 3: Fuel Tank Testing
  • [AirCare] InTheAir - Week 4: Using the CC3200
  • [AirCare] InTheAir - Week 5: openHAB and MQTT
  • [AirCare] InTheAir - Week 6: Accessing Fuel Tank's Data
  • [AirCare] InTheAir - Week 7: Dust sensor
  • [AirCare] InTheAir - Week 8: MSP430FR5969 with Energia14


  • Introduction
  • AnalogRead
  • Conclusion


Introduction


As you'll notice, week 9 and 10 have gone missing. I wasn't able to put enough time in the project during the holiday period to justify a blog post (or two).

With the family visits all over Belgium done, I'm gradually able to put more time back in my projects. Here goes week 11 ...


During week 7, I experimented with my dust sensor using an Arduino. This made it easier to understand the sensor using a microcontroller I'm familiar with.

For this post, I thought I'd hook up the dust sensor to the CC3200. Shouldn't be too hard, right ? Well ... just a little bit harder than expected!


AnalogRead


It would seem that the ADC on the CC3200 only supports input levels up to 1.46V and not the 5V I had on the Arduino!

For testing purposes I used a voltage divider, with a ratio of 1/3. Because the maximum analog output voltage of the dust sensor is approximately 3.5V, that should do.


Another thing to be aware of, is that the analog value read using the analogRead() function results in a value between 0 and 4095 (as opposed to 0 and 1023 on Arduino).


I adapted my measuring function to the new conditions as follows:


void readDustSensor() {
  digitalWrite(ledPin, LOW); // turn LED on
  delayMicroseconds(delaySampling); // wait before sampling

  sensorValue = analogRead(sensorPin); // sample
  delayMicroseconds(delayLed); // wait before turning LED off

  digitalWrite(ledPin, HIGH); // turn LED off
  delayMicroseconds(delayCycle); // wait for end of cycle

  // max voltage of 1.46V, represented by values from 0 to 4095, times 3 to compensate for the voltage divider
  voltage = sensorValue * (1.46 / 4095.0) * 3;
}


I was expecting this to return the same value (or at least close to it) as during my tests with the Arduino. Somewhere around 0.74V.


Unfortunately, I'm getting values reported around 2.0V! Why ?! image

image


Using the TBS 1052B oscilloscope from the previous challenge, I tried to understand what was going on. With both probes, I tried to visualise the (divided) output of the dust sensor and the trigger of the IR LED.


This was the resulting snapshot:

image

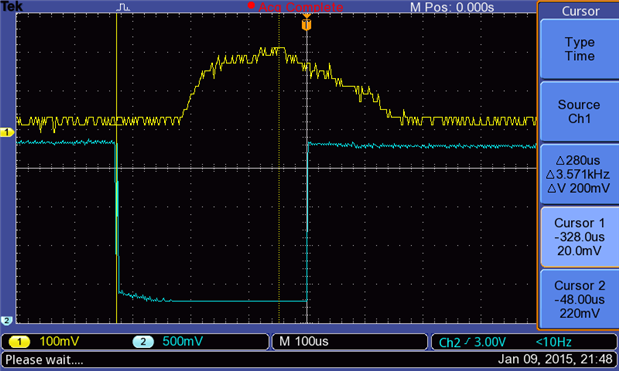
Using the cursors, I measured 0.280ms between the IR LED being turned on (fCursor 1 - falling edge on Ch2) and the dust sensor's (divided) analog output (Cursor 2 - Ch1).


As you can see, the snapshot matches the expected behaviour as documented in the sensor's datasheet rather well:

image

Cursor 2 on Ch1 reports an amplitude of 220mV, times 3 to compensate for the divider, that results in 660mv. So why is the analogRead() reporting 2.0V ??


With the scope reporting a plausible value, I'm thinking the issue lies in the analogRead() itself. So I started searching for similar issues online.

I came across following issue where multiple analogRead() attempts must be made before a correct value is obtained (what's the deal with that?).

Not having better options at this stage, I decided to give it a try. But adding multiple analogRead() calls would surely affect the sampling timing.


To assess the impact, I report the microseconds using micros() right before and after the four dummy analogRead(), measuring how long it takes to execute.

This delay is then subtracted from the 0.280ms sampling delay.

image

The four dummy analogRead() introduce a delay of 0.040ms, so that's what I'll subtract from the 0.280ms delay.


The good news is that the readings after those changes are much closer to what I had measured with the Arduino, and are in line with what is measured with the scope.

The bad news is that the results fluctuate a lot more, losing the ability for proper monitoring of dust levels.

image


Smoke however, is still properly identifiable at 3.6V, as it results in the maximum output value of the sensor.

image


Conclusion


Well, that wasn't as easy as I had expected ... at all.


Unfortunately, it looks like this approach won't give me reliable and stable readings. I'll have to find another solution and make it work in the remaining seven weeks of the challenge.

That will be a challenge on its own image On the bright side, I now know these limitations/issues with the CC3200/Energia and am able to take it into account for future projects. Oh well.


(Unless I did something very wrong in all of this and someone will point out the obvious ...)

  • Sign in to reply

Top Comments

  • shabaz
    shabaz over 10 years ago +4
    Hi guys, I've not used Energia with the CC3200 so I've not checked the ADC code, but I had a look at the CC3200 datasheet and the ADC pins are for signals from 0 to 1.4V, but also expects the source impedance…
  • shabaz
    shabaz over 10 years ago in reply to fvan +4
    Hi! Yes the Arduino is a bit of an exception that it has a fairly high input impedance anyway. I think you'll get some really nice results though once the opamp is in place. After I saw your blog post…
  • BigG
    BigG over 10 years ago +2
    Very insightful feedback indeed. Just thought that maybe this ready made module may help The JeeLabs Shop - Analog Plug Its a MCP3424 analog-to-digital converter with I2C bus interface.
  • tomaja
    tomaja over 10 years ago in reply to shabaz

    I ordered my PCB but didn't take the OpAmp into account when I was designing the dust sensor connection with LP.

    Well, not too much of a problem, I can make a small auxiliary board that will be built into the sensor cable...

    • Cancel
    • Vote Up +2 Vote Down
    • Sign in to reply
    • More
    • Cancel
  • fvan
    fvan over 10 years ago in reply to shabaz

    Wow, great, you sure do move ahead fast image Thanks again!

    • Cancel
    • Vote Up +1 Vote Down
    • Sign in to reply
    • More
    • Cancel
  • shabaz
    shabaz over 10 years ago in reply to fvan

    Hi! Yes the Arduino is a bit of an exception that it has a fairly high input impedance anyway. I think you'll get some really nice results though once the opamp is in place. After I saw your blog post I too ordered the sensor, but I've not had a chance to try it yet.

    A circuit as below would work (I think you'll have figured it out already anyway):

    image

    Basically it makes sure the input is less than 1.4V (the sensor datasheet guarantees a minimum output voltage, but not a maximum, so the resistor ratio is conservative). The opamp could be something like MCP601, which can operate at 3.3V or 5V (i.e. the existing supplies you'll have).

    • Cancel
    • Vote Up +4 Vote Down
    • Sign in to reply
    • More
    • Cancel
  • BigG
    BigG over 10 years ago in reply to fvan

    True. If you comfortable with SMD components, you could just buy the MCP3424 from Farnell and then just the pcb board (€3). This MCP3424 is still a pricey component - MICROCHIP  MCP3424 is > €3.50 from Farnell. Anyhow I think the others have proposed something better through cheaper opamp solution.

    • Cancel
    • Vote Up +1 Vote Down
    • Sign in to reply
    • More
    • Cancel
  • fvan
    fvan over 10 years ago in reply to BigG

    Hi BigG,


    I can see this being useful in more than this project, thanks for sharing!

    Not sure about the price though, 13EUR seems rather expensive ?

    • Cancel
    • Vote Up +1 Vote Down
    • Sign in to reply
    • More
    • Cancel
>
element14 Community

element14 is the first online community specifically for engineers. Connect with your peers and get expert answers to your questions.

  • Members
  • Learn
  • Technologies
  • Challenges & Projects
  • Products
  • Store
  • About Us
  • Feedback & Support
  • FAQs
  • Terms of Use
  • Privacy Policy
  • Legal and Copyright Notices
  • Sitemap
  • Cookies

An Avnet Company © 2025 Premier Farnell Limited. All Rights Reserved.

Premier Farnell Ltd, registered in England and Wales (no 00876412), registered office: Farnell House, Forge Lane, Leeds LS12 2NE.

ICP 备案号 10220084.

Follow element14

  • X
  • Facebook
  • linkedin
  • YouTube