


Previous posts
Post 2 - Installing OpenCV - Prerequisites
Post 5 - Installing eye tracker
EyePrints - Post 6 - SPI communication
Most the time I could stick with programming C, which continues to be my preferred language. However, in this project I am trying to expand my knowledge base and I will code some part in Python. After testing the low-level SPI communication, in this post I will make a small module to interface Pygaze with the SPI module written in C
First of all, let's take a moment to figure out how to interface Pygaze with the SPI interface. The idea is to make a C module that could be called anytime in Python and passed in a string of Hex values. So the first thing I understood about passing a C module into Python is its very similar to a DLL for windows. We will have a module that has a list of function that can be called from our Python variable and will transfer our data. My Goal is to take in a Python string like this and get a C hex like the following.
Pyhon String Input:
data = ["FFFF40009545"]
C Hex output:
uint8_t list = {0xFF, 0xFF, 0x40, 0x00, 0x95, 0x54, 0x45};
The reason for wanting to do this is simplicity on the Python side. I will just make a string with the hexadecimal representation of (X, Y) coordinates the pen has to move to and that’s all.
To do the transformation there must first be a C program that takes in both the string data and the length of string. This will guaranteeing the data is being parsed out right in C as it was expected in Python.
The Python test is attached to the post and is called spitest.py. As you can see in spitest.py there are a few commands that are called out, such as spi.SPI, transfer, and close. These are the three main commands the C module will be centered around and will be the ones I call out and use in Python. One opens, one transfers the data, and one closes the SPI port.
The spimodule.c file will do the conversion of the incoming string to a hex value that can be transferred to the hardware.
To do so there has to be a understanding of two things:
- how to convert from a string to a hex
- how to write an extension module
I'm not going to cover how to write a extension module for Python. More info on that can be found here Python Documentation for writing extensions. Great examples can also be found at Tutorials Points. The original code I found and edited and based my module from is documented here.
Within this spimodule.c there is the code that allows for the conversion. This code takes the string parses out the first two characters and saves them into a variable called hexbyte. Then using sscanf and scans it into a uint8_t type as a hex value using %X.
  PyArg_ParseTuple(args, "s|i:transfer", &list, &length_list);
  printf ("Length of String List from Python: %d\n", length_list);
  printf ("Read in String List from Python: %s\n", list);

  char hexbyte[3] = {0};
  uint8_t tx[10];
  for (i=0; i < (length_list); i++){
    //should grab first two characters
    printf("Should grab %c%c\n",list[2*i], list[(2*i)+1]);

    //Data Transfer from String list to 2 byte string
    hexbyte[0] = list[2*i];
    hexbyte[1] = list[(2*i)+1];

    //Passing the 2 byte string into a Hex unsigned int 8-bit and then printing result
    sscanf(hexbyte, "%X", &tx[i]);
    printf("Got HEX: 0x%2.2X\n\n",tx[i]);
  }

  printf("TX array size after conversion: %d\n",length_list);
Data is finally sent to the physical SPI interface using a call to the ioctl function
/*This is the transfer part, and sets up
  the details needed to transfer the data*/
  struct spi_ioc_transfer tr = {
  .tx_buf = (unsigned long)tx,
  .rx_buf = (unsigned long)rx,
  .len = length_list,
  .delay_usecs = delay,
  .speed_hz = speed,
  .bits_per_word = bits,
  };

  //The Actuall Transfer command and data, does send and receive!! Very important!
  ret = ioctl(self->fd, SPI_IOC_MESSAGE(1), &tr);
  if (ret < 1)
    printf("ERROR: Can't send spi message");
A good rule of thumb for helping with debugging and using different types of parsing and type conversion is to print your results and to separate them in your code so you can keep track and debug it later. You can see in my code that I often do printf so that I know where my data is and what it should be.
The first thing to do is to compile the code. There are basically three files: spimodule.c, spitest.py and a setup.py. The setup file is used as a compiling file that calls the C file and any other extension or author notes that are needed.
cd ~/spitest
 sudo python setup.py build
This will build your spi.so file and it will be located in the folder build/lib.linux-armv6l-2.7. If it isn't this is because it was built somewhere else and after building it it will tell you were it is located. There may be some warnings when you compile it but thats ok, as long as there aren't errors. It is important to have both spi.so (created by building the spitest.c file) and spitest.py in the same directory.
cd ~/spitest/build/lib.linux-armv6l-2.7
check the directory,
ls
You should see a file spi.so. Copy spi.so in the same directory of spitest.py
cd ~/spitest
cp cd ~/spitest/build/lib.linux-armv6l-2.7/spi.so .
Now let’s run the spitest.py.
NOTE: make sure you have a wire across the MOSI and MISO pins before running the test, as explained in previous post
sudo python spitest.py
You should get a result like this:
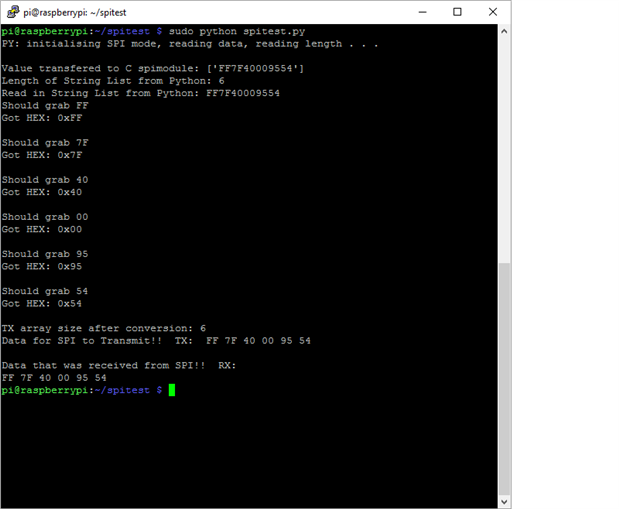
As you can see the string has been passed, and separated and then converted to Hex format. Then the data shows you what is going to be sent and what is received. If they are the same, than everything is a success.