element14 Community
element14 Community
    Register Log In
  • Site
  • Search
  • Log In Register
  • Community Hub
    Community Hub
    • What's New on element14
    • Feedback and Support
    • Benefits of Membership
    • Personal Blogs
    • Members Area
    • Achievement Levels
  • Learn
    Learn
    • Ask an Expert
    • eBooks
    • element14 presents
    • Learning Center
    • Tech Spotlight
    • STEM Academy
    • Webinars, Training and Events
    • Learning Groups
  • Technologies
    Technologies
    • 3D Printing
    • FPGA
    • Industrial Automation
    • Internet of Things
    • Power & Energy
    • Sensors
    • Technology Groups
  • Challenges & Projects
    Challenges & Projects
    • Design Challenges
    • element14 presents Projects
    • Project14
    • Arduino Projects
    • Raspberry Pi Projects
    • Project Groups
  • Products
    Products
    • Arduino
    • Avnet & Tria Boards Community
    • Dev Tools
    • Manufacturers
    • Multicomp Pro
    • Product Groups
    • Raspberry Pi
    • RoadTests & Reviews
  • About Us
  • Store
    Store
    • Visit Your Store
    • Choose another store...
      • Europe
      •  Austria (German)
      •  Belgium (Dutch, French)
      •  Bulgaria (Bulgarian)
      •  Czech Republic (Czech)
      •  Denmark (Danish)
      •  Estonia (Estonian)
      •  Finland (Finnish)
      •  France (French)
      •  Germany (German)
      •  Hungary (Hungarian)
      •  Ireland
      •  Israel
      •  Italy (Italian)
      •  Latvia (Latvian)
      •  
      •  Lithuania (Lithuanian)
      •  Netherlands (Dutch)
      •  Norway (Norwegian)
      •  Poland (Polish)
      •  Portugal (Portuguese)
      •  Romania (Romanian)
      •  Russia (Russian)
      •  Slovakia (Slovak)
      •  Slovenia (Slovenian)
      •  Spain (Spanish)
      •  Sweden (Swedish)
      •  Switzerland(German, French)
      •  Turkey (Turkish)
      •  United Kingdom
      • Asia Pacific
      •  Australia
      •  China
      •  Hong Kong
      •  India
      • Japan
      •  Korea (Korean)
      •  Malaysia
      •  New Zealand
      •  Philippines
      •  Singapore
      •  Taiwan
      •  Thailand (Thai)
      • Vietnam
      • Americas
      •  Brazil (Portuguese)
      •  Canada
      •  Mexico (Spanish)
      •  United States
      Can't find the country/region you're looking for? Visit our export site or find a local distributor.
  • Translate
  • Profile
  • Settings
Path to Programmable
  • Challenges & Projects
  • Design Challenges
  • Path to Programmable
  • More
  • Cancel
Path to Programmable
Blog Path to Programmable - SW Lab 4 - Designing an application
  • Blog
  • Forum
  • Documents
  • Polls
  • Files
  • Events
  • Mentions
  • Sub-Groups
  • Tags
  • More
  • Cancel
  • New
  • Share
  • More
  • Cancel
Group Actions
  • Group RSS
  • More
  • Cancel
Engagement
  • Author Author: aspork42
  • Date Created: 31 Dec 2018 11:13 PM Date Created
  • Views 1085 views
  • Likes 3 likes
  • Comments 3 comments
  • path to programmable
  • xilinx
  • fpga
  • minized
Related
Recommended

Path to Programmable - SW Lab 4 - Designing an application

aspork42
aspork42
31 Dec 2018

Hello,


In this lesson, we create our own application; and explore some of the available code examples for the Zynq MiniZed training board.


About:

Through Avnet, Xilinx and Element14, a training program to learn about the Zynq 7000 platform which is System On Chip combining an FPGA with an ARM processor. This comes to the students as complete development board packed with goodies like a wireless chip from MuRata (BT/BTLE/WIFI), 8GB Flash memory, onboard RAM, USB to JTAG (JTAG programmable over USB), Arduino-style headers (3.3V compatible only), Microphone, Bi-Color LED, and two additional expansion ports.


See all blog posts for this training here.


Creating our own application

To start with, we will create our own application with File --> New --> Application Project. We are given the opportunity to start with a canned project templates, but will choose "Empty Application" instead. This will create an empty "C" file in our source folder. The next step is to cheat a little bit and pull in the example code for "Hello World." We navigate to our System.mss file; which as described in the previous blog post; contains links to import example code for each (known) included library. These are provided from Xilinx as a jump start for each peripheral.


So the instructions have us find the examples directory via the 'Import Examples' and then copy-paste the source code from HelloWorld C file for the UART. This is pasted into our empty application called "hello_Zynq.c". Once this file is saved, and automatic build is done by the SDK to verify that our code is OK. Thankfully; this can be disabled from the menu bar (Project --> Build Automatically) Auto builds can very often result in heaps of errors when someone is very deep into making lots of changes and starting new code from scratch as not all the code is written yet. Even as the lessons brought me through this section the very first automatic build fails because our empty program contains no "main()" loop.


The console window at the bottom of the screen provides a running output of what is happening in the background as you are working; and here shows the result of a successful build.

image


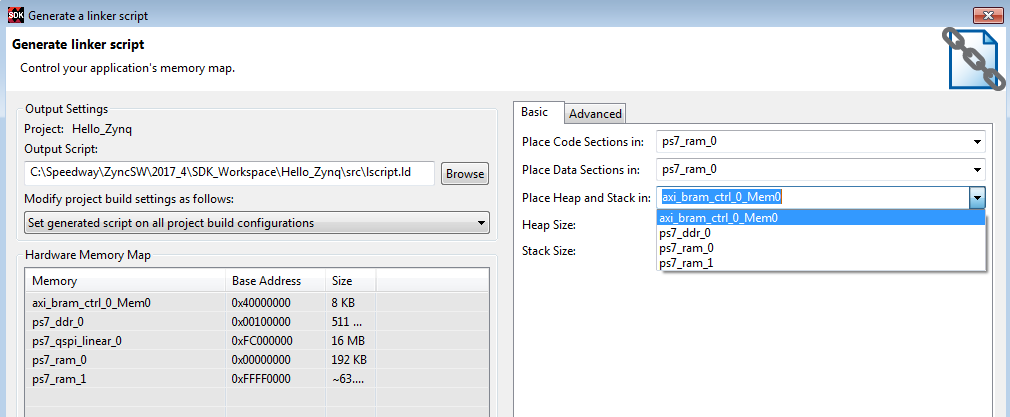
The Linker Script file


I was also introduced to the Linker Script file - lscrit.ld. This is a way of seeing the memory mapping. We can see the different types of memory attached - in this case, BRAM, DDR, SPI, on-chip memory 1 and 2.

image


It is also showing the default Stack and Heap sizes.

We could also see specific memory mapping and could allocate specifically which memory would be used.

image


This was the "GUI" based linker script - a text based version was also available from a separate tab which would make it easier to do operations like a "find and replace" to remap memory allocations. Yet another option would be to generate a brand-new linker script, and chose specific memory allocations right from the start. This way, the SDK will do all the mapping correctly the first time without risk of doing a manual edit incorrectly.

image


Test Peripherals

The next section is to create a new application (File--> New --> Application Project) then chose "Test Peripherals" from the Templates. This is basically all that is done in this section, and we'll run it later in the next lesson. This is similar to what was done in the Hardware section of the training as well.


Memory Tests

Memory tests are also added here as with above. One new way shown of making a project is to copy the top-level project folder from the Project Explorer, and paste it with a new name. We did this with the Test_Memory and created a Test_Memory_FullDDR. We then manually edited some of the C code to refer to the entire DDR range (512 MB), and saved out the file. An automatic build was created at this point.

image


Time to run it yet?!?!

Excited to get rolling on the next lesson. I am starting to get comfortable with the SDK and a lot of what we've been doing was done in the Hardware section of the training; although not covered in very much detail as the focus of those lessons was different. So very soon, I'll be running these tests on the MiniZed board and seeing if I've done this all correctly image


- James

  • Sign in to reply

Top Comments

  • genebren
    genebren over 6 years ago +1
    James, Keep up the good work! Gene
  • rscasny
    rscasny over 6 years ago +1
    James, You said: Excited to get rolling on the next lesson. I am starting to get comfortable with the SDK and a lot of what we've been doing was done in the Hardware section of the training; although not…
  • aspork42
    aspork42 over 6 years ago in reply to rscasny +1
    I think it may have been easier to start with the SW modules; since any time the HW modules need to run, we have to go through the SDK to upload them. When I started with the HW modules and they did this…
  • aspork42
    aspork42 over 6 years ago in reply to rscasny

    I think it may have been easier to start with the SW modules; since any time the HW modules need to run, we have to go through the SDK to upload them. When I started with the HW modules and they did this it got super confusing as there was a lot of new things going on: Synthesize, export; launch SDK; create BSP; import program; program FGPA; then /finally/ run the system deugger. That process was repeated multiple times.


    Starting with the SW side would have made me a lot more comfortable with SDK since there is basically one import of the hardware at the start; and we make a few different BSPs from it (so I know understand what they are). Then we create a bunch of applications, and go through the different steps of programming the FPGA and doing debug environments.

    • Cancel
    • Vote Up +1 Vote Down
    • Sign in to reply
    • More
    • Cancel
  • rscasny
    rscasny over 6 years ago

    James,


    You said:


    Excited to get rolling on the next lesson. I am starting to get comfortable with the SDK and a lot of what we've been doing was done in the Hardware section of the training; although not covered in very much detail as the focus of those lessons was different. So very soon, I'll be running these tests on the MiniZed board ..."


    I was wondering about how the HW and SW module interacted in the training. I wasn't sure if giving you the HW mopdule first and waiting for you to complete that before I sent you the SW module was the best thing to do. However, it sounds like things are fuilling into place for you now.


    Randall

    • Cancel
    • Vote Up +1 Vote Down
    • Sign in to reply
    • More
    • Cancel
  • genebren
    genebren over 6 years ago

    James,


    Keep up the good work!


    Gene

    • Cancel
    • Vote Up +1 Vote Down
    • Sign in to reply
    • More
    • Cancel
element14 Community

element14 is the first online community specifically for engineers. Connect with your peers and get expert answers to your questions.

  • Members
  • Learn
  • Technologies
  • Challenges & Projects
  • Products
  • Store
  • About Us
  • Feedback & Support
  • FAQs
  • Terms of Use
  • Privacy Policy
  • Legal and Copyright Notices
  • Sitemap
  • Cookies

An Avnet Company © 2025 Premier Farnell Limited. All Rights Reserved.

Premier Farnell Ltd, registered in England and Wales (no 00876412), registered office: Farnell House, Forge Lane, Leeds LS12 2NE.

ICP 备案号 10220084.

Follow element14

  • X
  • Facebook
  • linkedin
  • YouTube