


After designing and putting together 3 SPOKES which you can take up as individual projects. It is now time ! to put them all together and have them communicate with each other via the HUB. To have the spokes and the Hub communicate with each other and other IoT and entertainment things! around the house we are going to use Home-Assistant.io, which is an open-source home automation platform running on Python 3, and we are going to install this on the Raspberry Pi 3.Here a demo video, controlling Hue bulbs using the Home-Assistant dashboard.
Here are the links to the blog post for all the 3 Spokes
Pi Control Hub: Spoke 1 :Security Camera
Pi Control Hub:Spoke2:Blinds Automation Using the Enocean Sensor Kit
Pi Control Hub:Spoke3: Keyless Door entry
As part of this blog post we are going to setup Home Assistant on the Pi 3 and have it control Phillips Hue light and in addition
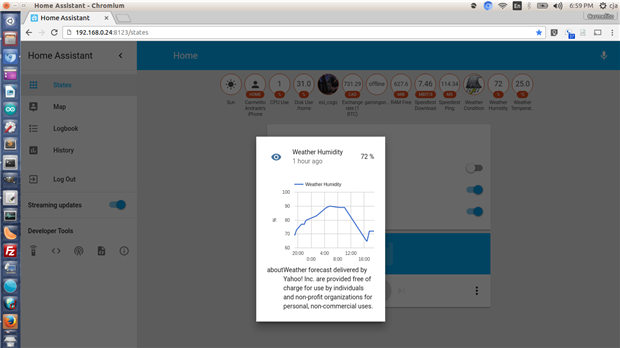
- Get the weather from the Yahoo weather API to display on Home-Assistant Dashboard as shown in video below
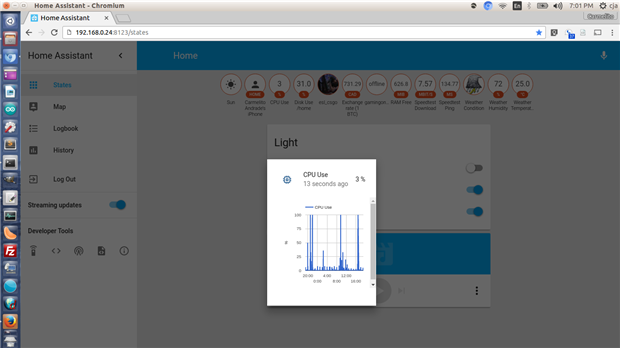
- Check the CPU usage of you Raspberry Pi 3
- Check on the exchange rate for BitCoin
- Check on if you favorite Twitch channels are online
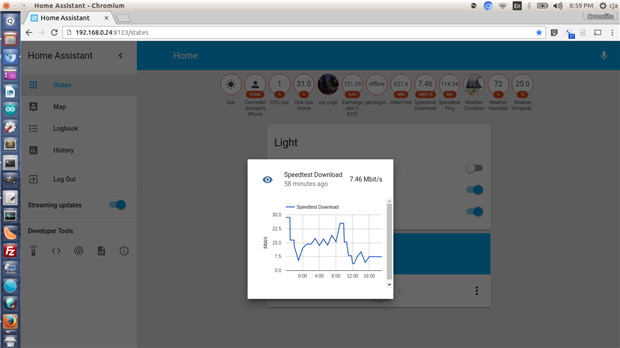
- Perform speed test of your network.
- Take advantage of the Bluetooth on the Pi to check if your phone "aka you are at home , which then turns on you Lights
| {gallery} Home Assistant controlling Philips hue |
|---|
Home Assistant setup on the Pi3 controlling Philips Hue bulbs |
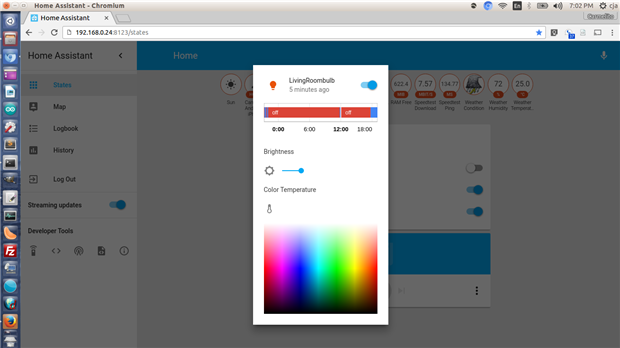
Picking a color for the Philips Hue bulb for my living room |
Screenhot of color picker for the Hue bulb |
Temperature from the Yahoo weather API |
Humidity from the Yahoo weather API |
Bitcoin value |
CPU usage of the raspberry Pi3 |
Download bandwidth speed test |
Monitoring Twitch channel at - https://www.twitch.tv/ |
Checking if you are Home or Away by checking if the Pi3 detect the Bluetooth of the phone |
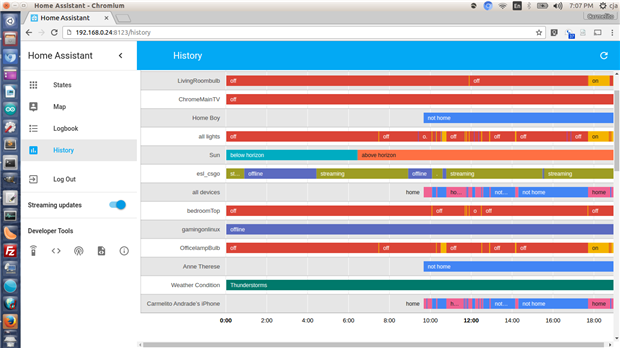
Checking the History of the various devices and sensors |
Some more history, in a fancy graphical form |
LogBook - And even more History , sorted by time.. |


Here are the steps to follow to setup things shown in the video demo above
#1 To install Home-Assistant.io you are going to need to install Python 3 on your Raspberry Pi
update Rasbian packages
sudo apt-get update
sudo apt-get upgrade
Install python 3 and python's package manager PIP for python3
sudo apt-get install python3 python3-pip
Note: I am using the Raspbian Jessie on a 16GB SD card on a Raspberry Pi 3
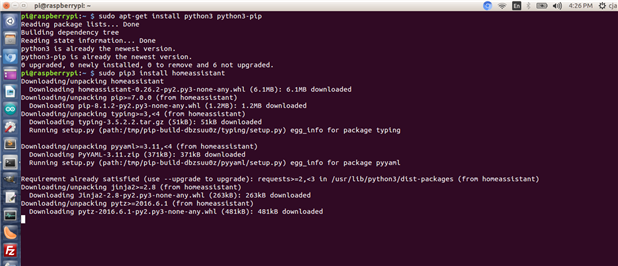
#2 install Home-assistant using pip
sudo pip3 install homeassistant
For more info refer to the awesome documentation on the Home-Assistant site - https://home-assistant.io/getting-started/
#3 Setup Home-Assistant to auto-start on boot
Before we setup home-assistant to auto start check if evening thing with you install went fine by typeing in the command
sudo hass --demo-mode
and then open on a browser on you laptop open - http://IpaddressofPi:8123 , this should load up the demo app of home assistant and gives you an overview of all the things you can setup with home assistant
Now if that was successful, use the following commands to setup home-assistant
sudo wget https://raw.githubusercontent.com/home-assistant/home-assistant/master/script/home-assistant%40.service -O /etc/systemd/system/home-assistant@pi.service
check the path of the install of home-assistant,using
whereis hass
then update the home-assistant@pi.service file with
cd /etc/systemd/system/
sudo nano home-assistant@pi.service
in the nano editor check and validate that ExecStart point to the path which is got as part of the whereis hass command, which in my case is
" ExecStart=/usr/local/bin/hass --runner "
Once done you will need to reload systemd to make the daemon aware of the new configuration. Enable and launch Home Assistant after that, using the commands
sudo systemctl --system daemon-reload
sudo systemctl enable home-assistant@pi
sudo systemctl start home-assistant@pi

Note: in the picture above i had my google chromecast on and connected to my Television called ChromeMainTV which was auto discovered in the Home-Assistant App
Now when you reboot the Home-Assistant should start automatically
for more info on the general instruction refer to https://home-assistant.io/getting-started/autostart-systemd/
#4 Setting up current weather conditions to show up on Home-Assistant
To setup weather condition , you will have to edit the configuration.yaml , for this you will need to familiarize yourself with the YAML syntax, but if you've worked with python this should be a breeze  , given you are already aware of the importance of indentation..
the configuration.yaml can be found at
cd ~/.homeassistant
the edit the file add the following to the end of the file
sudo nano configuration.yaml
sensor:
- platform: yweather
  woeid: 4118
  monitored_conditions:
   - weather
   - humidity
   - temperature
To read more about the yahoo weather components check out - https://home-assistant.io/components/sensor.yweather/
For other weather options like forecast.io,OpenWeather maps check out - https://home-assistant.io/components/#weather
#5 Monitoring you Pi CPU, disk usage etc
this is setup as a sensor, and add the following platforms section under sensor section of configuration.yaml
#Pi system monitor
- platform: systemmonitor
  resources:
    - type: disk_use_percent
      arg: /home
    - type: memory_free
    - type: processor_use
- platform: cpuspeed
  name: CPU
For more info check out - https://home-assistant.io/components/sensor.systemmonitor/
https://home-assistant.io/components/sensor.cpuspeed/
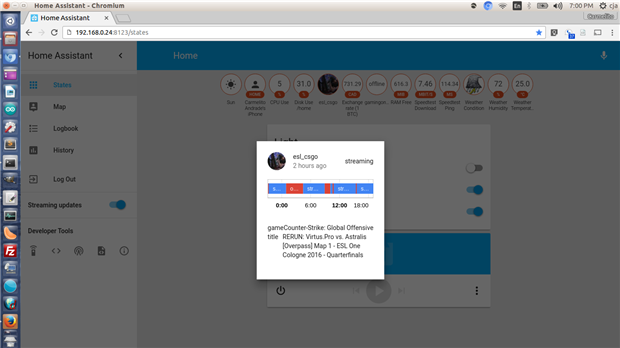
#6 Monitoring your favorite twitch channel to check if it is streaming now!
This again is setup as a sensor, which means you will have to add this to the sensor section of configuration.yaml , here is an example
- platform: twitch
  channels:
    - esl_csgo
    - gamingonlinux
here I am monitoring two channels as a demo , the fist one, is the most active Counter-Strike: Global Offensive channel
For more info check out https://home-assistant.io/components/sensor.twitch/
#7 Checking on you network speed
Add the following bit to the sensor section , i my case I am interested in Download speed and pings, check out this link for more options - https://home-assistant.io/components/sensor.speedtest/
#Wifi speed tests using Speedtest.net
- platform: speedtest
  monitored_conditions:
    - ping
    - download
#8 Checking on the BitCoin exchange rate
In my case I am checking the bitcoin exchange rate in Candian dollars CAD
- platform: bitcoin
  currency: CAD
  display_options:
    - exchangerate
#9 Setting up the Philips hue Lights
To setup the Philips hue lights you will first have to get the IP address of the Hue bridge, to do this get on you phone , in the Hue app go to the network setting and make a note of ip address
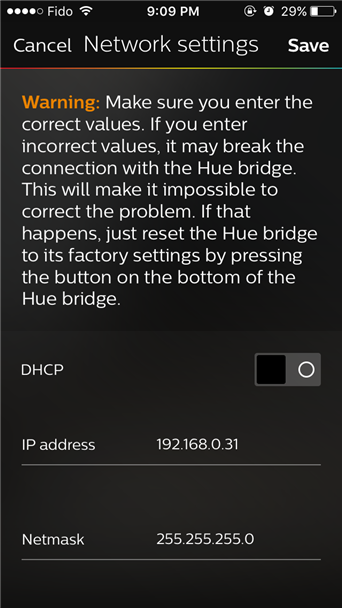
Add the following lines to the configuration.yaml file
#Philips Hue lights
light:
  platform: hue
  host: 192.168.0.31
  allow_unreachable: true
once you are done with this setup reboot your Pi and then when you should see the Configurator for Hue bridge in the Home-Assistant dashboard

One you hit the configure button , you should see all the Hue device in you dashboard
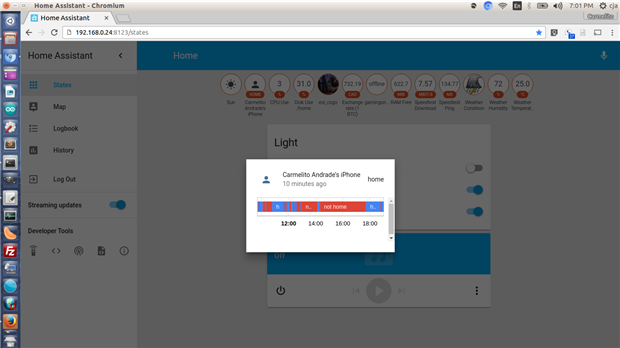
#10 Setting up Bluetooth , to detect your Phone
It is now time to take advantage off the Bluetooth on the Pi 3, basically we are going to check if the phone is Bluetooth range of the Pi 3 and switch on the Hue lights in the Living room, this mimics that you have reached home and the Lights come on automatically. Start off by installing
sudo apt install bluetooth libbluetooth-dev
And then add the following to the configuration.yaml file
device_tracker:
  platform: bluetooth_tracker
once done reboot your pi , and also switch off and switch on the Bluetooth on you phone , to check if device is discovered and added to Home-Assistant check the file at
cd ~/.homeassistant
and open the file,and you should see an entry for your phone, as show in the screenshot below
sudo nano know_devices.yaml

For more info check out - https://home-assistant.io/components/device_tracker.bluetooth_tracker/
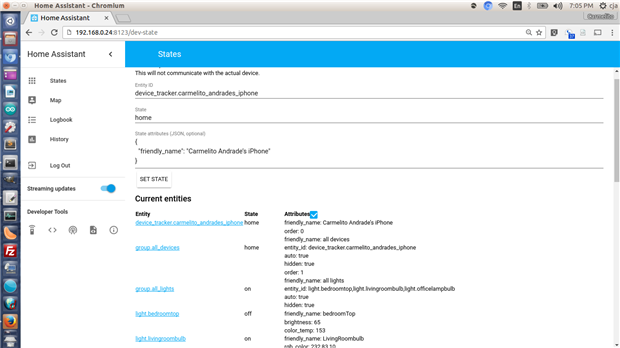
Now to lets setup an automation rule in the configuration.yaml file to check if your phone is detected by the Pi 3's Bluetooth
automation:
  alias: CarmelitosIphone is Home
  trigger:
       platform: state
       entity_id: device_tracker.carmelito_andrades_iphone
       state: 'home'
  action:
    service: light.turn_on
    entity_id: light.officelampbulb
to get the name of you device to add to the rule in the Developer tools of the Home-Assistant dash board , ie http://ipaddressofPi:8123/dev-state , as you see in the screen shot below the entity_id for my phone is "device_tracker.carmelito_andrades_iphone" and the state is "home"
Note: this is a very basic rule to get you started, you can modify this to add time check in the trigger section, to only switch on the lights if you get home at night between 7 PM to 11 PM..
Top Comments