element14 Community
element14 Community
    Register Log In
  • Site
  • Search
  • Log In Register
  • Community Hub
    Community Hub
    • What's New on element14
    • Feedback and Support
    • Benefits of Membership
    • Personal Blogs
    • Members Area
    • Achievement Levels
  • Learn
    Learn
    • Ask an Expert
    • eBooks
    • element14 presents
    • Learning Center
    • Tech Spotlight
    • STEM Academy
    • Webinars, Training and Events
    • Learning Groups
  • Technologies
    Technologies
    • 3D Printing
    • FPGA
    • Industrial Automation
    • Internet of Things
    • Power & Energy
    • Sensors
    • Technology Groups
  • Challenges & Projects
    Challenges & Projects
    • Design Challenges
    • element14 presents Projects
    • Project14
    • Arduino Projects
    • Raspberry Pi Projects
    • Project Groups
  • Products
    Products
    • Arduino
    • Avnet Boards Community
    • Dev Tools
    • Manufacturers
    • Multicomp Pro
    • Product Groups
    • Raspberry Pi
    • RoadTests & Reviews
  • Store
    Store
    • Visit Your Store
    • Choose another store...
      • Europe
      •  Austria (German)
      •  Belgium (Dutch, French)
      •  Bulgaria (Bulgarian)
      •  Czech Republic (Czech)
      •  Denmark (Danish)
      •  Estonia (Estonian)
      •  Finland (Finnish)
      •  France (French)
      •  Germany (German)
      •  Hungary (Hungarian)
      •  Ireland
      •  Israel
      •  Italy (Italian)
      •  Latvia (Latvian)
      •  
      •  Lithuania (Lithuanian)
      •  Netherlands (Dutch)
      •  Norway (Norwegian)
      •  Poland (Polish)
      •  Portugal (Portuguese)
      •  Romania (Romanian)
      •  Russia (Russian)
      •  Slovakia (Slovak)
      •  Slovenia (Slovenian)
      •  Spain (Spanish)
      •  Sweden (Swedish)
      •  Switzerland(German, French)
      •  Turkey (Turkish)
      •  United Kingdom
      • Asia Pacific
      •  Australia
      •  China
      •  Hong Kong
      •  India
      •  Korea (Korean)
      •  Malaysia
      •  New Zealand
      •  Philippines
      •  Singapore
      •  Taiwan
      •  Thailand (Thai)
      • Americas
      •  Brazil (Portuguese)
      •  Canada
      •  Mexico (Spanish)
      •  United States
      Can't find the country/region you're looking for? Visit our export site or find a local distributor.
  • Translate
  • Profile
  • Settings
PiCasso Design Challenge
  • Challenges & Projects
  • Design Challenges
  • PiCasso Design Challenge
  • More
  • Cancel
PiCasso Design Challenge
Blog 9 Pieces of Pi: Slice 1: The Long Way Round
  • Blog
  • Forum
  • Documents
  • Polls
  • Files
  • Events
  • Mentions
  • Sub-Groups
  • Tags
  • More
  • Cancel
  • New
  • Share
  • More
  • Cancel
Group Actions
  • Group RSS
  • More
  • Cancel
Engagement
  • Author Author: jc2048
  • Date Created: 6 Apr 2019 1:22 PM Date Created
  • Views 2861 views
  • Likes 12 likes
  • Comments 19 comments
  • picasso
Related
Recommended

9 Pieces of Pi: Slice 1: The Long Way Round

jc2048
jc2048
6 Apr 2019

Introduction


I'm following along with this Design Challenge as an independent participant, not as one of the challengers (that's because I don't agree

with the T&Cs); so I'm ruling myself out of winning any of the prizes, even the finisher prize. I hope that's acceptable to element14

- if not, they can always move the blogs to my personal blog area to get them out of the way.


This is the first in a series of nine, weekly works of electronic art. There won't be time to do anything at all complicated or

elaborate so they'll all be fairly simple and there will probably be quite a lot of LEDs involved. I doubt any of it will be particularly

original from a technical viewpoint, but I'm doing it in my own way so hopefully the resulting art will be interesting or curious. I

need to get my skates on here because some of the actual challengers are already on to their second or third blogs and we are supposed

to blog at least once a week.


This first piece is going to involve LEDs because I'm used to working with them and have all the bits I need to build it.


If you want to see where I started with the Pi 3, have a look at these two blogs:


Getting Started with a Raspberry Pi 3 B+

Using the IO on a Raspberry Pi 3 B+


The Work


Here it is on the wall of my workroom.


image


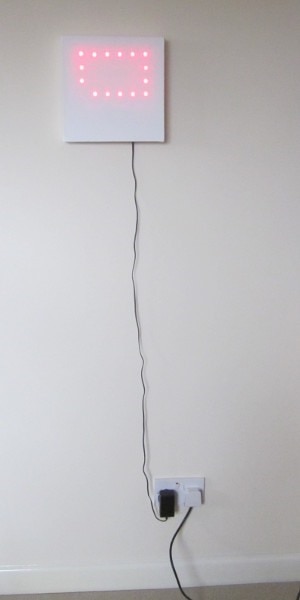
The following video shows it working. The 'space' moves to a new, random position and always takes the long way round - hence the

title.


You don't have permission to edit metadata of this video.
Edit media
x
image
Upload Preview
image


The Technical Stuff


I decided that I wanted to use canvases for at least some of the pieces. Some of the later slices will also involve paint, though for

some reason the first one has ended up being more spare and conceptual. Conveniently, I've got a few spare canvases that I bought

years ago and never used for anything. Here is what the small one that I've chosen looks like back and front in the packaging (the

wooden pieces in the plastic bag are wedges that allow the canvas to be tensioned). This one is 10" x 10" (25cm x 25cm) which is quite

small but felt about right given the small size of the PI and the diameter of the pixels and the somewhat sparse and minimalist

general feel of the thing.


image


I initially thought of either having the LEDs projecting light forward onto the back of an acrylic sheet ahead of the canvas or from

the front back onto the canvas but, after a bit of experimenting, discovered that it would work by projecting the LEDs onto the back

of the canvas which would act as a diffuser. The LEDs I used have a narrow viewing angle and produce a nicely defined, not too fuzzy

pixel on the surface. The red light is a bit of a cliche with LEDs, but never mind. Here's a picture of the LED support and the driver

electronics in more detail from when I was testing it on the bench.


image


The Pi has enough GPIO lines to drive all 16 LEDs directly but I wasn't very sure about powering them from the 3.3V supply generated

on the board so I used a couple of shift register ICs (TPIC6B595) as drivers running on the 5V supply that comes from the power input.


That meant I needed level conversion from the 3.3V GPIO pins, but it's only three lines - clock, data, and latch - so it wasn't too

difficult to do. I used three BSS138 MOSFETs for that.


Here's the circuit diagram. I've only showed one of the level converters, but the other two are the same. They invert, so the code

driving the pins has the levels swapped. The pull-up was a bit on the high side and so the rising edge is a bit slow but the shift

registers don't seem to mind.


image


Here's a top and bottom view of the circuit board. The MOSFETs are the SOT23 packages [the black blobs] on the righthand side of the

bottom view. The wiring is done with wire-wrap wire.


image


image


Here it is wired to the LEDs behind the canvas - not very tidy, but that doesn't matter too much for something like this.


image


Python seemed to be the quickest way to get going, having previously already followed the simple examples given by Shabaz in his how-

to-use-the-Pi-GPIO blog, so that's what I went for.


Here's the code. I don't think it needs much explanation from me as I should think everyone reading this is better at Python

programming than I am; it's very simple.


import RPi.GPIO as GPIO
import random
# set GPIO directions - all outputs
GPIO.setmode(GPIO.BCM)
GPIO.setup(14,GPIO.OUT) #clock
GPIO.setup(15,GPIO.OUT) #latch
GPIO.setup(18,GPIO.OUT) #data
# outputs are inverted by level convert (True is low)
GPIO.output(14,True)
GPIO.output(15,True)
GPIO.output(18,True)
# start off with something sensible and in range
ledIncrement = 1
currentLed = 2
nextLed = 6
# do forever
while True:
  for x in range(0,16): # do for the 16 LEDs
    if x == currentLed: #set up data
      GPIO.output(18,True)
    else:
      GPIO.output(18,False)
    GPIO.output(14,False) # generate clock
    GPIO.output(14,True)
  GPIO.output(15,False) # after all 16, latch on s/r outputs
  GPIO.output(15,True)
  if currentLed == nextLed:
    time.sleep(3) # at destination, so pause for 3 seconds
    while currentLed == nextLed:
      nextLed = random.randint(0,15)
    if nextLed > currentLed:
      if (nextLed - currentLed) > 8:
        ledIncrement = 1
      else:
        ledIncrement = -1
    else:
      if (currentLed - nextLed) > 8:
        ledIncrement = -1
      else:
        ledIncrement = 1
  else:
  time.sleep(0.5) #not there yet, display for half a second
    currentLed = currentLed + ledIncrement #update position
    if currentLed > 15: # correct for running off either end
      currentLed = 0
    else:
      if currentLed < 0:
        currentLed = 15
GPIO.cleanup()


I set the PI up to run the code from power-up simply by adding this line to cron:


@reboot sudo python /home/pi/slice1.py


Cron can be edited using this command at a command prompt:


crontab -e


The whole thing didn't quite turn out how I imagined it in my head - art rarely seems to - but it will do for the challenge and gets

me off to a reasonably quick start. Originally, I was going to have the Pi on the front, but partway through changed my mind and

tucked it in behind the canvas.


Now to start work on Slice 2. I have rough ideas for all nine now, the next two are planned in detail and underway, so hopefully I can

catch up a bit with the one-a-week schedule.

  • Sign in to reply

Top Comments

  • dubbie
    dubbie over 6 years ago +5
    Jon, I really like this first canvas. It is just the type of art I like. Simple and sparse, but with interest. A pity it needs a lead to the power supply. I look forward to seeing the remaining 8 slices…
  • jc2048
    jc2048 over 6 years ago in reply to balearicdynamics +5
    I was slightly involved with a group of people who were making art - mostly interactive computer-based stuff - about 15 years ago and had a couple of pieces of electronic art in one of their exhibitions…
  • jw0752
    jw0752 over 6 years ago +4
    Hi Jon, I always enjoy your postings as they are always clear and well organized with a lot of good technical insught. John
  • three-phase
    three-phase over 6 years ago in reply to jc2048

    The first time I watched the patterns, it reminded of those sliding puzzles you can get, that you move around to make the picture or put the numbers in order.


    image

    • Cancel
    • Vote Up +3 Vote Down
    • Sign in to reply
    • More
    • Cancel
  • jc2048
    jc2048 over 6 years ago in reply to shabaz

    There is an odd sort of fascination to it.


    I don't know how well it would work for back-lighting a painting - the pre-prepared ground is very thin and is just enough to seal the canvas, but you probably wouldn't need too much paint on top of that to start dramatically cutting the amount of light getting through. Worth experimenting with if it's of interest, though.

    • Cancel
    • Vote Up +2 Vote Down
    • Sign in to reply
    • More
    • Cancel
  • shabaz
    shabaz over 6 years ago

    That's intriguing, I can see people watching it for quite a while, to try to discover the pattern : )

    The framed canvas is a neat idea.. I have a family member who is an artist, I'll have to suggest to them that they can illuminate their work with such techniques from inside..

    • Cancel
    • Vote Up +2 Vote Down
    • Sign in to reply
    • More
    • Cancel
  • balearicdynamics
    balearicdynamics over 6 years ago

    Anyway, IMHO, using shift registers is more elegant than a lot of outputs.


    Enrico

    • Cancel
    • Vote Up +4 Vote Down
    • Sign in to reply
    • More
    • Cancel
  • three-phase
    three-phase over 6 years ago

    Very good project showing the fundamental use of shift registers - look forward to the second slice.


    Kind regards.

    • Cancel
    • Vote Up +3 Vote Down
    • Sign in to reply
    • More
    • Cancel
>
element14 Community

element14 is the first online community specifically for engineers. Connect with your peers and get expert answers to your questions.

  • Members
  • Learn
  • Technologies
  • Challenges & Projects
  • Products
  • Store
  • About Us
  • Feedback & Support
  • FAQs
  • Terms of Use
  • Privacy Policy
  • Legal and Copyright Notices
  • Sitemap
  • Cookies

An Avnet Company © 2025 Premier Farnell Limited. All Rights Reserved.

Premier Farnell Ltd, registered in England and Wales (no 00876412), registered office: Farnell House, Forge Lane, Leeds LS12 2NE.

ICP 备案号 10220084.

Follow element14

  • X
  • Facebook
  • linkedin
  • YouTube