Today I’m writing about an alternative to Raspbian, which is the OS almost everyone runs on Raspberry Pi these days. The OS I’m using for my project is called Android Things, and it’s a version of Android that is specifically tailored to run on Raspberry Pi (and some other screen- and keyboard-optional boards).
Android vs. Raspbian
From the developer’s perspective, Android Things is completely different from Raspbian. When you use Raspbian, you typically interact with the Raspberry Pi using a keyboard and mouse, SSH, or VNC. Raspbian is similar to a desktop, laptop, or server, where you download, install, and launch packages and programs locally on the device. This is useful because it means you have full control over what processes are running, and you can hack away in any language you want. You can run pretty much any Linux software you want on Raspbian, which is why Raspberry Pi is so successful as a tiny and inexpensive media center, weather station, video game console, and more.
In contrast, Android Things narrows the purpose of the Raspberry Pi. Where Raspbian turns the Pi into a general-purpose computer, Android Things turns it into a single-purpose device that is optimized for a designated task. This paradigm makes a lot of sense for IoT devices, since you probably don’t need to be able to play Super Mario Bros. on your thermometer.
Android Things is a slimmed-down version of the same Android OS that runs on phones, tablets, and TVs. Therefore, the programming model is exactly the same as developing apps for those devices. Instead of writing and compiling software on the Raspberry Pi itself, like you often do with Raspbian, you write and compile your code on another computer with Android Studio, and then you install the app on the Raspberry Pi when you want to run it. While this means that you are limited to using Java, Kotlin, or C++ as your programming language, the Android Things APIs and device drivers just work without having to monkey around with sensitive config files and installing packages and all of their finicky dependencies. With Android Things, you never have to worry about corrupting your OS installation while you are trying to figure out how to launch something at startup or enable I2C.
Installing Android Things
Putting Android Things on a Raspberry Pi is pleasantly simple. I won’t list all of the steps here because the official documentation is very good, but basically, you just use a command-line tool that downloads the Android Things image and flashes it to an SD card. Once this mostly-automated, 30ish-minute process is complete, you can pop the card in your Raspberry Pi and you’re ready to go.
Figure 1. Flashing Android Things to the micro SD card.
Once Android Things is running, you can’t really do anything with your Pi, unlike Raspbian. If you plug in a monitor, there isn’t a desktop or even a command-line interface, and there's no SSH or VNC service to access remotely. You will only have access to a status screen that displays some information about the device. If you plug in a keyboard, you can navigate around and connect to WiFi here too. Once you install an app, this screen will be replaced with your UI, if you choose to have one. What you do have is a fully-functional Android device in debug mode, so you can connect it to Android Studio. There’s also the traditional Android Debug Bridge (ADB) shell, but, like on all Android devices, it is not really a full shell, and it doesn’t give you much access to anything besides debugging tools. From within Android Studio, you can install apps, view the logs, and explore the filesystem.
Figure 2. The Android Things status page.
A (Very) Simplified Explanation of Android App Architecture
Since this is a Raspberry Pi competition, I expect that most readers are familiar with writing code for Raspbian and not for Android. I’ll give a brief overview of the anatomy of an app and point out the key differences between the two. You can visit the Android docs if you want to see some beginner guides, samples, and other reference material.
Android takes a different approach to process management. In a desktop system like Windows or Raspbian, when you want to launch an application, you tell the OS to run its code from its main entry point, such as the first line of a script or a “main” function. The program starts executing and stays running until it stops itself or until the OS forcibly kills it. It lives in its own process and can coexist with other applications on the system. This is a fine model for a desktop computer and is the traditional way of organizing code. Android, on the other hand, was designed to run on devices with highly constrained resources such as memory, battery power, and network bandwidth. The use case of an Android app is different than a desktop app because people typically only use a single app at a time, and the device also spends a lot of time in a low-power mode in the pocket. For these reasons, Android is designed to aggressively destroy applications that are not currently being used in order to more efficiently share its limited resources. Android apps have to be written in a way that allows them to be torn down and then restored as the OS deems necessary. For that reason, Android apps do not really have a single, main entry point. Instead, they have multiple entry points that are used at different moments during its lifecycle. You put different pieces of code in these different callbacks in order to handle the events as they happen. It takes a bit to get used to this new paradigm, but it becomes second nature after a while.
The main component in any Android app is the Activity. An Activity is what gets “launched” when you “launch” an app. Its name comes from the smartphone world: if you are “doing” something on your phone, then you are performing an “activity”. Think of an Activity as one “screen” in an app, and when you click something that takes you to a different screen, that Activity transitions to a different Activity. You can have many Activities in an app, or just one. In the Android Things world, you might not build any visible “screens” at all if you are going to have no display connected, but the device is still performing a task. An Activity is what you build when you write code to run on Android Things.
The other major difference between Android applications and traditional applications that developers need to be aware of is how threads are handled. In plain Java code, Python, C++, and most other languages, you are probably used to running all of your code in one thread, doing disk and network operations synchronously. In Android, however, you must offload these long-running operations to a background thread, or you will cause the screen to lag, input events to be delivered late, and other glitchiness to occur. Even if your Android Things app doesn't have a GUI, it's still a good practice to stay off of the main thread as much as possible because you risk being killed by the operating system, which will assume your application has stalled in an infinite loop. There are several tools and components provided by the Android SDK that help with this, including AsyncTask, Handler, IntentService, and even a raw Java Thread.
Android apps have a file called AndroidManifest.xml that declares a whole bunch of stuff about your app to the OS. It declares the identity of the app, the permissions the app needs, the features it requires the hardware to have, and a bunch of other things. Most importantly, this file declares what Activities there are in the app, what code corresponds to each Activity, and how that Activity should be treated. This is where you designate which Activity should be launched when the device boots up. An Activity that specifies the “IOT_LAUNCHER” category will be recognized by the OS as being the app to launch immediately after boot, so your application should always specify one Activity as such. Again, this is all covered in the Android Things developer guide.
Android Things Peripherals
Controlling GPIO, Serial, PWM, and the other peripheral interfaces of the Raspberry Pi is very easy in Android Things. Once you wire up your device according to the pinout, you use the Java API to open the device and control it. You do need to take care that only one thing is using each specific device at a time. If your code gives the device conflicting commands all at once, it may behave unpredictably or crash, so I recommend wrapping usages of each device in a singleton or using the Android user-space drivers feature.
Connecting to an External ADC with SPI
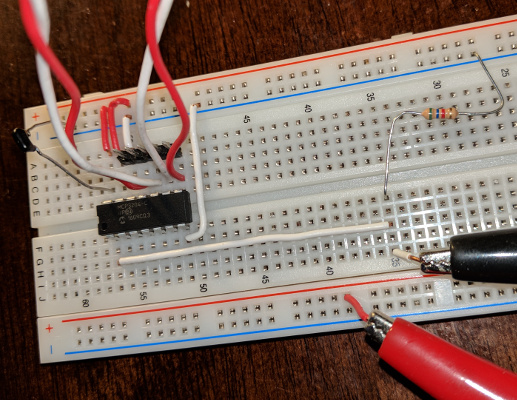
For my project, the Raspberry Pi will be getting temperature data from my thermistor probes via an ADC. The ADC I purchased supports the SPI serial protocol, so I connected it up to the Raspberry Pi’s SPI pins using a breadboard and some jumper wires according to the Android Things documentation.
The next step was to connect the thermistor probes to the input of the ADC. I plugged the Tip/Sleeve connector of my probe into the matching jack I purchased. Unfortunately, the pin layout of the jack isn’t on a 100-mil grid, so it doesn’t fit on my breadboard. Eventually I’ll have a custom PCB made that will have holes in the right places, but for now I’m just attaching alligator clips to the leads and clipping the other ends to wires sticking out of my breadboard. Now that the thermistor is connected to my breadboard, I need to build the voltage divider that I designed in my last post (Thermistor Calibration), and hook it all up.
Figure 3. Breadboard with ADC connected to voltage divider and Raspberry Pi.
Reading ADC Values
I created a new project in Android Studio to test my connection to the ADC. The small app requests values from the ADC and prints the value to the Android debug console. I wrote a wrapper class for accessing the SPI peripheral device that encapsulates the configuration of the Pi’s SPI hardware and the MOSI commands necessary to talk to the ADC. You can see the source of my test app on GitHub.
When you open a SPI device in Android Things, there are a few options you have to configure, and they need to match the needs of your project and the requirements of the SPI device you’re talking to. Here’s a link to the documentation for my ADC: MCP3204. I configured my SPI peripheral like this:
- Device name: Android Things recognizes two different SPI devices on the Raspberry Pi, “SPI0.0” and “SPI0.1”. It’s really a single SPI device that has two CS pins. The device with the “.0” suffix uses the SS0 pin, and the one with the “.1” suffix uses the SS1 pin. I wired my ADC to the SS0 pin, so I am using “SPI0.0” as my peripheral name
- SPI mode: The documentation for my ADC says both 0,0 and 1,1 are supported. The main difference between the two modes is the phase of the clock line. 0,0 is the more common mode, so I’ll use that one.
- Bits per word: The ADC documentation says this should be 8.
- Clock frequency: The ADC documentation says that a minimum clock rate of 10kHz should be used in order to avoid errors. Its maximum clock rate is supposedly 1MHz with a supply voltage of 2.7V (I’m using 3.3V), but I have no need to sample this quickly, so I’ll stick with the minimum of 10kHz.
- Chip Select Change: This determines whether the CS signal can stay low between multiple read/write transactions. The ADC documentation states that the CS signal must return to high between readings, so I’ll set this parameter to false.
The ADC documentation shows a few examples of how to send a command and receive the result over SPI. The command includes a few different parameters, and includes a start bit, the ADC channel to measure (in my case, channel 0), and whether the measurement is differential or single-ended. I’m using single-ended because I’m taking my measurements with respect to GND. The documentation spells out how to pack these bits into the command bytes, and it has diagrams that indicate how to decode the response. You can see how I accomplish this in my SpiAdcDevice class.
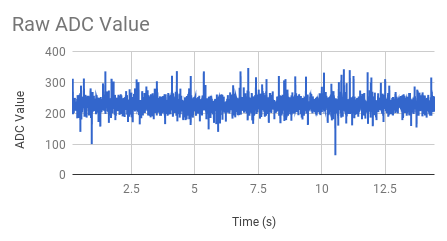
My test app prints the elapsed real time since the app was launched and the ADC value to the Android logs. I pasted this output into a spreadsheet and graphed the result. As you can see in Figure 4 below, the output is extremely noisy, swinging between about 220 and 260. This result is unacceptable, since the temperature is clearly not going up and down as indicated. I’m not exactly sure why there is so much noise in the reading. I expect it has to do with the fact that I’m not buffering my input like the ADC documentation suggests. Also, this prototype is built on a breadboard, and they are infamous for introducing noise due to crosstalk from the nearby, high-frequency digital SPI signals.
Figure 4. Graph of raw ADC value over time.
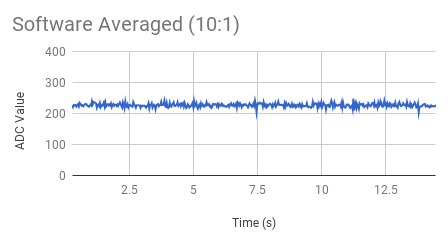
My first thought was to apply a low-pass filter in software, averaging many noisy points into a smoother result. Figure 5 shows the result of doing this, where each point is averaged with the last 9 points. It is clearly improved, but it still has some spikes where there shouldn’t be. I'm happy with this result for now, but later I’ll want to reduce this noise even further using more hardware.
Figure 5. Graph of ADC values averaged in software with the last 9 values
I’ve successfully integrated the ADC with some code running on the Raspberry Pi in an Android Things app! If you’re curious, check out my test project on GitHub.


Top Comments
-

genebren
-
Cancel
-
Vote Up
+1
Vote Down
-
-
Sign in to reply
-
More
-
Cancel
-

e14phil
in reply to genebren
-
Cancel
-
Vote Up
+2
Vote Down
-
-
Sign in to reply
-
More
-
Cancel
Comment-

e14phil
in reply to genebren
-
Cancel
-
Vote Up
+2
Vote Down
-
-
Sign in to reply
-
More
-
Cancel
Children