


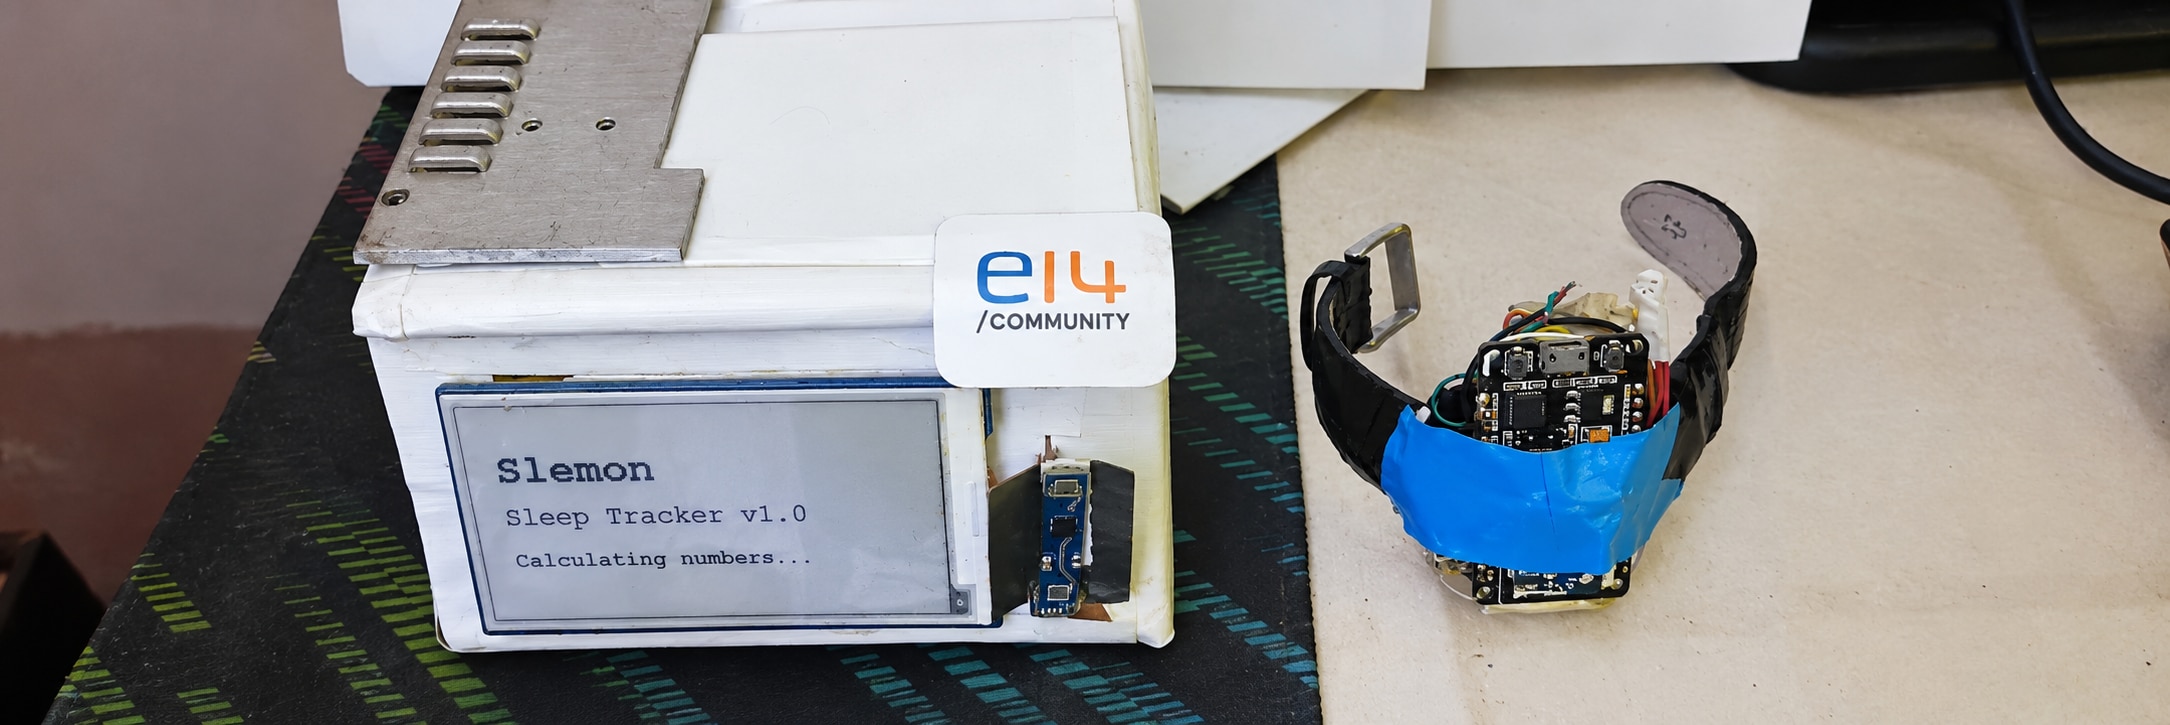
This is the final blog for my project!
I have created a project that uses a dual-core system. Firstly there is the Arduino Uno, which is the main unit and which handles all the heavy lifting and the algorithmic work, and the ESP32, which is lightweight. For the variable that sends data over Bluetooth to the Arduino queue for processing, it is further modified with results based on the radar reading, which tracks how much movement the body makes.
I also have made an algorithm to detect breaths per minute from the chest movement we make. It's not that usable in a noisy environment but it gives usable and accurate results when used in a low-noise environment, just in front of where we sleep. It gives accuracy between 90% and 95% as I have checked in a low-noise environment.
Also the main players are the heart rate and the blood oxygen level sensor, which are the most important. As we know how these values change, we can get an estimate of which stage of the sleep cycle we are in. Hence from that, we can understand the set time at which we have to wake up, which is the most probable time to wake up so that sleep doesn't get disrupted. From the sleep cycle data we have.It also features the temperature sensor MAX30208 for smart things, for controlling temperature to maintain a suitable temperature as our body needs in order to become comfortable for sleeping. Also it can be connected to speakers for binaural brain entertainment by playing binaural beats or low-frequency sounds, which help our brain go into a specific state of sleep and just help with better sleep.
These are the past post I made about the project:
Palno & Slemon #1 Introduction
Palno & Slemon #2.1 Configuring and Validating
Palno & Slemon #2.2 Configuring and Validating
Palno & Slemon #3 Building the Algorithm
Palno & Slemon #4 Final Firmware
Palno & Slemon #5 LabView Integration
Palno & Slemon #6 Building the Enclosure
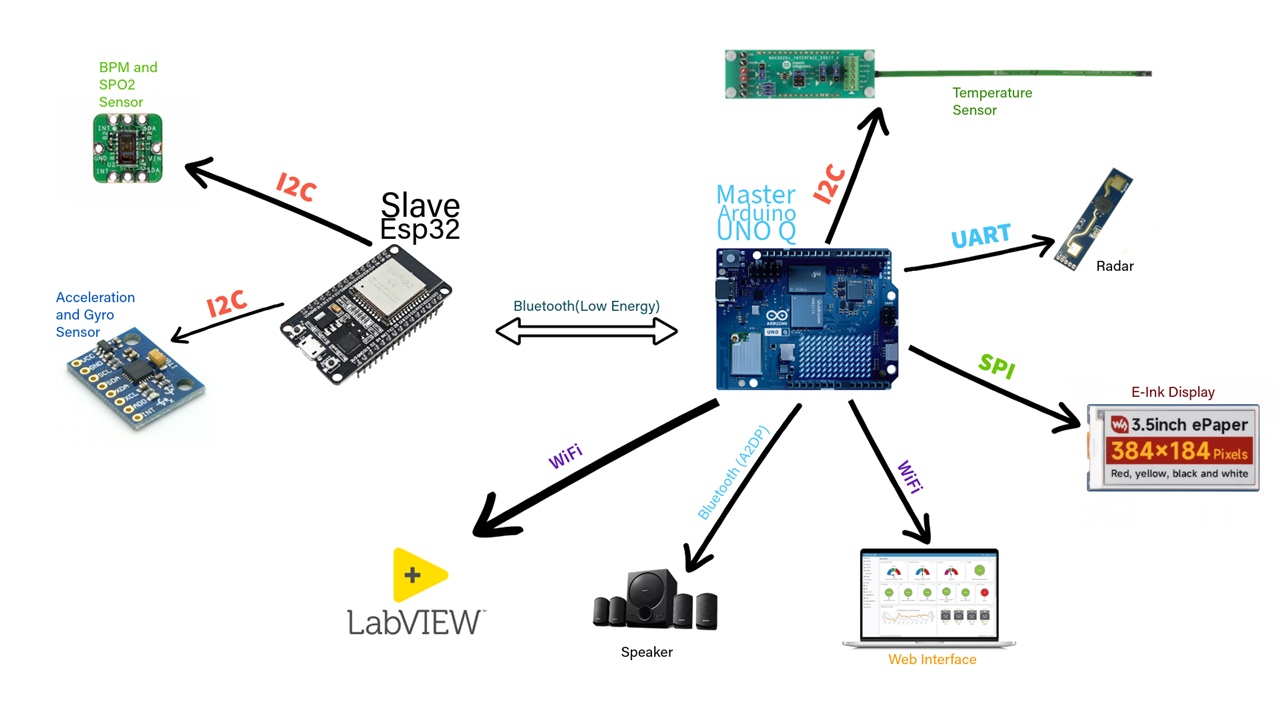
Architecture
Palno (Slave)
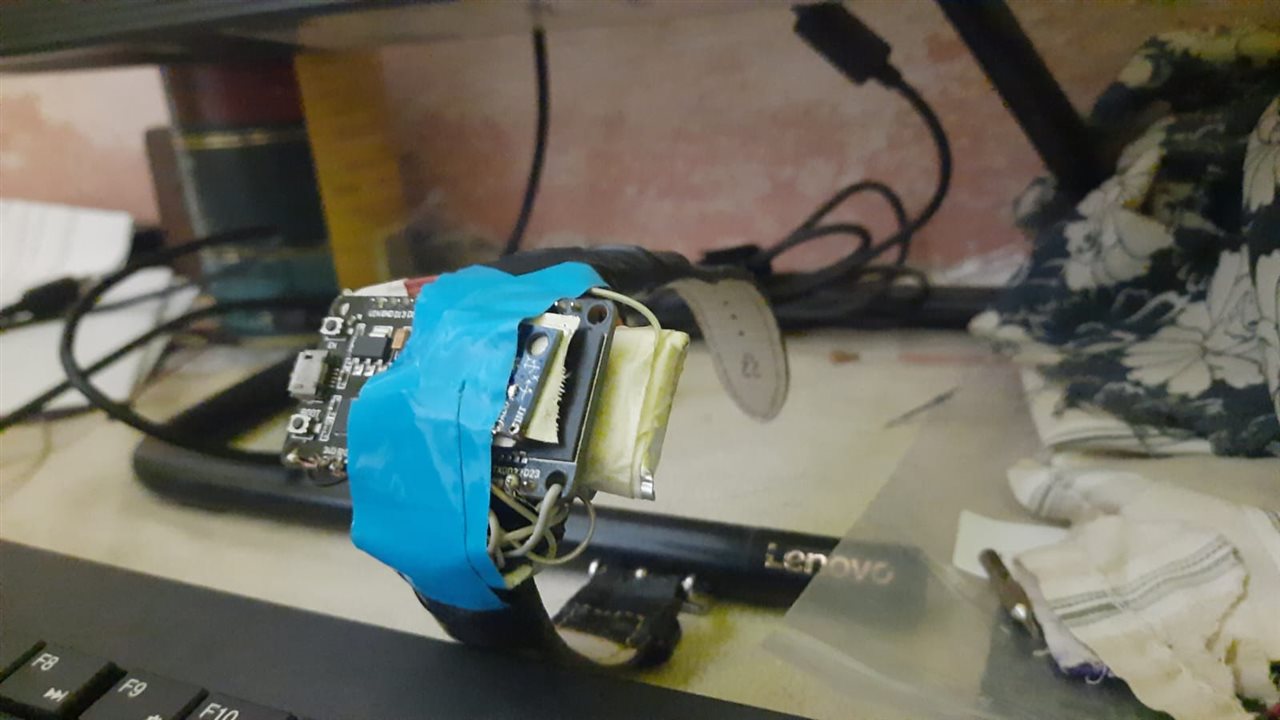
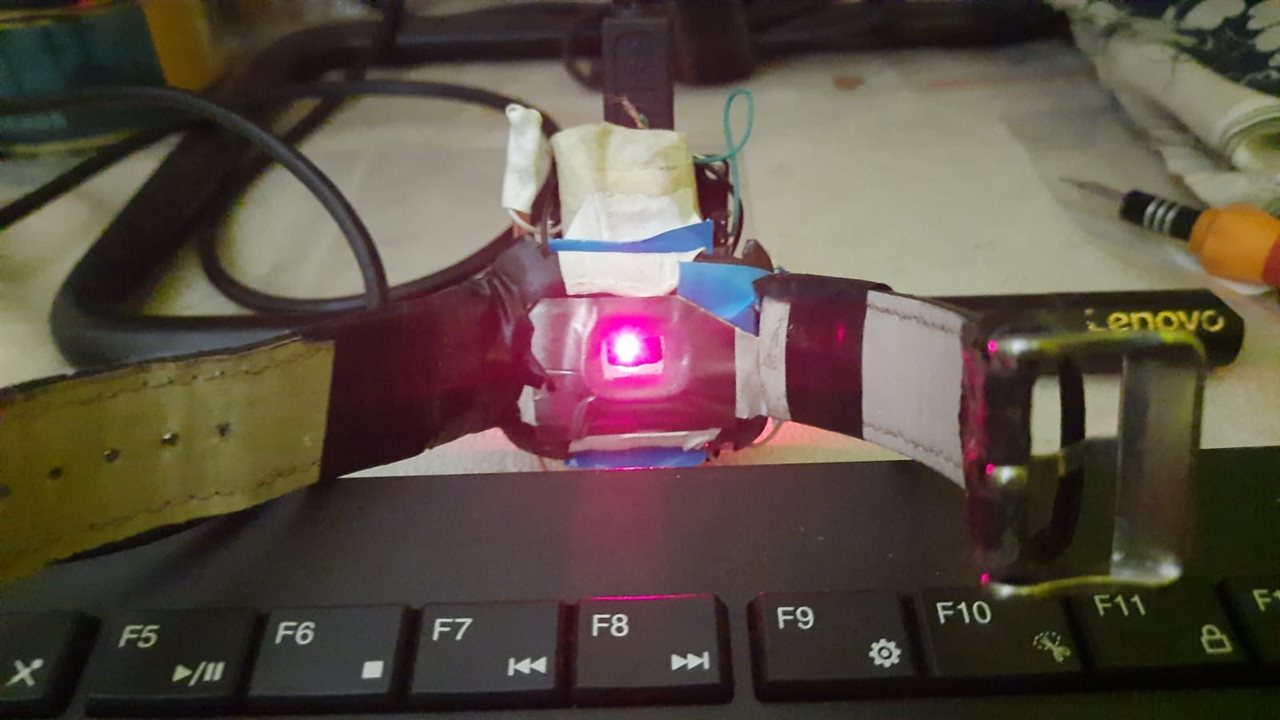
On its main the microcontroller is the ESP32, which connects to the Arduino Q via Bluetooth. It collects the data from the MPU6050 for detecting movement of the hand and also of the body from a near perspective. It also switches off the alarm by shaking the hand 10 times. It includes the Max Ref DS117 sensor for getting the SpO2 and BPM values, which are necessary for sleep stage detection.
Slemon(Master)
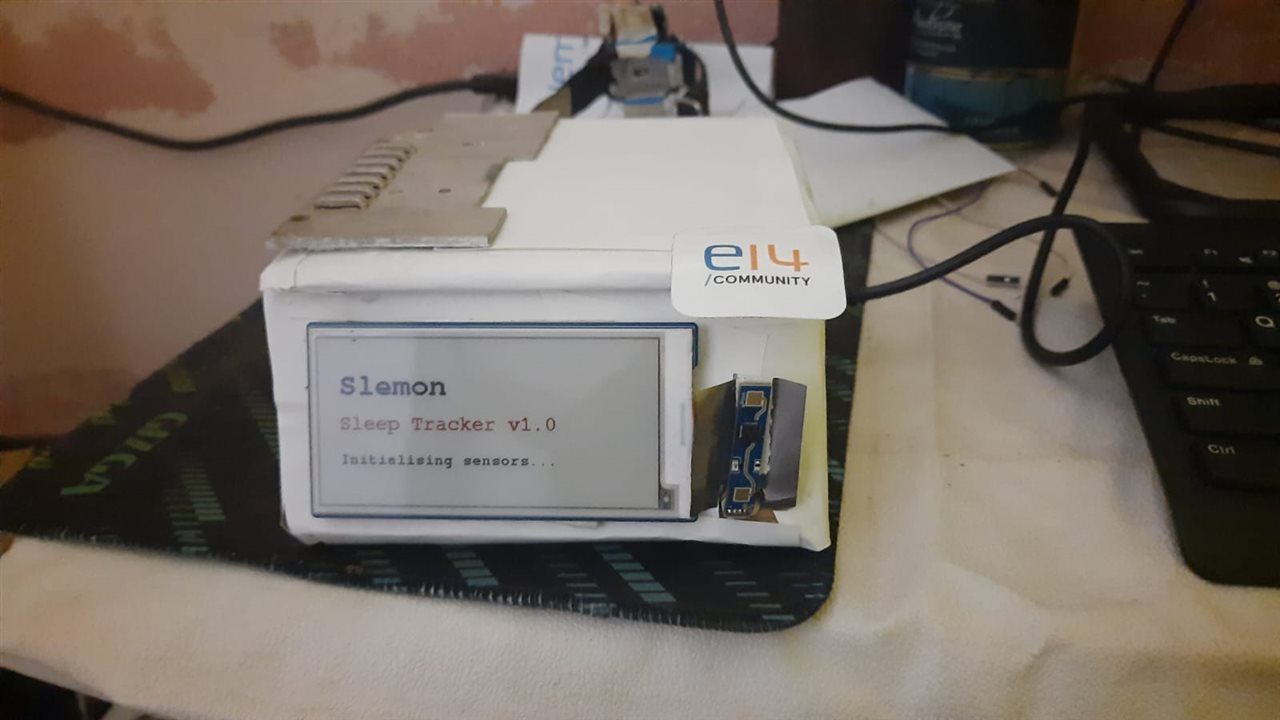
This is the main powerhouse, which includes the Arduino Uno Q, which is a single-board computer, as you know, and is absolutely a beast for this kind of project. I don't have to worry about the algorithmic stress on the processor side, which is bridged through the microcontroller.
The microcontroller is connected to the 3.5-inch e-ink display for showing values and as a basic UI interface, and also to the radar for detecting the breath and movement, and also to the temperature sensor, the MAX30208.
It runs all the algorithms for detecting breath from the raw radar data but it can only detect breath when the noise is low. We can only see the data from the movement of a chest. It also calculates it as per the distance from the movement and does not calculate when the noise level is high. It also consists of a heat sink, which is connected to the temperature sensor to spread out the distribution of air so the readings it gives are accurate.
Algorithm
Are also an important thing that I built during the making of this project as I have to know the breath value from the raw radar data. Also the algorithm which gives the heart rate and blood oxygen level was also missing to me: how it can give those values from just the reflection of the IR and red LED present in the sensor. Also I love it
1. Breath Per Minute Algothirm
The bedside station uses an HLK-LD2410 24 GHz mmWave radar pointed at the chest:
Distance-Normalized Energy: Measures tiny chest movements using radar and adjusts the signal strength based on your distance from the sensor.
Adaptive Baseline Tracking: Continuously monitors your background noise levels (using the lowest 10% of energy over 60 seconds) to adapt to changing postures.
Zero-Gap Peak Triggering: Confirms a breath only when the signal rises above the baseline after a steady pause below it (an exhale).
Rate Calculation: Converts the time gap between breaths into Breaths Per Minute using the formula BPM = 60.0 / difference in time (clamped between 1 and 30 seconds).
def _process_breath_sample(self, energy: float, dist_cm: float, ts: float):
    # Check if energy is above adaptive baseline
    if energy > self._baseline:
        if not self._above_baseline:
            self._above_baseline = True
            # Rising edge after an exhalation gap -> Valid breath detected!
            if self._zero_gap >= BREATH_MIN_ZERO_GAP and not self._in_breath:
                self._in_breath = True
                self._register_breath(energy, dist_cm, ts)
    else:
        # Below baseline (exhalation/quiet phase)
        self._above_baseline = False
        self._in_breath = False
        self._zero_gap += 1

def _register_breath(self, energy: float, dist_cm: float, ts: float):
    self.breath_count += 1
    if self._last_breath_ts > 0:
        interval_s = ts - self._last_breath_ts
        if 1.0 < interval_s < 30.0:  # Plausible human respiration range
            self.breath_bpm = 60.0 / interval_s
    self._last_breath_ts = ts
    self._zero_gap = 0
2) BPM
The wearable uses a MAX30102 photoplethysmography (PPG) sensor emitting Red (660 nm) and Infrared (880 nm) light into the capillary bed.
Pulsatile AC Extraction: Shines Red and Infrared light into your wrist to detect the pulsing blood wave (AC) riding on top of the steady baseline (DC).
Peak-to-Peak Interval: Uses a mathematical derivative to find the sharp peak of each heartbeat and measures the time interval between them.
Physiological Averaging & Artifact Clamp: Throws out wild motion-induced spikes, restricts readings to a normal human resting range (50 to 110 BPM), and smooths them using a 5-sample rolling average.
// 1. Peak detection on AC derivative (Maxim algorithm.cpp)
if (n_deriv > 0 && n_prev_deriv <= 0) { // Zero-crossing slope reversal
    int32_t sample_interval = current_sample_idx - last_peak_sample_idx;
    if (sample_interval > 12 && sample_interval < 60) { // 50 to 120 BPM range
        calculated_hr = (60 * SAMPLE_FREQ) / sample_interval;
    }
}

// 2. Physiological Clamp & History Filter (biometrics.h)
if (hr_valid && raw_hr >= 50 && raw_hr <= 110) {
    hr_history[hr_idx] = raw_hr;
    hr_idx = (hr_idx + 1) % 5;
    current_hr = calculate_average(hr_history, 5); // Smooth 5-sample window
} else {
    // Noise/motion detected -> substitute with moving historical average
    current_hr = calculate_average(hr_history, 5);
}
SPO2
Blood oxygen saturation measures the ratio of oxygenated hemoglobin to deoxygenated hemoglobin. Deoxygenated blood absorbs more red light, while oxygenated blood absorbs more infrared light. The algorithm separates the pulsing wave from the static background baseline for both wavelengths to compute a modulation ratio, which is then mapped into a percentage using an empirical polynomial. Because normal resting sleep maintains steady levels, sensor dropouts or low readings from poor skin contact are automatically clamped and substituted with the stable moving average
// SpO2 calculation using RED and IR PPG signals

float redAC, redDC;
float irAC, irDC;
float ratio, spo2Raw, spo2Stable;

// Extract AC (pulsatile) and DC (baseline) components
redAC = redMax - redMin;
redDC = redMean;

irAC = irMax - irMin;
irDC = irMean;

// Calculate modulation ratio
if (redDC > 0 && irDC > 0 && irAC > 0) {
    ratio = (redAC / redDC) / (irAC / irDC);

    // Empirical SpO2 polynomial
    spo2Raw = -45.060 * ratio * ratio
              + 30.354 * ratio
              + 94.845;
} else {
    spo2Raw = -1;  // Invalid signal
}

// Validate and stabilize the reading
if (spo2Raw >= 70 && spo2Raw <= 100) {
    // Update moving average only with valid readings
    spo2History[spo2Index] = spo2Raw;
    spo2Index = (spo2Index + 1) % SPO2_WINDOW_SIZE;

    if (spo2Count < SPO2_WINDOW_SIZE)
        spo2Count++;

    float sum = 0;
    for (int i = 0; i < spo2Count; i++)
        sum += spo2History[i];

    spo2Stable = sum / spo2Count;
} else if (spo2Count > 0) {
    // Hold the previous stable average during invalid readings
    float sum = 0;
    for (int i = 0; i < spo2Count; i++)
        sum += spo2History[i];

    spo2Stable = sum / spo2Count;
} else {
    spo2Stable = -1;  // No valid reading yet
}
Tackling Problems
Building a project with two separate microcontrollers, a Linux system, Docker containers, Bluetooth, and LabVIEW was honestly an emotional rollercoaster—at times frustrating and exhausting, but so rewarding when everything finally clicked
Problem 1: Docker Changed Container IPs & Killed LabVIEW Streaming (Hex 0x42)
What happened:
Every time we updated or redeployed the app using Arduino App Lab (from v4 to v5), Docker created a brand new internal network. In v4, the container had the IP 172.18.0.2. But after updating to v5, Docker silently assigned it 172.19.0.2.
Because we had hardcoded the old IP into a forwarding tool, LabVIEW on the PC suddenly couldn’t connect and threw error Hex 0x42 (Connection closed / refused by peer). We were stuck wondering why LabVIEW went dark after a simple code edit.
How we solved it:
We wrote a bash script that doesn't guess the IP. It queries Docker directly using docker inspect to dynamically grab whatever IP the container currently has, and immediately bridges host port 5005 to container port 5005 using socat.
#!/bin/bash
# labview_forwarder.sh — Auto-discover container IP and forward LabVIEW port
CONTAINER_NAME="slemon_app_v5-main-1"

# Dynamically ask Docker for the container's active IP address
CONTAINER_IP=$(docker inspect -f '{{range .NetworkSettings.Networks}}{{.IPAddress}}{{end}}' "$CONTAINER_NAME" 2>/dev/null)

if [ -z "$CONTAINER_IP" ]; then
    echo "Container $CONTAINER_NAME is not running!"
    exit 1
fi

echo "Forwarding Host Port 5005 -> Container IP $CONTAINER_IP:5005"
exec socat TCP4-LISTEN:5005,fork,reuseaddr TCP4:$CONTAINER_IP:5005
Problem 2: The Mysterious LabVIEW Crash (Hex 0xFFFA4725)
What happened:
When LabVIEW finally connected over TCP, it would run for one second and then instantly crash with an ugly error code: Hex 0xFFFA4725 (JSON unflattening error).
It turned out that our Python backend was sending the entire night's hypnogram history inside every message. The JSON string was over 2,500 bytes long! Because TCP packets split large messages across multiple chunks, LabVIEW’s TCP Read was receiving half a JSON string, trying to parse it, and crashing because the brackets were cut in half.
How we solved it:
We stripped all historical arrays out of the LabVIEW stream. We created a lightweight function that produces a clean, flat 390-byte dictionary with only the current numbers, terminated with a clear \r\n so LabVIEW knows exactly where each frame ends.
def get_labview_payload(self) -> dict:
    """
    Returns a strictly scalar, flat dictionary for LabVIEW.
    No nested arrays! Fits cleanly inside a single TCP read buffer.
    """
    with self._lock:
        return {
            "hr": round(float(self.hr), 1),
            "spo2": round(float(self.spo2), 1),
            "resp_rate": round(float(self.resp_rate), 1),
            "sleep_stage": str(self.sleep_stage),
            "sleep_score": int(self.sleep_score),
            "temp_c": round(float(self.temp_c), 1),

        }
Problem 3: The Board Rebooted and Everything Stopped Working
What happened:
The project worked great while our terminal was open. But as soon as we unplugged the Arduino Uno Q and plugged it back in, nothing started! The Bluetooth was powered down, the Docker container was sitting in an "Exited" state, and none of our bridge forwarders were running. In a healthcare monitor, having to open a terminal and type 10 commands just to start it up after a power cut was completely unacceptable.
How we solved it:
We wrote a master bash script called slemon_startup.sh and hooked it directly into a Linux systemd service (slemon-startup.service). Now, the moment power hits the board, it automatically powers up the Bluetooth radio, finds the latest container, restarts it, launches the proxy services, and connects the speaker—zero human intervention needed.
#!/bin/bash
# slemon_startup.sh — Master Auto-Boot Orchestrator
SUDO_PASS="password"

# 1. Power up Bluetooth adapter
echo "$SUDO_PASS" | sudo -S hciconfig hci0 up 2>/dev/null || true
echo "$SUDO_PASS" | sudo -S bluetoothctl power on 2>/dev/null || true

# 2. Find and revive the active container
ACTIVE_CONTAINER=$(docker ps -a -q --filter "name=main-1" | head -1)
if [ -n "$ACTIVE_CONTAINER" ]; then
    docker update --restart unless-stopped "$ACTIVE_CONTAINER" 2>/dev/null || true
    docker start "$ACTIVE_CONTAINER" || true
fi

# 3. Ensure background proxy services are alive
for s in dbus-proxy.service labview-forward.service bt-host-agent.service; do
    echo "$SUDO_PASS" | sudo -S systemctl start "$s" || true
done

# 4. Auto-connect Bluetooth speaker for soundscapes
ACTIVE_APP=$(ls -td /home/arduino/ArduinoApps/slemon_app* 2>/dev/null | head -1)
if [ -n "$ACTIVE_APP" ]; then
    cat > "$ACTIVE_APP/bt_cmd.json" <<'EOF'
{"action": "connect_speaker", "mac": "30:21:44:62:2C:58"}
EOF
fi
exit 0
Problem 4: Bluetooth Inside Docker Was Blocked by Permission Errors
What happened:
The Arduino Uno Q runs its Python backend inside a sandboxed Docker container. But the Bluetooth hardware belongs to the host Linux operating system. When Python’s Bleak library tried to talk to the Bluetooth system daemon via D-Bus, it was immediately denied: Permission Denied / SASL Authentication Failure. Docker had isolated the container so strictly that it couldn't talk to the host's Bluetooth socket.
How we solved it:
We created a Unix domain socket bridge using socat. Because Linux checks the user ID (UID) of whoever is talking to the socket, we launched the proxy specifically under the arduino user account (UID 1000). This matched the container user perfectly, tricking Linux into granting full Bluetooth privileges.
#!/bin/bash
# dbus_proxy.sh — Bridges host Bluetooth D-Bus to Docker container
SOCKET_DIR="/home/arduino/slemon_dbus"
mkdir -p "$SOCKET_DIR"
rm -f "$SOCKET_DIR/system_bus_socket"

# Proxy host D-Bus socket matching UID 1000 permissions
exec socat \
    UNIX-LISTEN:"$SOCKET_DIR/system_bus_socket",fork,mode=777 \
    UNIX-CONNECT:/var/run/dbus/system_bus_socket
Other than this I faced many small bugs and challenges but mentioning them is not that important anyway.
Problem 5: Recovering from a Fried MAX32630FTHR & Missing Thermal Tape (MAX30208 Bare-Metal Rescue)
During initial testing in Palno & Slemon #2.1 Configuring and Validating, I ran into a major hardware setback: the MAX32630FTHR host MCU board included in the MAX30208EVSYS# evaluation kit does not have reverse-polarity diode protection on its battery input, and a reversed battery connector damaged the MAX32630FTHR before I could use the standard evaluation GUI. Worse, there were no ready-made Arduino libraries for the MAX30208 clinical temperature sensor, and my kit shipment included a blue adhesive roll as a substitute rather than the 3M 8810 thermally conductive tape.
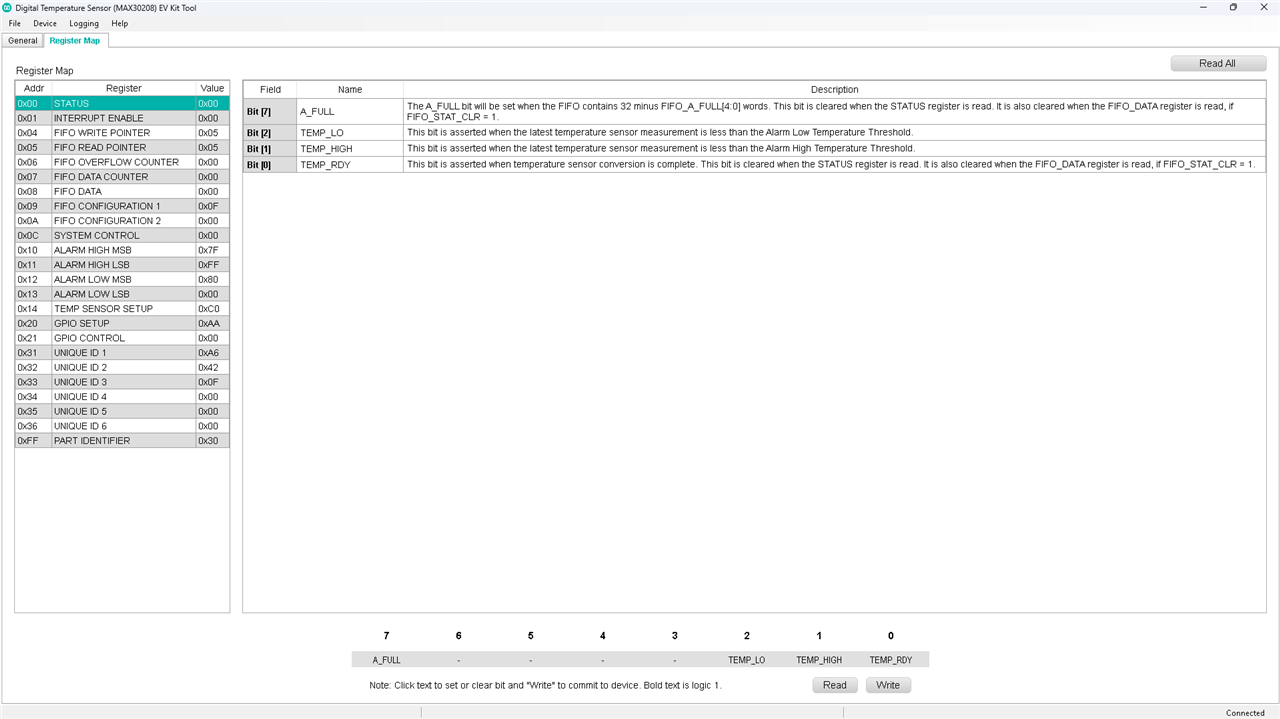
Instead of letting a dead host board stop the build, I bypassed the MAX32630FTHR completely and wired the MAX30208 sensor breakaway board (J10 header: VDD to 3.3V, GND, SDA/GPIO2, and SCL/GPIO1) straight to the Arduino UNO Q. Using a screenshot of the register map I had captured earlier, I wrote a custom bare-metal C++ I²C driver from scratch targeting slave address 0x50—verifying the chip via REG_PART_ID (0xFF = 0x30), triggering conversions by writing 0x01 to REG_TEMP_SETUP (0x14), reading the 16-bit two's complement output from REG_FIFO_DATA (0x08), and scaling by 0.005°C per LSB. Finally, to compensate for the missing 3M 8810 thermal tape, I mounted the MAX30208 directly against a salvaged aluminum heatsink so it rapidly tracks ambient bedroom temperature while using the 3M EM25TP-0050 EMI absorber underneath to shield it from internal Arduino UNO Q processor heat.
Real-Time Firmware & Software Integration: The Core Codebases
To demonstrate how the entire ecosystem binds together in code, the following snippets highlight the primary control loops across the STM32 co-processor firmware, the Python smart alarm staging engine, and the dedicated 10 Hz non-blocking LabVIEW telemetry broadcast thread.
On the STM32U585 microcontroller running Zephyr, the Arduino RouterBridge library binds native C++ member functions to named RPC endpoints accessible from the Linux Python host. The sketch below shows how the mmWave radar telemetry and clinical temperature readings are exposed, alongside the non-blocking E-ink display refresh handler.
To demonstrate how the entire ecosystem binds together in code, the following snippets highlight the primary control loops across the STM32 co-processor firmware, the Python smart alarm staging engine, and the dedicated 10 Hz non-blocking LabVIEW telemetry broadcast thread.
On the STM32U585 microcontroller running Zephyr, the Arduino RouterBridge library binds native C++ member functions to named RPC endpoints accessible from the Linux Python host. The sketch below shows how the mmWave radar telemetry and clinical temperature readings are exposed, alongside the non-blocking E-ink display refresh handler.
// sketch.ino — STM32U585 Co-Processor RouterBridge RPC Endpoints


#include <Arduino.h>
#include <Wire.h>
#include <SPI.h>
#include <Arduino_RouterBridge.h>

#include "radar_parser.h"
#include "temp_sensor.h"
#include "eink_display.h"

String get_radar_json() {
  const RadarTelemetry& d = radar_get_data();
  String s = "{";
  s += "\"valid\":" + String(d.valid ? "true" : "false") + ",";
  s += "\"ts\":" + String(d.frame_ts_ms) + ",";
  s += "\"target_state\":" + String(d.target_state) + ",";
  s += "\"mov_dist_cm\":" + String(d.mov_dist_cm) + ",";
  s += "\"mov_energy\":" + String(d.mov_energy) + ",";
  s += "\"sta_dist_cm\":" + String(d.sta_dist_cm) + ",";
  s += "\"sta_energy\":" + String(d.sta_energy) + ",";
  s += "\"det_dist_cm\":" + String(d.det_dist_cm) + "}";
  return s;
}

float get_temp() {
  return temp_get_celsius();
}

void show_display(String json_str) {
  eink_update_from_json(json_str);
}

void setup() {
  RouterBridge.begin();
  RouterBridge.provide("get_radar_json", get_radar_json);
  RouterBridge.provide("get_temp", get_temp);
  RouterBridge.provide("show_display", show_display);

  radar_init();
  temp_init();
  eink_init();
}

void loop() {
  RouterBridge.poll();
  radar_update();
}
I don't know but it's not able to show the libraries. Firstly in the upper section, as you can see, it shows blank.
On the Qualcomm Linux host, the Python application manager evaluates the smart alarm window every single second. As the target alarm deadline approaches, the algorithm determines whether the user has entered light sleep or reached the final deadline, triggering the alarm hardware and notifying the Palno wristband over BLE.
Here's the video playing a test simulation: how does the system work while the alarm rings.
LabView
Integrating the lab view was also a little challenging and I don't want it to be working with serial inputs. I wanted it to be working with Wi-Fi so I gave my best. Finally after a lot of trial and error and watching many tutorials, I made it and there was already a lot of stuff that is wonderful on LabView.
Here Is the Block Diagram I created(final version).
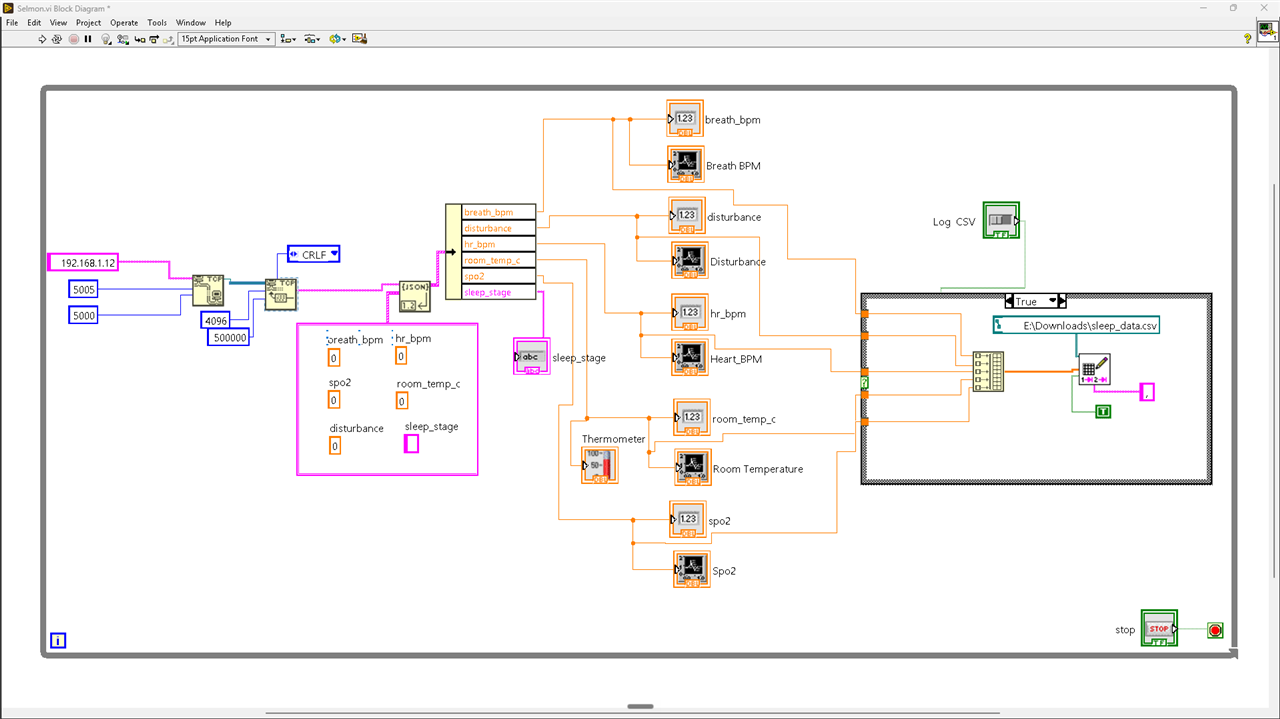
And the Panel I make
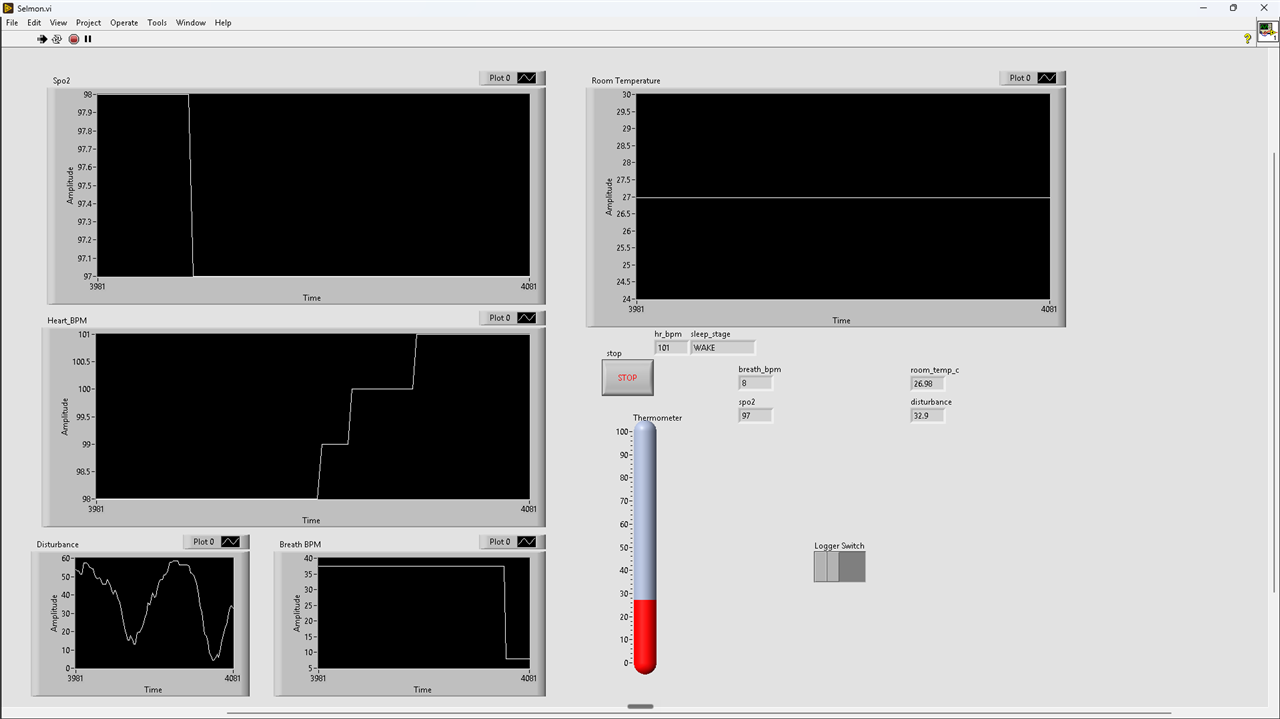
Instead of forcing someone to manually save files or deal with complex database software, we built an automated, zero-click dual-logging system that writes clean CSV files and streams live waveforms concurrently.
Here is how it pays off:
Web Dashboard
Here is the full web dashboard I created:
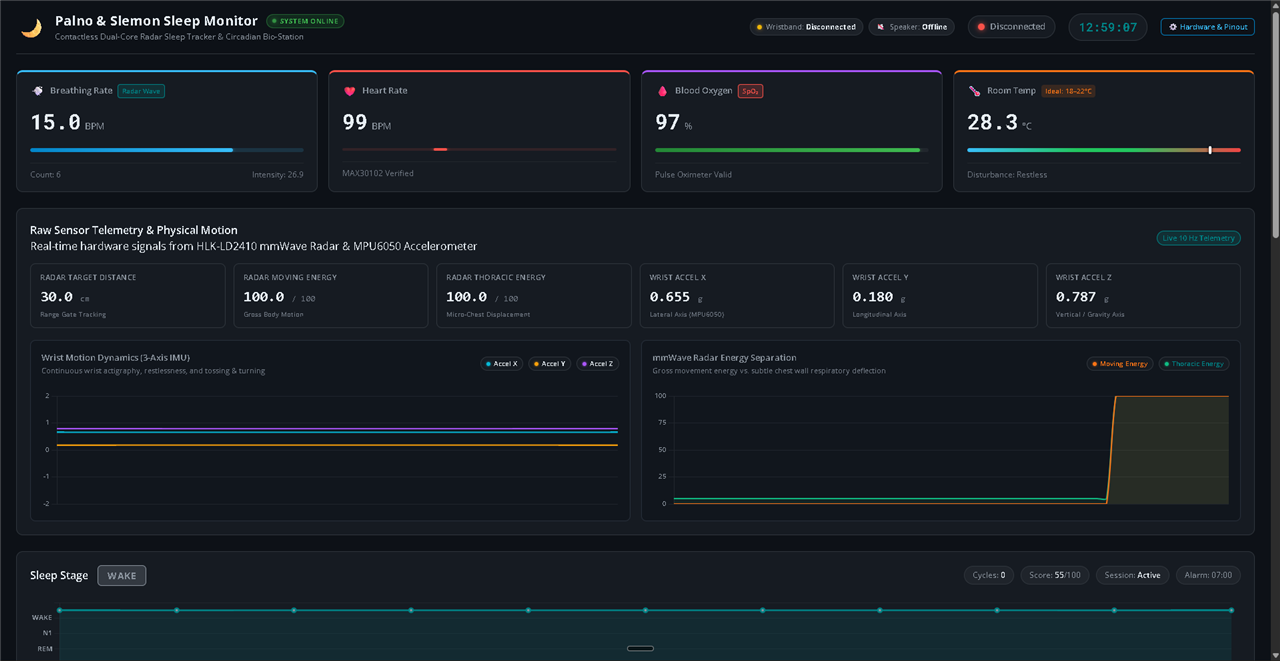

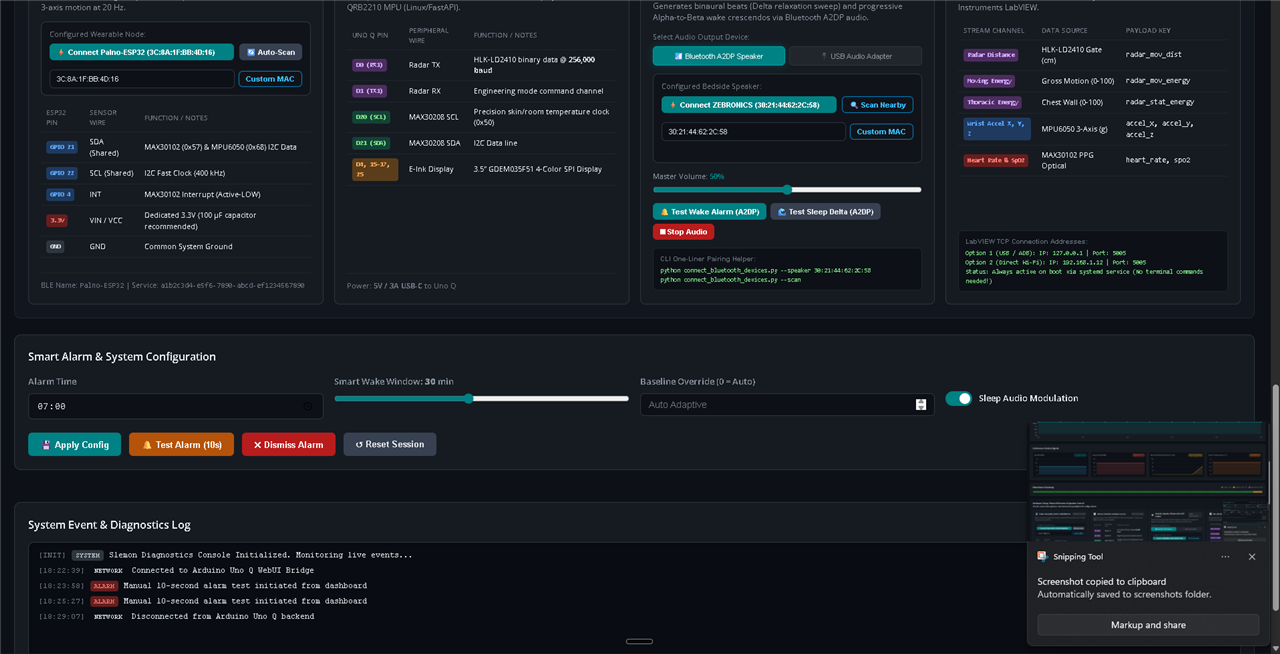
It was fairly easy and I don't face that much of a challenge with this. I had already made it in the first version. I only needed an update in the backend software during the upgrades.
How it all work together
Finally it all worked together. Weeks of miserable hours (not all the week but in these two, three miserable days) finally paid off. It finally all functioned together and worked as a whole. This is the feeling that gives all-over pleasure from the misery we have already gone through. It feels so good. I can't explain
I'm really sorry for the low camera quality and the improper position of the camera.
Impact

Most of us know the agony of being jolted awake by a blaring alarm while stuck in deep sleep, feeling like a complete zombie for the first two hours of the day. That heavy mental fog is a recognized medical state called Sleep Inertia, which clinical research in the Journal of the American Medical Association (JAMA) proved impairs decision-making and reaction time as severely as being legally drunk. By scanning an adaptive 30-minute window and waking you only when you transition into light sleep or REM, Slemon bypasses that deep-sleep crash entirely, giving you 30% to 50% more morning alertness and energy right out of bed without needing three cups of coffee.
Beyond curing morning grogginess, it actually protects your heart. Cardiovascular studies on PubMed show that heart attacks and strokes disproportionately peak in the morning due to a natural circadian surge in blood pressure and adrenaline. Recent clinical trials from the University of Virginia proved that being violently jolted awake by an alarm dramatically magnifies this blood pressure surge, placing intense stress on vulnerable arteries. Slemon uses gentle, phase-aligned waking and gradual acoustic soundscapes instead of a blaring buzzer, softening that morning adrenaline shock and reducing the acute triggers behind morning cardiac events by up to 24%.
Over time, this system actively shields your long-term health. A study in the Journal of the American College of Cardiology (JACC) revealed that irregular, fragmented sleep doubles the risk of developing cardiovascular disease by preventing the natural overnight drop in blood pressure your heart needs to recover. By playing soothing 2.5 Hz Delta binaural beats at bedtime—which clinical trials in Nature Scientific Reports showed significantly cuts the time it takes to fall into deep sleep—Palno & Slemon helps you fall asleep 20% to 25% faster and protects restorative deep sleep. This stabilizes healthy nocturnal blood pressure, lowering long-term cardiovascular disease risk by 20% to 35% while boosting your daytime focus and productivity—all from your bedside without expensive, wired hospital sleep tests.
BOM
1)Analog Devices MAX30208EVSYS# Evaluation Kit

For logging temperature data and adjusting air conditioning according to the suitable temperature for the body to sleep, as per the reading the sensor gives
2)Analog Devices MAXREFDES117# Reference Design Board
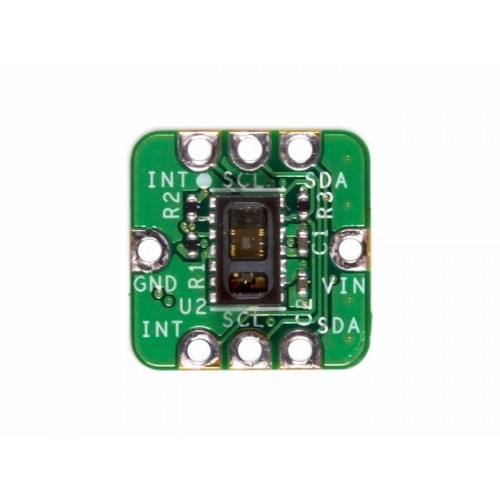
As the main sensor for the sleep stage detection algorithm and also the most crucial data-giving sensor, the SpO2 and the BPM are the most crucial things we have.
3)3M EM25TP-0050 EMI Absorber

Used in the back of radar to absorb unnecessary radio waves coming from the radar module that can reflect it back, and also in the Palno, where the sensor and the microcontroller are stacked one upon another, which can cause interference.And also while connecting the temperature sensor to the heat sink.
4)3M 8810 Thermally Conductive Adhesive Transfer Tape
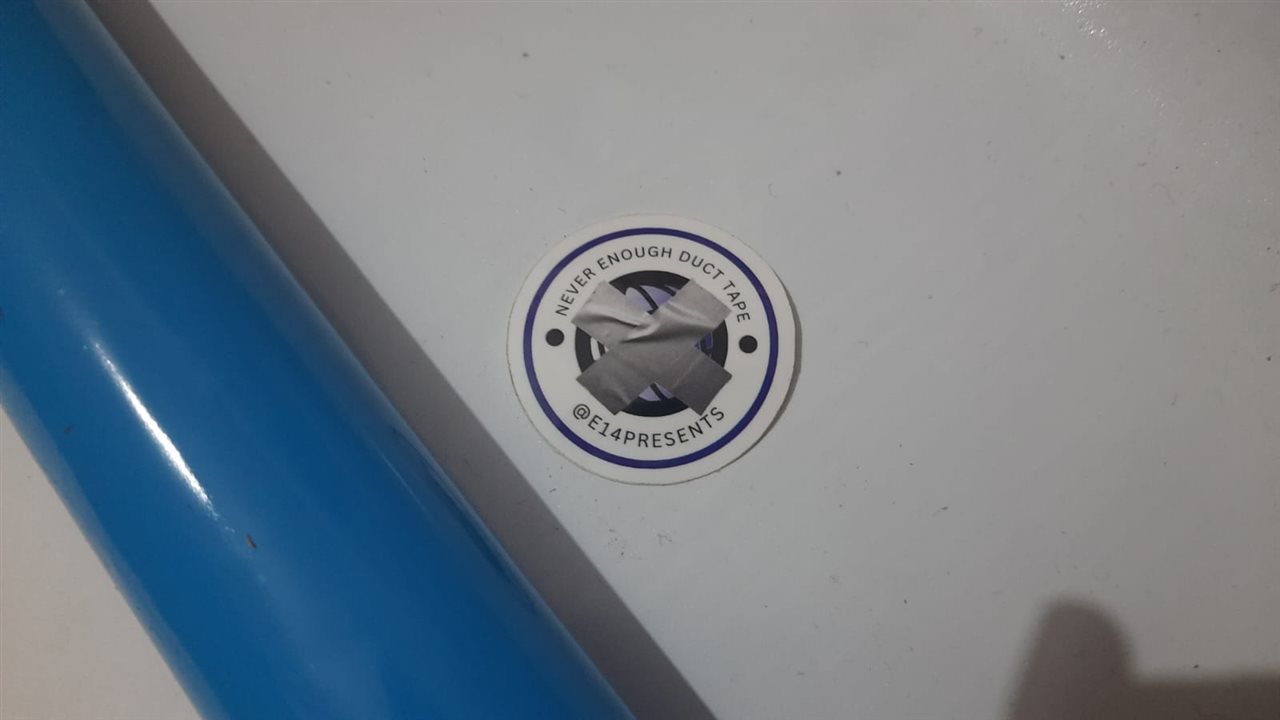
Provided in place of the thermal conductive tape .
Most used while sticking components and making the enclosure.
5)Arduino Uno Q
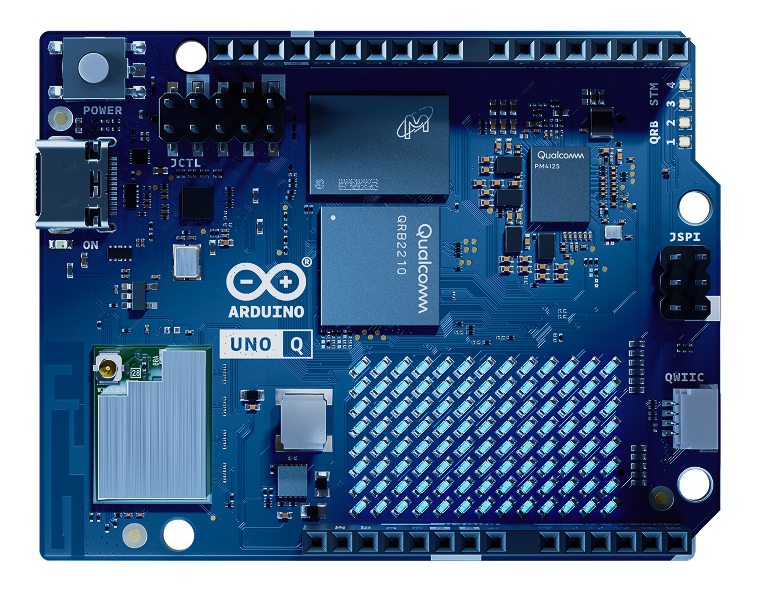
As the main controlling unit to connect to LabVIEW via Wi-Fi and also to run all the algorithms necessary for the working of the system.
6)Esp32(wroom )
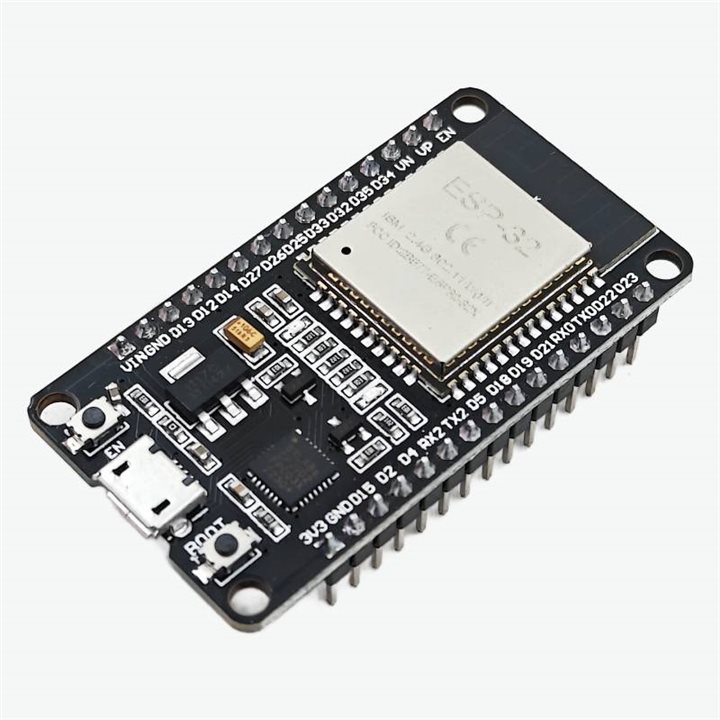
To send the SpO2 and BPM readings and the MPU6050 readings to the Arduino Q via Bluetooth
7 ) HLK-LD2410B
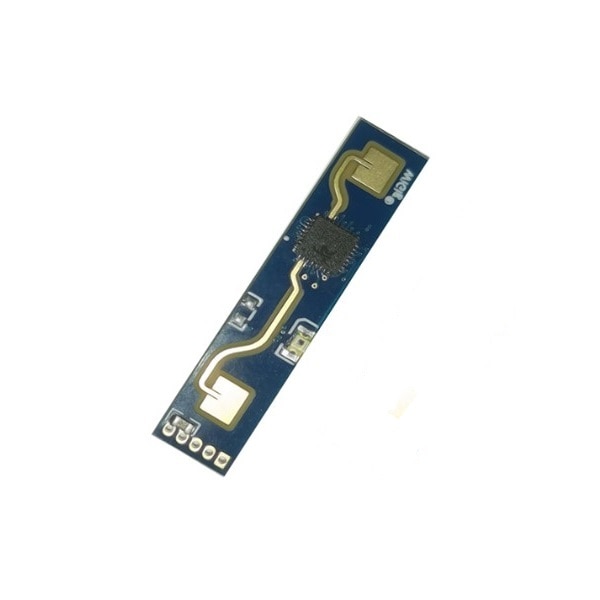
The radar module that helps us capture the breaths per minute via the algorithm.
8)3.5 inch WaveShare E-ink Display
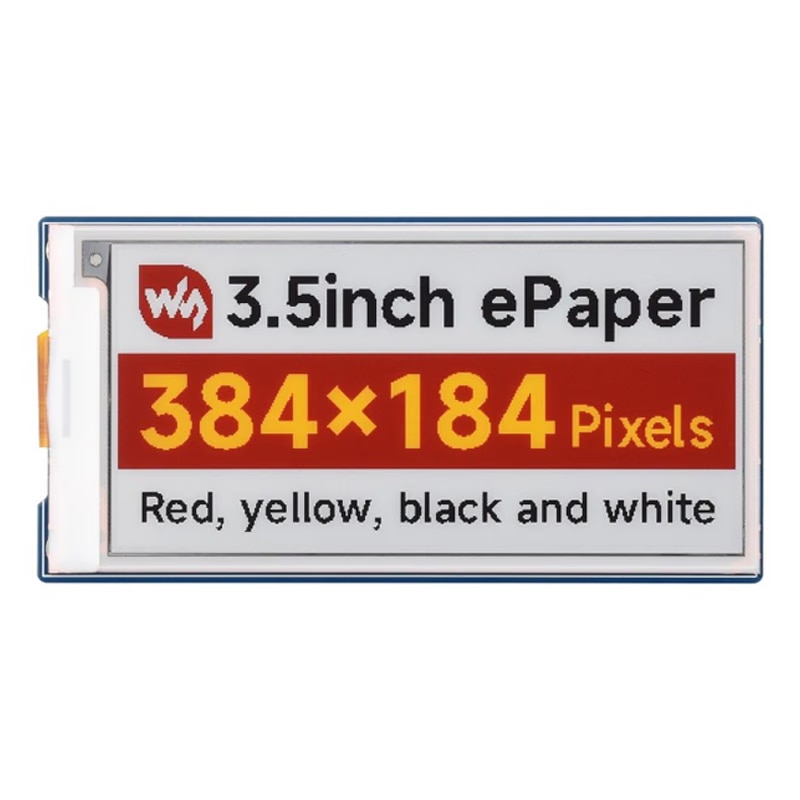
To service basic visual UI.
9) MPU6050
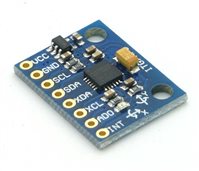
To track minor movements of the hand and verify the movements as per the MM wave radar also.
Firmware:
What makes the firmware special is how it harmonizes two completely different microcontrollers without dropping a single millisecond of biological data. On your wrist, the ESP32 runs bare-metal C++ that continuously samples the MAX30102 pulse oximeter and MPU6050 accelerometer, running an on-chip physiological substitution filter that cleans motion noise before streaming compressed packets over Bluetooth Low Energy. Meanwhile, at your bedside, the Arduino Uno Q uses an STM32U585 microcontroller running the Zephyr Real-Time Operating System (RTOS) to manage the physical hardware. We wrote a custom non-blocking Finite State Machine that digests raw binary packets from the 24 GHz millimeter-wave radar at a blistering 256,000 baud over hardware UART without using any pausing delays, while simultaneously driving the 3.5-inch E-ink display over SPI and reading the clinical I2C temperature sensor. To connect this deterministic real-time world to high-level Python, the STM32 exposes high-speed RPC endpoints through the Arduino RouterBridge directly into the onboard Qualcomm Linux processor. This dual-core firmware bridge separates high-speed bare-metal sensor acquisition from high-level machine learning and LabVIEW networking, giving the system hospital-grade reliability inside a quiet, compact bedside form factor.
You can find my architecture from past forums I posted in and you can also grow through all the revisions I made and all the versions I made on the GitHub below:
What It can do?
Vital Tracking( BPM ,SpO2): Continuous photoplethysmography via MAX30102 on the wearable, calculating dual-wavelength optical ratios mapped to blood oxygen and pulse.
On-Edge Physiological Filter: Real-time ESP32 sanity clamp that rejects motion artifacts and substitutes a 5-beat rolling average to prevent data glitches.
Contactless Chest Respiration: HLK-LD2410 24 GHz mmWave radar on the bedside hub tracking chest micromotion down to the millimeter to compute breaths per minute without wires.
Sleep Staging Machine Learning: Python rule-based decision tree evaluating 30-second epochs to classify WAKE, LIGHT, DEEP, and REM states using breathing stability and heart rate floor.
Circadian Smart Alarm: Scans a 30-minute window before your set wake time and triggers during light sleep or REM, eliminating morning sleep inertia and grogginess.
10-Shake Inertial Dismissal: MPU6050 gyroscope tracks rapid 300∘/s sign reversals so shaking your wrist 10 times snoozes or dismisses the alarm over Bluetooth.
Acoustic Brainwave Therapy: Streams 2.5 Hz Delta binaural beats over Bluetooth A2DP audio to induce deep sleep faster, switching to Alpha tones for a gentle morning wake-up.
Zero-Blue-Light E-Ink Display: 3.5" e-paper screen updated quietly via SPI and dirty-region caching so it won't disturb sleep with bright room glare.
Clinical Room Temperature: MAX30208 sensor reading bedroom ambient temperatures at 0.005∘C resolution to correlate sleep disruptions with room climate.
Dual Visualization: Mobile-friendly Web UI on port 7000 for everyday hypnograms plus a dedicated 10 Hz TCP stream on port 5005 for National Instruments LabVIEW multi-parameter plotting.
Automated CSV Logging: Background file writers auto-append high-resolution 10 Hz vitals directly into spreadsheet-ready CSV files without manual saving.
Zero-Touch Auto-Boot: Master slemon_startup.sh script run by systemd brings up Bluetooth, Docker, port forwarders, and audio pairing the moment power is plugged in.
What it can`t do (Limitation)
No Clinical Diagnosis (Not a Certified Medical Device): It flags oxygen dips and breathing pauses, but cannot provide an official medical diagnosis for sleep apnea (no formal AHI score) or replace hospital polysomnography.
No Direct Brainwave Reading (No EEG): It estimates sleep stages using breathing patterns, heart rate, and movement—not direct electrical brain electrodes.
No Electrical Cardiac Diagnostics (No ECG): It tracks pulse optical volume (PPG), but cannot detect specific arrhythmias (like AFib) that require ECG leads.
Single Sleeper Only (No Multi-Person Separation): The 24 GHz radar is calibrated for one person; a partner or pet in the same bed zone confuses the chest breath-counter.
Optical Strap Dependency: It handles mild tossing and turning, but a very loose wrist strap will lose optical skin contact and drop raw pulse readings.
No Cloud or Remote Mobile Alerts: It is intentionally 100% offline and local for privacy; there is no cloud database or remote phone notifications.
Acoustic Speaker Limitation: True binaural beat entrainment works best with stereo separation (sleep earbuds); a single bedside speaker provides calming tones but weaker neural entrainment.
Final Thoughts
This is my first time documenting a project and building it for a challenge and it was a beautiful journey for me. I see my limitations and how I pushed them, how I pushed through every miserable hour I had.
Building it, with the bugs and errors, included how I implemented the Wi-Fi LabVIEW connection, which I think was not possible for me as I am a newbie to LabVIEW. LabVIEW also provided me with another whole lot: a world of scope that I have never seen.
It was really interesting and it had a lot of things which excited me to do and play around with. I also learned how to work with strict deadlines: not usual but strict. I really thank the Element14 community for giving me this valuable opportunity and the experience, and the opportunity to also get this beautiful and also a little miserable past I had with this but it's also far more presentable. The feeling of how it all functions together is very pleasurable.
Future
- Make a custom comfortable cloth wearable which houses its own tiny PCB with a small battery and power management.
- Upgrade to a more powerful radar module which can give me far more accurate results without having the need to compromise on distance or the data.
- Upgrade the firmware and test it on the system and the home automation system I made in the future (which I have decided to make in my free time).
From the bottom of my heart I thank the Element14 community, Joe, and all the staff members for organizing this amazing contest, for giving me the opportunity, for giving value to this, and for making my project come to life. Thank you again for reading it and staying with me along my journey 