


Hey everyone!
I received the Sponsored Challenger Kit on Wednesday April 9, 2026. I unboxed the kit and took inventory of the contents. Everything was there, including some neat stickers from Element14. Unboxing other evaluation kits, I’m refered to some sort of “getting started” path to become familiar with the device. I did not find one in the MAX32630FTHR package?Since I never experimented with it, I decided to do some research to try and figure out what to do with this thing.
I noticed some confusing labels on the Analog Devices product page—specifically that this board is "Not Recommended for New Designs" (NRND). What I surmise is it just means ADI isn't pushing it for mass-market commercial products anymore. Turns out, the MAX32630FTHR is an older generation chip. While it’s reliable, ADI has moved their focus to newer chips like the MAX32650 and the MAX78000 (AI-focused) series which are supported by the modern MSDK. For us hackers and makers, it’s still a powerhouse with a great FeatherWing form factor right.
OK Fine.. then I stumbled onto the Arm Mbed OS website MAX32630FTHR | Mbed and I see Mbed is reaching “End of Life” in July of this year 2026, plastered on this page and all over the website. Apparently, Mbed OS is being phased out in favor of newer IoT frameworks, making it a "legacy" choice for this board.
Ok, now I’m beginning to wonder how the heck to program this thing. I hear you can use the Arduino IDE from fellow challenger Alistair (check out his forum post Programming the MAX32630FTHR with the Arduino IDE (Don't Forget to Set) - element14 Community). Then I hear that another challenger arvindsa is going to use LPSDK ( check out https://community.element14.com/challenges-projects/design-challenges/smart-security-and-surveillance/f/forum/56840/identity-protocol---part-3---unboxing-and-blinking-with-maxim-lpsdk ) .
I stopped in my tracks and before jumping on the band wagon and starting installing development environments, I decided to write this blog for this forum post. I’m a software Engineer and interested in embedded programming tool chains (there’s a lot of them out there). I am now interested in finding out more about these two environments, and I find there is a third option available.
So here's a breakdown of how to actually program this thing in 2026.
Supported Development Environments
|
Environment |
Pros |
Cons |
|
Arduino IDE |
Massive library support; easiest for beginners; familiar "Blink" workflow. |
Harder to do deep register-level optimization; abstraction hides hardware complexity. |
|
PlatformIO (VS Code) |
Professional-grade; handles both Arduino and Mbed frameworks; great for version control. |
Steeper learning curve than Arduino; requires manual environment switching. |
|
Maxim LPSDK (Eclipse) |
Official C/C++ access is provided at the "bare-metal" level. This includes the original examples and drivers, encompassing all the bare-metal register files, peripheral drivers, and original C examples. |
Legacy software; Eclipse can be "clunky"; no longer receiving major updates. |
|
Mbed OS (Legacy) |
Built for ARM; great hardware abstraction for RTOS features. |
End of Life (EOL); online compiler is gone; community support is fading. |
MY Choice for Beginners: Arduino IDE
If you want to get a "Blinky" running in under 5 minutes, go with Arduino. Analog Devices maintains an official Arduino Core for Maxim git repo for Maxim's MAX326xx series based Boards.
Blinky Battle: Comparing the Frameworks
To see the differences in how these environments "think," let’s look at how they handle the onboard Green LED (P2_5).
1. The Arduino Way (Procedural)
C++
#include <Arduino.h>
void setup() {
  pinMode(LED_GREEN, OUTPUT);
}

void loop() {
  digitalWrite(LED_GREEN, LOW); // Active Low on this board!
  delay(500);
  digitalWrite(LED_GREEN, HIGH);
  delay(500);
}
- Why it’s different: It uses the standard setup/loop structure. It’s simple, but it hides the fact that you're interacting with a complex ARM Cortex-M4F.
2. The Mbed Way (Object-Oriented)
C++
#include "mbed.h"
DigitalOut green_led(LED_GREEN);
int main() {
  while(1) {
    green_led = !green_led; // Toggle logic
    thread_sleep_for(500);
  }
}
- Why it’s different: Mbed treats the LED as an "Object" (DigitalOut). It feels more like modern C++ and is built for multi-threaded applications.
3. The Bare-Metal / LPSDK Way (Register-Level)
C++
#include "mxc_device.h"
#include "gpio.h"
int main(void) {
const gpio_cfg_t led = { PORT_2, PIN_5, GPIO_FUNC_OUT, GPIO_PAD_NONE };
GPIO_Config(&led);
while (1) {
GPIO_OutToggle(&led);
for(int i=0; i<1000000; i++) { __NOP(); } // Manual delay
}
}
- Why it’s different: This is "the real deal." You are talking directly to the GPIO registers. It’s extremely efficient but requires you to understand the hardware datasheet inside and out.
I plan to try all Supported Development Environments mentioned above, starting with the Arduino IDE to verify my hardware works. Then,to move on to PlatformIO in VS Code. It gives you the best of both worlds: the ease of either using Arduino code or Legacy Mbed code. I might try Maxim LPSDK, since I'm familiar with Eclipse.
To set up a development environment for the MAX32630FTHR on Windows, you have several options ranging from beginner-friendly to professional-grade toolchains. Since Mbed OS is deprecated, the Arduino IDE or PlatformIO are now the recommended paths.
Required Hardware
For all environments, you must use a MAX32625PICO (DAPLink adapter) and a 10-pin ribbon cable to flash code to the MAX32630FTHR.
To prepare the boards for programming follow these steps:
- Connect the MAX32625PICO to the MAX32630FTHR board with the fine pitch 10 pin ribbon cable.
- Apply power to the MAX32630FTHR board through a micro USB connector.
- Connect the MAX32625PICO to a computer through a micro USB connector.
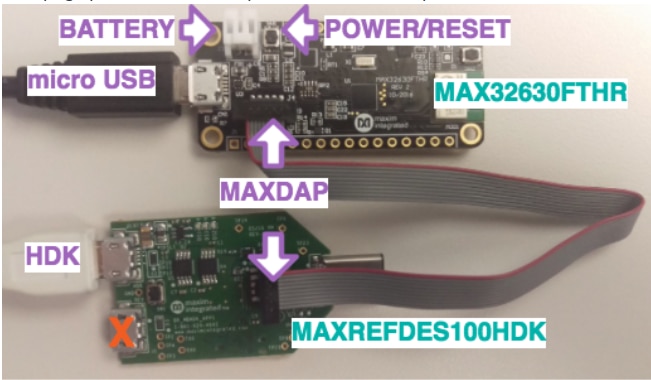
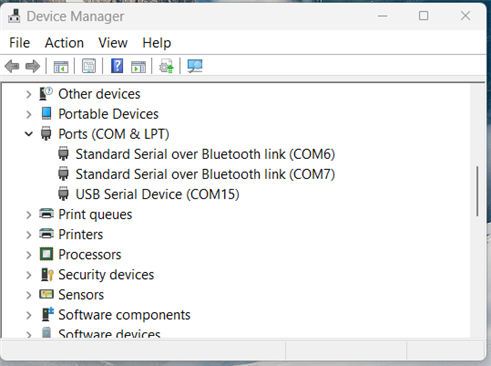
My host PC is running Windows 11. Once the hardware is connected and the MAX32625PICO is plugged into the computer, the system automatically creates a new COM port and mounts the device as a USB drive.
As shown in the Device Manager below, the board is recognized as COM15:
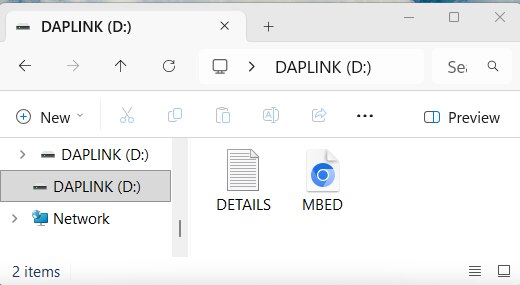
Additionally, the DAPLINK drive appears in the file system. Upon first connection, it contains two default files:
1. Arduino IDE (Highly Recommended for Beginners)
The simplest way to get a "Blinky" running quickly.
- Download & Install:
- Download the latest version from the Arduino website.
- Run the installer and follow the standard Windows prompts. I have installed version 2.3.8
- Configure:
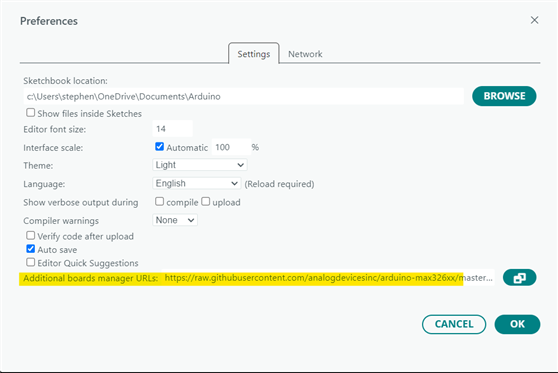
- Open Arduino IDE and go to File > Preferences.
- Paste this URL into Additional Boards Manager URLs:
- Go to the preferences screen (File, Preferences) add https://raw.githubusercontent.com/analogdevicesinc/arduino-max326xx/master/package_maxim_index.json to the list of “Additional Boards Manager URLs”.
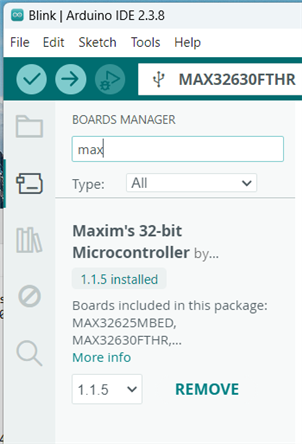
- Go to Tools > Board > Boards Manager, search for "maxim", and install Maxim's 32-bit Microcontroller.
- Select your board: Tools > Board > Maxim ARM (32-bit) Boards > MAX32630FTHR.
- Select a Port : Tools >Port
- Set the programmer: Tools > Programmer > DAPLink.
- Compile & Run Blinky:
- Open the example: File > Examples > 01.Basics > Blink.
- Connect the board via the MAX32625PICO adapter.
- Click the Upload arrow icon.
- Results:
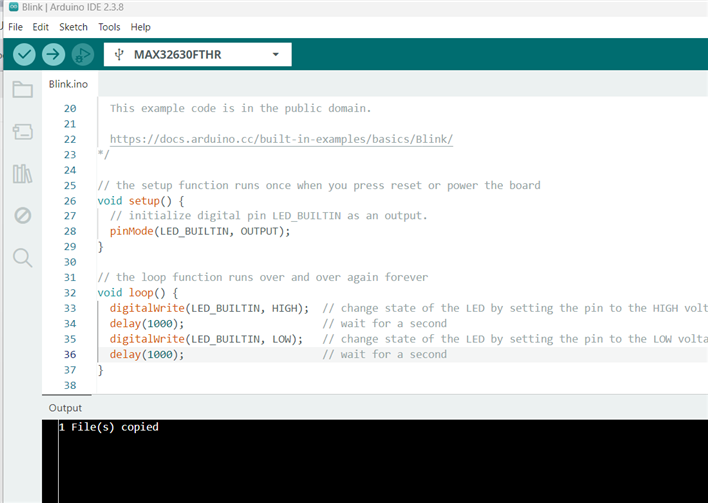
- Here is the IDE after the Upload. Success the LED is blinking using the example code.
- Windows gotchas
- Since I'm using Windows11, II ran into a few problems that I was able to resolve
- Mbed serial driver is required.
- If you are a Windows user and do not already have the mbed serial drivers installed, then you will need to download and install them from https://os.mbed.com/handbook/Windows-serial-configuration
- I need to get this since I'm running Windows 11. But my Chrome browser did not work on the download link, so I needed to use another browser.
- Now that Mbed serial driver is installed , the device manager shows a different COM port from the initial connection of COM15. The port is now COM16 as shown below.

- Upload Fails
- When I clicked the Upload icon, the upload failed. The following error appeared:

- So what is happening? I researched this and found my Arduino IDE for the MAX32630FTHR is trying to use a legacy Windows tool called wmic that Microsoft has recently disabled or removed in Windows 11.
-
Via Command Line : Open Command Prompt or PowerShell as Administrator and run:
- DISM /Online /Add-Capability /CapabilityName:WMIC~~~~
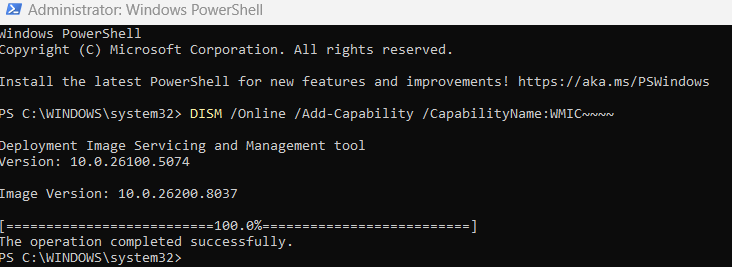
- After this, restart the Arduino IDE and try your upload again.
- DISM /Online /Add-Capability /CapabilityName:WMIC~~~~
Ok this is my Arduino setup completed on to the next environment.
Update: APR 15,2026
2. Mbed - PlatformIO Extensions (VS Code)
PlatformIO is a professional-grade VS Code Extension that provides a unified development environment capable of handling multiple frameworks—like Arduino and Mbed—seamlessly in one place.
Mbed OS (Legacy) is still supported via PlatformIO as a local framework, which is a lifesaver now that the online compiler is gone. While it's officially End of Life (EOL) and not recommended for new projects, you can still compile and run your code locally. Just select "mbed" as your framework when creating a project in PlatformIO to keep working without those discontinued online services.
-
- Download & Install:
- Install Visual Studio Code.
- Open VS Code, click the Extensions icon, search for "PlatformIO IDE", and click Install.
- Configure:
- Click the PlatformIO (Ant) icon and select + New Project.
- Name your project and search for a board: "Maxim MAX32630FTHR".
- Mbed as the framework.
- Compile & Run Blinky:
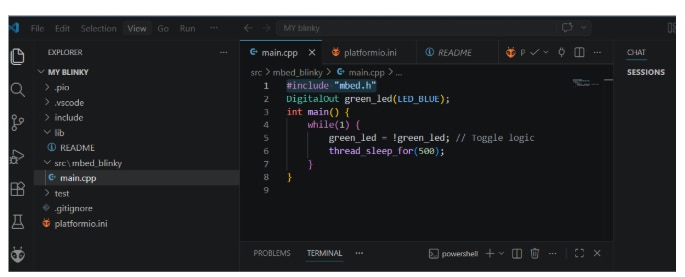
- Replace the contents of src/main.cpp with the blinky code. Add this Mbed code from the above section "2. The Mbed Way (Object-Oriented)".
- Download & Install:
#include "mbed.h"
DigitalOut green_led(LED_BLUE);
int main() {
while(1) {
green_led = !green_led; // Toggle logic
thread_sleep_for(500);
}
}
-
- Connect your board via the DAPLink adapter.
- Click the Checkmark (Build) and then the Right Arrow (Upload) on the bottom status bar.

- Result
- LED is blinking GREEN now.

- LED is blinking GREEN now.
3. Maxim LPSDK (Eclipse-based Legacy)
Official bare-metal environment specifically for older chips like the MAX32630.
- Download & Install:
- Visit the MAX32630 Product Page and go to Tools & Simulations.
- Download the LPSDK for Windows.
- Critical: Install it in a path without spaces (e.g., C:\MaximSDK\) to avoid build tool errors.
- Configure:
- Launch the bundled Eclipse IDE.
- Import an existing project: File > Import > General > Existing Projects into Workspace.
- Navigate to the Examples/MAX32630/Hello_World folder within the SDK directory.
- Compile & Run Blinky:
- Right-click the project and select Build Project.
- To run, right-click the project and select Run As > Maxim C/C++ Application (ensure your DAPLink is connected).
Thanks for reading my blog. hope you find it helpful. I'll be experimenting with these development environments over the next couple of days. Stay tuned and let me know what development Environments you are having success with programming the MAX32630FTHR

