


Goals for my 5th BLOG entry of the Upcycle It Challenge: Due April 27th.
- LCD - DONE
- Web interface to turn on/off relay and LED - Move to BLOG #6 (due date 4/30)
- Inputs to select what is displayed on the LCD with regular updates (once a minute) - Move to #8
- Via inputs in node-red
- Via web page
- Storage for output states in Node-Red - Moved to #7
- Client connect get initial update - Moved to #7
- Real status of outputs - Moved to #7
- Feed back to WS
- Update state database
- Pull external data via Web page in Node-Red - DONE
I leave my goals here to show that I am short of where I want to be, but on the same token I think that sharing all of this would be too much to share in one BLOG that people would not fall asleep. Short and to the point is now the goal.
Here is a reminder of my plan:
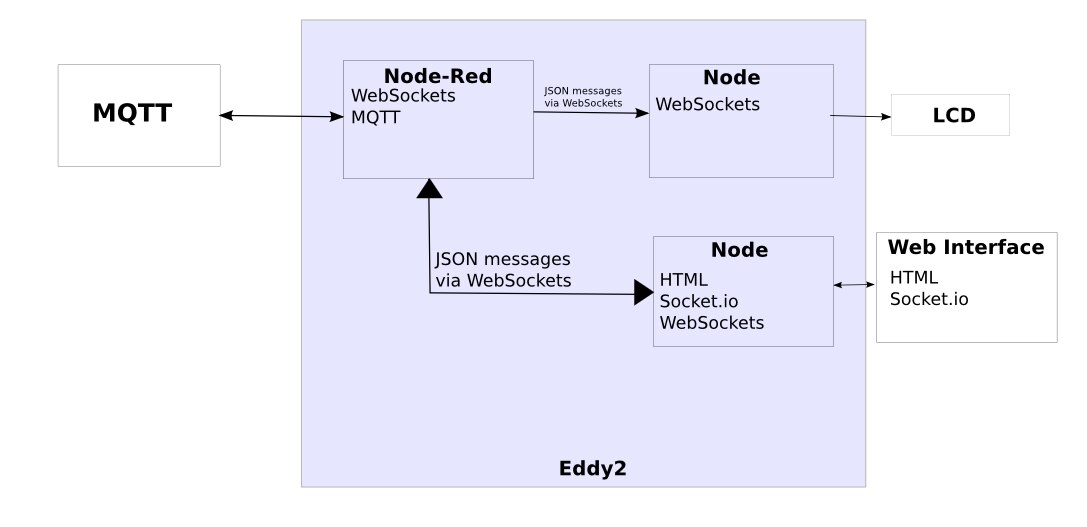
This last week my work has been mostly on the LCD controller. Most modern PDU's have a LCD on them to show some information, but mine will show more than just some information, mine will show what ever information gets sent to it.
My Road This Week
My week start with hope for the LCD and using it in Node-Red without a module. This hope came from gpolder #6 BLOG post in Upcycle It Challenge. He got he RGB LCD working in Node-Red and I was excited. My excitement went down the drain fast as I could not get the LCD to work at all. Nothing! I even tried banging my head against the wall. Then I tried via two scripts that I had from testing before and nothing still worked, did I mention NOTHING? "What is going on?", bounced around in my then sore head. Then in a moment of genius, I remembered the advice I give to everyone, "Did you reboot/reset/restart yet?". Ah, so I halted and removed power. Then plugged back in and it worked!!! Then I tested. Got it working, could change the color, etc. Then I wanted to be able to change the color externally, but it is hard coded in the node. So I made three nodes like this, each one outputs a different color, but the only color that worked was the last one. Change the last one's color and that was the color for all three.
Then I tried moving the different colors to different flows, nothing. Looked at the code and the color is set outside of the message being received. Thought about pulling the code and suggesting a change, but decided that might take too long and I know I can write the other part in node quickly, so I put that on the back burner for another day. Another reason I picked the other road, is because the node also would not let you control the two lines of the LCD. Yes, you can pad the strings and put them on the second line, but that is just not how I wanted to operate, just to have this in Node-Red.
So here is what I came up with:
var mqtt = require('mqtt');
var client = mqtt.connect('mqtt://192.168.2.20');
var five = require("johnny-five");
var Edison = require("edison-io");
var board = new five.Board({
          io: new Edison()
});


board.on("ready", function() {
        var lcd = new five.LCD({controller: "JHD1313M1" });


        client.on('connect', function() {
          client.subscribe('eddy2/lcd');
          client.publish('presence', 'Eddy LCD Gateway Online');
        });


        client.on('message', function(topic,message) {
          var sMsg = message.toString();
          var jsonMsg;
          try {
            jsonMsg = JSON.parse(sMsg);
            lcd.clear().bgColor(jsonMsg.R, jsonMsg.G,jsonMsg.B)
                .cursor(0,0).print(jsonMsg.msg1.substring(0,16))
                .cursor(1,0).print(jsonMsg.msg2.substring(0,16));
          }
          catch (err) {
            console.log('Error: ', err);
            console.log('Topic: ',topic);
            console.log('Message: ', sMsg);
          }
        });
});
The code can also be found at my GitHub here if you would like to use or change this code. Simple and easy in my opinion.
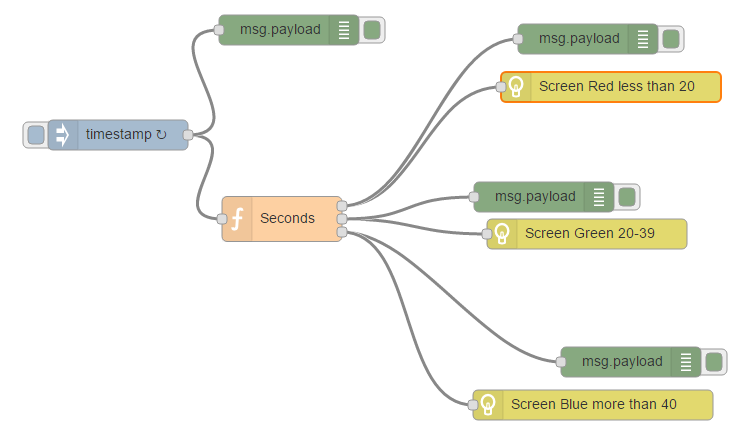
Next task was to output data to gateway via MQTT and test. So I wrote this flow in Node-Red.

I have started to change it to store data in MongoDB, but that is not tested yet. Here is a sample of a message.
{ msg1: "Temp. Outside", msg2: "18.2",R: 100, G: 50, B: 50 }
That message gets it's data from an ESP8266 running ESPEasy on my porch to report temperature and humidity. So I pull the web page like this:
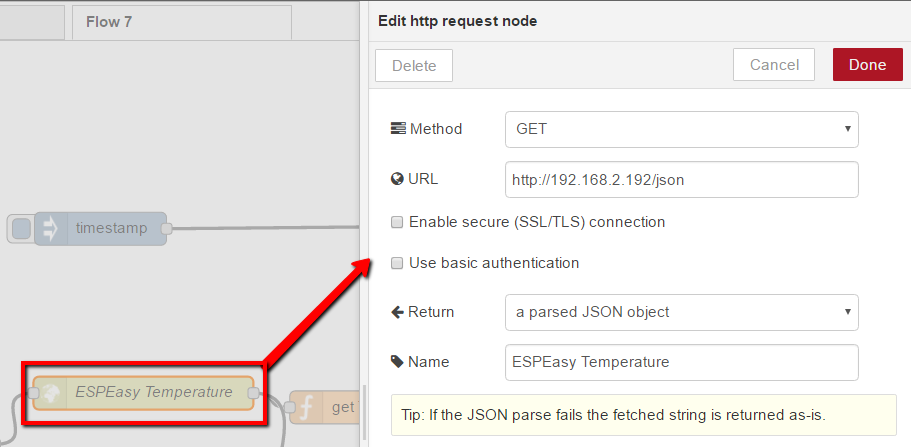
Then pull out the temperature from the JSON
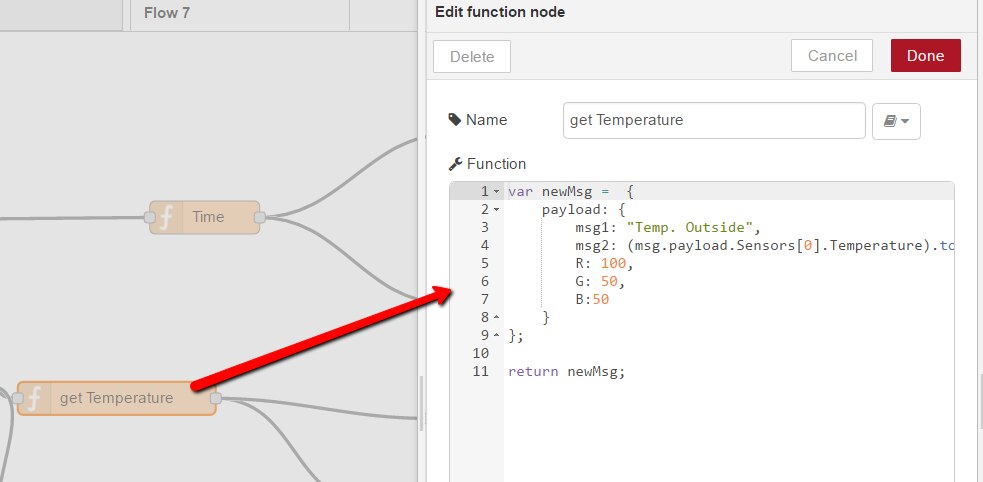
Then that gets outputted to the Debug and MQTT.
Next Up?
- BLOG #6: I will send information to the Edison to turn on LED and Relay (started) for testing. Also I will work on storing data in MongoDB (started) (4/30)
- BLOG #7: I will store and pull the data from MongoDB and also be able to monitor changes in output from external sources (just in case it happens) (5/4)
- BLOG #8: Start of web interface and build. LCD update control. (5/11)
- BLOG #9: Web Interface and build final (5/18)
- BLOG #10: Wrap and demos (5/25)
Top Comments