element14 Community
element14 Community
    Register Log In
  • Site
  • Search
  • Log In Register
  • Community Hub
    Community Hub
    • What's New on element14
    • Feedback and Support
    • Benefits of Membership
    • Personal Blogs
    • Members Area
    • Achievement Levels
  • Learn
    Learn
    • Ask an Expert
    • eBooks
    • element14 presents
    • Learning Center
    • Tech Spotlight
    • STEM Academy
    • Webinars, Training and Events
    • Learning Groups
  • Technologies
    Technologies
    • 3D Printing
    • FPGA
    • Industrial Automation
    • Internet of Things
    • Power & Energy
    • Sensors
    • Technology Groups
  • Challenges & Projects
    Challenges & Projects
    • Design Challenges
    • element14 presents Projects
    • Project14
    • Arduino Projects
    • Raspberry Pi Projects
    • Project Groups
  • Products
    Products
    • Arduino
    • Avnet & Tria Boards Community
    • Dev Tools
    • Manufacturers
    • Multicomp Pro
    • Product Groups
    • Raspberry Pi
    • RoadTests & Reviews
  • About Us
  • Store
    Store
    • Visit Your Store
    • Choose another store...
      • Europe
      •  Austria (German)
      •  Belgium (Dutch, French)
      •  Bulgaria (Bulgarian)
      •  Czech Republic (Czech)
      •  Denmark (Danish)
      •  Estonia (Estonian)
      •  Finland (Finnish)
      •  France (French)
      •  Germany (German)
      •  Hungary (Hungarian)
      •  Ireland
      •  Israel
      •  Italy (Italian)
      •  Latvia (Latvian)
      •  
      •  Lithuania (Lithuanian)
      •  Netherlands (Dutch)
      •  Norway (Norwegian)
      •  Poland (Polish)
      •  Portugal (Portuguese)
      •  Romania (Romanian)
      •  Russia (Russian)
      •  Slovakia (Slovak)
      •  Slovenia (Slovenian)
      •  Spain (Spanish)
      •  Sweden (Swedish)
      •  Switzerland(German, French)
      •  Turkey (Turkish)
      •  United Kingdom
      • Asia Pacific
      •  Australia
      •  China
      •  Hong Kong
      •  India
      • Japan
      •  Korea (Korean)
      •  Malaysia
      •  New Zealand
      •  Philippines
      •  Singapore
      •  Taiwan
      •  Thailand (Thai)
      • Vietnam
      • Americas
      •  Brazil (Portuguese)
      •  Canada
      •  Mexico (Spanish)
      •  United States
      Can't find the country/region you're looking for? Visit our export site or find a local distributor.
  • Translate
  • Profile
  • Settings
Upcycle It
  • Challenges & Projects
  • Design Challenges
  • Upcycle It
  • More
  • Cancel
Upcycle It
Blog [Upcycle It] Interactive Race Car Driver - Bits and Pieces
  • Blog
  • Forum
  • Documents
  • Polls
  • Files
  • Events
  • Mentions
  • Sub-Groups
  • Tags
  • More
  • Cancel
  • New
  • Share
  • More
  • Cancel
Group Actions
  • Group RSS
  • More
  • Cancel
Engagement
  • Author Author: Workshopshed
  • Date Created: 14 May 2017 7:41 PM Date Created
  • Views 1880 views
  • Likes 6 likes
  • Comments 11 comments
  • upcycled_interactiveracecardriver
Related
Recommended

[Upcycle It] Interactive Race Car Driver - Bits and Pieces

Workshopshed
Workshopshed
14 May 2017

3d Printing

The 3D printing and car modification has run into a second week. Although each of the components does not take a long time to print there are a lot of them so it does add up. I've been printing with the recycled filament which has printed ok with the exception that the PET does not span well. This means I need to design my parts accordingly.


Lights

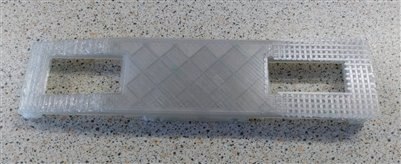
A curved section was printed to support the lighting components. Although curved this was printed curved side down with supports so that I did not need to create a complex scaffold to do the cutouts for the lights. This printed without issue and I cleaned off the supports.

image

A lamp housing was created for the headlights. Which was a simple box with a concentric rings on the front. This was put together with the previously printed indicators and the above plate.

image

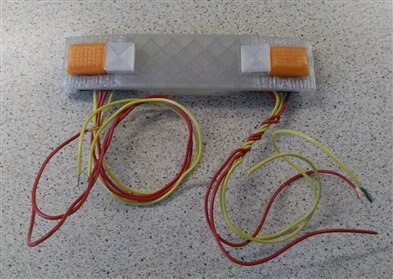
These were tested by simply hooking up the supply.


You don't have permission to edit metadata of this video.
Edit media
x
image
Upload Preview
image


A block was added to the bottom so that this section could be bolted to the bumpers.


Bumpers

The bumpers went through a few changes since last week. To produce the best flex in the bumper the pivot point was moved right to the middle and the design was adjusted accordingly. Some mounting holes were added so that this could be bolted to the bumpers.

image

Chassis

The chassis has been slimmed down as previously mentioned and the mounting points for the bumpers were spread apart so that they cleared the existing frame. The chassis was printed with the black ABS from Refil (ex car dashboards) and it printed without problem. I did drill out the mounting holes to 3.5mm as I suspected that my printed sizes were a little small.


Wiring

The front lights wiring has been finished off this week with a NPN transistor being added so that the headlight LEDs can be driven. The grove connectors have also been wired up. I realised that I could also put the bumper switches through the same board so an additional grove connector has been added and wired up to the resistor network described in [Upcycle It] Interactive Race Car Driver - Bumper switches and wiring loom I just need some spade connectors to finish the complete assembly.
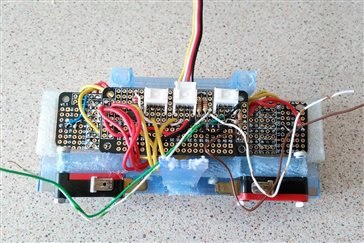
image

Putting it together

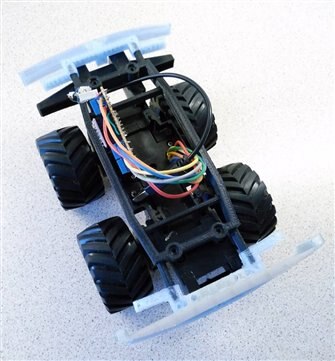
When I came to assemble the printed parts there were a few issues. The first was that the new lights and bumper clashed with the existing frame. A hacksaw quickly solved that problem and the frame was shortened. I also dug into my bag of reclaimed screws and bolts and found 4 that would fit the chassis nicely. I also found that the lights and bumpers were higher than I wanted so I chopped up the back bumper and glued it to the top of the front lights to allow those to hang below. This meant that the front assembly hangs a long way from it's supports. So I'll need to add an additional brace at the bottom, there's a handy screw point that I'll likely attach that to. With a three point mounting the lights and bumper are solid. I'll likely incorporate these changes into the models so that the back bumper/lights are simpler to assemble.


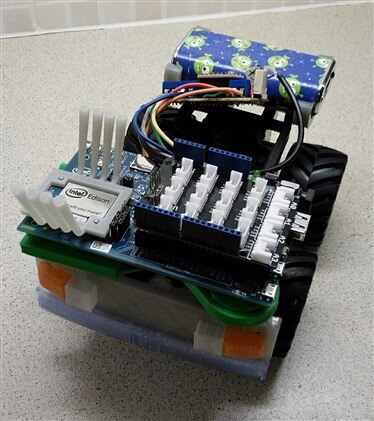
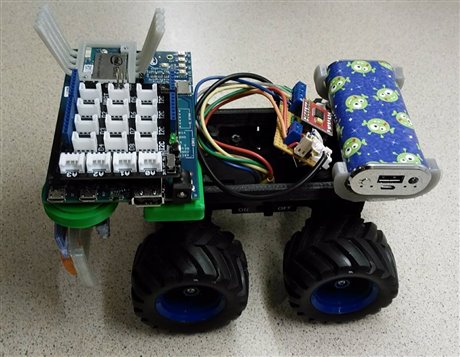
As you can see the battery pack and Edison balance each other out and since I've taken these photos I've moved the batteries further back to give my driver more space.

imageimage

Freddie

I've been preparing the driver which my daughter has nicknamed Freddie. The second Edison has been flashed, connected up to the network and configured for SSH.


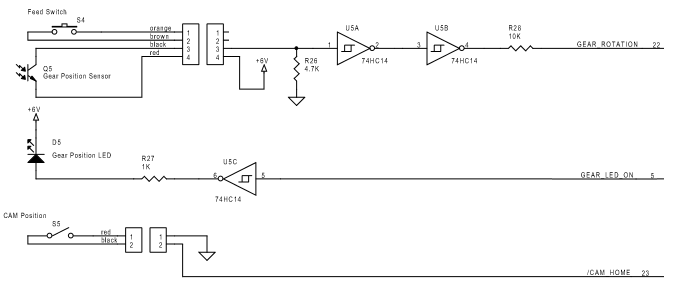
As mentioned in the previous discussion the Edison breakout board runs at 1.8v volts. The 74HC14 Schmitt triggers that are used on the driving the LED and monitoring of the position sensor can run down to 2v so to interface these to the Furby something is needed. Referring to Harry Fairhead's book on the Edison Exploring Edison - Life At 1.8V the approach of using a simple transistor to boost or lower the voltage seems the best option.


image

Transistors

In my collection of salvaged parts I had 5 identical transistors. The "FRB" code seemed the ideal choice to put in the Furby but I could not find out what transistors they were. Luckily a friend from twitter @MrTomsWorld has a gadget (Peak Atlas DCA55) to test them so I posted him one and he identified it as NPN and sent me the pin details. Following this, I was showing the results to my radio ham friend Alan. From the design he commented it was likely to be a silicon transistor and commented that if you prefix with "2SD" then you should find the transistor that way. A google search found me the datasheet and spec.
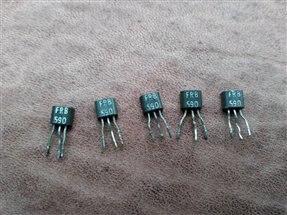
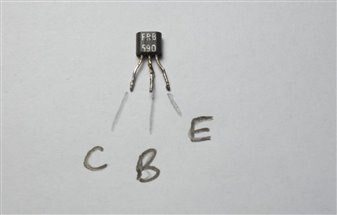
imageimage

2SD590

Material of transistor: Si

Polarity: NPN

Maximum collector power dissipation (Pc), W: 1

Maximum collector-base voltage |Ucb|, V: 100

Maximum collector-emitter voltage |Uce|, V: 90

Maximum emitter-base voltage |Ueb|, V: 6

Maximum collector current |Ic max|, A: 2

Maksimalna temperatura (Tj), °C: 200

Transition frequency (ft), MHz:

Collector capacitance (Cc), pF:

Forward current transfer ratio (hFE), min: 100

Noise Figure, dB: -

Package of 2SD590 transistor: TO39


Reference

Exploring Edison - Life At 1.8V

74HC1474HC14

2SD590 transistor


Previous Posts

Upcycle It Blogs tagged with upcycled_interactiveracecardriver

  • Sign in to reply

Top Comments

  • DAB
    DAB over 8 years ago +1
    Nice update Andy. Good wire work and part integration. DAB
  • mcb1
    mcb1 over 8 years ago +1
    and you thought building Hot Rod's was easy
  • balearicdynamics
    balearicdynamics over 8 years ago +1
    Good and surprising update. Nice the approach of hacking the hack Enrico
  • mcb1
    mcb1 over 8 years ago in reply to gpolder

    Be a nice car for her graduation/21st ... oh wait you meant the Furbie model...image

    • Cancel
    • Vote Up +1 Vote Down
    • Sign in to reply
    • More
    • Cancel
  • gpolder
    gpolder over 8 years ago

    nice update, I think my daughter also want such a car.


    Gerrit.

    • Cancel
    • Vote Up +1 Vote Down
    • Sign in to reply
    • More
    • Cancel
  • mcb1
    mcb1 over 8 years ago in reply to Workshopshed

    We've both got electronic throttle and electric steering (assisted) and the battery is in the rear.

    • Cancel
    • Vote Up +1 Vote Down
    • Sign in to reply
    • More
    • Cancel
  • Workshopshed
    Workshopshed over 8 years ago in reply to mcb1

    Mine has a capacitor for that

    • Cancel
    • Vote Up +1 Vote Down
    • Sign in to reply
    • More
    • Cancel
  • mcb1
    mcb1 over 8 years ago in reply to Workshopshed

    That's not an engine ...


    image

    They even add small chambers in the intake system duct to prevent harmonics and resonances...

    • Cancel
    • Vote Up 0 Vote Down
    • Sign in to reply
    • More
    • Cancel
>
element14 Community

element14 is the first online community specifically for engineers. Connect with your peers and get expert answers to your questions.

  • Members
  • Learn
  • Technologies
  • Challenges & Projects
  • Products
  • Store
  • About Us
  • Feedback & Support
  • FAQs
  • Terms of Use
  • Privacy Policy
  • Legal and Copyright Notices
  • Sitemap
  • Cookies

An Avnet Company © 2025 Premier Farnell Limited. All Rights Reserved.

Premier Farnell Ltd, registered in England and Wales (no 00876412), registered office: Farnell House, Forge Lane, Leeds LS12 2NE.

ICP 备案号 10220084.

Follow element14

  • X
  • Facebook
  • linkedin
  • YouTube