element14 Community
element14 Community
    Register Log In
  • Site
  • Search
  • Log In Register
  • Community Hub
    Community Hub
    • What's New on element14
    • Feedback and Support
    • Benefits of Membership
    • Personal Blogs
    • Members Area
    • Achievement Levels
  • Learn
    Learn
    • Ask an Expert
    • eBooks
    • element14 presents
    • Learning Center
    • Tech Spotlight
    • STEM Academy
    • Webinars, Training and Events
    • Learning Groups
  • Technologies
    Technologies
    • 3D Printing
    • FPGA
    • Industrial Automation
    • Internet of Things
    • Power & Energy
    • Sensors
    • Technology Groups
  • Challenges & Projects
    Challenges & Projects
    • Design Challenges
    • element14 presents Projects
    • Project14
    • Arduino Projects
    • Raspberry Pi Projects
    • Project Groups
  • Products
    Products
    • Arduino
    • Avnet & Tria Boards Community
    • Dev Tools
    • Manufacturers
    • Multicomp Pro
    • Product Groups
    • Raspberry Pi
    • RoadTests & Reviews
  • About Us
  • Store
    Store
    • Visit Your Store
    • Choose another store...
      • Europe
      •  Austria (German)
      •  Belgium (Dutch, French)
      •  Bulgaria (Bulgarian)
      •  Czech Republic (Czech)
      •  Denmark (Danish)
      •  Estonia (Estonian)
      •  Finland (Finnish)
      •  France (French)
      •  Germany (German)
      •  Hungary (Hungarian)
      •  Ireland
      •  Israel
      •  Italy (Italian)
      •  Latvia (Latvian)
      •  
      •  Lithuania (Lithuanian)
      •  Netherlands (Dutch)
      •  Norway (Norwegian)
      •  Poland (Polish)
      •  Portugal (Portuguese)
      •  Romania (Romanian)
      •  Russia (Russian)
      •  Slovakia (Slovak)
      •  Slovenia (Slovenian)
      •  Spain (Spanish)
      •  Sweden (Swedish)
      •  Switzerland(German, French)
      •  Turkey (Turkish)
      •  United Kingdom
      • Asia Pacific
      •  Australia
      •  China
      •  Hong Kong
      •  India
      •  Korea (Korean)
      •  Malaysia
      •  New Zealand
      •  Philippines
      •  Singapore
      •  Taiwan
      •  Thailand (Thai)
      • Americas
      •  Brazil (Portuguese)
      •  Canada
      •  Mexico (Spanish)
      •  United States
      Can't find the country/region you're looking for? Visit our export site or find a local distributor.
  • Translate
  • Profile
  • Settings
Upcycle It
  • Challenges & Projects
  • Design Challenges
  • Upcycle It
  • More
  • Cancel
Upcycle It
Blog [Upcycle It] Interactive Race Car Driver - Bumper switches and wiring loom
  • Blog
  • Forum
  • Documents
  • Polls
  • Files
  • Events
  • Mentions
  • Sub-Groups
  • Tags
  • More
  • Cancel
  • New
  • Share
  • More
  • Cancel
Group Actions
  • Group RSS
  • More
  • Cancel
Engagement
  • Author Author: Workshopshed
  • Date Created: 30 Apr 2017 6:49 PM Date Created
  • Views 741 views
  • Likes 5 likes
  • Comments 4 comments
  • interactiveracecardriver
  • upcycle_it
  • upcycled_interactiveracecardriver
Related
Recommended

[Upcycle It] Interactive Race Car Driver - Bumper switches and wiring loom

Workshopshed
Workshopshed
30 Apr 2017

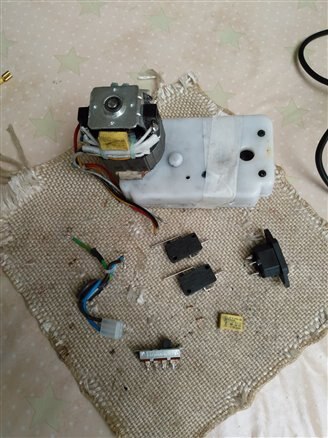
So that I could tell if the car had bumped into anything I wanted to put some microswitches into the bumpers. I had recently stripped down a paper shredder and had stripped out a few useful parts including a couple of micro-switches. Luckily these were the same size as a couple of others I already had (which may have come from my previous shredder).

image

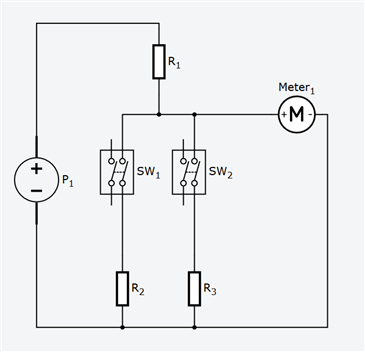
As mentioned in the discussions I was concerned over the number of I/O used by the car and wondered if it was possible to connect all of the switches on one input. I'd previously seen the idea of using a resistor ladder into an analogue input. However, I wondered if that could be adapted to support multiple buttons. I came up with a schema using the change over connections of the micro switches before realising that I did not have these connections on my two new switches. However, I also realised that I could use a couple of ports, one for the front and one the back. Unfortunately, this means I don't have ISRs on the bumper switches but that can be handled in the software instead.


I put the circuit in the simulator again so I could rapidly play with resistor values. I came up with the ratio of R1 = R2, R3 = 2 x R2 which gave the values of 5v, 3.3v, 2.5v and 2.0v for the different switch settings. I had originally used push buttons but then realised I could not press 2 at once in the simulator. Of course, you could also do this with simple maths too. BBC - Higher Bitesize Physics - Resistors in circuits : Revision

image


Software for sensors

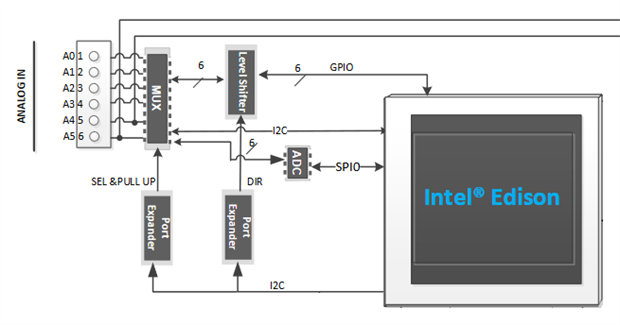
I did look into using the MCU to monitor the switches but the ADC is handled by the Arduino breakout and the MCU does not handle floating point. So I'm not saying that it's impossible but it is undocumented and there are numerous challenges to resolve.

image

So I stuck with using MRAA and Node for the Analogue inputs. The code in the "setInterval" function polls the analogue input every 100ms. If it has changed from one of the 4 states then it raises an event which is picked up by the "listener" function, this simply writes the data to the console but in the real car it would cause the car to stop and the driver to say something like "ouch".


var mraa = require('mraa');
var events = require('events');

var listner1 = function listner1(value) {
   console.log('Bumper:%d' , value);
}

var eventEmitter = new events.EventEmitter();
eventEmitter.addListener('bumper', listner1);

var previous = -1;
var analogPin0 = new mraa.Aio(0); //setup access analog input pin 0

//Monitor the bumper analogue pin and raise events if it changes
setInterval(function () {
    var analogValueFloat = analogPin0.readFloat();
    var newval = floatToSwitch(analogValueFloat)
    if (newval != previous) {
        eventEmitter.emit('bumper',newval);
        previous = newval;
    }
} , 100);

var BumpEnum = {
  None: 0,
  Left: 1,
  Right: 2,
  Both: 3
};

//Scale the input to one of our 4 values depending on
//which of the two switches are pressed
function floatToSwitch(value) {
    if (value < 0.45) return BumpEnum.Both;
    if (value < 0.58) return BumpEnum.Left;
    if (value < 0.83) return BumpEnum.Right;
    if (value >= 0.83) return BumpEnum.None;
}


process.on('SIGINT', function () {
    console.log("Shutting down SIGINT (Ctrl-C)");
    process.exit();
});


Pins and cables

I came up with the following wiring that allows me to use the grove connections without modification and not need to create any clever split cables to handle front and back.


Lights

  • Brake lights - Pin 1
  • Headlights - Pin 5 (PWM)
  • Indicator L - Pin 3
  • Indicator R - Pin 4

Motor

  • Motor Speed - Pin 6 (PWM)
  • Motor 1 Direction - Pin 7,8
  • Motor 2 Direction - Pin A3, A4

From: https://github.com/intel-iot-devkit/mraa/blob/master/docs/edison.md  - AIO pins are treated as 0-5 in mraa_aio_init() but as 14-19 for everything else.
Therefore use mraa_gpio_init(14) to use A0 as a GPIO

Bumpers

  • Bumpers A0 and A1 (split front and back), resistor ladder to be used to allow left and right switches to be independently detected.

Light Sensor

  • Light sensor - A2

Cables (10 needed)

  • Front Lights - D2, D4
  • Rear Lights - D3, UART
  • Motor - D6, D7, A3
  • Bumpers - A1
  • Ambient light sensor - A2


So that's pretty much all that can be added so if I need anything else it will have to break out via I2C and need to buy some more cables
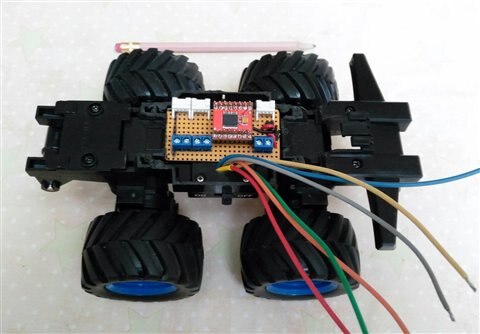
 image


Assembly

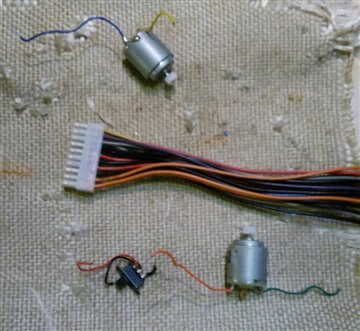
I've started soldering up some of the sub-modules that make up the car.


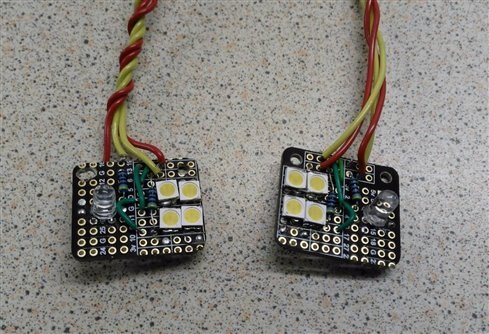
The main drive motors have been fitted with new wires that came from an old PC power supply, the motor drive board has been started and the headlights / indicators have been soldered up. As there are quite so many LEDs for the headlights, I'll use a simple transistor switch to boost the current to those and for the brake lights too.

imageimageimage

Reference

tronixstuff.com/2011/01/11/tutorial-using-analog-input-for-multiple-buttons

https://github.com/intel-iot-devkit/mraa/blob/master/examples/javascript/AioA0.js

https://github.com/intel-iot-devkit/mraa/blob/master/docs/edison.md

https://www.tutorialspoint.com/nodejs/nodejs_event_emitter.htm

Previous Posts

[Upcycle It] Interactive Race Car Driver - Plan of action

[Upcycle It] Interactive Race Car Driver - Software

[Upcycle It] Interactive Race Car Driver - Lights

[Upcycle It] Interactive Race Car Driver - Detailed Plan

[Upcycle It] Interactive Race Car Driver - Edison

[Upcycle It] Interactive Race Car Driver - Drive Motor Testing

[Upcycle It] Interactive Race Car Driver - Car modification

[Upcycle It] Interactive Race Car Driver - Furby Hacking

[Upcycle It] Interactive Race Car Driver - Powering Motors

  • Sign in to reply

Top Comments

  • Workshopshed
    Workshopshed over 8 years ago in reply to DAB +2
    Cheers Dab, that's definitely an option as are the ultrasound sensors. The advantage of building something like this around a programmable board is that it can be adapted later. I hope to get my daughter…
  • DAB
    DAB over 8 years ago +1
    Hi Andy, When I tore down my mom's old Rumba, I found that they used IR LED's and LED photodetectors to detect objects. You might find that approach easier to implement and they used a simple comparator…
  • Workshopshed
    Workshopshed over 8 years ago in reply to dougw +1
    They seem to last about 5 years before the paper gets generally caught up in the teeth and they start mangling themselves.
  • Workshopshed
    Workshopshed over 8 years ago in reply to DAB

    Cheers Dab, that's definitely an option as are the ultrasound sensors. The advantage of building something like this around a programmable board is that it can be adapted later. I hope to get my daughter programming with it, similar to how we did with turtles and bigtraks back in the day.

    • Cancel
    • Vote Up +2 Vote Down
    • Sign in to reply
    • More
    • Cancel
  • Workshopshed
    Workshopshed over 8 years ago in reply to dougw

    They seem to last about 5 years before the paper gets generally caught up in the teeth and they start mangling themselves.

    • Cancel
    • Vote Up +1 Vote Down
    • Sign in to reply
    • More
    • Cancel
  • DAB
    DAB over 8 years ago

    Hi Andy,


    When I tore down my mom's old Rumba, I found that they used IR LED's and LED photodetectors to detect objects.


    You might find that approach easier to implement and they used a simple comparator to detect objects.


    Just a thought,

    DAB

    • Cancel
    • Vote Up +1 Vote Down
    • Sign in to reply
    • More
    • Cancel
  • dougw
    dougw over 8 years ago

    Okay - cool project, but what are you shredding that keeps frying shredders?

    • Cancel
    • Vote Up 0 Vote Down
    • Sign in to reply
    • More
    • Cancel
element14 Community

element14 is the first online community specifically for engineers. Connect with your peers and get expert answers to your questions.

  • Members
  • Learn
  • Technologies
  • Challenges & Projects
  • Products
  • Store
  • About Us
  • Feedback & Support
  • FAQs
  • Terms of Use
  • Privacy Policy
  • Legal and Copyright Notices
  • Sitemap
  • Cookies

An Avnet Company © 2025 Premier Farnell Limited. All Rights Reserved.

Premier Farnell Ltd, registered in England and Wales (no 00876412), registered office: Farnell House, Forge Lane, Leeds LS12 2NE.

ICP 备案号 10220084.

Follow element14

  • X
  • Facebook
  • linkedin
  • YouTube