

Does using a soldering iron or a hot air gun come to mind when you think of soldering with surface mount device (SMD) components? In this video Milos explores another way that printed circuit boards (PCBs) can be soldered. The answer? Using a hot plate. A hot plate can be bought as a module by itself, some people have even built their own out of an electric clothes iron (just do not use it for your shirt afterwards!). A hot plate is a great tool for soldering when you have a stencil for your PCB and you are using solder paste, but it can also be useful when you are trying to unsolder some kind of integrated circuit (IC) with many small pins.
Watch the Video:
Designing the Concept of the Hot Plate
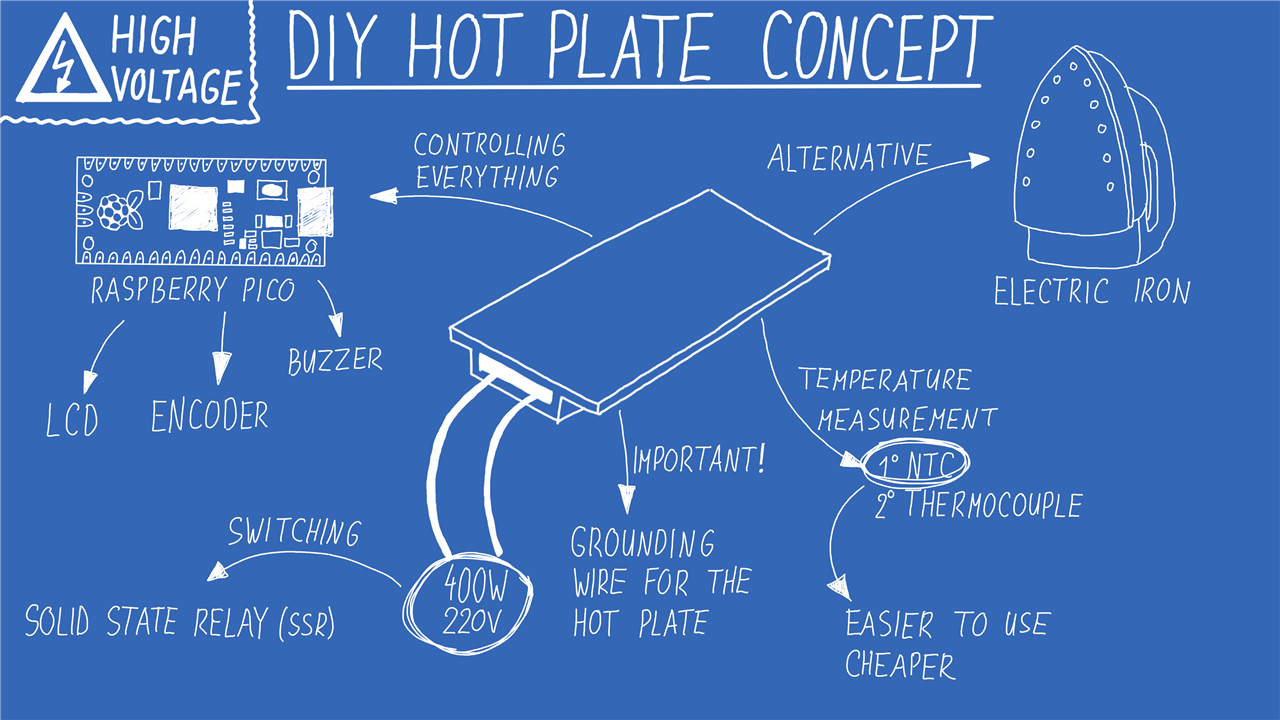
Note: It is typical that a hot plate must connect to mains voltage, whether that is 110 volts or 220-250 volts. Make sure that if you intend on completing this project yourself, that you are either a sufficiently competent and qualified person to do so, or you are working with someone else that can supervise the project to ensure that it is completed safely.
Controlling the solid-state relay (SSR) was Milos’ first task, deciding upon a solid-state relay, because it can be controlled with a pulse width modulation (PWM) signal unlike an ordinary relay. For measuring the temperature, he opted to use a negative temperature coefficient (NTC) thermistor, which is essentially a resistor which changes its resistance based on the temperature, allowing it to be read appropriately.
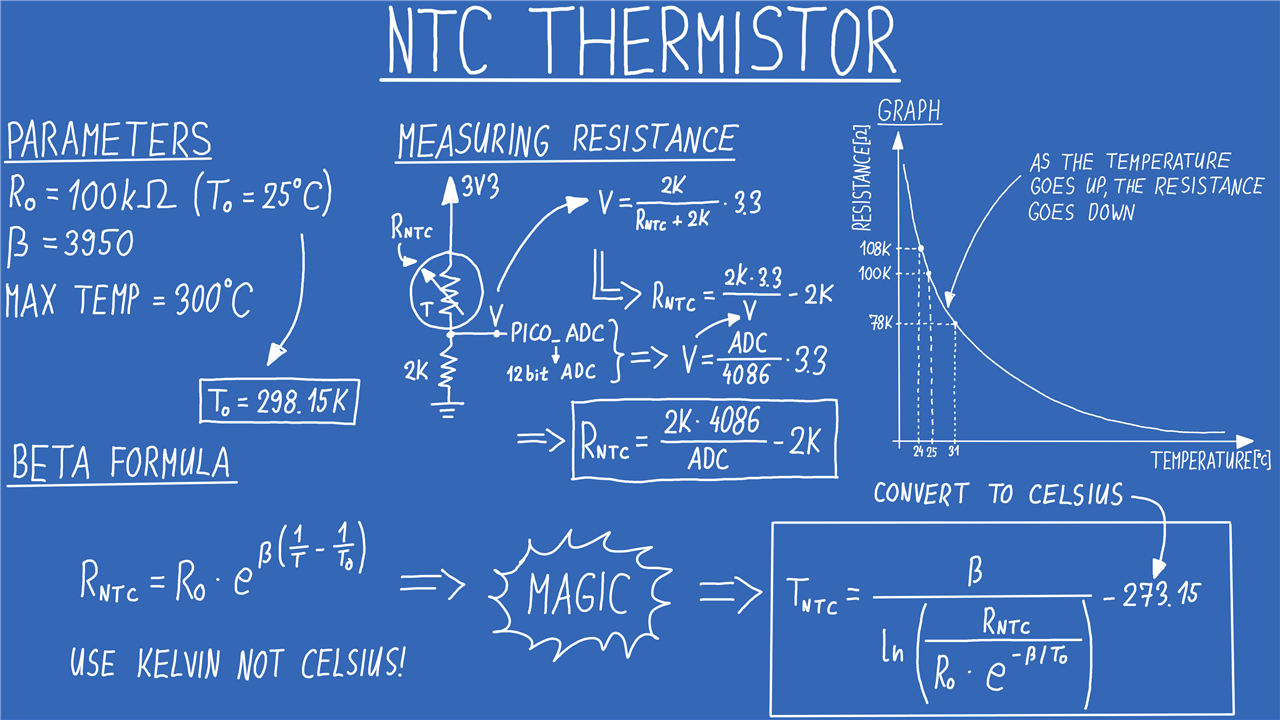
In the video, Milos introduces us to the fundamental principles of the NTC thermistor, how it reacts to temperature and how to calculate the temperature from the resistance as well as how to calculate the resistance from the ADC reading. If you are interested in more detail about the calculations, here is a great blog that you can learn from:
Blog #3: Characterising Thermistors – A Quick Primer, Beta Value & Steinhart-Hart Coefficients
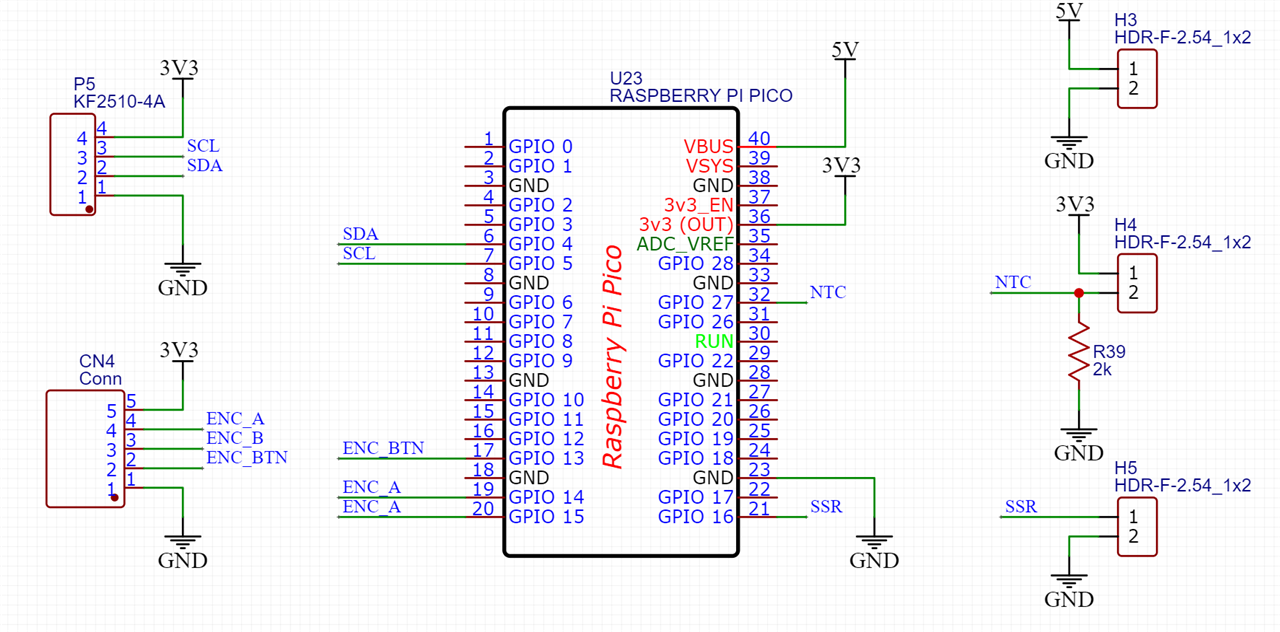
For the project, the final schematic can appear rather simple, connecting all of the component as modules to the Raspberry Pi Pico, except in the case of the NTC thermistor that connects to a voltage divider with a 2k ohm resistor.
CAD Designing an Enclosure
No project is complete without a presentable and a suitable enclosure. Milos’ decides to combine materials for convenience and an aesthetic. Choosing two types of material: wood and plastic. Since the hot plate can reach temperatures up to 300 degrees centigrade, the plastic can get too soft from temperatures of 60 degrees centigrade, up to melting at 160 degrees centigrade. Insulating the plastic would be a good choice, separating them as much as possible. To help with the design, Milos first secured the hot plate using standoffs (sized at 40mm) that are connected to wooden planks. These are then connected with 20mm standoffs to a top plywood plate. The plywood used is 4mm thick and can be cut by whichever method you prefer. This is the computer aided design (CAD) model of the whole device.

For an output display of the state of the hot plate, Milos opts for a simple 16x2 character liquid crystal display (LCD) which will show the intended set and measured temperatures, as well as the mode that the hot plate is currently in, whether it’s idle, heating up, or in an error state. To the right of the LCD goes the rotary encoder with a button that is used for setting the temperature as well as turning the heater on and off. On the side to the right of the enclosure, there is an external USB connector which is handy if you want to track the temperature plots on your computer while the hot plate is working, giving you the opportunity to tweak how it operates. To secure it together it uses M3 sized screws with the solid-state relay secured using M4 screws and nuts.
| {gallery}My Gallery Title |
|---|
 |
|
|
|
|


Programming the Software Controller
Now to get the components working it needs to be told what to do, the code for the hot plate created by Milos provides the functionality needed to monitor and control the temperatures and heating. Milos wanted to make it as simple to use as possible to ensure that very little could go wrong, and it gives a great basis to build upon!
As there are many variables which can affect the temperature of the hot plate, reading the temperature does not need to be incredibly accurate but it should be within a small margin of error. To regulate, a straightforward proportional-integral (PI) controller is employed, featuring supplementary elements like a ramp limiter for the temperature reference. Additionally, safeguards against overshooting and undershooting are integrated into the integral aspect of the controller.
The output of the proportional-integral controller is the PWM duty cycle which was limited in software to 40% since the hotplate can get up to temperature incredibly quickly. Milos also implemented an automatic shut-down of the heater if the temperature doesn’t rise on the thermistor, while the controller is keeping an above zero duty cycle a set amount of time. This can happen when the thermistor gets somehow disconnected from the hot plate (or when the SSR or the hot plate itself are faulty). This prevents the PI controller from trying to heat up the hot plate perpetually, causing components to burn out or catch on fire.
Have you moved on from soldering irons and heat guns? Do you repair your electronic devices with a heat plate to ensure an even distribution? Did you make your own hot plate or buy one, and what do you use? Let us know in the comments, or simply share your feelings on this episode.
Download Files and Related Links
- Download CAD Files and Code!
- Blog #3: Characterising Thermistors – A Quick Primer, Beta Value & Steinhart-Hart Coefficients
- Mastering Oven Control: Precision Resin Curing with DIY Modifications - How Hard Can it Be? -- Episode 616
Bill of Material:
| Product Name | Manufacturer | Quantity | Buy Kit |
|---|---|---|---|
| MULTICOMP PRO MCKSI240D10-LM(070)Solid State Relay, 10 A, 280 VAC, Panel Mount, Screw, Zero Crossing | MULTICOMP PRO | 1 | Buy Now |
| RASPBERRY-PI RASPBERRY PI PICO H | RASPBERRY-PI | 1 | Buy Now |
| VISHAY 4N27 | VISHAY | 1 | Buy Now |
| EATON BUSSMANN NRBG105F3950B1F | EATON BUSSMANN | 1 | Buy Now |
| DFROBOT Expansion Board, Gravity I2C 16x2 Arduino LCD, DFRduino UNO R3 Board | DFROBOT | 1 | Buy Now |
| DFROBOT Rotary Encoder Module, Breakout, Fermion, EC11, DFRduino UNO R3 Board | DFROBOT | 1 | Buy Now |
| SCHURTER 6100.3100 | SCHRUTER | 1 | Buy Now |
| MULTICOMP PRO MCMRA-1-KKFTCRocker Switch, On-None-Off, SPST, Non Illuminated, Panel Mount, Black | MULTICOMP PRO | 1 | Buy Now |
Additional Parts:
| Passive components like wires, perfboard, resistors |
| M3 and M4 screws for holding everything together |
| 4mm plywood sheet |
| PLA or PET-G for printing the enclosure |
-

paulnanaimo
-
Cancel
-
Vote Up
0
Vote Down
-
-
Sign in to reply
-
More
-
Cancel
Comment-

paulnanaimo
-
Cancel
-
Vote Up
0
Vote Down
-
-
Sign in to reply
-
More
-
Cancel
Children