element14 Community
element14 Community
    Register Log In
  • Site
  • Search
  • Log In Register
  • Community Hub
    Community Hub
    • What's New on element14
    • Feedback and Support
    • Benefits of Membership
    • Personal Blogs
    • Members Area
    • Achievement Levels
  • Learn
    Learn
    • Ask an Expert
    • eBooks
    • element14 presents
    • Learning Center
    • Tech Spotlight
    • STEM Academy
    • Webinars, Training and Events
    • Learning Groups
  • Technologies
    Technologies
    • 3D Printing
    • FPGA
    • Industrial Automation
    • Internet of Things
    • Power & Energy
    • Sensors
    • Technology Groups
  • Challenges & Projects
    Challenges & Projects
    • Design Challenges
    • element14 presents Projects
    • Project14
    • Arduino Projects
    • Raspberry Pi Projects
    • Project Groups
  • Products
    Products
    • Arduino
    • Avnet Boards Community
    • Dev Tools
    • Manufacturers
    • Multicomp Pro
    • Product Groups
    • Raspberry Pi
    • RoadTests & Reviews
  • Store
    Store
    • Visit Your Store
    • Choose another store...
      • Europe
      •  Austria (German)
      •  Belgium (Dutch, French)
      •  Bulgaria (Bulgarian)
      •  Czech Republic (Czech)
      •  Denmark (Danish)
      •  Estonia (Estonian)
      •  Finland (Finnish)
      •  France (French)
      •  Germany (German)
      •  Hungary (Hungarian)
      •  Ireland
      •  Israel
      •  Italy (Italian)
      •  Latvia (Latvian)
      •  
      •  Lithuania (Lithuanian)
      •  Netherlands (Dutch)
      •  Norway (Norwegian)
      •  Poland (Polish)
      •  Portugal (Portuguese)
      •  Romania (Romanian)
      •  Russia (Russian)
      •  Slovakia (Slovak)
      •  Slovenia (Slovenian)
      •  Spain (Spanish)
      •  Sweden (Swedish)
      •  Switzerland(German, French)
      •  Turkey (Turkish)
      •  United Kingdom
      • Asia Pacific
      •  Australia
      •  China
      •  Hong Kong
      •  India
      •  Korea (Korean)
      •  Malaysia
      •  New Zealand
      •  Philippines
      •  Singapore
      •  Taiwan
      •  Thailand (Thai)
      • Americas
      •  Brazil (Portuguese)
      •  Canada
      •  Mexico (Spanish)
      •  United States
      Can't find the country/region you're looking for? Visit our export site or find a local distributor.
  • Translate
  • Profile
  • Settings
Auto Hacks
  • Challenges & Projects
  • Project14
  • Auto Hacks
  • More
  • Cancel
Auto Hacks
Blog Enable Raspberry Pi CAN with an Arduino Shield
  • Blog
  • Forum
  • Documents
  • Events
  • Polls
  • Files
  • Members
  • Mentions
  • Sub-Groups
  • Tags
  • More
  • Cancel
  • New
Join Auto Hacks to participate - click to join for free!
  • Share
  • More
  • Cancel
Group Actions
  • Group RSS
  • More
  • Cancel
Engagement
  • Author Author: Jan Cumps
  • Date Created: 18 Nov 2021 2:06 PM Date Created
  • Views 30670 views
  • Likes 15 likes
  • Comments 0 comments
  • autohacksch
  • can_bus
Related
Recommended

Enable Raspberry Pi CAN with an Arduino Shield

Jan Cumps
Jan Cumps
18 Nov 2021

An out-of-box Pi doesn't have CAN support.

This Project14 mini-project shows how you can give it a CAN bus with an Arduino CAN ShieldArduino CAN Shield.

The end result is a Pi with a physical CAN driver and the Linux CAN-utils software installed and ready to use.

image


Craig Peacock wrote the instructions to integrate several CAN breakout boards with the Pi.

I'm adding the Arduino MKR CAN Shield to that.

In the spirit of Project14, it's a very simple project. If you happen to own a CAN shield, you can play along.
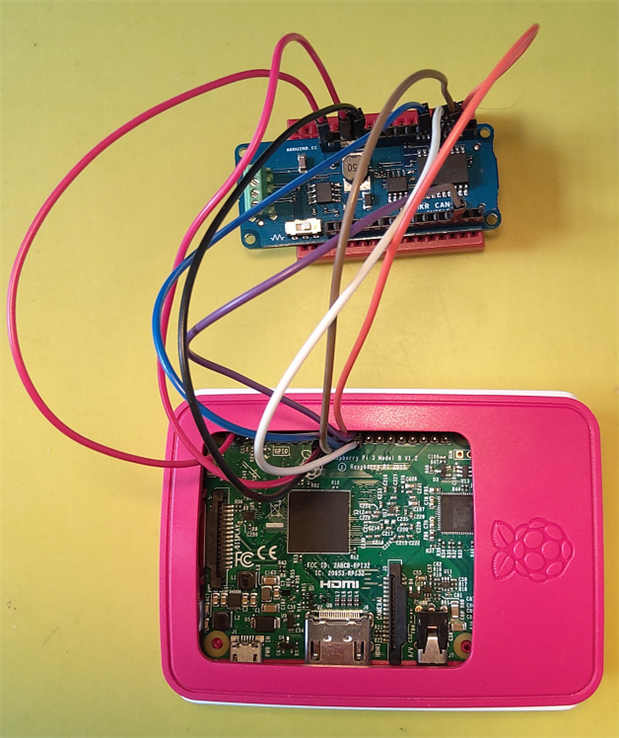


Connections


All signals and voltages are available on the Pi's 40-pin connector.

The table below cross-references all required signals, the location on the Pi header and the Shield pin.

I used the same Pi pins as Craig.


image

click to enlarge


Warning: https://forum.arduino.cc/t/wiring-a-mkr-canbus-shield-to-an-arduino-uno/670010

Also beware that the MKR Canbus Shield has an error on labeling the Can H and Can L on the BOTTOM of the board.

They are reversed. They are correct on the top of the board (in micro letters).

If the Shield is an end node (first or last unit connected to your CAN bus), set the terminate switch on the shield towards the resistor symbol.


Linux CAN-utils Tools


I literally followed the steps of Craig's post. Do the same.

Follow the Driver Installation and CAN-util sections .

(not needed, because the overlay does it automatically: But first enable SPI interface with raspi-config).


I used a fresh Debian Buster Lite.

First enabled the driver for the MicroChip CAN controller by enabling an overlay.


Attention. The Arduino Shield has a 16 MHz crystal, so the oscillator attribute in the overlay string should be set to 16000000:


dtoverlay=mcp2515-can0,oscillator=16000000,interrupt=25


I tested if that was successful. dmesg reports a successful load:


image

image


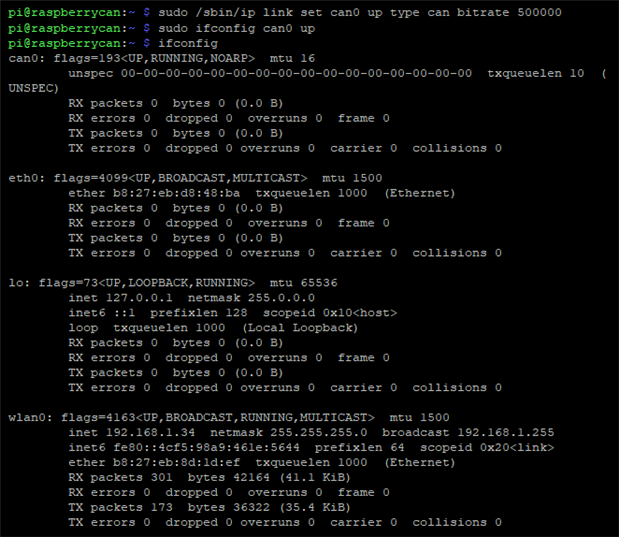
Then I installed the CAN-utils package (check Craig's post for instructions).

I'm using the cansend and candump utilities of that package.


You don't have permission to edit metadata of this video.
Edit media
x
image
Upload Preview
image

action video: hardware setup (with audio)


Testing It


I used a MicroChip CAN Bus analyser (see links at the end of this project).

Ground, CAN Hi and CAN Lo of analyser and Shield are connected to each other (attention: wrongly labeled on the underside of the Shield).

Can Hi and CAN Lo wires should be twisted.


I then used both devices to exchange data and show the results. In both directions
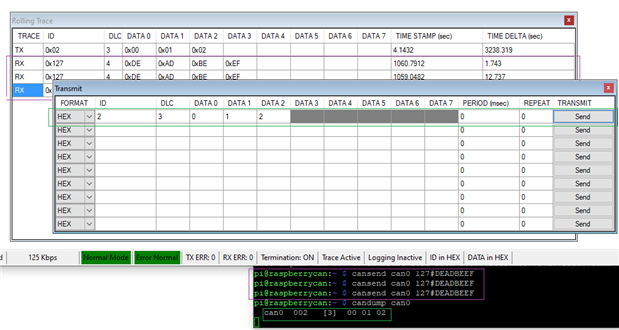
 

image


Success!


You don't have permission to edit metadata of this video.
Edit media
x
image
Upload Preview
image

action video: it works (no audio)


Related Blog:

Test CAN BUS on BeagleBone

Arduino MKR CAN Shield Review - part 1: Log BUS Traffic

Arduino MKR CAN Shield Review - part 2: Interrupt and Filter

AVNET SmartEdge IIOT Gateway: Use the Isolated CAN

CAN programming in C on Linux: Filter and Mask

CAN Analyser Road Test

Microchip CAN Analyzer Road Test - part 1: First trials

Microchip CAN Analyzer Road Test - part 2: Inject CAN Messages

Microchip CAN Analyzer Road Test - part 3: Analyzer as Test Tool

Microchip CAN Analyzer Road Test - part 4: Analyze the Physical layer of CAN Bus

Microchip CAN Bus Analyser Tool - Review

Poor man's CAN:

TI Hercules LaunchPad -  test the CAN with a poor man's CAN driver

Probing your Hercules LaunchPad CAN bus Part 1

Probing your Hercules LaunchPad CAN bus Part 2

Probing your Hercules LaunchPad CAN bus Part 3

Make my own CAN Driver:

CAN communication with Hercules Safety Microcontroller - part 1: tryout

CAN communication with Hercules Safety Microcontroller - part 2: Communication between 2 Devices

CAN communication with Hercules Safety Microcontroller - part 3a: Design a Bus Driver PCB

CAN communication with Hercules Safety Microcontroller - part 3b: Design a Bus Driver PCB - Schematics and Custom Components

CAN communication with Hercules Safety Microcontroller - part 3c: Design a Bus Driver PCB - Layout

CAN communication with Hercules Safety Microcontroller - part 3d: Design a Bus Driver PCB - Test

  • Sign in to reply
element14 Community

element14 is the first online community specifically for engineers. Connect with your peers and get expert answers to your questions.

  • Members
  • Learn
  • Technologies
  • Challenges & Projects
  • Products
  • Store
  • About Us
  • Feedback & Support
  • FAQs
  • Terms of Use
  • Privacy Policy
  • Legal and Copyright Notices
  • Sitemap
  • Cookies

An Avnet Company © 2025 Premier Farnell Limited. All Rights Reserved.

Premier Farnell Ltd, registered in England and Wales (no 00876412), registered office: Farnell House, Forge Lane, Leeds LS12 2NE.

ICP 备案号 10220084.

Follow element14

  • X
  • Facebook
  • linkedin
  • YouTube