Previous Posts:
tinyMonster AIO Robot (part-1)
tinyMonster AIO Robot (part-2)
tinyMonster AIO Robot (part-3)
tinyMonster AIO Robot (part-4)
tinyMonster AIO Robot (part-5)
In this part I am going to explain how to built RF remote to control robot (or anything) using STM32F103C8T6 (aka blue pill), NRF24L01+, 2-axis analog joystick and few buttons (optional).
Hardware Used
| {gallery} tinyMonster Robot - RF remote |
|---|
IMAGE TITLE: STM32F103C8T6 |
MAGE TITLE: NRF24L01+ module |
IMAGE TITLE: 2-Axis Analog Joystick |
IMAGE TITLE: Buttons and Power Switch |
IMAGE TITLE: Small LED with 470R resistors to indicate communication and switches position |
IMAGE TITLE: Li-Ion single cell to 5V booster |
IMAGE TITLE: Li-Ion 18650 single cell with its holder |
IMAGE TITLE: Li-Ion single cell charger with protection circuit |
Circuit Diagram
STM32F103C8T6 using Mbed
Before start programming we need to add STM32F103RB platform in mbed online compiler. In order to do that we will follow these step:
Goto: https://os.mbed.com/platforms/ST-Nucleo-F103RB/
Click on "ADD to your Mbed Compiler" And it will take you to online compiler and add it to your platform list
After Adding NUCLEO-F103RB platform to Mbed online compiler. You can simply copy paste the code given below and add the STM32F103C8T6, NRF24L01+ and USB serial libraries from the important links.
#include "stm32f103c8t6.h"
#include "mbed.h"
#include "math.h"
#include "USBSerial.h"
#include "nRF24L01P.h"

// The nRF24L01+ supports transfers from 1 to 32 bytes, but Sparkfun's
//  "Nordic Serial Interface Board" (http://www.sparkfun.com/products/9019)
//  only handles 4 byte transfers in the ATMega code.
#define TRANSFER_SIZE   2


#define LED1 PB_3
#define LED2 PB_4
#define LED3 PB_5
#define LED4 PB_6

#define BUTTON1 PB_7
#define BUTTON2 PB_8
#define BUTTON3 PB_9
#define BUTTON4 PB_10


#define CSN  PC_14
#define CE   PC_15
#define IRQ  PB_1

#define LED_ON 1
#define LED_OFF 0


DigitalOut  myled1(LED1);//funcrion 1
DigitalOut  myled2(LED2);//function 2
DigitalOut  myled3(LED2);//function 3
DigitalOut  myled4(LED4);//tx activity

AnalogIn   xin(A0);
AnalogIn   yin(A1);
AnalogIn   bat_volt(PB_0);

DigitalIn  mybutton1(BUTTON1, PullUp);//funcrion 1
DigitalIn  mybutton2(BUTTON2, PullUp);//funcrion 2
DigitalIn  mybutton3(BUTTON3, PullUp);//funcrion 3
DigitalIn  mybutton4(BUTTON4, PullUp);//joystick sw


nRF24L01P my_nrf24l01p(SPI_MOSI, SPI_MISO, SPI_SCK, CSN, CE, IRQ);    // mosi, miso, sck, csn, ce, irq

int main() {
    char txData[TRANSFER_SIZE];
    int txDataCnt = 0;
    int rxDataCnt = 0;
    confSysClock();     // Configuring system clock
    USBSerial usbSerial(0x1f00, 0x2012, 0x0001,  false);    // connection is not blocked when USB is not plugged in

    myled1 = LED_OFF;      // turn the LED off
    myled2 = LED_OFF;
    myled3 = LED_OFF;
    myled4 = LED_OFF;

    usbSerial.printf("STM32+nRF24L01+ Test\r\n");


    my_nrf24l01p.powerUp();

    // Display the (default) setup of the nRF24L01+ chip
    usbSerial.printf( "nRF24L01+ Frequency    : %d MHz\r\n",  my_nrf24l01p.getRfFrequency() );
    usbSerial.printf( "nRF24L01+ Output power : %d dBm\r\n",  my_nrf24l01p.getRfOutputPower() );
    usbSerial.printf( "nRF24L01+ Data Rate    : %d kbps\r\n", my_nrf24l01p.getAirDataRate() );
    usbSerial.printf( "nRF24L01+ TX Address   : 0x%010llX\r\n", my_nrf24l01p.getTxAddress() );
    usbSerial.printf( "nRF24L01+ RX Address   : 0x%010llX\r\n", my_nrf24l01p.getRxAddress() );

    my_nrf24l01p.setTransferSize( TRANSFER_SIZE );

    my_nrf24l01p.setReceiveMode();
    my_nrf24l01p.enable();

    bool rf_remote_ctrl = false;
    bool func_1 = false;
    bool func_2 = false;
    bool func_3 = false;

    while (1) {
        float x_val = xin.read();
        float y_val = yin.read();

        if (!mybutton4){
            while (!mybutton4);
            rf_remote_ctrl=!rf_remote_ctrl;
            myled4 = rf_remote_ctrl;
        }

        if (rf_remote_ctrl){
            if ( x_val < 0.4f || x_val > 0.55f) {
                txData[txDataCnt++] = 'X';
                txData[txDataCnt++] = (char)(rintf)(x_val*100);
                if ( txDataCnt >= sizeof( txData ) ) {
                    my_nrf24l01p.write( NRF24L01P_PIPE_P0, txData, txDataCnt );
                    txDataCnt = 0;
                }
                usbSerial.printf( "tinyMonster Robot RF remote - X-axis value : %1.4f\r\n", x_val);
                myled4 = !myled4;
            }
            if ( y_val < 0.4f || y_val > 0.55f) {
                txData[txDataCnt++] = 'y';
                txData[txDataCnt++] = (char)(rintf)(x_val*100);
                if ( txDataCnt >= sizeof( txData ) ) {
                    my_nrf24l01p.write( NRF24L01P_PIPE_P0, txData, txDataCnt );
                    txDataCnt = 0;
                }
                usbSerial.printf( "tinyMonster Robot RF remote - Y-axis value : %1.4f\r\n", y_val);
                myled4 = !myled4;
            }

            if (!mybutton1) {
                while (!mybutton1);
                func_1 = !func_1;
                txData[txDataCnt++] = '1';
                txData[txDataCnt++] = ((func_1) ? '1' : '0');
                if ( txDataCnt >= sizeof( txData ) ) {
                    my_nrf24l01p.write( NRF24L01P_PIPE_P0, txData, txDataCnt );
                    txDataCnt = 0;
                }
                usbSerial.printf( "tinyMonster Robot RF remote - Function 1 : %d\r\n", func_1);
                myled1 = func_1;
            }
            if (!mybutton2) {
                while (!mybutton2);
                func_2 = !func_2;
                txData[txDataCnt++] = '2';
                txData[txDataCnt++] = ((func_2) ? '1' : '0');
                if ( txDataCnt >= sizeof( txData ) ) {
                    my_nrf24l01p.write( NRF24L01P_PIPE_P0, txData, txDataCnt );
                    txDataCnt = 0;
                }
                usbSerial.printf( "tinyMonster Robot RF remote - Function 2 : %d\r\n", func_2);
                myled2 = func_2;
            }
            if (!mybutton3) {
                while (!mybutton3);
                func_3 = !func_3;
                txData[txDataCnt++] = '3';
                txData[txDataCnt++] = ((func_3) ? '1' : '0');
                if ( txDataCnt >= sizeof( txData ) ) {
                    my_nrf24l01p.write( NRF24L01P_PIPE_P0, txData, txDataCnt );
                    txDataCnt = 0;
                }
                usbSerial.printf( "tinyMonster Robot RF remote - Function 3 : %d\r\n", func_3);
                myled3 = func_3;
            }
        }

        wait (0.001f);
    }

}
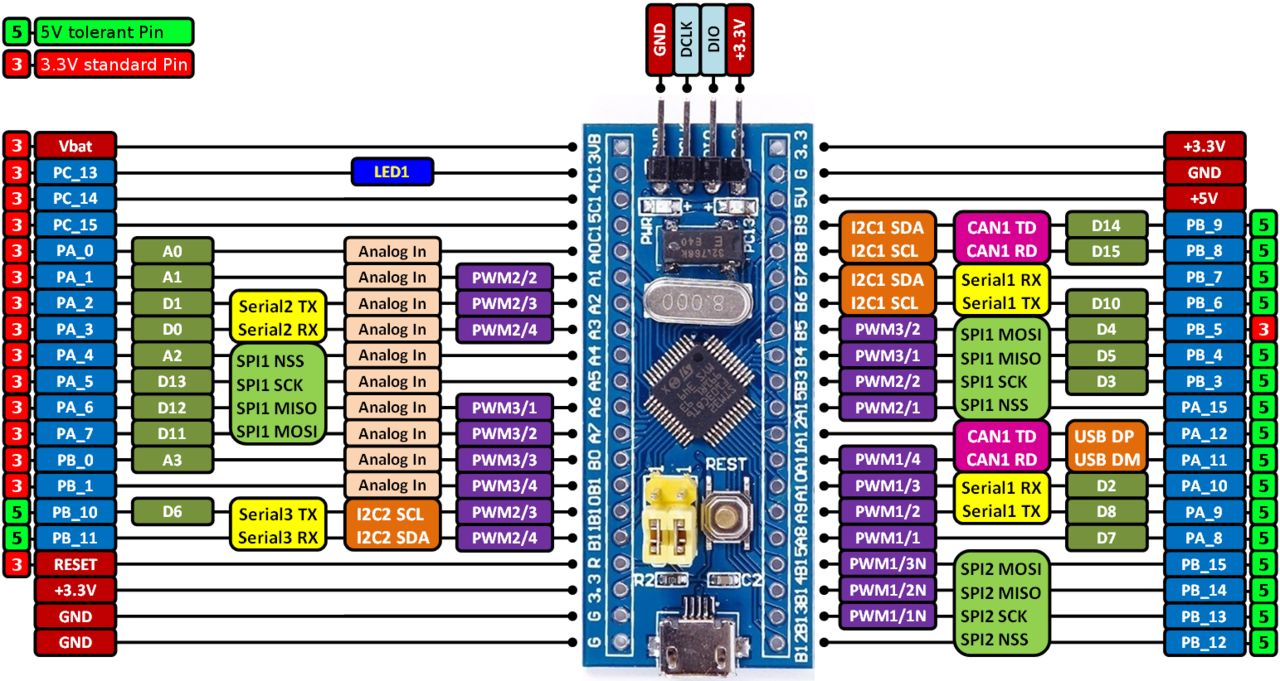
This code use the micro USB port of Blue pill for debugging. And pin names that can be used in Mbed code are either shown in Blue boxes with white text or Green boxes with White text
Important Links
https://os.mbed.com/users/hudakz/code/STM32F103C8T6_Hello/
https://os.mbed.com/users/hudakz/code/mbed-STM32F103C8T6/
https://os.mbed.com/users/Owen/code/nRF24L01P/
https://os.mbed.com/users/cfb95/code/STM32F103C8T6_nRF24L01P_Hello_World/


