


The WRONGCO Hamper Helper – blog 6 (final) – I'm not crazy, It is ARDUINO ALIVE !
Short operating description:
The Hamper Helper is a stand alone Dirty Clothes Hamper that emphatically reminds you when the hamper is full and you need to do your laundry. The Hamper Helper will give your dirty laundry a spritz of a freshener, of your choice, to deodorize & help keep down the stink of rotting sweaty clothes.
If its WRONCO, its gotta be right.
************************************************************************
The Hamper Helper Demonstration VIDEO:
The Hamper Helper Demonstration VIDEO, Arial View, electronics shown:
***************************************************************************
Detailed Operating Description:
The Hamper operates from a 12V battery, consuming only 6mA while waiting for people to approach the hamper.
A motion detector senses when someone is the room by the hamper, and powers up the hamper helper Arduino Nano controls. After a minute or so without sensing more motion, the timing is adjustable, the hamper will power the controls down.
The first action is to give the laundry in the hamper helper a short spritz of deodorizer from the atomizer. The atomizer bottle is supported in a cup to capture any spills or drips, and allow manual aiming if desired.
The next action is to check the hamper helper clothes level by firing light beams lengthwise and then widthwise across the hamper top edge. If the light beams are seen by the photo transistors, the controls loop back around and recheck every few seconds. It continues checking until the hamper helper times out on the motion detector. The light beams only flash for 150ms reducing battery consumption and maximizing the lifetime on the light source.
The exciting part is what happens if both light beams are blocked by clothes. The Hamper Helper turns on a flashing red LED beacon and also sounds a small piezo buzzer until the clothes are removed from the hamper helper. The buzzer is supposedly 80 dB and changes tones to catch your attention when first triggered.
The visual and audible alarms only are reset if the Hamper Helper powers down, OR if clothes are removed from the Hamper Helper.
Some of the research in developing this fabulous must have product:
The WRONGCO Hamper Helper – blog 5 – get a spritz of the aromatic Atomizer, hack a bit, build a bit, and test
The WRONGCO Hamper Helper – blog 4 – photo detection system test with Arduino at the helm
The WRONGCO Hamper Helper – blog 3 – photo "electric eye" detection calibration, and down a COB LED rabbit hole
The WRONGCO Hamper Helper–blog 2-Intro to Optical sensors from a Dummy
The WRONGCO Hamper Helper - experiment 1 dirty clothes pile height detection - not so good
Future improvements to this alpha version Hamper Helper:
- Change COB LEDs to RED or Infared.
- Greatly reduce size of COB LED beam transmitters and phototransistor receiver assemblies.
- Compact the control box layout, move mounting to Hamper front face.
- Allow for repositioning of motion detector and deodorizer spritzer.
- IOT networked Hamper Helpers. To show you, on the phone app , which rooms have full hampers.
- Customers may insist on a silence pushbutton, or disable the audible alarm.
- Fluid level detection in the Spritzer bottle to remind the customer to give it a refill.
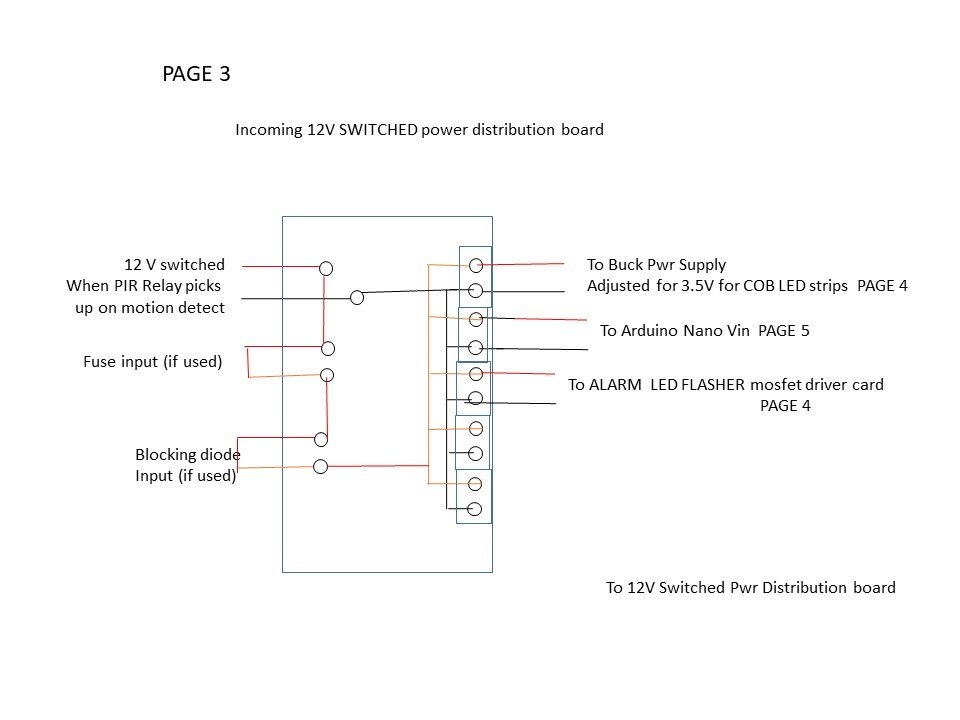
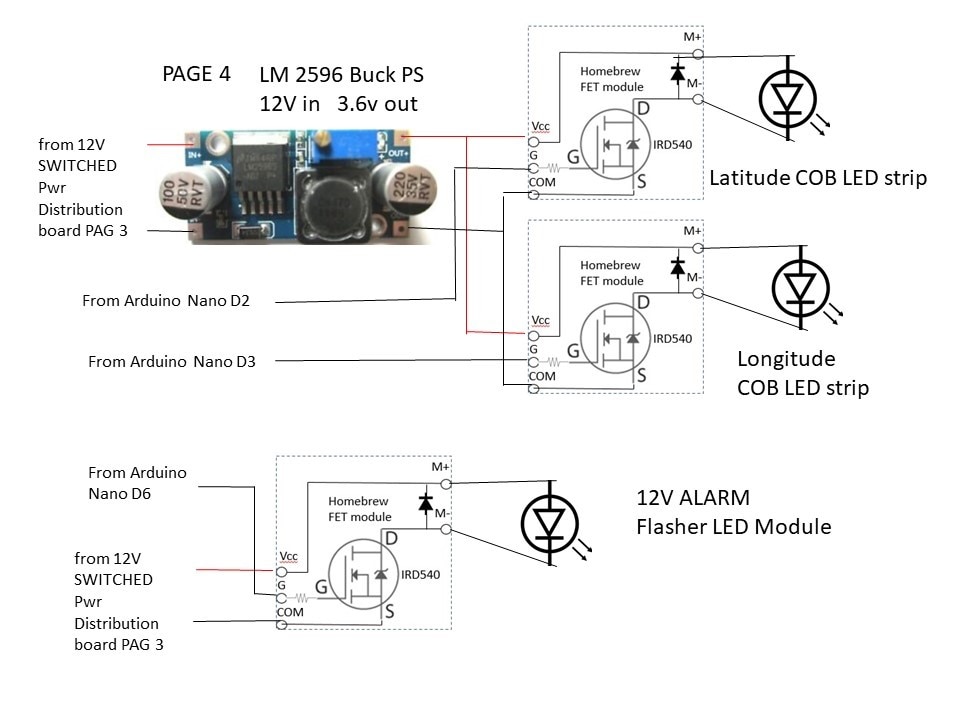
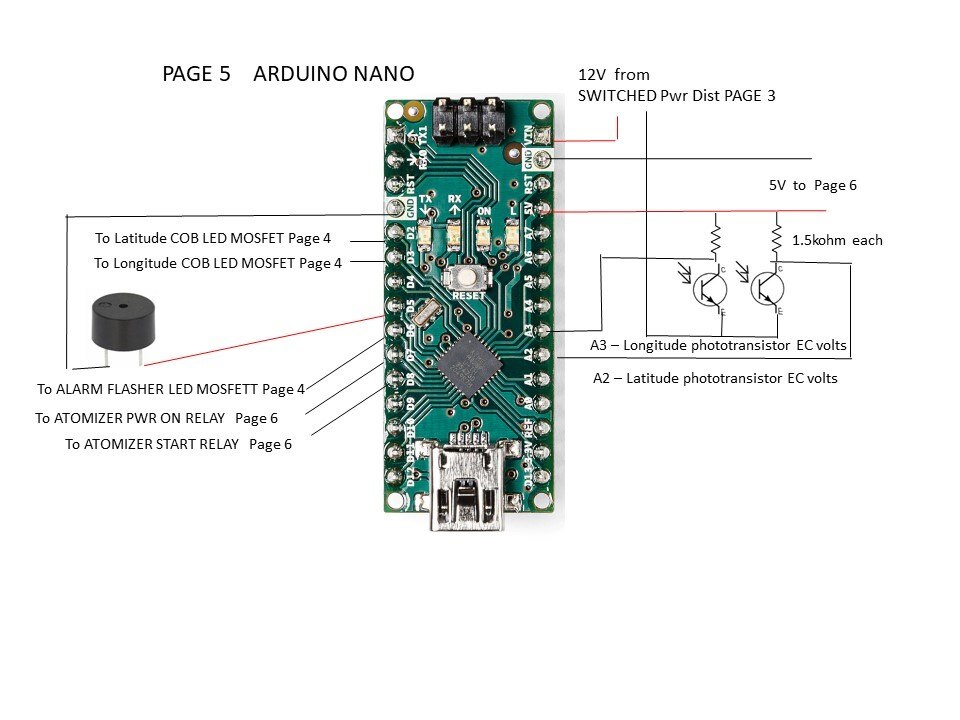
The photos , schematics/ML and Arduino code:


// ---------------------------------------------------------------------------
//
// Hamper Helper R0 starts from test program for the Hamper Helper_TestElectricEye.ino
// which detects and alerts if clothes are piled above the top of the hamper.
// This program fires the COB light source & reads the voltage drop across the
// phototransistor mounted directly across from it.
// Low light conditions, the phototransistor is high impedance, reading a voltage drop of approximately 5V.
// If the phototransistor sees the COB LED light, the phototransistor conducts more, with a lower voltage drop.
// The measured voltage drop of the phototransistor hit with the COB LED beam is about 4V.
// The code will set a "beam seen" flag if the beam is detected. If the beam isnt seen when the COB LED is lit,
// it assumed clothes are blocking the light beam.
// This simple code tests the beam COB LED transmitter and phototransistor detector.
// code
// R0 - Make the Electric Eye height check as a function (i.e. void)
// R1 - remove photo eye height check as a function, make part of main loop, add buzzer code
//      add atomizer outputs to setup
// ---------------------------------------------------------------------------


int LongitudePhotoEyeValue;
int LatitudePhotoEyeValue;
int LongitudeSeeBeam;
int LatitudeSeeBeam;
float LatitudePhotoEyeVolts;
float LongitudePhotoEyeVolts;


void setup() {

pinMode(A2, INPUT); // Latitude phototransistor voltage drop 5V = no light (1023), 4V sees beam (900)
pinMode(A3, INPUT); // Longitude phototransistor voltage drop 5V = no light, (1023), 4V sees beam (900)

pinMode(2, OUTPUT); // Driver for Latitude PhotoElectric Eye COBLED
pinMode(3, OUTPUT); //Driver for Longitude PhotoElectric Eye COBLED
pinMode(5, OUTPUT); // turn on Hamper Full BUZZER
pinMode(6, OUTPUT); // turn on Hamper Full Flashing LED assembly
pinMode(7, OUTPUT); // Power atomizer
pinMode(8, OUTPUT); // start atomizer

delay(1000);//a little power up time for Buck PSs to settle
//Serial.begin(9600);

// freshen the laundry with a little spritz of ginger water

   digitalWrite(7, HIGH); // close relay to power the atomizer
   delay(2000);  // atomizser boot up time
   digitalWrite(8, HIGH); // close relay to start atomizer, simulate a slow pushbutton
   delay(900); //
   digitalWrite(8, LOW); // close relay to start atomizer, simulate a slow pushbutton
   delay(5000);  // atomizser boot up time
   digitalWrite(7, LOW); // open relay to power down the atomizer, dont soak the laundry
}

void loop()
{
  delay(10000);  // how often to cycle test for laundry height

// check hamper clothese height with eye Beam

// check Latitude direction for eye Beam
    digitalWrite(2, HIGH); // Latitude turn on COB LED
    delay(50);
    LatitudePhotoEyeValue=analogRead(A2);
    LatitudePhotoEyeVolts=(LatitudePhotoEyeValue)*5.0/1023.0;
    delay(10);
    if (LatitudePhotoEyeValue<920)   ///phototransistor impedance goes down with light
      { LatitudeSeeBeam = HIGH;}
      else   { LatitudeSeeBeam = LOW;}
    digitalWrite(2, LOW); // Latitude turn off COB LED
    //Serial.print( "LatiitudePhotoEyeValueLIT=");
    //Serial.println( LatitudePhotoEyeValue);
    //Serial.print( "LatiitudePhotoEyeVoltsWhenLIT=");
    //Serial.println( LatitudePhotoEyeVolts, DEC);
    //Serial.println(" ");
    delay(200); // give time for DVM to display reading, avoid crosstalk
    //digitalWrite(2, LOW); // Latitude turn off COB LED


    // check Longitude direction for eye Beam
    //digitalWrite(2, HIGH); // Latitude turn on COB LED
    //delay(500);
    //LatitudePhotoEyeValue=analogRead(A2);
    //delay(50);
    //if (LatitudePhotoEyeValue<920)
    //  { LatitudeSeeBeam = HIGH;}
    //  else   { LatitudeSeeBeam = LOW;}
    //digitalWrite(2, LOW); // Latitude turn off COB LED
    //erial.print( "LatiitudePhotoEyeValue_AMB=");
    //Serial.println( LatitudePhotoEyeValue);
    //Serial.println(" ");

    // check Longitude direction for eye Beam
    digitalWrite(3, HIGH); // Longitude turn on COB LED
    delay(50);
    LongitudePhotoEyeValue=analogRead(A3);
    LongitudePhotoEyeVolts=(LongitudePhotoEyeValue)*5.0/1023.0;
    delay(50);
    if (LongitudePhotoEyeValue<920)
      { LongitudeSeeBeam = HIGH;}
      else   { LongitudeSeeBeam = LOW;}
     digitalWrite(3, LOW); // Latitude turn off COB LED
    //Serial.print( "LongitudePhotoEyeValue=");
    //Serial.println( LongitudePhotoEyeValue);
    //Serial.print( "LongitudePhotoEyeVolts=");
    //Serial.println( LongitudePhotoEyeVolts, DEC);
    //Serial.println(" ");
    //delay(1000); // give time for DVM to display reading
    //digitalWrite(3, LOW); // Longitude turn off COB LED


    //test ambient valuefor diagnostics
    //LongitudePhotoEyeValue=analogRead(A3);
    //delay(50);
    //Serial.print( "LongitudePhotoEyeValue_AMBIENT=");
    //Serial.println( LongitudePhotoEyeValue);
    //Serial.println(" ");


if ((LatitudeSeeBeam==LOW) && (LongitudeSeeBeam==LOW))
    {
    tone(5,3700); ///use TONE rather than PWM
    digitalWrite(6, HIGH);  // lite flasher
    delay(500);
    noTone(5);
    tone(5,4000); ///use TONE rather than PWM
    delay(500);
    noTone(5);
    tone(5,4500); ///use TONE rather than PWM
    delay(500);
    noTone(5);
    tone(5,4050); ///use TONE rather than PWM

    }
    else
    {
    noTone(5);
    digitalWrite(6, LOW);   //flasher off
    }
}
