


Introduction
If you want to do energy harvesting, you also want the powered device consume as little power as possible.
My first bigger electronics project is an IR thermometer. I have previously written a few blog posts about it’s goal and evolution. (Here is the first blog post with links to the following parts: "No lies" IR Thermometer - part I ). It is also my first battery powered micro-controller design and I still have much to learn how to improve this device. One thing I didn’t have time to optimize is battery life. The thermometer is used twice a week on average, to check our body temperature etc. The rest the time it should be in low power mode, ready to be used.
Just a quick recapitulation on hardware used:
- MCU: CY8C4245AXI-483CY8C4245AXI-483 , PSoC with ARM Cortex-M0 core, made by Cypress https://www.cypress.com/part/cy8c4245axi-483
- IR sensor: MLX90614 https://www.melexis.com/en/product/mlx90614/digital-plug-play-infrared-thermometer-to-can
- LCD: RC0802A-GHW-ESV, 8x2 characters, made by Raystar Optronics (the first thermometer revision had a some no-name 16x2 display)
Both the IR sensor and LCD (and separately LED back-light) are powered directly from PSoC pins.
Before optimization
Here is an older video of the 1st thermometer revision, measuring a power consumption using a Keysight U1282A multimeter.
Power consumption during operation is not that important. It’s usually 5 - 15 mA, but the device stays only 10 seconds in this mode.
Note: At this point I have already caught a huge power leak to the LCD data pins, when the LCD power pin had logic 0 on output. When the data pins were not disconnected (switched to analog inputs), ca. 20 mA was leaking through them. That was twice as much as in run mode!
However, power consumption in low power mode was bouncing between tens of microamps to hundreds of nanoamps. This situation means, there are floating MCU pins and the current is leaking to/from external circuitry. In the second HW version (which has the same components, smaller LCD and a different PCB shape) the current was bouncing between 70 – 300 uA.
My colleagues taught me a simple way to diagnose this issue. Touch and leave the MCU and if the consumed current jumps with the touches, it is caused by the floating pins that get charged or discharged by the touch. One exception is touching pins connected to an external oscillator. Added capacity of the finger can change the clock frequency and affect the power consumption.
After optimization
Cypress has an application note for power modes and power reduction techniques: https://www.cypress.com/documentation/application-notes/an86233-psoc-4-low-power-modes-and-power-reduction-techniques
The lowest achievable power mode is stop mode, which retains nothing and the only way to wake up from this state is an external reset or a logic state change on P0.7 pin. I intentionally have a button on this pin, using it to start or perform an additional temperature measurement. Power consumption in this state is supposed to be around 20 nA.
I have already applied some of the advice, connecting the IR sensor and LCD directly to the MCU pins. This way, the MCU is in the command of the overall power consumption.
What I didn’t realize is set the pins to appropriate state before going to a lower power mode. The advice is to set all pins to high impedance analog inputs to avoid current leaks. If that is not possible, make them digital inputs will pull-up or pull-down resistors, or make them outputs with a strong drive. It really depends of the hardware design.

So I set all unused pins to high impedance analog inputs, programmed the MCU, measured the current and… nothing changed. Which is not a surprise, because all unused pins are in this state by default.
Then I realized I didn’t take care of the I2C data pins leading to the IR sensor and UART. Setting these pins is specific, because once they are internally connected to a component like I2C or serial communications block, they can’t be set in GUI nor generated API. The only way is to change the control using Cortex-M0 registers. One has to go to a PSoC 4 Architecture Technical Reference Manual (TRM) https://www.cypress.com/file/126171/download and PSoC4 Registers TRM https://www.cypress.com/documentation/technical-reference-manuals/psoc-41004200-family-psoc-4-registers-trm-technical .
After this change, the device goes to a stop mode and consumes really low power.
How much? Let’s see on three different devices.
Keysight U1828A multi-meter
https://www.newark.com/keysight-technologies/u1282a/digital-multimeter-handheld-4/dp/58Y5948
Multi-meter is set to auto-range (the thermometer won’t turn on if set to the lowest range manually), the lowest range is 600 uA. The picture below shows 0.01 uA = 10 nA . We are on the edge of precision that can be displayed. In addition to that, the accuracy of this meter is 0.05 % + 5 cnts , which is 0.0005 * 600 uA + 50 nA = 350 nA.

Here is a live video showing the measurement. The auto-ranging takes a while, so I take multiple measurements in order to get the result in both run and stop modes.
Joulescope
Joulescope is a $800 device (low cost, compared to what comes next) for energy profiling. It was originally funded on Kickstarter, but is currently commonly sold. If you want to know more about it, here is a link to the website: https://www.joulescope.com/
I hope you don't mind if I just copy a few numbers from the specification https://www.joulescope.com/specs/
- -1V to 15V voltage range
- -1A to 3A current range, continuous
- Up to 10A pulses (<10 ms, < 3A average per second)
- Down to 1.5 nA resolution, equivalent to 32-bits of dynamic range
- Synchronously measures voltage and current at 2 million samples per second, 14-bit
- 250 kHz bandwidth
- Rapid 1 μs switching between shunt resistors for seamless dynamic current measurement
First, the Joulescope multi-meter mode. It provides live view and has the ability to average values over time. I captured almost 20 seconds in the MCU stop mode.
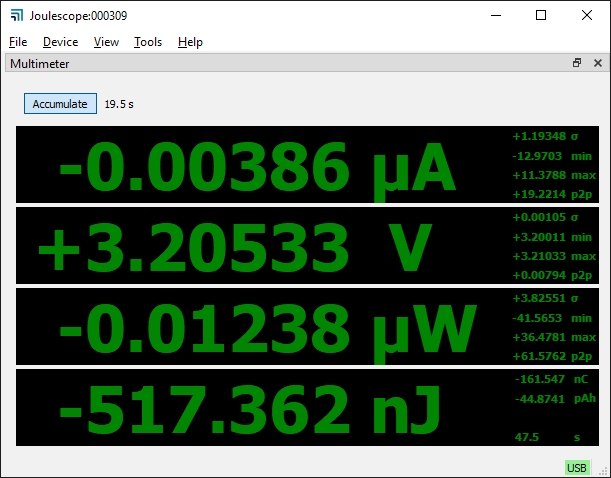
At the lowest 18 uA range, it has a resolution of 1.5 nA (but for some reason adds one more fake digit) and accuracy of 0.25% + 30 nA = 0.0025 * 18 uA + 30 nA = 75 nA
It looks like the current was more flowing from the thermometer to the battery than the supposed way. Again, we are at the edge with accuracy.
Next, a scope view (yellow line shows the average value):
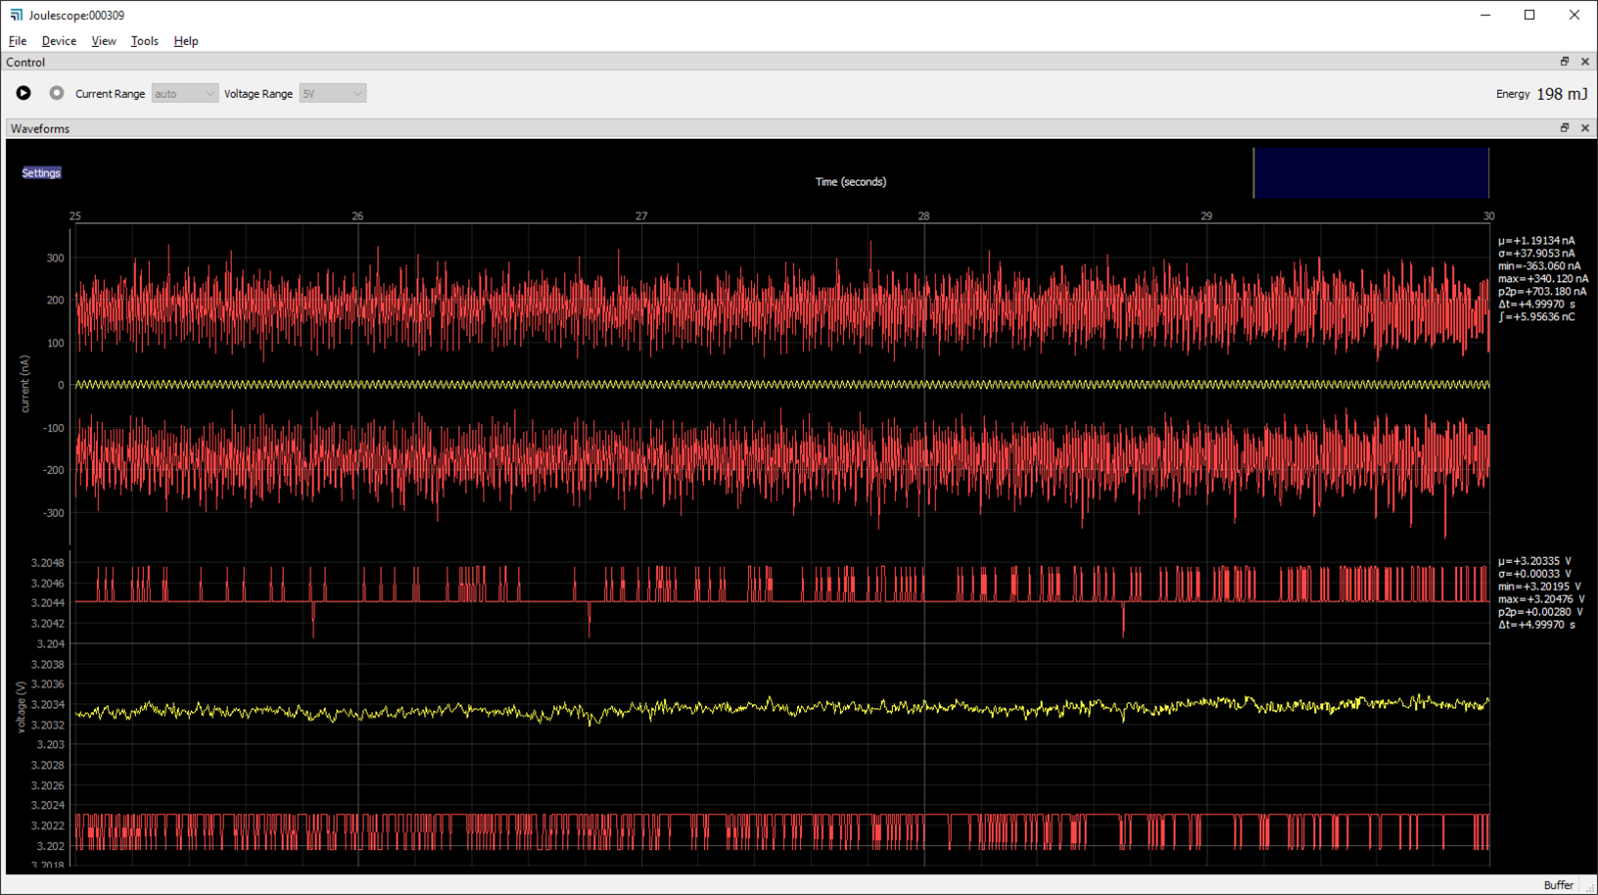
Then I tried the scope view and captured one temperature measurement. Waking up from the stop mode, measuring and displaying the temperature and going back to the stop mode. The scaling in GUI is automatic, which means I had to zoom to specific time in order to get a better picture of the signal. The dynamics of the current makes it sometimes hard to see the details.
Full measurement view
There is no way to differentiate between an active and stop mode, however, there are noticeable spikes when the MCU comes to live (ca. 2 Amps) and later when everything is shut down (ca. 200 mA).

MCU start

Run mode
Ca. 10 mA current consumption.

Starting LCD back-light
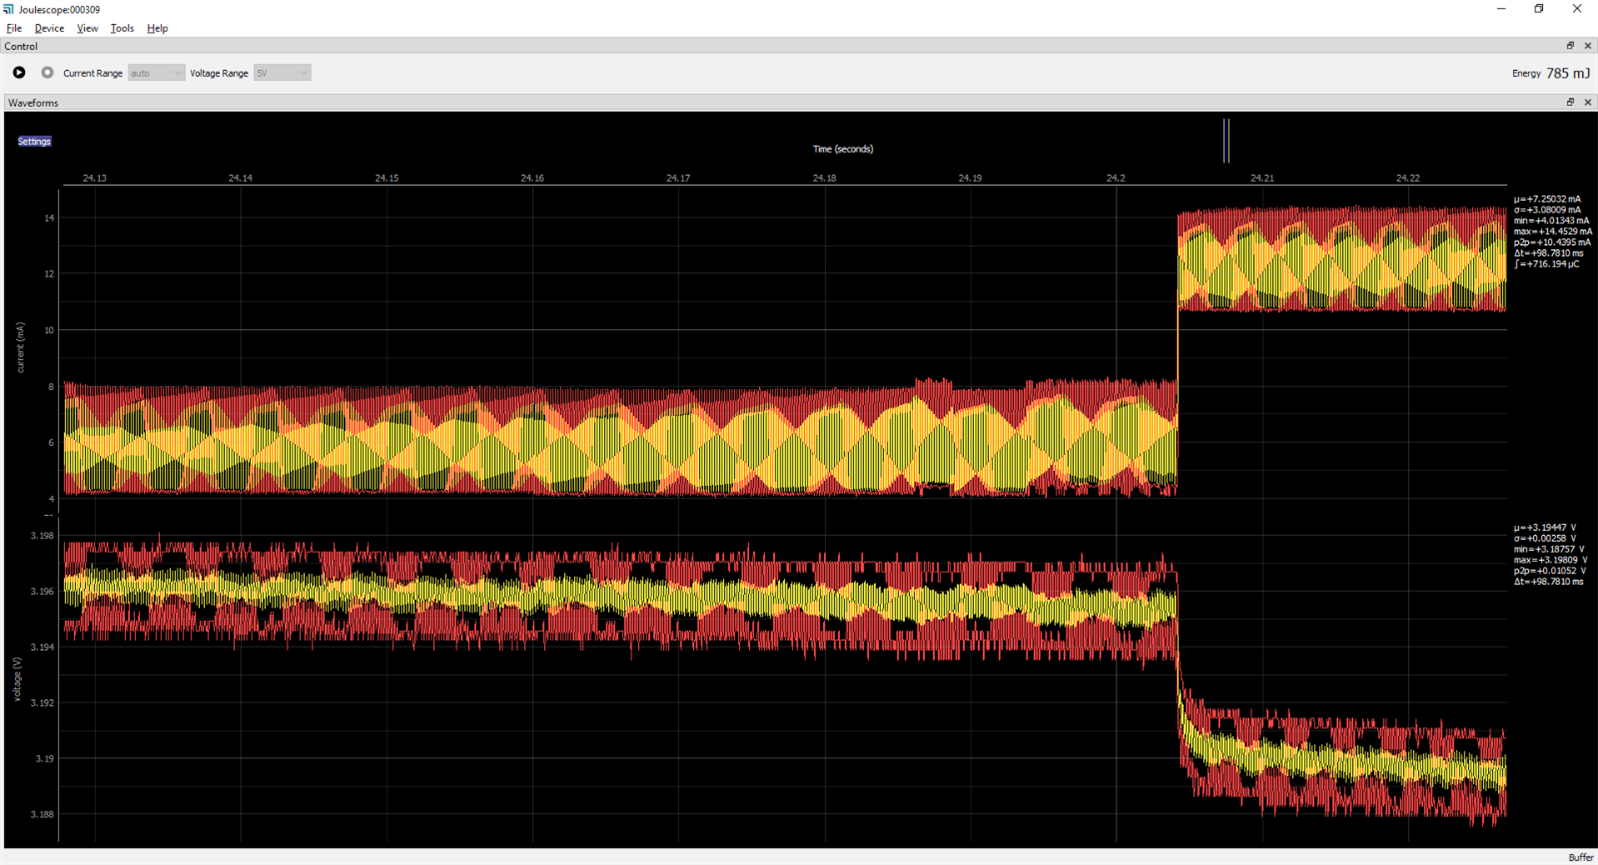
MCU and components shut down
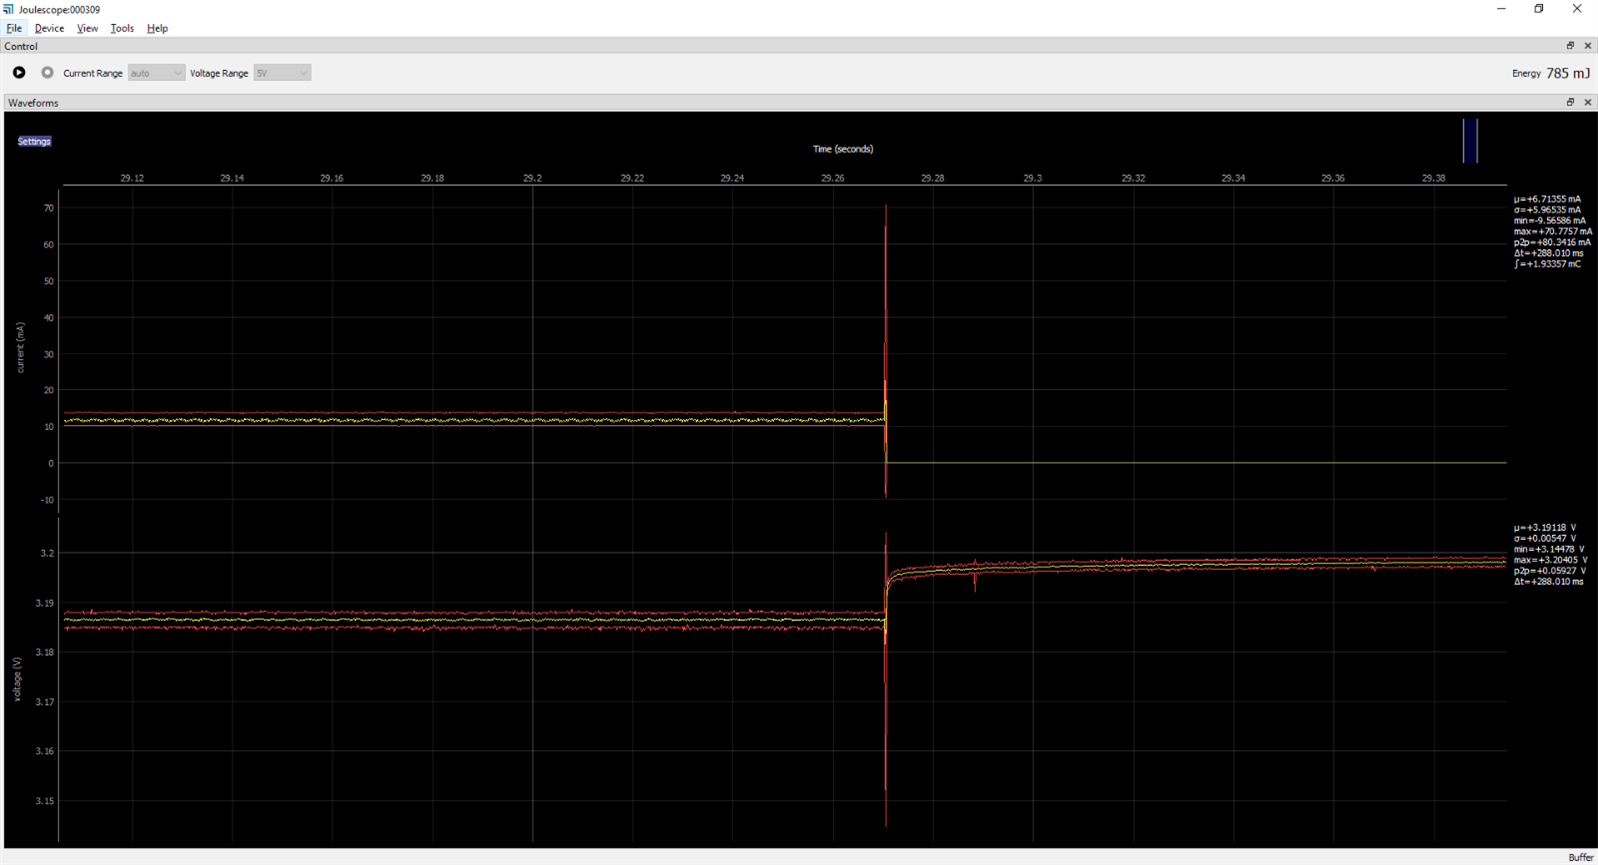
Detail of the stop mode
Looks a bit different than the stop mode graph above.

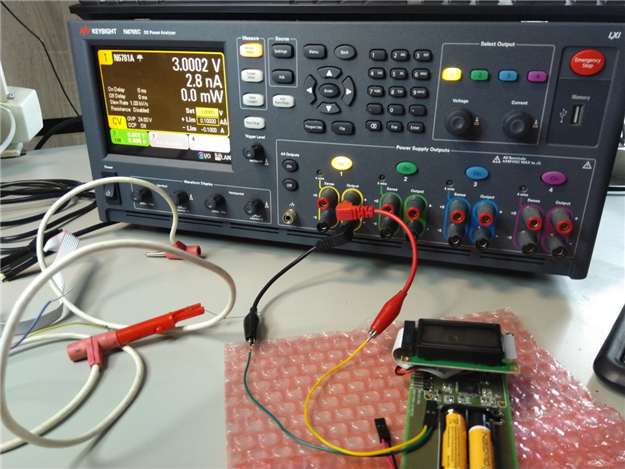
Keysight N6705CN6705C power supply with N6781AN6781A unit
This device is a beast. Bench power supply with many power modules options. $8000 chassis with a $6400 module inside. https://www.newark.com/keysight-technologies/n6705c/dc-power-analyzer-current-pow/dp/02AC5191 , https://www.newark.com/keysight-technologies/n6781a/source-measure-unit-for-battery/dp/79R9083
(No, I don’t have this at home  )
)
Lowest power range of the optional N6781AN6781A unit is 10 uA. Accuracy is 0.025% + 8 nA = 0.00025 * 10 uA + 8 nA = 10.5 nA
However, the device display doesn’t seem to show what I was expecting.
Let’s see what the data logger mode shows. This requires a PC with software connected to the power supply. The graph resolution is 100 nA per division, the average line is obviously the one in the center. You can see a 30 s recording. The disturbance in the first 12 seconds was simply to illustrate what happens when touching the wires. The capacity of hands is enough to provide some current. If you look at the Avg column (not the Marker 1), you can see an average of 16 nA.

Conclusion
I tried to measure a very low current using three different devices and got five different results. I didn’t expect a $4 MCU can do such a benchmark even for a $14 000 setup Anyway, I changed the consumer batteries in the thermometer for the industrial ones and hope them to last a few years…
What is the lowest current of your devices?
Thanks for reading,
David
Top Comments