


Overview
The Arduino 33 BLE Sense, outside of the many sensors available on the board, is based on the UBLOX NINA B306 which includes a Nordic nRF52840, made from a 32-bit ARM Cortex
 -M4 CPU running at 64 MHz. The UBLOX NINA B306 provides both Bluetooth 5 and BLE support. The BLE feature will be used in this exercise.
Related Posts
BLE on Arduino Nano 33 BLE Sense - Flask Remote Control
References:
Arduino Nano 33 BLE Sense
https://store.arduino.cc/usa/nano-33-ble-sense
Adafruit - Install bluez on the Raspberry Pi
https://learn.adafruit.com/install-bluez-on-the-raspberry-pi/installation
Previous MKR WiFI 1010 Project
Hardware
- Arduino Nano 33 BLE Sense
https://store.arduino.cc/usa/nano-33-ble-sense
BLE Device:
UBLOX NINA B306
https://www.u-blox.com/sites/default/files/NINA-B3_DataSheet_%28UBX-17052099%29.pdf
Nordic nRF52840
https://content.arduino.cc/assets/Nano_BLE_MCU-nRF52840_PS_v1.1.pdf
- Button (Tactile Switch)
- Piezo Buzzer
- LED
- 1K Ohm Resistor
- 220 Ohm Resistor (x2)
- 2N2222 Transistor
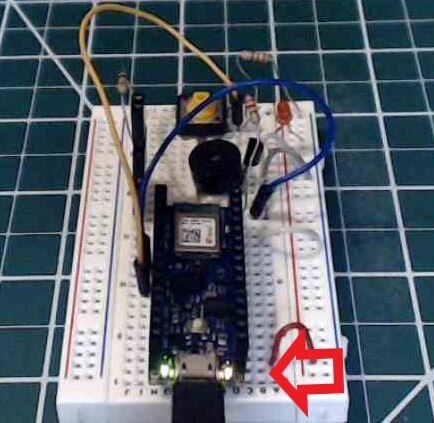
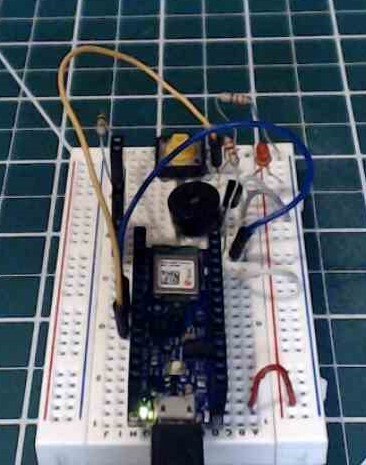
The Circuit
- Connect the Button to Pin 4 of the Nano
- Connect the Pizeo Buzzer to Pin 2 of the Nano
- The On-board LED_BUILTIN

Prepare Arduino IDE
1. Install the ArduinoBLE Library
https://www.arduino.cc/en/Reference/ArduinoBLE
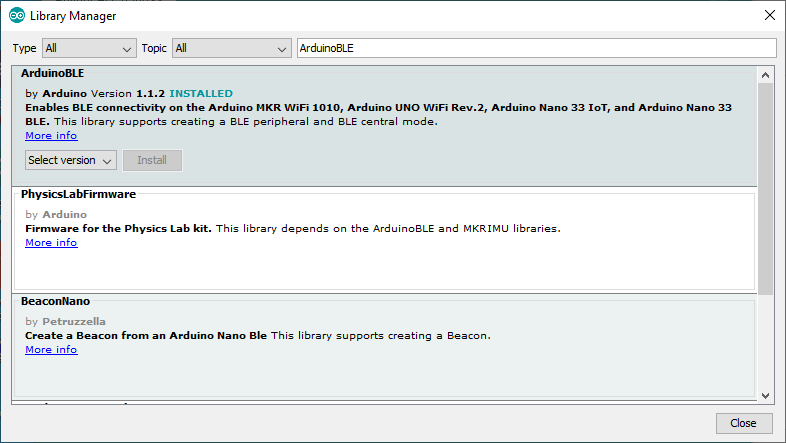
2. The ArduinoBLE->Peripheral->ButtonLED example was used for this post.

3. Compile and load the code to the Nano
NOTE: An added Characteristic for a Piezo Buzzer was added for this post.

ArduinoBLE Code
The ArduinoBLE code defines a ledPin variable to LED_BUILTIN and the buttonPin to pin 4 of the Nano.
These are used when communicating with the board via BLE via predefined Characteristics.
const int ledPin = LED_BUILTIN; // set ledPin to on-board LED
const int buttonPin = 4; // set buttonPin to digital pin 4
const int piezoPin = 2; // set piezoPin to digital pin 2
1. A BLEService named ledService is defined to initialize the BLE configuration
BLEService ledService("19B10010-E8F2-537E-4F6C-D104768A1214"); // create service
2. Then Characteristics are defined to handle communication with the LED and Button.
NOTE: An Pizeo Characteristic was added to the original code as an audio indicator.
// create switch characteristic and allow remote device to read and write
BLEByteCharacteristic ledCharacteristic("19B10011-E8F2-537E-4F6C-D104768A1214", BLERead | BLEWrite);
// create button characteristic and allow remote device to get notifications
BLEByteCharacteristic buttonCharacteristic("19B10012-E8F2-537E-4F6C-D104768A1214", BLERead | BLENotify);
// create button characteristic and allow remote device to get notifications
BLEByteCharacteristic piezoCharacteristic("19B10013-E8F2-537E-4F6C-D104768A1214", BLERead | BLEWrite);
3. The BLE.begin method is used to initialize the BLE configuration.
  // begin initialization
  if (!BLE.begin()) {
    Serial.println("starting BLE failed!");
4. A BLE Local name of 'ButtonLED' is defined to identify the Nano board when scanning for the device.
  // set the local name peripheral advertises
  BLE.setLocalName("ButtonLED");
5. Set the UUID
  // set the UUID for the service this peripheral advertises:
  BLE.setAdvertisedService(ledService);
6. Add the characteristics to the service
  // add the characteristics to the service
  ledService.addCharacteristic(ledCharacteristic);
  ledService.addCharacteristic(buttonCharacteristic);
  ledService.addCharacteristic(piezoCharacteristic);
7. Add the ledService to the BLE configuration
  // add the service
  BLE.addService(ledService);
8. Initialize the led and button Characteristics to 0.
  ledCharacteristic.writeValue(0);
  buttonCharacteristic.writeValue(0);
9. Start advertising
  // start advertising
  BLE.advertise();
10. In the loop, poll for BLE events
void loop() {
  // poll for BLE events
  BLE.poll();
11. Read the button and check for a change in state from the buttonCharacteric
  // read the current button pin state
  char buttonValue = digitalRead(buttonPin);

  // has the value changed since the last read
  boolean buttonChanged = (buttonCharacteristic.value() != buttonValue);
12. Check for button changes and print to serial port if there is a change
if (buttonChanged) {
// button state changed, update characteristics
ledCharacteristic.writeValue(buttonValue);
buttonCharacteristic.writeValue(buttonValue);
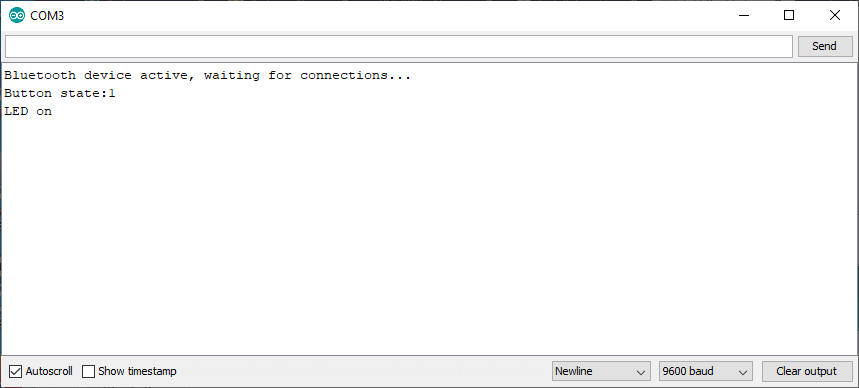
Serial.print("Button state:");
Serial.println(buttonValue, DEC);
}
13. Check if ledCharacteristic was written to or there is a button change and print state to serial port
if (ledCharacteristic.written() || buttonChanged) {
// update LED, either central has written to characteristic or button state has changed
if (ledCharacteristic.value()) {
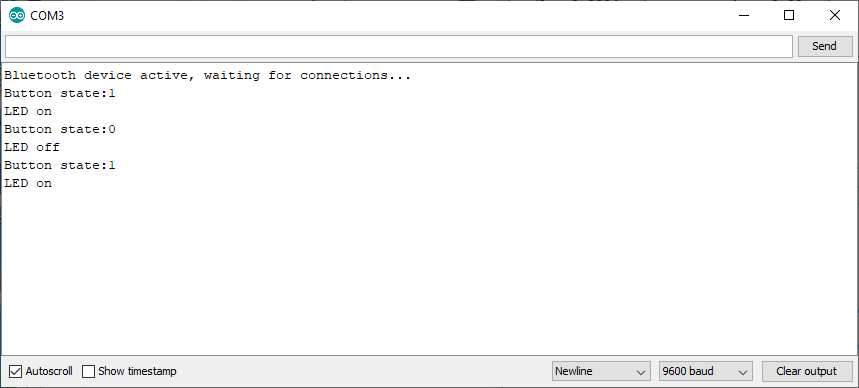
Serial.println("LED on");
digitalWrite(ledPin, HIGH);
} else {
Serial.println("LED off");
digitalWrite(ledPin, LOW);
}
}
14. Check if piezoCharacteristic was written to and print to serial port
  if (piezoCharacteristic.written()){
    // update Buzzer, buzzer state has changed
    if (piezoCharacteristic.value()) {
      Serial.println("Piezo on");
      digitalWrite(piezoPin, HIGH);
    } else {
      Serial.println("Piezo off");
      digitalWrite(piezoPin, LOW);
    }
  }
Connect to the Nano 33 BLE Sense using BlueZ
To connect to the Nano 33 BLE Sense via Bluetooth LE, I used BlueZ from a Raspberry Pi. This can be done from a Ubuntu VM as well if there is a BLE device present on the system.
The install of BlueZ will not be covered, but if instructions are needed, see the Reference section for the Adafruit Install bluez on the Raspberry Pi for a good overview of the install process.
Enable BLE on the Raspberry Pi
On the Raspberry Pi, to verify the Bluetooth radio is enabled, these steps should enable it
1. Unload the btusb driver if it is loaded
rmmod btusb
2. Load the btusb driver
sudo modprobe -v btusb
3. Start the dbus and bluetooth
/etc/init.d/dbus start
/etc/init.d/bluetooth start
4. Enable the bluetooth service
systemctl enable bluetooth.service
5. Verify the bluetooth radio is enabled.
$ lsusb
Bus 002 Device 001: ID 1d6b:0003 Linux Foundation 3.0 root hub
Bus 001 Device 004: ID 1a2c:2124 China Resource Semico Co., Ltd
Bus 001 Device 003: ID 04f2:0939 Chicony Electronics Co., Ltd
Bus 001 Device 002: ID 2109:3431 VIA Labs, Inc. Hub
Bus 001 Device 001: ID 1d6b:0002 Linux Foundation 2.0 root hub

 $ sudo hcitool dev
Devices:
        hci0    DC:A6:32:02:B2:DA
6. More details of the Raspberry Pi BLE device
$ hciconfig
hci0:   Type: Primary  Bus: UART
        BD Address: DC:A6:32:02:B2:DA  ACL MTU: 1021:8  SCO MTU: 64:1
        UP RUNNING
        RX bytes:1197 acl:0 sco:0 events:68 errors:0
        TX bytes:2547 acl:0 sco:0 commands:56 errors:0
Use BlueZ to connect to the Nano 33 BLE Sense
1. From the Arduino IDE, open the Serial Monitor to enable the BLE radio.
2. Scan for available Bluetooth devices
$ sudo hcitool lescan
LE Scan ...
D8:4C:FD:36:96:EB (unknown)
D8:4C:FD:36:96:EB ButtonLED
65:08:15:98:ED:3E (unknown)
65:08:15:98:ED:3E (unknown)
NOTE: The Nano 33 BLE Sense is listed as ButtonLED with Address of D8:4C:FD:36:96:EB
3. Use gatttool to connect to the Nano BLE Address
$ sudo gatttool -I
[                 ][LE]> connect D8:4C:FD:36:96:EB
Attempting to connect to D8:4C:FD:36:96:EB
Connection successful
4. Get a list of the Primary UUIDs
[D8:4C:FD:36:96:EB][LE]> primary
attr handle: 0x0001, end grp handle: 0x0005 uuid: 00001800-0000-1000-8000-00805f9b34fb
attr handle: 0x0006, end grp handle: 0x0009 uuid: 00001801-0000-1000-8000-00805f9b34fb
attr handle: 0x000a, end grp handle: 0x000f uuid: 19b10010-e8f2-537e-4f6c-d104768a1214
5. List available Characteristics
[D8:4C:FD:36:96:EB][LE]> characteristics
handle: 0x0002, char properties: 0x02, char value handle: 0x0003, uuid: 00002a00-0000-1000-8000-00805f9b34fb
handle: 0x0004, char properties: 0x02, char value handle: 0x0005, uuid: 00002a01-0000-1000-8000-00805f9b34fb
handle: 0x0007, char properties: 0x20, char value handle: 0x0008, uuid: 00002a05-0000-1000-8000-00805f9b34fb
handle: 0x000b, char properties: 0x0a, char value handle: 0x000c, uuid: 19b10011-e8f2-537e-4f6c-d104768a1214
handle: 0x000d, char properties: 0x12, char value handle: 0x000e, uuid: 19b10012-e8f2-537e-4f6c-d104768a1214
handle: 0x0010, char properties: 0x0a, char value handle: 0x0011, uuid: 19b10013-e8f2-537e-4f6c-d104768a1214
Note: The three ButtonLED Characteristics from the Arduino code are the last three listed
Arduino Code definitions:
// create switch characteristic and allow remote device to read and write
BLEByteCharacteristic ledCharacteristic("19B10011-E8F2-537E-4F6C-D104768A1214", BLERead | BLEWrite);
// create button characteristic and allow remote device to get notifications
BLEByteCharacteristic buttonCharacteristic("19B10012-E8F2-537E-4F6C-D104768A1214", BLERead | BLENotify);
// create button characteristic and allow remote device to get notifications
BLEByteCharacteristic pizeoCharacteristic("19B10013-E8F2-537E-4F6C-D104768A1214", BLERead | BLEWrite);
6. Read the Button state using handle 0x000e from step 5.
[D8:4C:FD:36:96:EB][LE]> char-read-hnd 0x000e
Characteristic value/descriptor: 01
7. Press the button connected to the Nano and read the value from bluez.
[D8:4C:FD:36:96:EB][LE]> char-read-hnd 0x000e
Characteristic value/descriptor: 00
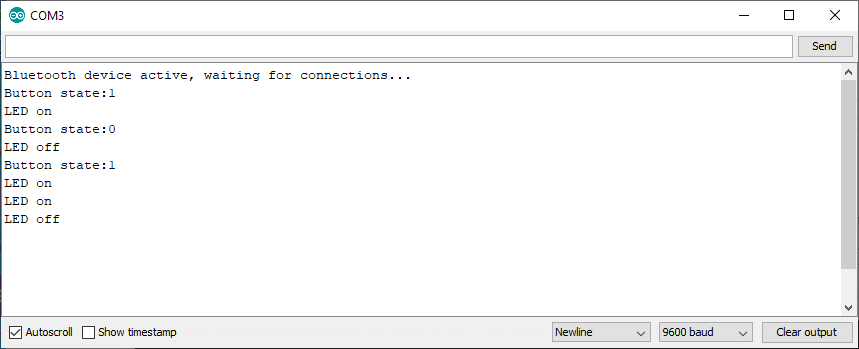
8. View the change of state from the Arduino IDE Serial Monitor
6. Write '01' to handle 0x000b to enable the onboard LED.
[D8:4C:FD:36:96:EB][LE]> char-write-req 0x000b 01
Characteristic value was written successfully
7. Write '00' to handle 0x000b to disable the LED.
[D8:4C:FD:36:96:EB][LE]> char-write-req 0x000b 00
Characteristic value was written successfully
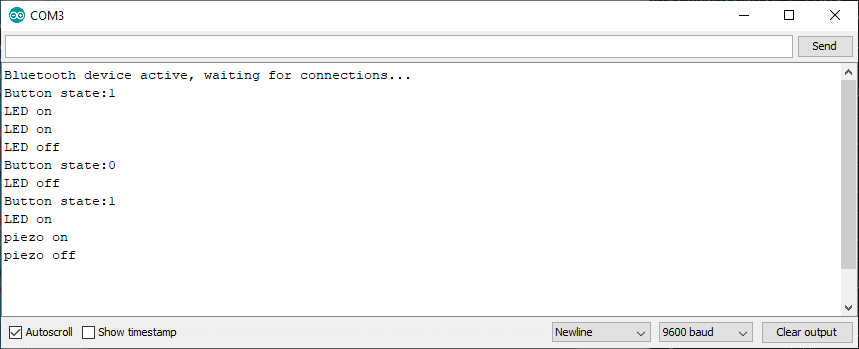
8. View the Serial Monitor for the LED state notices
9. For the Buzzer, writing a '01' to handle 0x0011 will turn it on.
10. Writing a '00' to handle 0x0011 will turn it off.
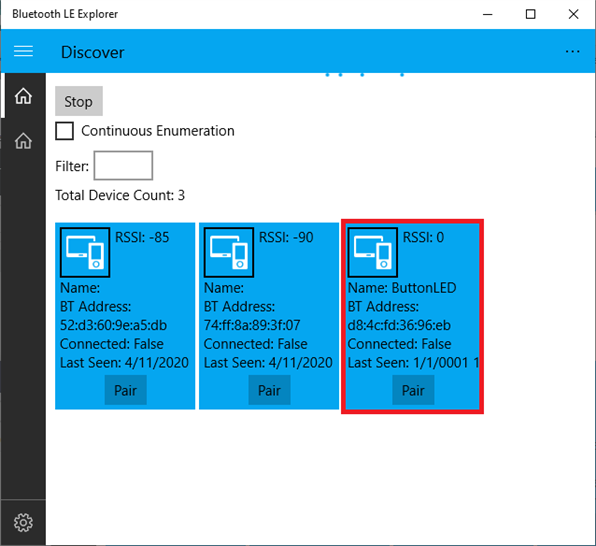
Attempt to connect using Windows 10 Bluetooth LE Explorer
An attempt was made to connect to the Nano 33 BLE Sense using Windows, but the only semi successful app was the Bluetooth LE Explorer in that the app would not pair to the Nano.
Overall, the Nano 33 BLE Sense was easier to get working with BLE than something like the MKR WiFi 1010 and did not require a firmware upgrade to enable it.
Next Step:
Add an ArduCam with an TinyML (TensorFlow Lite) for person detection.
Top Comments
-

clem57
-
Cancel
-
Vote Up
0
Vote Down
-
-
Sign in to reply
-
More
-
Cancel
Comment-

clem57
-
Cancel
-
Vote Up
0
Vote Down
-
-
Sign in to reply
-
More
-
Cancel
Children