element14 Community
element14 Community
    Register Log In
  • Site
  • Search
  • Log In Register
  • About Us
  • Community Hub
    Community Hub
    • What's New on element14
    • Feedback and Support
    • Benefits of Membership
    • Personal Blogs
    • Members Area
    • Achievement Levels
  • Learn
    Learn
    • Ask an Expert
    • eBooks
    • element14 presents
    • Learning Center
    • Tech Spotlight
    • STEM Academy
    • Webinars, Training and Events
    • Learning Groups
  • Technologies
    Technologies
    • 3D Printing
    • FPGA
    • Industrial Automation
    • Internet of Things
    • Power & Energy
    • Sensors
    • Technology Groups
  • Challenges & Projects
    Challenges & Projects
    • Design Challenges
    • element14 presents Projects
    • Project14
    • Arduino Projects
    • Raspberry Pi Projects
    • Project Groups
  • Products
    Products
    • Arduino
    • Avnet Boards Community
    • Dev Tools
    • Manufacturers
    • Multicomp Pro
    • Product Groups
    • Raspberry Pi
    • RoadTests & Reviews
  • Store
    Store
    • Visit Your Store
    • Choose another store...
      • Europe
      •  Austria (German)
      •  Belgium (Dutch, French)
      •  Bulgaria (Bulgarian)
      •  Czech Republic (Czech)
      •  Denmark (Danish)
      •  Estonia (Estonian)
      •  Finland (Finnish)
      •  France (French)
      •  Germany (German)
      •  Hungary (Hungarian)
      •  Ireland
      •  Israel
      •  Italy (Italian)
      •  Latvia (Latvian)
      •  
      •  Lithuania (Lithuanian)
      •  Netherlands (Dutch)
      •  Norway (Norwegian)
      •  Poland (Polish)
      •  Portugal (Portuguese)
      •  Romania (Romanian)
      •  Russia (Russian)
      •  Slovakia (Slovak)
      •  Slovenia (Slovenian)
      •  Spain (Spanish)
      •  Sweden (Swedish)
      •  Switzerland(German, French)
      •  Turkey (Turkish)
      •  United Kingdom
      • Asia Pacific
      •  Australia
      •  China
      •  Hong Kong
      •  India
      •  Korea (Korean)
      •  Malaysia
      •  New Zealand
      •  Philippines
      •  Singapore
      •  Taiwan
      •  Thailand (Thai)
      • Americas
      •  Brazil (Portuguese)
      •  Canada
      •  Mexico (Spanish)
      •  United States
      Can't find the country/region you're looking for? Visit our export site or find a local distributor.
  • Translate
  • Profile
  • Settings
Recycle & Retrofit
  • Challenges & Projects
  • Project14
  • Recycle & Retrofit
  • More
  • Cancel
Recycle & Retrofit
Blog Mr. Machine gets an upgrade - time is running down
  • Blog
  • Forum
  • Documents
  • Events
  • Polls
  • Files
  • Members
  • Mentions
  • Sub-Groups
  • Tags
  • More
  • Cancel
  • New
Join Recycle & Retrofit to participate - click to join for free!
  • Share
  • More
  • Cancel
Group Actions
  • Group RSS
  • More
  • Cancel
Engagement
  • Author Author: genebren
  • Date Created: 10 Dec 2020 10:43 PM Date Created
  • Views 1465 views
  • Likes 10 likes
  • Comments 3 comments
  • recycleretrofitch
Related
Recommended

Mr. Machine gets an upgrade - time is running down

genebren
genebren
10 Dec 2020
image

Recycle & Retrofit

Enter Your Electronics & Design Project for a chance to win a $200 shopping cart!

Submit an EntrySubmit an Entry  Back to homepage image
Project14 Home
Monthly Themes
Monthly Theme Poll


In my prior blogs (Mr. Machine gets an upgrade - working on the pieces. and Mr. Machine gets an upgrade - new internals, motors installed and new PCBs ) I walked through Mr. Machine's history and some of my updates.  This time I will update my my progress on the project and outline what remains (too much).


I have been super busy printing (and reprinting....) more of the internal pieces that are the basis to the retrofit process.  Today, for the first day in a long time, the 3D printer is idle and quiet.


Today started with a bit of cleaning.  This version of Mr. Machine was sold in the later 1970's (starting with 1977), so it is no stretch of the imagination to say that these parts have 40+ years of dirt and grime on them (not to mention all of my recent handling - shop and office).  So today was bath time.  First I when through the collection of parts (from two host machines) and selected the best combination of parts.  In a sink full of hot, soapy water they go.  Then plenty of scrubbing (using my highly honed dish washing skills).  Here are the results:


image

Due to the broken arms (one on each machine), there is some differences in coloration in the arm and leg pairs.  The body and wheels also show some yellowing, but all in all not to bad for the years of play (and likely a lot of storage time).  From here I will walk through the re-assembly process, detailing the new pieces.


imageimage

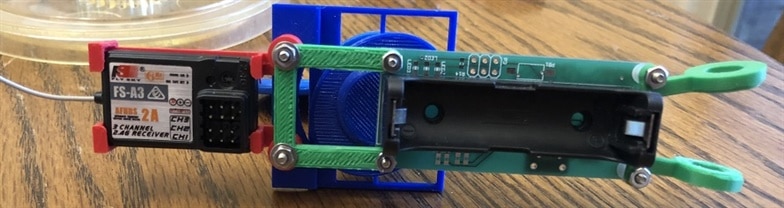
This is the key (power switch), power pack and radio holder assembly.  The key has and new 'clicker' mount that provides a simulated cranking sound, while providing attachment points for the power pack module (the larger, ring mounts attach to a boss which once held the rear wheel) and the radio holder.  The power pack PCB has a tiny microswitch mounted to the backside of the board to sense the cam lobes attached to the old winding key.  (Note: all of the PCB assembles are bare boards left over from my WalkyII robot, as my new PCBs have not arrived.  They have been shipped, but with the holiday shipping crunch it's anyone's guess if they will arrive in time for the deadline).


Next we have the completed skeleton/cage that holds the stepper motors, control and motor driver boards and the speaker for Mr. Machine's sound system.  Here are some pictures of those assemblies:


imageimageimageimage

Newly added PCB mounts are added to the top and rear of the skeleton/cage for the control board (top) and the motor driver (rear).  A tiny speaker (with grill) is mounted to the top rail, along side of the control board.  Note:  The 'fake' motor driver PCB is actually an old version of the controller board, which is 0.1" narrower that the 'real' motor driver PCB, so it should fit just right (I hope).


With Mr. Machine's independent stepper motors, it will now be able to turn left and right (and even spin).  This required a change to Mr. Machine's third wheel.  Instead of a simple wheel, I have opted for a free rolling cater ball.  Here are some pictures of this assembly:


imageimage

The caster ball assembly is made up of two mirror image parts, that get assembled around a 0.75" metal ball bearing.  The assembly fits in the opening made for the old plastic wheel.  The caster will allow the robot to move (turn) more freely, while adding a bit of extra weight to keep Mr. Machine from falling forward.


New to this project and the two I/R distance sensor assemblies, one for the front  and one for the rear.  These sensor will be used to keep Mr. Machine from running into things, off of things.  Here are some pictures of the new parts:


imageimage


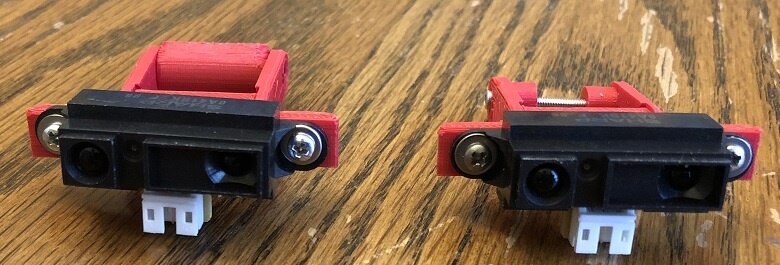
The front sensor uses a screw and screw button arrangement to mount in one of the joiner bosses, while the rear sensor uses a small slot cut into the two halves of Mr. Machine (just below the key switch assembly) and a pivot pint with a tab that fits into the slot.  The wires from the sensor will pass through a small hole in the parting line (not drilled yet) to route signals up the the control board.


Now that we have gone through all of the pieces, let's finish putting Mr. Machine back together (I will have to take it apart several more times, but let's just see if everything fits.


imageimage

The Key/PowerPack/Radio and caster ball are installed first  (about midway on the back side of the power pack is the slot that was added to hold the read sensor mount).  The two bottom tabs of the power pack mount fit on either side of the caster ball (with a boss passing through the assembly).  The skeleton/cage slips in, around the power pack module and into the bosses in the case halves (three on one side, one and a tiny pin on the other side).  From here, the side of the case can be lowered into place (with a bit of fiddling and wiggling).


Here are some pictures for Mr. Machine (new) along side of Mr. Machine (old):


imageimageimageimageimage


There still is a lot of work to do, and hopefully the PCBs will arrive in time for me to have a chance to build and test all of the pieces.  I will be following up this blog with progress as it happens.


Here is my list of things to do:

  1. Assembly and test PCBs.
  2. Write software for the three Boards (4 processors).
  3. Document electronic (BOMs) and software.
  4. Drink lots of Beer (only once the work is done).


Thanks for following along on this journey with me.  I don't know about you, but for me, this has been a lot of fun!

  • Sign in to reply

Top Comments

  • ajcc
    ajcc over 4 years ago +2
    Great update Gene! I really like that you're adding the proximity sensors to Mr Machine to help him moving around without hitting things. I hope Mr Machine is driving around your house soon so you can…
  • ralphjy
    ralphjy over 4 years ago +1
    Can't wait to see him in action . Amazing that you were able to maintain the original structure so well.
  • dubbie
    dubbie over 4 years ago +1
    Gene, A very 'clean' upgrade. I am very impressed with your 3D printing. One day maybe I'll be as good. Dubbie
  • dubbie
    dubbie over 4 years ago

    Gene,


    A very 'clean' upgrade. I am very impressed with your 3D printing. One day maybe I'll be as good.


    Dubbie

    • Cancel
    • Vote Up +1 Vote Down
    • Sign in to reply
    • More
    • Cancel
  • ralphjy
    ralphjy over 4 years ago

    Can't wait to see him in action image.   Amazing that you were able to maintain the original structure so well.

    • Cancel
    • Vote Up +1 Vote Down
    • Sign in to reply
    • More
    • Cancel
  • ajcc
    ajcc over 4 years ago

    Great update Gene! I really like that you're adding the proximity sensors to Mr Machine to help him moving around without hitting things. I hope Mr Machine is driving around your house soon so you can enjoy those much deserved brews image

    • Cancel
    • Vote Up +2 Vote Down
    • Sign in to reply
    • More
    • Cancel
element14 Community

element14 is the first online community specifically for engineers. Connect with your peers and get expert answers to your questions.

  • Members
  • Learn
  • Technologies
  • Challenges & Projects
  • Products
  • Store
  • About Us
  • Feedback & Support
  • FAQs
  • Terms of Use
  • Privacy Policy
  • Legal and Copyright Notices
  • Sitemap
  • Cookies

An Avnet Company © 2025 Premier Farnell Limited. All Rights Reserved.

Premier Farnell Ltd, registered in England and Wales (no 00876412), registered office: Farnell House, Forge Lane, Leeds LS12 2NE.

ICP 备案号 10220084.

Follow element14

  • X
  • Facebook
  • linkedin
  • YouTube